Needlework
05.15.2018 Anastasia Prozheva
Many people are interested in how to weave beaded bracelets for beginners, because for beginners this is a complex art that requires patience and hard work. But in fact, there are many simple schemes, thanks to which a person who has never held a needle or beads in his hand before can make himself a wonderful piece of jewelry. This activity does not take a huge amount of time and also will not reduce your wallet.
The simplest bracelet
This simple bracelet is woven using a cross pattern. In weaving you can use either one color or two.
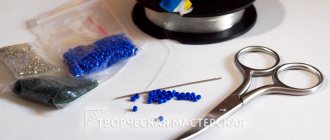
To work you will need:
- beads of one or two colors;
- fishing line;
- needle.
First you need to take a fishing line with two needles and string 4 beads on its middle. Pass one end of the fishing line through the outer bead towards its other end, tighten it until a cross comes out. Next, you need to put one bead on each end of the fishing line, pass the third bead through both ends and tighten.
The end result will be a chain like the one below in the photo.
You can also make a simple, but very original bracelet, if you collect 2 more beads, pass both ends through the first bead of the chain, then tighten and secure the fishing line, cut it.
DIY steampunk bracelet - master class
You can make such a wonderful steampunk bracelet with your own hands in a few hours. Here you can get creative and design the bracelet to your liking.
To work you will need:
- Base for a bracelet.
- Beads size 11/0.
- Wire (preferably copper).
- Beads.
- Pliers.
- Metal keys, wire rings.
As for the color of beads and beads, choose colors so that they match the color of the wire. Anything that resembles metal in color is suitable.
It is better to cover the base for the bracelet with wire, like this.
Here the base for the bracelet has a metal ball, but this is not necessary.
After we have wrapped the entire bracelet with wire, we need to start making wire constrictions, stringing beads and seed beads onto these constrictions. You can add here keys, rings, iron zippers, and, if available, clock gears - in short, everything that relates to steampunk.
We continue to make jumpers (constrictions) between the edges of the bracelet. Pull the wire tighter, we need a tight weave. After you have finished doing the work, you need to carefully hide the sharp ends of the wire by hiding them between the turns of the wire. This type of work is an excellent option for an inexpensive but original bracelet.
Bright flowers
A master class on making this bracelet will be another good lesson for those who have begun to learn beading techniques.
To make it you will need:
- beads of two colors (for example, let them be red and yellow);
- fishing line;
- needle;
- lock.
Tie a knot, secure the end of the fishing line and leave a small tip to secure the ends of the bracelet. Collect 5 red beads and one yellow one. Pass the needle through the first bead. Then collect 3 more red beads, insert the needle into the nearest red bead and tighten.
Related article: Weaving colored tubes for beginners step by step: master class with video
The result of weaving should be a beautiful flower. To make a bracelet, you need to make the required number of such flowers, secure the ends of the thread and cut them.
Weaving a cord bracelet
For those who have already mastered the technique of simple bead weaving, this tutorial will be very interesting.
To make a rope bracelet you will need a large amount of beads, since it is woven in a circle.
First you need to secure the end of the thread and leave a small piece. Collect 7 beads and close them in a ring, threading the thread through the first one. String a bead and thread the thread into the third bead. Take one bead again and pass the thread through the fifth bead. Then continue weaving, putting on one bead at a time and passing the thread through the bead located one after the other. The weaving will have to go in a spiral.
When the tourniquet reaches the desired length, you need to tie the ends together. Or you can sew a lock to one edge and a clasp to the other.
Bracelet "Flowers". Start of weaving.
For work we will need leftover beads of any colors. For one flower you need only 6 beads. So, if you have 6 beads of different colors, it’s time to weave such a bracelet.
The principle of selecting beads: the petals (6 beads) of one flower must be exactly the same color. The middle (1 encore) should contrast with the color of the petals and stand out against their background, decorating the flower. The spaces between the flowers should be green. Those. You will need a little more green beads than the rest.
You can weave not only a bracelet. If you make a long path of such flowers, you can wrap it around your hand, put it around your neck, laying out threads of flowers in rows of different lengths. In general, there is room for imagination.
So let's get started:
1. The length of the thread depends on what you will weave - a bracelet or beads. I will be disassembling the weaving of the bracelet so the thread is not required to be too long. 60-70 cm is enough.
We put on 6 beads of the same color, lower them to the end of the thread, not forgetting to leave a tail of 15-20 cm.
2. We thread it “into the ring” through the first bead.
3. Put the middle on the thread, lower it to the resulting ring, put it in the ring, squeeze it between your fingers, holding the middle inside the petals.
4. Thread through 4 beads so that the thread comes out like the first bead. The diagram is from bottom to top.
5. We tighten the thread, checking whether the center fits well into the petals. It happens that the middle bead is larger in size than the petals, then it will not fit into the ring and will come out. It's ugly and not neat. Therefore, you need to replace the bead with a smaller one. Beads larger than the petals can be used, but then for 1 flower you need not 6 petals, but 8.
6. We put 6 green beads on a thread and lower them to the flower.
7. Put on 6 petal beads again. You can take a different color. But try to take flower beads of the same size and quality.
8. We thread it “into the ring” through the first petal.
9. put on and insert the middle, threading it through the 4th bead from bottom to top.
10 We put on intermediate green beads.
11. We continue to weave the flowers to the desired length.
12. We finish the weaving with intermediate beads, as in the diagram if the decoration is woven without a lock, and with a flower if a lock is installed. Sometimes it happens that the bracelet seems to be woven, but a little length is missing: if you weave another gap, it will be too big, if you leave it like that, it will be too small. In such cases, we increase the number of intermediate beads at the ends. Those. The lock is not placed on the flower, but on the intermediate beads. Here you need to make sure that the ends of the bracelet are the same.
An option for weaving a bracelet with 8 beads.
I think that the description here is unnecessary, because... The weaving principle is similar. The difference is that on the first set we put not six, but eight beads. We also pass through the first one into the ring. This weaving option is used if the size of the center is larger than the size of the flower beads.
Setting up the castle.
The lock is very easy to install. On the thread that came out of the bead, after threading, we put a lock on, return to this bead in a circle, pass along the petals of the flower, exiting into the same bead, again pass through the lock, through the same bead, along the flower and then fasten the end of the thread, tying knots.
Let me remind you how to tie a knot: “we walk along the weave” for some distance. Which one doesn’t matter: m.b. one flower at a time, maybe by 2.
We pass the thread under the broach in the place where the thread came out, pull it up so that a loop is formed into which we thread the needle and tighten the knot.
ATTENTION: thread through the loop only when it is not twisted. Otherwise, the knot will tighten crookedly and stick out. You'll have to untie it and do it again. And it’s not easy to untie a tight knot on a thread. It's better to spend a few seconds unwinding a loop than spend a lot of time untying it.
So our simple beaded bracelet is ready. Weave, fantasize, try different color combinations, decoration lengths.
Be sure to photograph and send the results, and I will post photos of your work in a special section.
If you liked the article, share it with your friends.
If you want to be the first to know about site news, subscribe to updates.
Tweet
"Zigzag"
To make a bracelet made using the zigzag weaving technique, you need to do the following.
First you need to put 3 beads on the fishing line. In the first two, you need to stretch the end of the fishing line and tighten the resulting chain link. Next, string 2 more beads onto the fishing line. After this, thread the end of the fishing line through the last bead of the previous link and the first bead of the new link of the chain. Continue until the bracelet reaches the desired length. The product can be either monochromatic or multi-colored.
Personalized charm
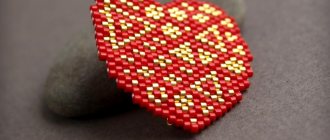
A bracelet with a name will be a wonderful gift for a loved one or friend. The product is woven using a “brick” pattern and to prepare it you will need beads of several colors.
First, you need to draw a diagram of the future bracelet on a sheet of checkered paper, paint over the beads that will be the letters. To make a bracelet with a width of 10 beads, you need to: fasten the end of the thread, put 10 beads on it. From the last bead, return to the previous one through the top, so that the fishing line points down. Thread the thread back into the last bead through the bottom. Continue weaving in the same way: take a bead, thread the tenth line through the top, and the eleventh (outermost) line through the bottom. And so on.
Related article: DIY sultanas from bags for kindergarten with photos
You need to follow the pattern and weave beads of the desired color to get the desired name.
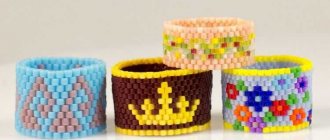
Types of beaded bracelets
There are a huge number of types of bracelets . The shape and appearance are limited only by the imagination of the master. Over time, it will be possible to create jewelry according to an individually designed design.
But for beginners, it’s better to start by paying attention to easy options :
- Simple bracelet . You can do it in one color, or use several. The easiest option is with pins.
- Personalized decoration . The letters of the name are made of beads of a different color. The work is complicated only by the need to use a long fishing line.
- "Flowers" . Bracelet in the form of a chain of several flowers woven from beads.
- Tourniquet . The wide beaded cord is hollow inside. If you have experience, it can be given an original shape.
- Pigtail . It is necessary to prepare the threads by stringing beads on them and braid them into a braid
- Jewelry on memory wires . Beads are strung on a fishing line and connected with a lock.
If you already have experience working with beads, you can try to weave more complex models : openwork with beads or voluminous ones. But even these types have simple patterns that even someone who has just started learning needlework can handle. Such jewelry looks massive and expensive.
Interesting things on the site:
Accessories for the business woman
Embroidery on knitted clothes (types and patterns)