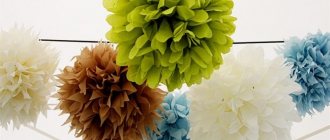
Recently, it has become a fashionable trend to decorate the interior of apartments, houses and banquet halls with huge paper flowers. They attract attention with their originality, bright colors and unusual manufacturing techniques. Although such products are short-lived, they are loved by craftsmen all over the world, because they are not difficult to make, require little material, and are inexpensive. You can update the interior every month, and even more often in celebration rooms.
In this article we will look at how to make paper flowers for the wall with your own hands, and what material you need to prepare for the work. We will share our knowledge about the methods and methods of making different flowers and leaves, how to attach them to the wall and to each other. The photographs presented will help you understand the material presented and choose something interesting for yourself.
Necessary materials
Large DIY paper flowers are made from a variety of materials. Bright and colorful they are obtained from thin isolon from 0.2 mm to 0.5 mm. It is purchased in hardware stores, as it is considered an insulating material. You can cut it with simple scissors, as the sheets are quite soft. It comes in different colors, so it’s easy to choose the one you need for the job.
Simpler DIY paper flowers are made from material with a density of 100 g/m2, rolls of corrugated paper, some products can even be made from thick napkins. The parts are glued together either with hot glue or thick and fresh PVA.
In order to assemble a beautiful and lush flower, you will need: cardboard for cutting out patterns of petals and leaves, a simple pencil for tracing the contours, scissors for cutting out elements. If you are planning to make a rose, then you can bend the flower petals with a knitting needle or a round wooden stick.
To work, free up some space in the room and prepare a flat surface on the table, removing everything unnecessary. Let's start the explanation by making your own flowers from paper napkins.
Basic techniques and secrets of creating life-size flowers from corrugated paper
The entire decorative effect of the finished product depends on the beauty of the flower head. The process of its formation is similar to making flowers from isolon, but adjusted for the properties of the material. Let's learn how to create large flowers from crepe paper with your own hands!
Accordion method
This funny hat can be made with children - the flower is assembled according to the accordion principle.
We will need several sheets of thin corrugated paper 20–25 cm wide. The length and quantity depend on the desired splendor of the finished flower. Before starting work, the sheets must be placed one on top of the other and the edges aligned.
Stages of work:
- Fold the sheets like an accordion and use scissors to give the edges a semicircular shape.
- Mark the middle of the prepared strip and tie it with thread or clamp it with floral wire, forming a loop for subsequent assembly.
- Disassemble the accordion, smoothing the edges.
- Lift the layers one by one, straightening each sheet.
- When all the layers are separated, the flower is ready.
- You can make several flowers and connect them through prepared loops.
The hanging balls from the previous photo were created using this principle. To create such colors, you can combine paper of several colors.
The difference with this design is that the inner part of the flower is cut with fringe separately, and then both parts are combined into a single flower.
And here are more flowers made using the same technique.
Detailed method
You will use this method if you decide to collect giant flowers from corrugated paper with your own hands. To do this, you need to cut out individual petals and leaves using templates. Patterns for large flowers differ from small ones only in size, so you can use the ones we offered in the article about corrugated paper flowers.
This giant peony hat is made using this method, but you will need some thick paper to keep it in shape.
The size of the petals depends on the author’s idea and the purpose of the decor: the largest petal can reach a length of 45 cm, but during assembly they will need additional fastening together so that the flower does not fall apart.
Since you will need a lot of blanks, it is better to make patterns from thick cardboard or pressboard - this way they will last longer. You can cut the petals with scissors or a stationery knife.
Tip: unroll the roll, fold it several times and then cut it out - you will get several blanks at once.
Next begins the most creative stage in creating a flower - giving shape to the petals. Smooth curves and detailed edge work are achieved by straightening the folds with your hands, stretching the workpiece using a metal ruler or the blunt edge of scissors.
First, use a pencil or stick to curl the edges of the petal, pressing firmly to secure the bend.
The volume is created by straightening the corrugations: slightly stretch them in the upper part of the petal and almost completely straighten the middle.
Finally, you can use the same technique to add wavy edges.
Important! When applying the template to the sheet, you need to make sure that the folds go along the petal - then it can be formed correctly.
This type of MK describes in detail the process of making peony petals:
If you are just learning how to collect large flowers from paper with your own hands, many of the nuances may seem incomprehensible. Let's look at them with an example.
This chrysanthemum is assembled from separate parts, mounted on a branch and placed in a stand made of a flower pot. We'll talk about these assembly details a little later.
For the flower head we will need:
- corrugated paper;
- cardboard circle with a diameter of 30 cm;
- glue gun
Cut out the blanks of petals and leaves according to the pattern, process the edges and give them shape.
You will need at least 30 petals of each size, 6 blanks 20 cm high for the sepals and as many leaves as your imagination and the length of the stem dictate.
Assembly is carried out on a cardboard circle. Let's look at the nuances that make the flower look realistic:
- The petals should be directed strictly to the center, thanks to this we will maintain the symmetry of the flower.
- Filling is carried out in circles, with each subsequent layer shifted towards the center by 1.5 - 2.5 cm. This will ensure a smooth decrease in the diameters of the petals, without the formation of voids. Approximately three rows should be obtained from each type of part. If necessary, you should add these or other blanks.
- The closer to the center, the more the petals should be bent upward, and the smallest ones are bent almost vertically before gluing, thereby filling the middle. This principle is laid down by nature - the petals open from the bud.
After the front part of the flower head is ready, we glue a piece of cardboard tube to the back side, the diameter of which is suitable for the future mount.
The reverse side is decorated with six sepals. They should be glued in a spiral, overlapping the next one, to cover the entire surface of the cardboard base.
Belt method
Flowers made in this way differ little from the previous ones. The whole peculiarity is that the petals are not cut out separately, but are formed on the tape: the profile of the petal is formed in the upper part of the paper strip, and the lower part remains uncut.
Peony made using this technique:
And another fancy flower, reminiscent of a dahlia:
Leaves and stem
If you make life-size flowers with your own hands, you will definitely need a stem and leaves. To realistically reproduce the structure of a leaf, make veins and create a relief:
- lay a wire in the middle of the sheet,
- position the corrugations towards the top of the leaf,
- reproduce the wavy edge.
Watch the video for making leaves for growing flowers:
The next element of a growth flower is the stem. Depending on the purpose, the stem can be made to hold the flower in the hands or as a stand.
A flower with a small stem is comfortable to hold in your hands
In these colors, the stem can be made from a cardboard tube, for example, from foil or cling film, or you can cut a piece of plastic pipe. This leg is multifunctional - such a flower can be placed freely on a stand made of metal rods.
To create spectacular photo zones, a flower on a stem, as in this photo, would be an excellent option:
The stem is made of a wire frame. The secret of its stability is in a plastic cup filled with cement mortar.
Advice. A plastic cup can be replaced with a small flower pot, and cement mortar can be replaced with any building mixture: gypsum, alabaster and the like.
The resulting stand should be wrapped in thick paper, then decorated with green corrugated paper. Using any technology convenient for you, make leaves and screw them to the trunk using wire.
A metal-plastic tube or even a real branch can also serve as a stem - for beauty they need to be decorated with green tape.
The metal-plastic tube holds the flower securely and looks great in the interior
Stand
Guests of the holiday will be very surprised when they find out that you made life-size flowers from corrugated paper with your own hands. And to decorate everything, you will need a stand. It can be metal, wood or a weighted flower pot.
It is especially important to make a stable stand if you plan to install not just one flower, but a whole branch or a giant bouquet.
For options for making stands for full-sized flowers, see the video:
Important! Take care of stable stands when decorating wedding ceremonies. Flat supports are perfectly camouflaged under a layer of artificial grass.
Dahlias from napkins
For work, purchase large thick napkins. First you need to unfold each one on the table surface, then put several products on top of each other and fold everything like an accordion, turning the product back and forth. When you have a thin strip, bend it in half to accurately determine the center point of the craft. It is on this that you need to tie a ribbon or thin thread that will hold the entire flower. Some craftsmen make small triangular cuts of paper in the middle so that the knot squeezes the napkin as little as possible.
The edges are cut in a semicircle, as can be clearly seen in frame No. 3 in the photo above. When everything is prepared, carefully, so as not to tear the thin leaves, straighten all layers of paper to the middle. You should get a lush flower-ball. Using the end of a thread or thin ribbon, you can hang it on a wall, a chandelier, a cornice, or one above the other, like a garland. The craft will look beautiful lying on a table or shelf.
Using corrugated paper
The principle of making such paper flowers for the wall with your own hands is similar to the previously described method of assembling with an accordion, but it is made from the folds of a whole roll of corrugated paper. Each fold is made at a distance of 6-8 cm from the previous one. The ends are rounded with scissors, and in the center, be sure to reduce the size of the paper by making two triangular cuts. After tying with nylon thread, the layers of paper are carefully straightened in all directions.
To place a center in a contrasting color, press the paper down slightly, making a small indentation. The middle is made up of a strip 10 cm wide, one edge of which is cut into “noodles”. After twisting the prepared strip around a rod (knitting needle, wooden skewer or pencil), coat the end with PVA glue and press it to the last turn. Then attach the finished part to the central point of the flower. The craft is ready!
Possible bud assembly schemes
A flower bud can be collected in several ways:
- Rolling up the crepe ribbon. A ribbon made of corrugated paper is wound around a wooden skewer or metal wire.
- Pulling a paper strip. The colored crepe ribbon is stitched by hand using a continuous seam. By pulling the edge of the thread, the ribbon is slightly folded and then rolled into a single bud.
- Sewing individual petal parts. This technique is used exclusively for crepe bouquets. Along the lower edge the petal is sewn to the felt pillow, and along the upper edge it is glued to the adjacent petals.
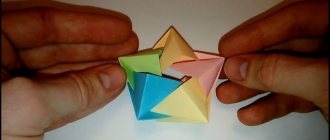
- Assembling a bud using the origami technique. This technique also has several options for independent work: continuous folding of a figure from one sheet of paper or folding of modules.
Depending on the preferences of the master himself, his skills, purpose and type of flower, the method of creative work is chosen.
Thick paper aster
You can assemble a paper flower on the wall with your own hands from many parts. The following sample shows that the product consists of large petals of the same size, arranged in two rows. The central part of the craft is assembled from 3 different parts in increasing order. The middle hides all the joints and is made using a method that we will describe later in the article.
First let's figure out how to do the biggest elements of the job. Cut them all out using one template, folding the sheet in half. At the junction, a round base is glued in the center, onto which all the petals are glued. Start work from the outer circle. The middle is attached last.
Let's look at how to do it further. You will need a long strip of paper, on which frequent cuts are made on top to the same depth “noodles”. Then roll it around a thin knitting needle, pressing the turns tightly together. The remaining end is attached with PVA glue to the last turn. The result is a voluminous center of the flower, which at the very end of the work is attached to the central point of the craft, smearing the end of the strip with glue. Press down the circle a little so that the glue sets. You can attach such a flower to the wall using double-sided tape in the middle. The petals should remain voluminous.
Lush rose
It’s easy to decorate your wall with paper flowers with your own hands. For example, such a lush rose, as in the photo below, is made up of petals cut out according to a template. Their size and shape are visible in the lower frames. To ensure that the rose has a natural appearance, the edges of the blanks are twisted around a pencil or using a metal knitting needle. It is enough to stretch the edge on its surface, pressing the workpiece tightly with your finger, and the petal will gracefully curl the end of the paper into a wave.
Begin gluing the petals from the outer edge. An ordinary circle is used as a basis. Each subsequent petal is placed with a slight overlap on the previous one.
A selection of videos for beginners
We have selected several interesting video instructions, in each of which you can learn a lot of new and useful things, and most importantly, enjoy the result and be inspired to create!
Stunningly stylish and large flower made of black corrugated paper plus coloring:
And this, according to the craftswoman, is an economical option. You can mix techniques to create picturesque flowers for wall decor:
You can make a beautiful three-dimensional rose from white corrugated paper:
You can learn how to make a large flower from corrugated paper with a double stem in this video:
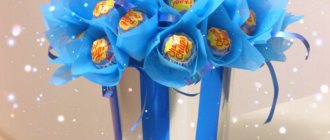
As a bonus, here's another inspiring video on how to make a bouquet of small paper flowers. You can hide sweets in them and give them to a loved one, or decorate your apartment with such a flower basket.
Pattern flower
The next option is assembled from multi-colored parts of the same shape, but of different sizes. Each petal consists of four elements. Production begins with black paper flowers. With your own hands, glue the largest parts onto the wall around a small central circle, after first bending the edges with a wave.
Next, attach the parts in order of decreasing size. The middle of the flower looks original. The loops need to be long and thin. To do this, take a wide strip and fold it in half. Only then the edge is cut into “noodles”, and quite thin ones at that. If you do custom work while earning money, then don’t skimp and buy special scissors that have many parallel blades. With one press, several cuts are made at once. This is convenient when you need to make a lot of paper flowers for the wall with your own hands.
When you have cut the center, roll it in the usual way and attach it to the center of the flower from the petals. At the end, press the cut part of the strip in different directions, and attach a small butterfly in the middle.
MK: flowers on a stand
To create a large flower on a stand, there are several ways. Let's consider one of them, making a delicate peony from corrugated paper. To make the stem, metal-plastic pipes are most often used, which bend and hold their shape, as well as PVC pipes and cement.
The photo shows large flowers on stands to decorate the room.
Tools and materials:
- Corrugated paper pink and green (3 meters).
- Cardboard circle (any box will do).
- Metal-plastic pipe (20-25 mm, sold in the plumbing department).
- Glue gun.
- Ruler.
- Scissors.
Step-by-step instruction:
- Let's get to work. Take 3 meters of paper and fold it in half along the long side. We measure a 6 cm segment from the edge, fold the paper into three layers:
- We cut the workpiece as shown in the photo, leaving about 3 cm from the bottom:
- We cut the accordion on both sides, giving it the shape of a petal.
- Its size should be approximately 20x8 cm:
- Using the same pattern, cut out a strip 1 meter long:
- We proceed to the second meter, but this time we increase the elements by 2 cm (22x10).
- The third part should have petals measuring 24x12 cm.
- We twist the ends of the blanks:
- We straighten the paper and stretch it a little:
- We make a circle of cardboard with a diameter of 30 cm. We cover it with corrugated paper.
- Take a glue gun and fix the smallest part in the center of the circle. The petals must be glued one at a time.
- Glue the other two parts in a circle, gradually increasing and straightening the flower. To give it more splendor, you can glue in additional petals.
- Let's start making the stand. We bend the metal-plastic pipe so as to make the base stable. If necessary, we decorate it with green corrugated paper, securing it around the pipe, or paint it.
- We fix the cardboard circle to the upper edge of the “stem”:
- Firmly glue the barrel to a large cardboard circle:
- We decorate the base of the flower with corrugated paper.
- This creates large, realistic peonies.
Here you can see detailed instructions for making a large peony using the ribbon method:
And how to make a stand from cement and plastic pipes at minimal cost is described step by step in this video:
flower composition
You already understand how to make paper flowers with your own hands. The principle of performing the work is similar in each product. The differences are minor and understandable to an experienced craftsman. For example, in the photo below you can see that burgundy petals cut out according to a template were first attached to the central circle, and the middle is made up of prepared strips of different widths.
When winding the strips onto the rod, the operation was first performed on a thin strip, then the wider part was glued to its edge, and the winding was continued to the end. The edge was attached with PVA to the last turn and the entire center was placed at the center point of a large paper flower. The work is interestingly complemented by carved figured leaves of the same color as the fluffy part of the craft itself.
Crafts from cones
You can decorate walls or doors with paper flowers using cones by gluing them with sharp tips to the center with hot glue. For work, you can use paper of the same color or different ones. A craft in which all the layers are multi-colored, but in harmony with each other, looks beautiful. For example, make the outer layer dark burgundy, the next layer red, then pink, pale pink, and finally lay out the white center.
Cone tubes are made from square sheets of thick paper. Some craftsmen make room decorations from magazine and even newspaper pages.
Corrugated paper flowers
Craftswomen are very fond of corrugated paper, as it is inexpensive, sold in large rolls and has an unusual texture. Flowers created from such paper turn out lighter and airier. Small folds and creases that are on the surface make crafts made from it more natural. This paper is best used for lush and voluminous flowers.
Corrugated paper peonies
Very voluminous flowers that can be used to decorate a children's party. By themselves, they are very bright, so they should be combined with a calm background.
Materials:
- corrugated paper of different colors;
- wire;
- scissors.
Procedure
- Take corrugated paper of different colors. Fold each color like an accordion.
- Arrange the leaves in the order you want the flower to have.
- We do not touch the first accordion (this will be the edge), but make each subsequent one a few centimeters shorter.
- Triangle the edges of each roll of paper. These will be the tips of the petals.
- Bend each roll slightly in half and determine its middle. You can mark it with a pencil.
- Unroll the rolls and fold them middle to middle.
- Use a wire to pull the paper together in the middle.
- Bend the paper in different directions to reveal the petals.
Options:
In a similar way, you can make a single-colored flower of a smaller size. To do this we need 6 squares of corrugated paper of the same color, wire and scissors.
We put six sheets of paper and fold them like an accordion. We fasten the accordion in the center with wire. We round the edges to get graceful petals. And straighten the flower layer by layer.
Simple corrugated paper flower
Materials:
- paper;
- cardboard;
- scissors;
- glue;
- toothpick.
Procedure
- You need to cut 12 circles from a sheet of corrugated paper. You can fold the paper several times to cut out 4 circles at once.
- Use your fingers to sharpen each circle on one side. Corrugated paper is thin, so this is easy to do. Glue can be used as a fixative.
- Cut out the center circles from cardboard and glue the petals to it in a circle.
- Cut a thin strip from the corrugated paper. Use scissors to create a neat fringe. Twist the strip onto a toothpick - this will be the core.
- Glue the middle to the center of the cardboard base.
Instead of using paper as the middle, you can glue small beads there.
Big Rose
Few people don't like roses. Lush and fragrant, they attract many admiring glances. It’s not for nothing that the rose is called the queen of flowers. But, unfortunately, the life of a flower is short-lived. You can correct the situation with the help of paper roses, which can “bloom” all year round.
Materials:
- a whole roll of rose-colored corrugated paper;
- green paper for the petal and stem wrapping;
- wire;
- rose stem (you can take a stick or an old pencil).
- glue;
- scissors;
- pencil;
- round surface;
- glue gun
Procedure
- Cut a large sheet of corrugated paper in half. Take one of the halves of the sheet.
- Fold it in half 8 times.
- We cut on the sides, getting identical rectangles.
- We take one rectangle, fold it in half, and start cutting a small leg almost from the center of the bottom. Having cut off a couple of centimeters, we begin to cut out a semicircle. Then we cut off the extreme corner and cut it out like half a heart. Then we open the rectangle. We should get a heart on a leg.
- We repeat these steps until we run out of paper.
- We pick up a pencil without any irregularities. We apply it diagonally to one corner of the heart and slowly twist it, stretching the paper a little. Repeat with the other edge of the heart.
- The resulting folded edges of the petals must be carefully stretched a little more so as not to tear the paper. The petal will get beautiful wavy edges. We do this with each petal.
- Take some small spherical surface. This could be a ball, or you could even use your knee. We apply each petal with the middle to a rounded surface and stretch it slightly so that it becomes curved. Thus, we proceed with all 16 petals.
- We take the second half of our large sheet of paper. Fold it in half, and in half again. And we pull each edge of the sheet to the middle of the sheet. So we get 6 folds.
- Cut the paper into 12 petals.
- We take the first sheet, fold it in half and immediately begin to cut out a semicircle of the heart. We immediately begin cutting the oval, without a leg. Cut out each petal this way.
- We repeat the steps we did with the first group of petals: twist them onto a pencil, stretch the edges and make them slightly concave. We should get almost identical petals, but different in width.
- Take green paper and cut out 6 rectangles approximately 15x20 cm. These will be rose leaves.
- Fold each rectangle in half and cut out a leaf.
- We take scissors and lightly straighten it along the grain of the paper to get a more natural look.
- Using glue or double-sided tape, glue the leaves to the wire frame. We bend the wire slightly, giving the shape of a sheet, and wrap it with green paper or tape.
- We fasten the sheets into two groups of three leaves.
- Take a piece of green paper approximately 25 by 30 cm. Cut out the bases of the flower from it. To do this, you need to cut a small “fence” up to about half the sheet. We twist each clove with scissors.
- We take wide petals, and slightly pulling the sides of the petal towards each other, we form folds in the center. We fix them with staples or glue and put them aside for now.
- We take our base stick and carefully apply petal by petal and glue the petals.
- Glue the edges of the green sepals together to form a ring. We put this ring on a rosebud. The rose is ready. Now, together with the leaves, it can decorate the wall.
Additional items
Bright green leaves will decorate any flowers on the wall. They are made in different ways, for example, by making shaped cuts on a sheet folded in half. The corrugated craft looks beautiful. In the example below, we consider the original version of a sheet element assembled from individual parts.
The photo shows that thick colored double-sided paper was used, which holds the required shape well. Rounded arcs with thin edges of different sizes are cut out on the parts folded in half. The fold is carefully smoothed with your fingers. The prepared parts are folded together, pressing them tightly at the base. They are placed in decreasing order of size towards the ends. Some smaller leaves are inserted between larger ones to give the finished product a natural look.
The lower part of the bundle is fastened together first with a stapler, and then pasted over with a thin strip in several layers. The result is spectacular pointed palm leaves that will go well with any wall decoration.
Knowing the principles of making large flowers, you can create your own compositions that match the interior of the room. Bring your creative ideas to life by following our tips. Good luck!