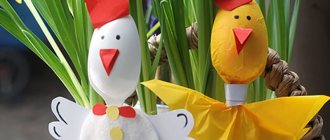
Introduction to the quilling technique. Detailed master classes with photographs.
Quilling is the creation of various beautiful compositions from paper using the rolling method. It should be noted right away that quilling is not an activity for restless people. Such a hobby requires perseverance, accuracy, patience and limitless imagination.
Postcards are usually made using the quilling technique. If you want to try yourself at something new, pay attention to quilling. With this exciting hobby you can please your friends and family with gorgeous cards.
How to make a postcard using the quilling technique? Quilling postcard step by step
Important: Before you start making a postcard, try making basic shapes. Once you can make the basics with ease, you can master any pattern.
Special kits are sold for quilling. You can choose the necessary tools yourself. To create a quilling style postcard you will need:
- Multicolored strips of medium weight paper
- Scissors
- Tweezers
- Safety pins
- Quilling template (ruler with holes in the form of geometric shapes)
- PVA glue
- Cardboard for the postcard base
- The main quilling tool is an awl with a forked needle.
Quilling tools
You may also need:
- Curly scissors
- Comb for creating special shapes
- A utility knife and a paper cutting mat (if you are using regular colored paper)
A strip of paper rolled into a roll is called a roll . Their roll consists of a pattern. After rolling the roll, shape it using safety pins, fingers or a comb. Secure the tip of the roll with glue. Some bends are also fixed with glue.
The main element is the roll.
Step-by-step creation of a postcard:
- Prepare the basis for the card: make a frame, think about how your rolls will be positioned
- Make a lot of rolls of different colors and diameters. How to make a roll: grab the tape with a special awl, wind it around its axis to the required diameter, fix the end with glue. You can loosen the roll a little after twisting, it will not be very tight
Use a toothpick to carefully stick the end of the tape.
- When the required number of rolls is ready, glue them onto the base of the card in the form of a crown.
- Form a pot out of fabric
- Add your own decorative elements to the card. In this case, the card is complemented by a cute butterfly
Ideas for cards using quilling technique
It's impossible not to fall in love with the charming quilling style cards. Below are ideas for creating cards.
Birthday card idea
Floral motif
Silver wedding card Card in quilling style
Birthday Card
A little more complicated
Let's look at examples of Christmas cards, the difficulty level of which is equal to average.
How it differs from simple: small details, complex contours, double volume. In addition, the card is decorated with additional elements, glitter, beads, and rhinestones.
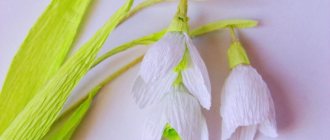
Making bells will take more time than making simple shapes. First, we roll up a tight roll from the desired color of paper. When the desired diameter is reached and the tip is fixed, carefully squeeze out the middle to form a cone-shaped figure. Then coat the future bell with glue and leave to dry. If this is not done, then it may turn around and the composition will be ruined.
And this is a whole set of Christmas quilling cards in the same style. They can serve as invitation cards.
What options for average postcards can be made for International Women's Day? Options with a voluminous bouquet.
Flat, but no less magnificent postcards.
Postcards for defenders of the Fatherland.
The card seems simple, but in fact, the complexity here lies in the main application. Yes, yes, this is not a drawing, but an outline of a soldier cut out of paper.
In addition, you can make a fun cardboard tank using the quilling technique.
For some reason, it is believed that cards with floral patterns are only suitable as gifts for women. This is a myth and not true. The only difference is the color. For a man, it is better to make a card in dark or cool colors. Photos of options suitable for a man's birthday gift.
Feel free to give men such gifts. By the way, in Europe it is considered normal to give a man bouquets of fresh flowers!
What kind of card should you give a woman for her birthday?
What about Valentine's Day? A couple of photos of similar works:
Try to repeat these works, you will succeed!
Children's card in quilling style
For the holidays, children often make cards with their own hands. Together with your parents, you can master the quilling technique. Children's cards should be simple. Simple figures can be completed by the child himself with a little help from adults. At the same time, the themes of the postcards should be interesting to children, then the child will make a postcard with great inspiration. For example, these could be postcards with animals or cartoon characters.
Baby Card Simple and Cute Patterns
As for the card intended for the child, there are also a lot of great ideas. Even if now the child cannot yet appreciate your efforts, at an older age he will certainly rejoice at your gift.
Card for a child
Card ideas for children
Postcard in quilling style for March 8
It is impossible to imagine March 8 without flowers. It is customary to decorate postcards for the holiday of March 8 with flowers of various shapes and colors. There are many ideas on this topic. Your mother, grandmother, friend, sister will be very happy with such a postcard; many women appreciate and love handmade work.
Flowers on a postcard for March 8
Postcard from March 8
Postcard in quilling style for February 23
You can choose a gift for your husband, dad, brother, grandfather to suit every taste, color and budget. But it’s much more pleasant to receive gifts made by yourself. Give your men a card in quilling style on February 23rd. They will be very pleased with your attention and effort.
Happy Defender of the Fatherland
Postcard for February 23
Ideas for unusual cards for February 23
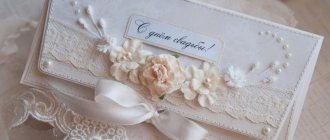
For the wedding
A wedding is a special day for the future family. Usually the bride and groom receive many gifts and congratulations on this day. However, you can stand out among the guests and include a handmade card with your wedding gift. A wedding card always looks solemn and elegant
- Fold a sheet of cardboard in half and glue a square of bright cardboard or paper onto the front side.
- Using curly scissors, cut out strips and glue them along the edges of the square.
- Next, we attach and record congratulations for the newlyweds in advance.
- We form rolls for the petals and leaves - 6 green and 6 yellow in the shape of a drop, 12 pieces in the shape of a crescent.
Related article: House carving: sketches, templates and stencils with photos and videos
- The card contains roses, they need to be folded a little differently. First we also start rolling it into a roll.
- Then we bend the free edge inward and continue twisting.
- And so on, twist and bend approximately every 1.5 cm.
- We collect 3 roses, not forgetting to glue the edges.
- We form leaves by gluing 2 crescents together.
- We begin to decorate the card with flowers - glue the leaves and a rose on top.
- We add the remaining parts in any order.
- Add colored elements - roses, petals and leaves.
- The top of the card can be decorated with sparkles or shimmering glue.
Quilling style card for Valentine's Day
The most romantic day of the year is Valentine's Day. On this day, thousands of declarations of love are heard, hearts are filled with love. The symbol of Valentine's Day is a valentine in the shape of a heart. You can make a card in the shape of a heart.
Valentine's Day card
Valentine's card
But the idea for creating a postcard can be not only the heart. You can come up with another love story. In quilling you can give freedom to your imagination.
Ideas for Valentine's Day Cards
Birthday cards using quilling technique step by step
The card will be a great addition to a birthday gift. You can make a simple, but very cute card.
We will need:
- Quilling paper
- Quilling tool
- Double-sided colored cardboard
- White paper
- Glue, scissors, ruler
Let's start making:
- Bend a sheet of cardboard in half
- Prepare in advance a white sheet of paper with the inscription “Happy Birthday”, cut out the inscription beautifully, glue it to the base
- Make colored or plain rolls, form them into flowers, and glue them to the card
- Decorate your card with beads
- Write a beautiful wish inside the card
Birthday Card
Jam Day
Such a card will be a wonderful birthday gift not only for relatives - mother, grandmother or sister, but also for friends, teacher or colleagues.
Related article: Crochet summer dress with an open back: master class with photos and videos
- Let's prepare the base of the postcard - bend a sheet of colored cardboard in half and glue textured material onto the front side. In the latter case, you can use a piece of wallpaper.
- We decorate the inside of the card with a cut-out colored piece of cardboard.
- We begin to twist the quilling parts for the flowers.
- The diameter of the roll should be 19 mm, do not forget to fix the end of the strip with glue.
- Let's prepare 5 such parts.
- Now you need to give the details the shape of an eye.
- Glue the flower.
- We collect 5 of these flowers.
- We make the centers of the flowers from paper strips cut into fringes.
- We twist it, fix it with glue and straighten the fringe.
- Let's collect the cores according to the number of flowers.
- We form the leaves in the same way as flower petals.
- We will decorate the card with multilayer curls, for which we will connect several colored strips of paper together at one edge.
- We twist it into a spiral.
- Carefully straighten the resulting curl.
- We begin to design the card, apply and glue the flowers.
- Then we glue the cores.
- We lay out the leaves and the composition with a curl.
- The free corner of the card can be decorated with tight rolls.
- Let's prepare the inscription - Happy Birthday! – we draw it ourselves or print it on a printer.
- Glue the congratulations onto the card.
The gift card is ready, all that remains is to add the wish inside.
How to make a wedding card in quilling style?
A wedding card can serve not only as a greeting card, but also as a wedding invitation. You can glue a postcard in the form of an envelope, and you will get a postcard for money.
To work you will need:
- Sheet of white construction paper
- Sheet of thin white paper
- A sheet of colored paper in the desired shade
- Decorative elements: beads and small ribbon
- Scissors, glue, ruler, pencil
- Quilling tool
Master Class:
- Cut thin long strips about 0.5 cm wide from thin white paper. They will be needed for rolls
- Form a rectangle from thick paper - the base of the postcard.
- Make a smaller rectangle out of colored paper, flowers will be placed on it, glue it to the base
- Roll the rolls. Make the number of flowers and petals at your discretion
- Press each roll with your fingers until it takes on a petal shape.
- Glue the petals onto the card, decorate the middle of the flower with a bead
- Make several loose rolls for the flower stems
- Add small beads
- Decorate your card with a satin bow
- You can add a caption
Step-by-step creation of a wedding card
For the New Year
Coming up with New Year's cards and how to decorate them will not be difficult. After all, the theme of the New Year always remains the same - snowflakes, Christmas tree decorations, Santa Claus and, of course, the New Year tree. Next, we will learn how to make a postcard with a green beauty.
- Let's make several loose rolls in green and one in black or brown.
- We form twisted spirals into “droplets”.
- The base of the card will be white cardboard, bend it in half and on the front side on top of each other, starting from the bottom row, glue the green petals-needles.
- We glue each row of the Christmas tree, reducing the top one by one piece.
- At the bottom we glue the trunk of the Christmas tree.
Related article: Knitting a beautiful warm skirt for women: pattern with description
- The Christmas tree should look like this.
- We are preparing tight multi-colored rolls - these will be New Year's balls.
- We decorate the Christmas tree with them.
- Next, decorate the card with painted snowflakes; you can use silver beads or sparkles.
New Year's card is ready! It is very simple to make, so even a child can handle making it.
Simple quilling cards step by step
Quilling cards can be quite an art, but if you're just learning, try making simple cards first. Simple cards consist of elementary rolls assembled into simple patterns, such as simple flowers. Try making a postcard using a ready-made template.
To make simple cards you will need all the quilling materials listed above.
The technique for making a postcard is as follows:
- Preparing the basis
- Making rolls
- Forming a pattern
- Decorating a postcard
- We write wishes
Simple cards in quilling style
Works for those who have already mastered the basics
For craftswomen who have already sufficiently understood the technique, work of medium complexity with additional details and a combination of various techniques is suitable.
A product that combines paper rolling and scrapbooking techniques will look impressive.
Well, such openwork mittens will undoubtedly appeal to both children and adults.
An ideal option for preparing an original gift for family members together with the child. Bright picture and fairly simple details.
This option also uses a combination of scrapbooking and paper rolling elements.
This New Year's card using the quilling technique is an ideal option for those who like to combine simplicity and originality.
A funny snowman made using the beehive style can decorate any postcard or New Year's picture.
Even with the help of simple details, curls and glitter, you can create an unusual and memorable design.
And again snowflake quilling + scrapbooking. The result is a card that you want to put on a shelf, in a visible place, and not put away for a very long time after the end of the holiday.
New Year's card in quilling style, which can be presented to both relatives and a loved one.
And again burning candles as an integral part of the holiday.
Christmas tree toy with an elegant pattern and a sign with congratulations. Everything original is simple.
A picture that can be used as a postcard design or as a completely independent craft.
Delicate snowflake of unusual color. A great solution for a New Year's declaration of love.
A voluminous card in the quilling style for the New Year will definitely delight any child or adult (after all, there is a child inside every adult, especially on New Year).
The combination of a pattern with a quilling candle and flowers is also suitable for decorating New Year's cards.
Nothing complicated, but the effect is simply amazing!
A clear confirmation of how, with the help of openwork paper curls, you can turn a sheet of cardboard into a real masterpiece.
Bells made from paper look like real ones. It seems that they are about to ring, calling on New Year's magic.
This product can be used as a regular postcard. Or you can attach it to a gift by writing congratulations and wishes on the back.
Glitter helps add charm to this card. Such a luminous and almost living Christmas tree can convey not only a festive atmosphere, but also the good feelings of the giver.
How to make a beautiful and unusual card using the quilling technique: tips and reviews
Polina : “I mastered the quilling technique by accident. I was browsing the Internet and saw beautiful curls. The thought immediately arose that this was not mine. But then I came across a detailed master class, and I learned the technique from it. Now I already have a quilling kit and am happy to make cards. A very interesting and exciting activity."
Valeria : “My daughter makes cards like this at school. It turns out very beautifully, and I was especially struck by the work of their teacher. I haven’t tried to make such cards myself, but I think it’s a very labor-intensive process.”
Irina : “I have already been familiar with quilling for 3 years. I want to say that everything is not as complicated as it might seem. I just saw beautiful flowers and wanted to make the same ones. Buying regular colored paper and cutting the strips yourself is cheaper than buying ready-made kits, but you need to get used to cutting out the strips. Now I delight my loved ones with postcards and paintings.”
If you liked quilling style cards and you have free time, if you are a creative person with a rich imagination, try making the same ones. We will be glad if you share your creativity with us.