Material for crafts does not have to be bought in a store for a lot of money. Often, everyone has something in their home from which they can create a product and assemble it. For example, seeds can be used as a natural material. These can be crafts made from pumpkin seeds, or from sunflower seeds, watermelon and other fruits and vegetables.
What can be made from seeds
Application - you get a three-dimensional picture on paper, which can be made using any types of seeds. For applique, it is better to use cardboard as a basis, because the paper will be thin and may not withstand the load of heavy seeds
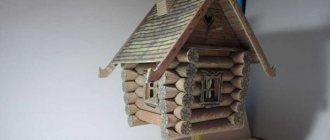
Figures - you can glue the seeds together and get a three-dimensional figure
Use as decoration - crafts made from seeds for children can be made in combination with other materials, and the seeds will act as decoration or auxiliary
Use as decorations - someone creates entire garlands or snowflakes from seeds, decorating the room with finished products
Magical transformation of ordinary objects
When a picture emerges from several types of cereals and seeds, it is akin to a miracle. After all, it is traditionally believed that we cook porridge from buckwheat and rice, and throw away melon and watermelon seeds without a second thought if we are not going to plant them. But it won’t be difficult to look at it differently and try to use non-traditional materials to create crafts.
Then cereals, legumes, seeds will magically turn into paints, and your imagination can suggest very unexpected solutions, and your little one will receive the first lessons in craftsmanship... But before you start mastering crafts from cereals, give your children a short drawing lesson on... semolina. Pour it into the tray and show how your finger can create a picture: a sun, a Christmas tree, a mushroom... The baby will be delighted!
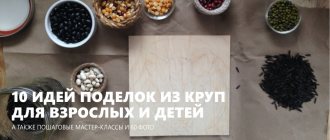
What may be useful
Just imagine: creativity doesn’t require any special devices or materials. You most likely already have everything you need in your home:
- thick paper, cardboard;
- glue, brush, pencil;
- gouache, alcohol, food coloring;
- plasticine;
- seeds of various plants;
- regular cereals.
When creating crafts from cereals for children with your own hands, you can use the natural colors of the inhabitants of the kitchen cabinet:
- brown - buckwheat, tea leaves;
- shades of white - rice, semolina, pumpkin seeds, zucchini;
- yellow - peas, millet;
- shortbread - wheat groats;
- black, gray - seeds.
You can create a whole picture from beans of various colors!
DIY rainbow
But if you want brighter colors, such as red or blue, the solution is simple: change the color of white raw materials with food coloring. Even if a young creator suddenly dares to taste a grain or a seed for inspiration, you will have nothing to fear.
- Add a few drops of vinegar to the prepared solution of the desired color. Color saturation can be adjusted by adding water.
- Place rice in a ziplock bag and add coloring.
- Close the bag and shake the contents periodically to ensure uniform coloring.
- The cereal has acquired the desired color, now you need to pour it onto a linen napkin in one layer to dry.
However, if you need to color semolina, you need to use a different technology. To dissolve gouache, you need to mix equal volumes of water and alcohol. In a glass or plastic plate, add the resulting liquid to the paint to achieve the desired shade.
- Pour 5 ml of dissolved paint into a saucer.
- Add enough cereal to form a moist mixture without excess liquid.
- Mix thoroughly so that there are no lumps left: first with a spoon, then with your fingers.
- Pour onto the canvas in one layer to dry. If in doubt, first sift through a strainer to avoid lumps.
Advice. The most convenient option is to paint a larger amount of cereal: not for one application, but with a reserve. Then you will always have a multi-colored palette ready in jars.
Craft base
You can draw a sketch of the future picture yourself or select an image on the Internet and print it.
This is a good solution for adults who are not artists at all. To begin with, you should try your hand at creating small applications from pumpkin seeds, sunflowers, beans and peas. In this case, plasticine applied to the base inside the contours of the figure can act as glue. For legumes, the retaining layer is needed thicker than for light seeds.
Of course, nothing will work on thin paper; it simply won’t withstand the load. To still use a printed stencil, it is better to stick it on cardboard and then wait until the glue dries.
What types of seeds are there?
Usually, for DIY seed crafts, certain shapes are used. There is a small classification of what kind of seeds there are:
In the shape of a drop or an oval - this shape can be seen in crafts made from watermelon seeds, pumpkin seeds or sunflower seeds. They are often used in volumetric applications or taken as a basis for crafts.
Cereals – you can take whatever you find in your cupboard at home. You can use it for different purposes - stick it, pour it, mix it with another type of cereal or seeds
Tree seeds – maple “airplanes”, ash or elm seeds
Legume seeds - beans, peas, beans - have a wide color palette and large shape, which makes them popular when creating crafts
Fruit seeds and coffee beans - they are usually taken for pasting three-dimensional figures or as a base
DIY sunflower craft
The sunflower is a bright sunny flower, so crafts with it turn out the same. This plant has long inspired the creativity of artists and sculptors. An applique with sunflowers can serve as a regular craft, or decorate a greeting card or room if you frame the work. Crafts with sunflowers can be made in different ways and from a variety of materials.
In this article I will talk about how to make sunflower applications with your own hands from paper, natural material (autumn leaves) and sunflower crafts from plasticine.
All of these works have real sunflower seeds glued to the central part of the flower. If the work is planned to be placed in a frame under glass, they will interfere. In this case, you can not glue them, but instead draw lines in the form of a grid.
Sunflower - paper applique. Option 1
- For a flower, cut out a circle from yellow or orange colored paper, and cut out a circle of a smaller diameter from black colored paper. For the stem and leaves, cut out a strip and two or three leaves from green colored paper.
- Glue the black circle in the center of the yellow one, cut out petals from the yellow one.
- Glue the stem, leaves and flower onto a background made of colored cardboard.
- On a black circle, using a ruler and a simple pencil, draw a grid or apply glue to it and glue the seeds.
Sunflower - paper applique. Option 2
This option differs from the previous one only in that instead of a circle of yellow colored paper you need to cut a strip, bend it like an accordion, and then cut out several petals at once. Glue the petals on the back of the black circle along the very edge.
Sunflower - applique made from natural material (seeds and autumn leaves)
In a similar way, you can make an applique with a sunflower from natural material - from seeds and dried yellow or orange autumn leaves from bushes or trees. For the work shown in the photo in this article, leaves of the fragrant honeysuckle honeysuckle were used (despite the middle of September, it is still hot here and there are no other yellow leaves, even these were found with difficulty - they were hidden in the middle of the bush).
If all the leaves are approximately the same size, they need to be glued to the base in a circle, leaving a little free space in the center. It will be more beautiful if you glue them in two layers, with the second layer glued in a checkerboard pattern.
If the leaves are different lengths, you need to fold them together, aligning them along the upper corners, and cut off the lower part.
Glue the resulting petals in a circle, overlapping or in two layers, leaving free space in the middle.
Glue a circle of black paper in the middle.
Draw a grid on the circle or glue sunflower seeds.
If desired, you can glue the stem and leaves from the stem of a blade of grass and dried green leaves.
Sunflower - a craft made from seeds and plasticine
My daughter made this craft at school during technology class. To the lesson you had to bring plasticine, seeds and a modeling board. The children made a sunflower according to the model and glued it directly to the board on which they sculpted the parts. I would recommend using colored cardboard as a base or background for this craft - the board will come in handy in the next lessons, and then this craft will have to be broken.
Stages of work completion
- Make a stem from green plasticine: roll it into a long sausage, flatten it at the top, forming a receptacle. Glue to the base.
- Make petals from yellow or orange plasticine: roll several balls of the same size, give them the shape of a drop, and flatten them. Glue in a circle above the receptacle, leaving an empty area inside.
- Make the core of a flower from black plasticine: roll it into a ball, flatten it into a circle and glue it to the center of the flower.
- Make leaves from green plasticine: roll as many balls of the same size (two or three), give them the shape of a drop, flatten them, and glue them to the stem. Apply veins in a stack.
- In the core of the flower, make indentations in the shape of a mesh in a stack or glue seeds.
These are the different works the children produced using the same pattern.
This photo shows plasticine sunflowers of Nika, Sasha and Ani.
And this is the work of Arina, Vitya and Dasha.
I suggest you look at the article on how to make a sunflower craft from sunflower seeds and paper palms or other crafts from seeds and cereals.
Preparing material for work
Before you start creating autumn crafts from seeds, it is worth preparing the material:
- The seeds are thoroughly washed with water
- Then they are allowed to dry - this is a mandatory procedure, otherwise they may become moldy over time.
- If required, the seeds are painted with acrylic paints
- After the dyeing procedure, it is thoroughly dried again, after which the material is ready for use.
Fantasy and creativity
What kind of materials do passionate people create their works from: scraps of fabric, pieces of paper, small stone chips... The list can be continued for a long time. And to name all the varieties of crafts is almost unrealistic, there are so many of them!
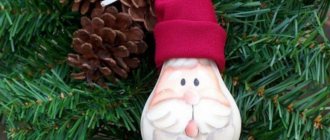
Hedgehog made from seeds
You can simply make a portrait of a cute animal with a prickly back, or, to complicate the task, draw another path along which the animal goes to its house.
The “Hedgehog” craft from seeds is not very difficult to make together with your child. Of course, you have already prepared a stencil on cardboard in advance, kneaded the plasticine until soft and poured seeds, buckwheat and rice into the bowls.
After completing each fragment filled with cereal, the excess should be shaken off onto a dish or tray. If you do everything step by step, carefully, the result will definitely please both you and the baby.
- Apply black plasticine to the entire outline of the animal’s back. On the pants - a layer of brown, on the shirt - white plasticine. Do not go beyond the contours!
- Back. Each seed should be placed in one direction and close to neighboring “needles” and pressed into plasticine.
- Shirt. Spread rice in one layer onto white plasticine. Now you need to press it onto the drawing with your palm. Your assistant can easily handle this if he is three or only two years old.
- Pants. In the same way, sprinkle all the brown plasticine with buckwheat and press the grain down.
Is your hedgehog ready to stock up for the winter? Then make several plasticine mushrooms and apples and attach them to the needle seeds.
The works “Chicken” and “Mushroom Family” are performed similarly..
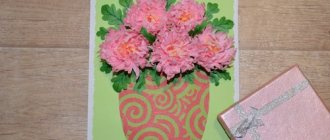
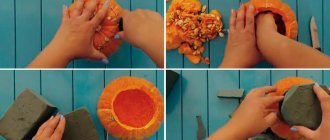
Craft “Flowers in a Vase”
And now it’s time for men (in this case, age is not the main thing, it’s about the state of mind) to get down to business.
To make women smile and feel happier, there is one recipe: give them flowers more often. Having received your bouquet, your mother and grandmother will be touched, and your sister or friend will reward you with a radiant smile. Making crafts from seeds and cereals with your own hands is not at all as difficult as it might seem at first glance. And if plasticine was needed for the hedgehog, then this time you will need PVA glue.
As you work, you need to do all the elements of the design one at a time and do not apply glue to several fragments at once: it may dry out while you work on one flower .
To ensure that each flower turns out neat, shake off excess grains - this way you will see where they did not stick and correct the situation in time.
- Pumpkin and melon seeds, crushed yellow peas, and ash wings will be used to create a wide variety of garden and wild flowers. You can try to depict roses or daisies, but you have every right to create your own fantastic, wonderful flower. By the way, later it will be possible to “revive” them with colors so that the bouquet becomes brighter.
- Grape “seeds” are quite suitable for this work: if you stick them inside the outline, and then paint them with yellow gouache to make them more similar to the original, you will get a sunny mimosa.
- To decorate a vase, you can take painted semolina and stick it in strips. Or make an applique of peas and get a fancy yellow-green ornament.
- Draw the stems with paints or felt-tip pens.
- A frame made from peas, pumpkin seeds, or a combination of both will give the piece a more finished, finished look.
To make the applique look like a painting , you can create a background for a bouquet in a vase. This is not difficult: just apply glue to the free areas of the paper and sprinkle with semolina or dried tea bags. If at the same time the color of the background changes and becomes lighter from the perimeter to the center, the picture will “come to life.”
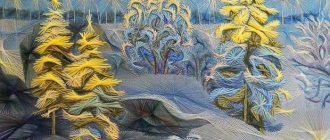
Panel “Cats on the night roof”
If you wish, the drawing can be done schematically and made with silhouettes of purrs on both sides of the pipe against the background of the moon and starry sky.
Or you can try to create more detailed images - only you can decide how difficult the work will be. To make it, you can use colored semolina and rice. Using something more massive is not entirely justified, since the panel is made on canvas. It is known that overloaded fabric can sag, become deformed and completely ruin the whole job.
If for some reason it is difficult to draw a plot picture yourself, you can print several templates from the Internet, and then transfer the contours to the prepared base.
A panel is characterized by two features : canvas and frame. Whether your work will be enclosed in a finished wooden structure, or whether it will be made from seeds, pasta, or strips of cereal, is up to you to decide. After all, you are the author and have every right to your own idea of beauty.
If you decide to make a picture from colored beans, it is better to take cardboard and plasticine (hot glue). Just keep in mind: in this case, the process of creating a man-made masterpiece will be more like making a mosaic. Or perhaps it will remind your child of putting together puzzles... Either way, it will be a fun activity. This picture can also have a frame made of beans in a contrasting color.
It is quite possible that you will want to create new works with other characters: “Geese and Swans”, “Lisa Patrikeevna and Kolobok”... You never know the plots!
Crafts made from various cereals and plant seeds are always original and can be used not only as exhibition objects, but also as full-fledged bright accents in the decor of the kitchen or on the desktop. Well, if you are “dragged” into the creative process, then, probably, a variety of ideas may soon arise and come to life: from topiary and napkin clips to decorated tabletops. Why not?
Painting from seeds
The picture can be decorated either on plain cardboard or on a canvas covered with fabric. The subject of the picture can be anything - from an animal to a tree. If the painting depicts an animal, it can be depicted on a branch. The seeds need to be glued in the shape of the animal, and then painted as desired.
A tree can be made either entirely from the seeds themselves or with the help of branches, and from the seeds you can depict foliage.
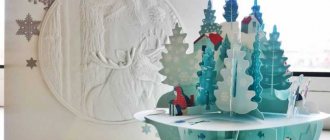
Panels, paintings, applications
Here I will show you wall decor ideas using the gifts of autumn. If you still have empty walls in your house, then this section is for you.
Decorative panels are usually made in the form of paintings, where different materials are glued onto the “canvas”. The finished painting (essentially also an appliqué, but often three-dimensional) can be inserted into a frame and hung on the wall. Rest assured: not a single guest will pass by!
Decorative panels are usually made in the form of paintings glued together from various materials
To create such masterpieces, you will also need glue, perhaps threads, paints, varnish - everything that is usually needed for crafts.
Decorative panel using the technique of floral collage. Photo: kruzheva-eka.nethouse.ru
Before you start working with natural materials, prepare the background. In the example above it is painted with paints. Actually, it is the background that determines whether your wall panel will fit well into the design of the room.
Another work in the same style:
Floral collage. Photo: pictures11.ru
You can make fun leaf appliques Photo: capitalkoala.com
They make very cute little animals. Then they can also be framed and hung on the wall in the children's room. Leaves applique. Photo: kokokokids.ru
If you have managed to dry herbs and flowers, you can “paint” the whole picture :
Picture of dried plants. Photo: pressed-flowers.com
Photo frames
I remembered that I once made a photo frame when I was a teenager. True, I never pasted the photo there. But the frame is still there, here it is:
Photo frame made from natural materials
It’s already falling apart little by little, but it’s not a bad idea, right?