Features of making crafts for Maslenitsa with children from plasticine, salt dough, paper, fabric, thread.
The joy of meeting the spring sun is transmitted to us from nature. Children are the most sensitive to it. They love to make fun crafts with their own hands and are happy to get involved in this process for the company.
Maslenitsa is a good reason to show your imagination and make stuffed animals, suns, birds, pancakes from different materials with children.
Continuing the theme of Maslenitsa festivities, let us dwell in more detail on the topic of crafts with children for this holiday.
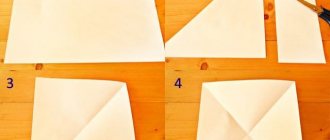
Craft - DIY postcard for Maslenitsa with children
cheerful hand-drawn postcard for Maslenitsa
I would like to create a themed card for Maslenitsa. For example, in the form of a smiling pancake-girl folded in half.
You need:
- colored paper
- plate and coin
- scissors and markers
- glue stick
Procedure:
- using a plate, trace a circle on a yellow piece of paper, cut it out and fold it in half,
- Make a scarf for the girl from the corner of a red sheet. Draw the tied tails and the uneven edge, cut everything along the contour,
- on a beige sheet of paper draw palms and cut them out,
- trace the coin on white paper, cut out the resulting circle and glue it to the scarf,
- pass the handles and head-scarf to the base-dress of the postcard,
- Let the child finish drawing the face and decorate the hem of the dress with flowers or peas.
Inside the card, add an interesting congratulation if you wish. Or let the child draw thematic pictures, and you add the inscription “Happy Maslenitsa!”
DIY paper craft for Maslenitsa with children
Paper Maslenitsa craft for children
It’s fun to create themed paper crafts with children. For Maslenitsa, for example, invite them to glue a doll together.
You need:
- colored paper
- glue stick
- scissors
- felt-tip pens
Operating procedure:
- fold 2 sheets of multi-colored paper, for example, orange and yellow, like an accordion,
- Fold each one in half. Glue one in the middle by the outer strips, and the second in the center so as to connect with the first from above. You've got the doll's dress and wide sleeves,
- Make a scarf from the corner of red paper, finishing the ends. Cut it out
- you need a piece of white paper to cut out the circle of the face. Pass it on top of the scarf,
- give it to your child to finish drawing eyes and smiles for Maslenitsa,
- Carefully glue the finished head to the dress,
- the doll is ready. She is even able to hold herself up on her own with her fluffy dress.
Making your own stuffed animal
It’s not difficult to build a woman for Maslenitsa; all you need is desire and a little ingenuity. There are many manufacturing options, as well as the materials from which the woman will be created. I offer 5 manufacturing methods step by step - to choose from.
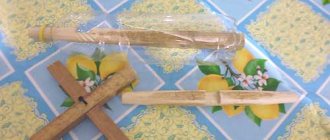
Burning doll made from hay or straw
This method is the most common, since almost every person had hay or straw, and also because these materials burn well.
Necessary:
- Branches or thin boards. The size of the doll will depend on the length of the branches. The materials you select must be well dried.
- Hay or straw. Well dried.
- Strong thread or twine.
- Several pieces of material.
- Paints or markers.
Manufacturing:
- We lay the branches or boards in a cross on top of each other and tie them firmly at the crossing point.
- The doll's head is made of hay or material. We paint her face with bright colors and put on a scarf.
- We make the rest of the body from hay, and put on bright clothes on top. Instead of clothes, you can use multi-colored scarves.
- Soak the resulting doll with saltpeter solution and dry well.
If you know how to weave braids, decorate the doll with braids made of straw or braided hands, it will turn out much more beautiful.
Paper doll
This option is appropriate for city dwellers where it is difficult to get hay or straw. Involve children in mastery. The craft is simple and colorful - they can definitely do it.
Necessary:
- Multi-colored paper.
- Ribbons of bright colors.
- Sewing threads.
- Toilet paper.
- Newspapers.
- Paints or markers.
- Cardboard.
Manufacturing:
- Cut two strips of cardboard and connect them with a cross. Tie with threads at the crossing point.
- For wrapping you will need toilet paper, do not wrap it very tightly, since the combustion process depends on this.
- Cut out a dress or robe from plain paper.
- We put the dress on a cross and tie it at the waist.
- We cut out an apron and other clothing attributes from multi-colored paper.
- Cut out the scarf and put it on your head.
- Decorate your face with bright colors.
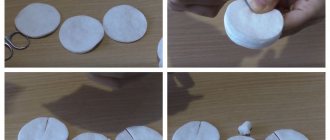
Instead of a painted face, you can make a face out of cotton pads, and clothes out of corrugated paper.
Scarecrow made from a broom
It is done quickly, and burns no worse than straw or hay.
Necessary:
- An ordinary broom.
- Pliers or pliers.
- Bright pieces of matter.
- Old things.
- Bright ribbons.
- Paints or markers.
Manufacturing:
- We take a broom, and it doesn’t have to be a new one, you can take an old one, and just straighten the uneven ends.
- Using pliers, we unbend the metal fasteners at the bottom of the broom. Divide into twigs.
- We align the separated rods and dry them. After drying, we divide into two parts, the workpiece is ready - the top will be the head part, and the bottom will be the legs.
- We make all other parts of the body from matter, as well as old things. We cut out two circles, sew them together, then fill them with cotton wool, this will be the head.
- We attach the hands to the head, for this you will need old children's tights, we also fill them with cotton wool and attach them to the head.
- We attach all this to the handle of a broom, and put a sundress or shirt on the lower part.
- We decorate the face with bright colors. Ready!
Of course, to make this product, it is better to take a new broom. The finished craft will be larger, which means it will burn brighter.
Large effigy for burning
The stuffed animal will delight both you and everyone around you. The only negative is that you need a large room for its production. If you have this, then the holiday with the burning of an effigy will be remembered for a long time.
Necessary:
- Old magazines or newspapers.
- Wooden blocks, two in number, preferably not thick.
- Hay or straw.
- Scraps of material.
- Old or unnecessary things.
- White matter.
- Bright ribbons and threads.
- Scotch.
- Sewing scissors.
- Wire.
- Bright colors or markers.
Manufacturing:
- We place the bars on top of each other in a cross. At the junction we fasten with wire.
- We sew a bag from white material, this will be the head. We fill our heads with hay, or chopped straw. We draw and decorate the face with paints or markers.
- We rewind the resulting cross with newspapers; thick magazine rolls should be attached to the waist area. This way the pelvic area will stand out.
- We sew clothes from scraps of fabric. We fold the long fabric and cut out a notch in the middle for the head, and wrap it around our hands with tape.
- We make the skirt from other scraps. Or use a ready-made bright skirt.
- We put the stuffed head on the crosspiece and tie it with a scarf.
- We decorate the finished product with bright ribbons.
If the doll does not seem full enough to you, you can add the remains of straw, hay under the clothes, or you can use simple cotton wool.
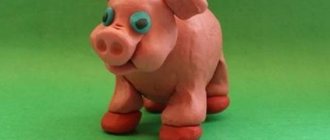
Maslenitsa crafts made from plasticine
DIY plasticine sun for Maslenitsa
One of children's favorite materials for creativity is plasticine. Therefore, for Maslenitsa, stick from it the main attributes of the holiday:
- scarecrow Maslenitsa
- pancakes
- Sun
- cheerful children dancing around the scarecrow
The youngest masters will be happy to “bake” a pile of pancakes for dolls and stuffed animals.
To do this, prepare:
- yellow and a few other colors of plasticine
- saucer-lid as a plate for pancakes
Operating procedure:
- roll the first ball of yellow plasticine and show your baby how to knead it correctly to make a flat cake,
- if your child needs help, roll a few more balls and knead them with your fingers,
- stack the pancakes on a plate,
- add eyes and a smiling mouth from other colors of plasticine to the top one.
To sculpt a scarecrow of Maslenitsa surrounded by cheerful children, prepare:
- more plasticine of different colors
- small scraps of fabric for scarves
- toothpick for stuffed animal
Operating procedure:
- Before sculpting part of the body of the figures, roll the plasticine into a ball. The largest one is for the body, hidden under the sundress, a little smaller is for the head, tiny ones are for the hands and noses,
- make a cone from a ball for the body, decorate its bottom with colored plasticine, for example, in the form of small flat circles along the radius,
- add sausage handles,
- tie a cloth scarf on the ball head, add a nose, eyes, a smile, rosy cheeks,
- Place the Maslenitsa scarecrow on a toothpick.
Blind the sun in several ways:
- to the round pancake base, add rays from individual parts of plasticine or from pieces of thread,
- Place the center circle on the cardboard and use your finger to pull out rays from the first circle in different directions.
Crafts for kindergarten
Children are looking forward to a fun holiday, when they can eat plenty of delicious pancakes, walk around the fair and make original crafts with their own hands. Often in kindergarten, together with the teacher, children make crafts from various materials: plasticine, salt dough, paper, cardboard, fabric. Creative work gives you the opportunity to show your talents and enjoy the exciting process, and develops your creative abilities.
Paper doll
Children in kindergarten are usually asked to make simple paper crafts. The Maslenitsa doll made of colored paper looks bright and colorful. The product will become a worthy exhibit at a crafts exhibition, and it can also be given to parents or friends as a home amulet.
Materials required for work:
- green cardboard;
- white and red paper;
- patterned paper;
- glue;
- scotch;
- ready-made paper flowers;
- curly scissors.
Let's start making the doll:
- Cut out a circle from green cardstock. Trim the edges with curly scissors.
- Make a snowflake from a square of white paper.
- Fold the squares of red paper and paper with a print into accordions so that the piece with the pattern is in the middle, and the red ones are on the edges.
- Glue the accordions together and secure them with tape on top.
- Glue the snowflake onto the green circle and the accordions in the center.
- Cut out a doll's face from white paper, draw eyes, a nose, a smile.
- Glue the face to the accordions on top, decorate the doll with a handkerchief made of colored paper.
- Next, decorate Maslenitsa with spring flowers.
Salt dough sun
Children of preschool and primary school age will happily fashion a cute sun out of dough as a symbol of the onset of spring.
What you will need:
- yellow salted dough;
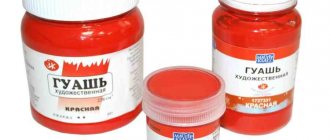
- multi-colored gouache;
- tassels;
- foil;
- sun template.
Stages of work:
- Knead a piece of dough and roll it out.
- Place the sun template on the mass and cut out a shape along the edges.
- Roll the foil into a tight ball and cover it with yellow dough.
- Moisten the ball with water and attach it to the center of the cut out template.
- Make eyes and a nose from the colorless mass, paint them with gouache and glue them to the sun.
- Shape the steak into a mouth and insert a tongue of pink dough inside.
- Sculpt eyebrows from the yellow mass and attach above the eyes.
- When the dough has dried, the product can be coated with colorless varnish.
You can make a hole in the sun template, then the craft will turn into a cute keychain.
Plasticine sun
A child of any age can, under the guidance of adults, make a sun for Maslenitsa with his own hands.
What you will need:
- culinary wooden skewer;
- plasticine;
- cardboard;
- toothpicks;
- beads.
Let's start making a plasticine sun:
- Cut out a cardboard circle and sculpt yellow plasticine onto it so that there is no free space left.
- We make the eyes from beads or blue plasticine, and the mouth from pink plasticine.
- Insert toothpicks in a circle (for small children it is better to use lollipop or ice cream sticks).
- Attach a cooking skewer to the bottom. The craft can be stuck into a flowerpot or placed in a small vase.
In order for the toothpick rays to hold firmly, the layer of plasticine on the cardboard must be thick enough.
If desired, the rays can also be made from plasticine
Paper sun
The simplest craft that little children can handle is a sun made of colored paper. Kids can be tasked with threading the “rays” into the holes, and older children can make the sun without the help of adults.
To make it, prepare the following materials:
- colored paper;
- yellow cardboard;
- glue;
- markers;
- scissors;
- stapler
Stages of work:
- Cut out a circle from yellow cardstock.
- Cut thin strips from colored paper.
- Punch holes around the perimeter with a hole punch.
- Take a colored strip, thread it through the hole, and seal the edges.
- When all the “rays” are in place, draw the sun’s face with felt-tip pens.
You can make a paper sun using the origami technique like this:
Crafts from salt dough with children for Maslenitsa
Maslenitsa scarecrow made from salt dough
To keep the shape of the figurines made with children for Maslenitsa for a long time, take salted dough.
From it create:
- Sun
- birds
- openwork pancakes
Bake each piece in the oven, then color it with a coffee solution as inspiration tells you.
Shape parts using:
- ridge
- knife
- caps
- narrow glasses or crushers
Decorate:
- wheat grains
- coffee
- grains of black or allspice
Add shine to your finished baked Maslenitsa crafts using varnish.
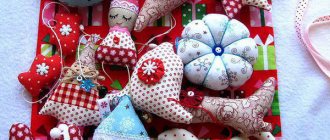
For inspiration, here are a few ready-made crafts in the photo:
bird figurines and salted dough pancakes for Maslenitsa
DIY scarecrow for Maslenitsa
Maslenitsa scarecrow at the table with pancakes and samovar
The main character of Maslenitsa is a stuffed doll. It is made in different ways - from:
- paper
- fabrics
- hay
- plasticine and dough
Involve the children in creating the scarecrow by telling them about its history and purpose. And also help collect the necessary materials for work. If the base is paper, then take newspapers and colored paper. For a fabric doll - scraps of fabric, for stucco molding - plasticine or salt dough.
As an example, let’s look at the features of making a Maslenitsa scarecrow with your own hands from fabric and a wooden frame.
Prepare:
- 2 branches as thick as a finger
- cotton wool or padding polyester
- fabric scraps in white, red and bright patterns
- paper
- needle and thread
- scissors
Operating procedure:
- Form a ball from cotton wool/sintepon and wrap it in white cloth. This is the head of a stuffed animal. Attach it to a stick with threads,
- fasten the second stick crosswise with threads just below the head. These will be the hands of Maslenitsa,
- tie a scarf on your head from a piece of bright fabric,
- Carefully make a hole in the middle of a rectangular piece of fabric. Pass the stuffed animal's head through it,
- fasten the Maslenitsa sundress under your arms, sew the ends of the fabric together,
- form sleeves from scraps of the same color and sew them to the sundress,
- tie 2-3 strips of red fabric on Maslenitsa’s wrists,
- Make an apron for the stuffed animal from a light square piece and attach it to the sundress,
- Under your skirt, fasten a piece of paper on which you write everything you want to get rid of in the new year. The moment the effigy is burned, the fire will take it all away from you.
For a brief guide to creating a Maslenitsa scarecrow with your own hands, see the picture below:
instructions for creating a stuffed Maslenitsa with your own hands
How to make a Maslenitsa scarecrow from threads with your own hands
The doll is also made from multi-colored floss, iris or yarn. Make your own Maslenitsa scarecrow using video or photo instructions.
Stages of work:
- The threads are wrapped around the hand to create a thick bundle. Stepping back 1-1.5 cm from the edge, tie it with a thread of a different color. The result is a head and torso.
- A bunch of threads of the main color is again made, but thin. They retreat 1 cm from the edges and tie them with a contrasting rope. The folds are cut. We got handles.
- The arms are placed inside the body and tied with a thread of a different color, highlighting the chest and waist.
- A ribbon is tied on the head or a scarf is cut out of fabric. Maslenitsa is ready.
Crafts made from threads are used to decorate a festive table, put on skewers or hung on threads.
Crafts with children from pancakes for Maslenitsa
cheerful scarecrow Maslenitsa made from pancakes
You can also make interesting crafts from the delicious Maslenitsa delicacy - pancakes. And get the kids involved! Have them next to you while you cook the pancakes so that you can roll them up in the heat of the moment.
Make pancakes:
- cheerful sun with the addition of pieces of fruit, airy cream
- well or house filled with sour cream
- dress for Maslenitsa, the basis of which will be the head of a baby doll
Photos of finished crafts made from delicious pancakes are below:
pancake crafts for Maslenitsa for children, option 1
pancake crafts for Maslenitsa for children, option 2
pancake crafts for Maslenitsa for children, option 3
Be the legislator of good traditions in your family. Involve children in them, then they will grow up to be happy and cheerful people who respect and honor the heritage of their ancestors.
Happy Maslenitsa!