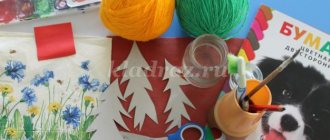
Isothread: materials and tools for work
To work you will need:
- Base (wooden or cardboard board),
- Threads (can be completely different, from thick wool to bright floss),
- A needle with an eye of sufficient diameter (to fit your thread),
- Scissors,
- Ruler,
- Styrofoam.
In addition to the basic ones, you may also need auxiliary tools and materials, including a beautiful backing (plain fabric, leather, etc.), glue, tape, an awl, safety pins, and additional accessories that can be used to decorate the finished panel. Sometimes a thread pattern can be formed around a base in the form of a brooch, a wooden house, several animal figures, etc.
Tips for choosing materials for string graphics
Cardboard is the simplest base, ideal for beginners. It is not necessary to look for any special types of cardboard; you can buy regular colored cardboard at a regular stationery store or hypermarket. Take several packs of cardboard of different densities (indicated in grams per square meter). The thicker the cardboard, the thicker the needle and thread you will need to use.
You can experiment with velvet backings (there is even velvet cardboard), but if the material is too thin, it will be awkward to work with. In this case, ordinary PVA glue will help you out, which can be used to glue a sheet of ordinary white cardboard to the base. This will make your work much easier.
Similarly, you can glue fabric onto cardboard.
The threads can be not just different, but different even within the same panel. For example, you embroider a spruce with thick fluffy threads, and snowflakes with thin ones. Please note that in this case you will need several different needles, with different eye sizes.
You can even start embroidering with ordinary threads sold on spools. But usually craftswomen stop at “Floss” or “Iris” as the main ones, using other varieties as necessary to complement the image.
A ruler and a compass are needed in order to apply isothread (schemes of future images) to the base of the picture. The most popular schemes are based on a circle, square, and angle.
One of the main activities that make up the craftswoman’s work is piercing holes in the base. Despite its apparent simplicity, this requires skill and caution; there is a chance of pricking your fingers or damaging the surface of your desktop. of foam plastic comes to the rescue . It is desirable that it be the size of the future painting or a little larger. It is placed on the base. You can also use a towel folded several times. But dense (extruded) foam is still the most convenient option.
Scotch tape is useful for securing threads on the wrong side. Not every knot will stick well to the cardboard and there is not always enough thread left to tie it. Scotch tape (good, sticky tape) does the job just fine.
An awl will help pierce thick cardboard or leather. It is not always convenient to do this with thread, especially if you decide to use thin threads and choose a needle to match them.
Technique using iso-thread circle
We use a compass. Using it, we draw a circle of the diameter you need on the base. It is better to let it be a small circle if you are just getting acquainted with the technique. Next, imagine that this circle is a watch dial. Place marks in the places where numbers are usually placed on the dial. In total, you will have 12 marks. Make holes in them with an awl. Number them.
So, we thread the needle through hole number one from the wrong side.
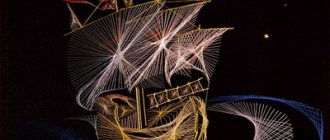
We pull it to the hole numbered 5. Next we connect the numbers 6 and 2. Then 7 and 3. And so on until you get a pattern like in the third picture.
Important ! You can connect any points of the circle in accordance with your (or someone else’s, if you use a ready-made diagram) idea, but so that the distance between the two connected points is always less than the diameter of the circle. That is, using our picture as an example, you cannot connect the numbers 12 and 6, 3 and 9, 11 and 5, etc.
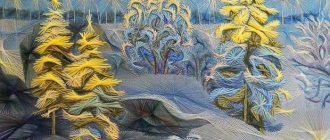
This technique is used as the basis for many beautiful embroideries. See picture below.
Or like this:
Templates and examples for children
Isothread is used in technology lessons for children; simple patterns are suitable for elementary school students (grades 1, 2, 3, 4). Older children and adults can create more complex and fancy patterns by combining several needlework techniques.
to contents ^
Chick
This chicken is made using a template and a simple diagram.
A detailed master class is presented in the video.
to contents ^
Butterfly
to contents ^
Fish
How to make a simple fish is shown in a step-by-step master class. For the base, use a template or draw an image of a fish with dots yourself.
Other schemes:
to contents ^
Christmas tree
There are many options for how to make a Christmas tree.
to contents ^
Snowman
to contents ^Snowflake
to contents ^
Technique using iso-thread angle
Here you will need a ruler. With its help, an acute, right or obtuse angle is drawn. As with a circle, its sides are divided into equal sections where holes are made. They must be paired, even if one side of the corner is longer than the other.
There is no hole made at the top of the corner. The holes are numbered starting from the top. The thread is threaded from the wrong side. Next - according to your scheme.
The easiest option for beginners:
Again, filling a corner using the isothread technique cannot be done in such a way that opposite points located at an equal distance from the top of the corner are connected.
Isothread - non-traditional embroidery, basic techniques, patterns with numbers
There are many types of handicrafts - sewing, knitting, creating jewelry, floristry, decoupage and much more.
Everyone can choose a hobby to their liking. I was interested in non-traditional embroidery - isothread. What is isothread embroidery, how did it appear and what are the basic techniques of thread printing - we will look into it today.
Thread graphics, isographics, thread design, isothread - all these are names for the technique of creating paintings from threads on a solid base (cardboard, velvet paper, leather, etc.). With its help, very impressive works are created, and besides, in order to engage in thread printing you do not need any special costs or materials.
England is considered the birthplace of isothread. According to one version, Mary Everest Boole, a famous English explorer and mathematician, invented the technique of filling various shapes with thread to help children learn geometry.
According to another, isothread was invented by English weavers, who created tapestries in a special way by intertwining cords on a wooden base with nails driven into it. Today, this technique has been simplified by eliminating boards and nails and replacing them with more affordable materials.
Materials and tools for isothread embroidery.
— Base — cardboard, artificial suede, velor, leather, sandpaper or velvet paper. The base must hold its shape and at the same time be such that it can be pierced.
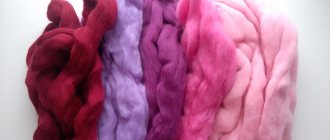
- Threads, cords - it is not recommended to choose thin silk or woolen threads. Everything else is up to your taste. The most popular threads for isothread are floss and iris; they have a rich range of colors.
- Glue (or tape) - any will do: stationery, "Moment", PVA, wallpaper - needed to secure knots and ends of threads on the back side of the product.
— Paper—an ordinary piece of checkered paper—for working drawings.
- An awl or safety pin - for making holes in the base.
- A needle with a large eye - for embroidery.
— Ruler (compass) — for measuring the distance between points and creating a neat drawing.
- Pencil.
- Substrate - polystyrene foam, an unnecessary book, cardboard - so that it is convenient to make holes in the base.
Isothread - the main embroidery techniques.
At first glance, it seems that weaving patterns using the isothread technique requires varied and complex patterns.
In fact, in this technique there are three main techniques for filling a pattern: filling a corner, an arc and a circle. The remaining elements are built on their basis.
Filling a corner when embroidering using isothread technique.
On the wrong side of the cardboard you need to draw an angle. Divide its sides into an equal number of segments. Use a pencil to mark each point, giving it a number. The numbering of points on the left side is from edge to top. On the right side - from the top of the corner to the edge. Punch holes in the cardboard at the points. Fill in the corner according to the diagram.
or so
Angles can be obtuse, acute, with sides of different lengths.
They may change depending on the design of the pattern or be partially stitched.
Filling a circle when embroidering using the isothread technique.
Draw a circle on the back of the cardboard.
Divide it into equal parts.
Punch a hole according to the markings - it is important that the number of punctures is even.
Use an arrow to indicate the direction of stitching.
Fill the circle according to the diagram.
The longer the stitch, the more filled the circle appears.
Circles can be changed depending on the pattern into ovals, various irregular shapes. They will be needed when embroidering flowers, birds, and animals with isothread.
Making an arc and spiral when embroidering using the isothread technique.
Arcs, spirals, curls are sewn according to the same rules as circles.
To stitch, you need to draw an arc on the wrong side of the cardboard and divide it into segments. The length of the segments can be different, depending on the purpose of the elements, but most often the recommendations advise making the length of the segments the same. These elements are used to depict bird tails, snowdrifts, waves, clouds, leaves, and decorative elements in various compositions.
Isothread is perhaps one of the most unusual types of embroidery available to people of any age. Nitography is good for developing imagination and artistic taste, and helps train memory and fine motor skills in both old age and childhood.
And after training on simple elements, you can not only embroider patterns of varying complexity, but also come up with your own compositions.
Isothread schemes with numbering for beginners.
Pattern for embroidering a mouse.
You should start flashing it from the body, moving to the ears. The ears are filled in like one of the main figures in isothread – an oval. The tail, according to the pattern, is embroidered with crosses. The lower arc of the body contour is embroidered with a stitch, the length of which is indicated on the sketch by a line between points 1 and 2. The arc located at the top is stitched in four stages with stitches of different lengths. These designations are marked on the diagrams in the form of numbers I, II, III, IV. For mouse embroidery using isothread technique, grey, black and brown thread colors are suitable. The nose and eyes are cut out of paper and glued in the right places.
Chamomile embroidery pattern.
To make a chamomile flower using the iso-thread technique you need to: embroider several petals; in the middle of each of the resulting flowers, sew a bead; using the diagram to work out the buds; Embroider the leaves and stems last.
Cornflower embroidery pattern.
To create a cornflower you need to - embroider the core of the flower - a circle (steps one to ten); carefully sew a bead along the contour; depict the petals of a plant; embroider leaves (steps one to eight); embroider the stems (steps one to three); finalize the remaining elements.
Dandelion embroidery pattern.
The flower and dandelion bud are embroidered with yellow thread using the method of filling the arc with triangles. The stem is created with stitches of green thread. The leaves are made by filling the corner with green threads.
Thanks to the Internet, you can find a lot of embroidery patterns using the isothread technique, from very simple to very complex. With their help, you can decorate a postcard, gift bag, notebook, or embroider a picture of tonal isothread to decorate the interior. In any case, the isothread technique is a wonderful type of needlework suitable for any age and very exciting.
Embroidery patterns using isothread technique.
How to make isona-thread using the fan technique
If you embroider flowers using the iso-thread technique, then you cannot do without this technique. The fan consists of a segment over which an arc is drawn at some distance. The purpose of the technique is to connect the holes on the segment with the holes on the arc, obtaining a beautiful petal. For an example, see the diagram:
The holes on the arc are made at an equal distance from each other. They begin to pull the thread from the first puncture in the arc (number 1).
This is how not only leaves are formed, but also petals and buds.
Reception of isothread arc
You can also use an arc-shaped pattern for floral ornaments. A part of a circle is drawn for it. Next, the holes are connected with thread so that the distance between them is less than half of the embroidered arc. Look at the diagram:
As always, the distance between the holes should be equal.
A spiral is embroidered using a similar pattern:
It is important to embroider it in one direction.
And this is how a droplet is embroidered using the iso-thread technique:
The basis for this is an arc and two segments. Embroidery begins at one end and ends at the other.
Beautiful panel with rose isothread - step-by-step master class and diagrams
Learning new needlework is always interesting; this master class will teach you the intricacies of creating pictures using an original embroidery method that differs from the usual types.
Preparing materials for work
For a painting with a rose using isothread technique you will need:
- base (sheet of cardboard, box, lid of a cardboard box or something else);
- fabric for covering the base and for the wrong side of the panel;
- threads (floss, acrylic or other suitable) - green, bright red, pink and burgundy
- colors;
- drawing template; needle of medium thickness;
- glue gun;
- scissors;
- awl.
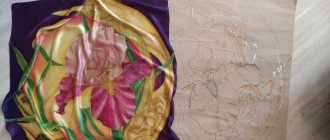
The painting can be done on a sheet of colored or velvet cardboard; in this case, there is no need to cover it with fabric. If you use another material at hand, you will need a piece of fabric of a suitable size.
Step-by-step technique for making a painting with a rose
Cover the cardboard base tightly with fabric, securing it on the wrong side with a glue gun.
Print or draw an image template using the rose isothread pattern in the photo below.
Isothread technique: some secrets of needlework
- If the chord (the distance between two connected points in a circle) is made as large as possible, then the circle will end up being maximally filled with threads.
- An interesting pattern is obtained if the circle is sewn twice - with one color of thread with a small chord, and the other with a large chord.
- When embroidering a circle from the front side to the back side, we get a star.
- If you want to get a corner embroidered with strokes, embroider it from the wrong side. Then the front one will look the same, but shaded.
- To secure the knots and the entire design as a whole, after finishing the embroidery you need to seal the base from the wrong side with a thick sheet of paper.
Picture using isothread technique step by step with numbers: goldfish. Step-by-step master class for children
Even a child can do such a simple drawing. In general, the isothread technique for children is extremely useful: it develops fine motor skills, imagination, and perseverance. Of course, you can embroider a complex fish. But for kids, we recommend using this simple scheme:
What you will need
From tools and materials you will need:
- Medium density colored cardboard,
- Scheme,
- Awl,
- Threads,
- Scissors,
- A simple pencil.
Progress
Step 1. Place dots on the cardboard as indicated in the diagram.
You will end up with something like this:
Step 2. Use a thin awl to make holes in the cardboard, according to the drawn diagram.
Step 3. Using a thread of the same color, sew the lower ornament (sea waves) according to the pattern.
In the end it should look like this:
Step 4. Let's start embroidering the fish. To do this, we sew a circle using the standard technique. Like this:
Step 5. In the final stage, sew the tail, mouth and fin of the fish:
To make it look more natural, don’t forget to draw an eye on the fish.
Painting “Butterfly” using isothread technique (master class)
Now let's move on to practical work. When all the basics of the technique are clear, you can begin embroidering a separate item. For example, butterflies. It will consist of the simplest patterns, when the entire image is completely filled.
For work you need the following materials:
- set of colored cardboard;
- graphic image of a butterfly (in which all the points are drawn);
- floss threads of two colors (yellow and green);
- awl;
- needle;
- scissors;
- thin tape.
Step by step
Take colored cardboard of such a shade that the threads you have chosen are clearly visible. For example, purple if the embroidery is with yellow and green threads.
Place the image of a butterfly on the cardboard and make holes with an awl. Don't forget about the backing so as not to spoil the work surface.
In the graphic drawing, use numbers to indicate the direction of movement of the needle.
This is the base with holes you need for work.
Take a needle, insert a thread into it and start forming segments.
This is what the openwork weaving should look like.
Do not forget to secure the edges of the threads with tape on the wrong side of the work.
The second yellow wing needs to be made symmetrically.
When you embroider the lower wings, you can change the color of the threads to make the work more vibrant.
You can even embroider the base in one color, and then add a different shade from shorter sections along the edge.
To form the body and antennae of the butterfly, you just need to sew the sections in a straight line and return.
This is what the finished work looks like.
It is better to cover the reverse side with a white sheet of paper to hide embroidery errors.
Agree, it will be nice to receive such work as a greeting card.
I hope that my detailed story about the iso-thread technique and a successful example of work will inspire you to come up with original ideas and soon beautiful embroidered items will appear in your home.
Regards, Tatiana!"
When you master the iso-threading technique, you will be able to create such beautiful paintings as in this video with your own hands:
Diagrams-drawings using isothread technique Easter
There is nothing complicated about the Easter theme. The main thing is to choose the right patterns in the isothread technique, some of which are so simple that you can use them to create isothread crafts, which are often asked to be made for kindergarten or school.
- Panel “Chicken and Egg”
The finished image looks like this:
Scheme:
- Postcard for Easter “Lukoshko with eggs”
Embroidery pattern:
- You can make isonite on disks. There is this cute Easter themed craft:
The diagram (chip) looks like this:
Small tricks and tips
- For beginner needlewomen, for convenience, you can glue a ready-made template with numbered marks for punctures on the back of the product. This way, it will be easier to monitor the length of the stitch, not to jump over the holes, and keep their length the same.
- When making punctures, you can place a sheet of foam plastic under the base. The holes will be neater.
- All movements must be smooth, leisurely and careful, otherwise the cardboard or thread may rupture.
- After finishing the work, the “tail” of the thread can be secured with a piece of tape on the reverse side of the product. Otherwise, it may “jump out” and ruin the appearance of the painting.
- You can use more than just cardboard for embroidery. Using the isothread technique, you can decorate a leather or fabric bag with a hard backing, or create a souvenir from a CD or a postcard.
It is very important to ensure that all stitches are the same length. This affects the appearance of the work.
Embroidery using the isothread technique is chosen by both experienced and novice needlewomen. It is also suitable for classes with children and teenagers. Isothread develops memory, spatial thinking, coordination and the ability to concentrate.
How to make a heart using the iso-thread technique
Embroidering a heart on cardboard is easy, and the result can be a unique DIY valentine.
The finished image will look like this:
You need to embroider according to this pattern:
As you can see, the numbering of the holes in the upper part of the heart starts from the center, and at the bottom we bypass the corner element - there the holes diverge to the sides from the center, the center itself is not numbered.
Overall, you should have an even number of holes to be able to connect them in pairs.
We start stitching from the inside out, threading the needle through number 1 (see diagram).
As you continue working, your valentine will look like this:
When you are done with this diagram, you will need to do the following to complicate the drawing:
- From the wrong side, where the thread will be at the end of the work, thread it into the hole numbered 47. From there - to 48. Then to 49 and so on until the end.
It will turn out like this:
Another version of the scheme