Bouquet of sweets “Yellow roses” in a basket
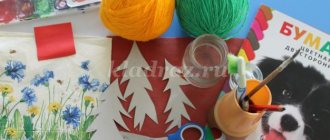
Bouquets of sweets have long ceased to be a new and unusual gift. More and more often, instead of fresh flowers, you can get a basket with wonderful homemade compositions and your favorite candies inside each flower. I offer a simple master class on creating a small basket without a handle with wonderful bright yellow and orange roses. To make such a composition you will need: 1. Crepe paper (or corrugated) in the desired colors (yellow, orange).2. Wooden skewers.3. Candy (mine is “Martian”).4. Green organza.5. Basket.6. Toothpicks.7. Construction adhesive.8. Spool of thread.9. Polystyrene foam (can be replaced with polyurethane foam or sheets of backing for laminate).10. Scissors.11. Clothespin. First, let me explain a little. In my basket there are flowers made of crepe paper. It is softer, less durable and not as fluffy as corrugated paper. Flowers made from corrugated paper are made lighter, more voluminous, and the paper is much stronger. At the same time, crepe paper produces more natural flowers and is more neat. Step 1. Prepare the basket. To do this, cut out a piece of foam plastic along the inner diameter of the basket, secure it tightly in the basket and decorate it with green paper. You can do it differently and much easier than with polystyrene foam. I use leftover laminate underlayment. I cut out two circles. One is the diameter of the bottom of the basket, and the second is the diameter of the top. We insert these two circles tightly into the basket. It turns out more neat than with polystyrene foam; you don’t even have to decorate it with anything on top. Everything will be covered with flowers and organza pound cakes. Step 2. Prepare the candies. I take “Martian” candies, since they are not too large and perfectly round. We attach the candies to the skewer using thread. You can re-wrap the candy a little to make it even rounder, and the tail of the candy wrapper will be longer, making it more convenient to attach it with thread. We make as many candies as we think is necessary (based on the size of your basket). Step 3. Make roses. To do this, cut off a piece of paper from the edge, as much as is needed to make roses, while the height and length of the petal will remain unchanged. We unwind an accordion into six petals from the cut roll, using scissors we give it a rounded shape, that is, we cut off the top in a circle. Cut off the corners from the bottom. At the same time, we cut so that the accordion is not damaged. We make another accordion, but we cut out six separate rose petals from it, without preserving the integrity of the accordion. First, we wrap the candy with the first accordion, tie it tightly with a thread and carefully form the necessary folds of the bud with our hands. Then we apply the remaining six petals in different orders and also tie them with a thread. First, slightly deform the petals with your hands, making a depression in them for the candy. This must be done carefully and not forcefully, so as not to tear the paper. We twist the edges of the petals using the blade of scissors. Next, we cut off a small ribbon of green paper and wrap it around the stem of our flower. You don't need a lot of glue here. Just drop some glue under the bud and secure it at the end. This is how we make fluffy roses in yellow and orange. Plus we’ll make a few more roses without individual petals, that is, rose buds. Step4. We make organza pound cakes for decoration. We cut a lot of small squares of organza, about 5 by 5 centimeters, again, based on the size of your basket. We fold the organza square into an isosceles triangle twice and attach it to a toothpick with a drop of glue. Clothes pins will help a lot with this. We press the joint with a clothespin and wait for it to dry completely, otherwise the organza will peel off from the toothpick. It’s even better to use construction glue instead of regular PVA glue; it dries faster and holds much better! When all the elements are ready, we begin to assemble the flower basket. We first insert the organza strips along the edges into the foam, and then the roses. You can also decorate the space between the roses with pound cakes! Enjoy a bright bouquet of wonderful yellow and orange roses! Photo of the finished basket: sdelaysam-svoimirukami.ru
Basket with roses from Raffaello
A basket of flowers is a great gift idea. Especially if there is candy inside each rose. Similar flowers are made from both corrugated paper and ordinary office paper in A4 sheets.
Materials and templates:
- corrugated paper of any cream color, another with a green tint;
- glue gun;
- scissors, pencil, ruler;
- wooden sticks;
- a low pot or flowerpot (from 9 to 12 cm in height);
- floral sponge (small piece 2.5 cm high, approximately 15x15 or 12x12 cm);
- green or light green sisal;
- candies;
- thin threads.
Repeat the steps with your own hands:
Popular articles Lotus
- The first thing to do is the flower petals. Cut out 8x9 cm pieces from bright paper. Round the top part with scissors and cut off the corners. Cut off a few cloves from the bottom.
- Wrap the lower part of the petal with the teeth around the candy. Wrap it tightly. Tie under the candy with a thread, capturing part of the candy wrapper. Tighten the base of the bud more tightly so that the candy does not fall out. The following pieces are 3x8 cm. 10 pieces per flower. Cut each petal from the bottom to create an arrow-shaped base. Round off the top with scissors. Round the tops of the petals with a wooden skewer.
- Apply one petal overlapping to the bud with the candy. Fix with turns of thread. For better attachment, apply drops of hot glue.
- Do you have artificial green leaves? If not, make them from green paper. Make 4x8 cm pieces. These will be the sepals. Cut into cloves on one side. Twist each clove with your fingers. In the middle, stretch the segment a little.
- Glue the sepals at the base of the rose. Fixation will be ensured by a glue gun. Trim off any excess paper.
- Insert a wooden stick into the middle of the base of the flower. Glue with a gun.
- Wrap the wooden stick with a strip of green paper. The size of the paper is 1×12 cm. Glue with a drop of glue.
- Glue some artificial green leaves to the stem. Cover part of the connection with a strip of paper. Make 15-20 tea roses using the same scenario.
- Insert a floral sponge into a flowerpot or pot. Trim to shape if necessary. Glue green sisal on top. It will hide the sponge. If the pot is not full, place a couple of crumpled paper napkins between the sponge and sisal.
- All that remains is to insert the flowers into the base so that the roses create a bouquet.
If desired, the basket can be easily replaced with a pot or iron box. Place a floral sponge in the box. We suggest using it as is or wrapping it in cling film to prevent it from falling out.
Stick the flowers into the sponge in an outer circle. Move in a circle to cover all the empty space. Makes an ideal decor item or wedding gift.
Basket of roses with workshop on making roses
To make a rose you will need corrugated paper, plasticine, skewers, double-sided tape, a sheet of green paper, and plain white paper for making templates. I made the templates very simply, took apart the living rose and took 4 sizes of petals for myself.
I cut out 6 larger petals, 6 smaller ones, 6 even smaller ones and the smallest 12 pieces from gavried paper
a piece of corrugated paper measuring 2.5 cm x 6.5 cm
rolled a small ball of plasticine
put it on a skewer and gave it a cone shape
I pulled out the rectangular shape with my fingers in the center
I started wrapping plasticine around her on a skewer, placing the corner at an angle and having double-sided tape glued to the skewer.
that's what happened
Next, take double-sided tape
wrap as shown in the photo
take a small petal and use your fingers to pull it out at the base as in the photo, giving it the shape of a petal
We apply the petal to the workpiece. Next we glue the small petals so that they are on top of each other as shown in the photo below.
those. glue them on like a spiral
after we cover all the tape with petals, stick a new one
we should get a fluffy heart
take the next size of petals and also form the bottom with your fingers
each subsequent row consists of three petals. The petals also gradually overlap each other
after all the petals are glued, wrap the bottom with tape again
take a strip of green office paper cut along the short side and approximately 1.5 cm wide
fold it into a pot
cut out the petals. I cut by eye
glue them to the bottom as shown in the photo
take green corrugated paper about 1 cm wide, as much as possible
start wrapping the bottom
After 5 turns, glue a piece of tape, continue wrapping going down to the bottom
that's what happened
If desired, you can twist the petals with a toothpick or leave them as you like
If anything is unclear, write. This is my first MK. but from the photo I think everything is clear. Make the post-story as detailed as possible
stranamasterov.ru
DIY roses made from candies and corrugated paper - master class
Surely, many have heard about the currently fashionable trend in paper art for adults and children - making bouquets of candy. As it is also called, suite design is gaining momentum today and winning universal love. Once you try to make roses from sweets and corrugated paper with your own hands - we will offer you a master class in this article, you will, without a doubt, become interested in this interesting activity seriously and for a long time.
Not only adults, but also children can create bouquets of sweets. They make the simplest paper flowers in craft lessons, and a little later they get acquainted with origami crafts. Unfortunately, making bouquets of candy is not taught in school. But you can make such crafts yourself with the help of clear and simple master classes. In this article we will talk about how to make a beautiful rose from candy. By making many of these flowers, you can create an original bouquet that will be an excellent gift.
What do you need to create?
To make a basket of roses from candy, you need to stock up on the following:
- Round-shaped candies with two tails.
- Crepe (special corrugated paper) of the desired colors for the petals and green for the stems.
- Reinforced thread.
- Single sided tape.
- Scissors.
- Skewers (wooden sticks) of the required length.
- Basket.
The process of making a basket of flowers from sweets
To make roses from corrugated paper with candies, you need to follow these instructions:
- Buy all the materials listed at a stationery and florist store.
- Prepare everything you need. Secure the candies to the sticks - do this with tape on one of the tails of the candy.
- Now cut out the rose petals: round the top of a 3x8 cm rectangle and slightly cut the corners from the bottom, forming a petal.
- Bend the middle of each petal with your fingers - this will make it possible to make crepe (special corrugated paper).
Important! Do not confuse it with the one that can be found in stationery - it will not suit you, because it has a completely different structure and does not stretch.
- Stretch the top layer of the petal (just the very edge) to create a frill.
- Now, using a wooden stick, bend it outwards, very carefully wrapping and rounding it.
- Do the same with all the previously prepared petals.
Important! It is convenient to first cut the required number of petals and prepare each of them. For one fluffy rose you will need about 8-10 petals.
- Twist the first petal onto the candy and secure with reinforced thread.
- Secure the second petal on the opposite side.
- Next, alternate the petals, overlapping each other with each subsequent one.
Important! Keep in mind that a real rose has only 5 petals in a row. This cannot be done from the very first row, but the last row must necessarily consist of five.
- Make the required number of candy roses - during the manufacturing process it is convenient to place them in a liter jar so that the petals do not wrinkle when lying on their sides.
- For the sepals, use green crepe. From a 4x8 cm rectangle, cut out two shapes that look like a fence or hedgehog needles.
Important! The secret is that one rectangle needs to be cut into two sepals at once - this saves time and affects the consumption of material.
- Wrap this sepal around the base of the rose and tie it with a thread, since it is inconvenient to use tape here - it greatly thickens the stem of the flower, and as a result, it will look ugly.
- Cover the stem itself with a long strip of the same green color or wrap it with green wax tape.
- Form the finished candy roses into a beautiful bouquet and place in a basket.
Here you have a beautiful basket of candy flowers ready!
Important! You can decorate rose petals with dew drops. To do this, glue the beads using a glue gun.
Video material
As you can see, making roses from corrugated paper with candies is quite simple. Even children successfully cope with this task. By creating bouquets of candy, you will have a great time and be able to make a universal gift for your loved ones or friends.
Share on social media networks:
serviceyard.net
How to make flowers from napkins with your own hands
Napkins can give you a lot of imagination to create amazing products. They are useful not only for your hands, but also for making various crafts and decorative items.
Carnation
Let's start with one of the simplest flowers - the carnation. The finished product looks like a real flower. And by making several of these carnations you can get a beautiful bouquet.
For manufacturing you will need the following materials:
- green crumpled paper;
- a strip of double-sided light green paper;
- threads;
- glue stick;
- pen rod;
- stapler;
- scissors;
- ruler.
Let's move on to step-by-step production:
Let's start working with a napkin. Ours is pink, you can replace it with red or white.
- We unfold the material and place the lower part slightly above the center line. Cover with the top layer.
- Turn the napkin over with the narrow side facing you. We cut the sides along the fold lines. We measure ten centimeters in width for each side obtained. We measure thirty centimeters in length. We cut off the excess.
- Fold them in half and cut along the fold line. We put the parts one on top of the other and make an accordion. We bend the resulting workpiece in half, mark the center and secure the paper in this place with a stapler. You need to make three such products. We tie them together with a thread in the middle.
- Making a stem. We take double-sided light green paper with dimensions of 4 by 29 centimeters. We treat the tip of the paper with glue and screw it onto the rod from the pen. Towards the end of the paper, once again grease everything with glue.
- We wrap the workpiece from a napkin. We glue it with glue and fix it with a stapler for reliability. The edges of the napkin need to be fluffed with scissors. After this, we begin to separate the layers by lifting them up. We omit the last layer.
- From corrugated paper we cut out leaves and a piece that looks like grass.
We attach it under the flower, hiding the lower petal. We attach the leaves and wrap the stem with a thin strip of paper.
How to make roses from napkins
You can even make roses in a simple way. They will turn out voluminous and realistic. To make them we will use:
- red napkins;
- green corrugated paper;
- scissors;
- pencil;
- skewers;
- scotch.
Let's start making roses from napkins:
Cut off the edges of the prepared napkins that are connected. You should now have separate squares. We divide them into a layer.
- Take one of the squares. We begin to wind it onto a pencil. Do not twist the paper all the way, there should be a straight edge.
- Using gentle movements, squeeze the twisted part, press it tightly and remove it from the pencil. We do the work with the remaining parts.
- We begin to roll one of the parts into a roll.
- Leave the untwisted section of the napkin at the bottom. Add the remaining layers in the same way. Add petals until you get the desired size of the rose. We press and twist the material at the bottom.
- We insert a skewer from below; this will be the stem.
Popular articles Making a stuffed bird
Use tape to secure the flower. Cut a strip from green corrugated paper. Wrap a strip around the skewer. We secure the material with tape at the top and bottom.
Dandelion
How to make a flower from a napkin in the form of a carnation to decorate a table or room, and in the form of a dandelion, is equally simple.
You need to take 2 bright yellow napkins and place them on top of each other.
- Using a compass, draw a circle with the diameter of the napkin on the top napkin.
- Napkins are cut out in a circle.
- In the middle, all layers of the napkin must be stapled.
- In a circle, cut the napkins into thin strips (1 cm), leaving a distance of 1-2 cm to the middle.
- Each strip in the circle needs to be bent perpendicularly and slightly twisted into a tube. All the petals of the bonded layers of the napkin are folded in a circle and given shape, while simultaneously dividing each napkin into layers.
- Then the bottom of the bud is secured with a piece of wire. A stem is formed from the remaining part of the wire.
- You need to cut several green stripes from a piece of napkin.
- The first strip is attached to the base of the flower using a glue stick and wrapped around the base of the flower.
- Attach 2 strips of napkins and wrap the stem completely. The edge of the napkin is folded inward and glued to the bottom of the stem.
- The bud needs to be shaped by fluffing it.
- Dandelion leaves (2-3 pieces) are cut out from a green napkin according to a template and glued to the bottom of the stem. All is ready.
Roses from corrugated paper - we create unusual bouquets with our own hands
It’s so easy to create roses from corrugated paper with your own hands that even a child can cope with this task.
Available materials, free time and a little imagination – that’s all you need to recreate natural floral perfection. Materials and tools To create roses from corrugated paper with your own hands, a beginner should purchase special materials and tools in advance. Firstly, it is corrugated paper. As the masters of this art note, it is this material that allows you to recreate a masterpiece of nature as naturally as possible. Just don’t experiment with color: it’s best to give your preference to natural tones: green, red, yellow and white. Secondly, tools. These are stencils, tape, scissors, pencil, glue in the form of a pencil or a gun, wire. The above is a minimum set that can be supplemented depending on what project is being carried out. An unusual bouquet of roses from corrugated paper. Even a beginner can make such a bouquet of roses. To do this, you will need a tape-roll of corrugated paper about 10 centimeters wide, a medium-sized foam ball, a glue gun and scissors. The first thing to do is cut blanks from corrugated tape 60 centimeters long. To begin with, you should prepare 10 pieces. Next, each blank is bent one-third in width and begins to twist so that the bent edge is at the bottom of the flower. Once all the roses have been created, they are attached to the ball using a glue gun. This must be done in such a way that the surface of the ball is not visible between the flowers. By the way, such bouquets can be used not only as a gift, but also as an element that gives the interior a delicate romantic style. To create the latter, foam balls should be taken with a small diameter, for example 6–8 centimeters. Wedding bouquet Making roses from corrugated paper with your own hands and assembling a wedding bouquet from them is somewhat more difficult. For it you will need soft pink and dark green corrugated paper, gold foil, round chocolates, gold metallic thread, scissors, green wire, tulle and a flower basket. The corrugated paper roses themselves are executed step by step as follows. First, we form the pestle. To do this, each candy should be wrapped in foil and tied with thread. Next, you need to cut out thin petals from pink paper. For each bud you will need two blanks. They are folded together with a slight shift and the pestle is wrapped in them, tied with thread. After this, a green cup is cut out of green paper. It’s easy to make: just cut out a “crown” from a green rectangle. The bud is wrapped in a cup, secured with glue, tightened again with thread and the ends are cut diagonally. Next, you should cut off a piece from the wire that will become the stem, place a bud on it and carefully cover it with green corrugated paper. The flower is ready! But to give a more romantic and delicate look, each bud is wrapped in milky white tulle, as is done with real roses. The number of such buds depends only on the design of the wedding rose basket. It is quite simple to secure the resulting flowers in the basket. To do this, the stems are placed on polystyrene foam or a floral sponge. As you can see, creating roses from corrugated paper with your own hands is quite simple. The main thing is to master the technique of performance and show imagination. stranamasterovv.ru
Video on how to make a bouquet of roses from corrugated paper with candies
Here again is the continuation of the sweet theme: a bouquet of flowers. I think this is the best gift. And not only because there are roses with sweets, but also because it was made with your own hands. This video explains how to make such a bouquet attractive! Even two videos, I couldn’t choose which one is better