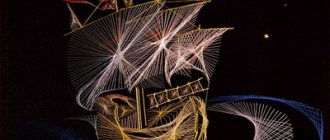
How to embroider on cardboard with threads
The history of needlework goes back to England, where similar patterns were created on wood by driving nails into a board and winding thread around them. Now the techniques and material that serves as the basis have changed.
When working, it is important to take into account the features of this type of needlework:
- The isothread technique, or as it is also called nitography, isographics, thread design, string art, and so on, is performed on thick cardboard. Sometimes velvet is used. You can also use paper, but then it is glued onto a thicker base.
- Any thread can be used, but preference is given to “Floss” or “Iris”. It is recommended to combine the material to obtain the desired image.
- The base is pierced with a needle and thread, using a previously made sketch.
If the material is thick, it is advisable to use an awl. To avoid getting pricked, craftswomen place a sheet of foam plastic or thick fabric (for example, a towel) under the cardboard. - Scotch tape is used to secure the threads on the back side of the warp.
- The kit for making crafts using the isothread technique must include a compass, a pencil and a ruler.
to contents ^
Isothread Cosmos. Master Class
Crafts for Cosmonautics Day in kindergarten. Master class with step-by-step photos.
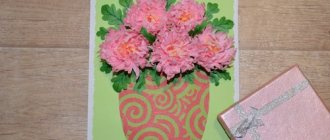
Postcard using isothread technique “Cosmos”
Author: Gavrilova Olga Davydovna, teacher of MBDOU No. 180 “Kindergarten of a general developmental type”, Kemerovo. Cosmonautics Day is approaching! Almost every child dreams of flying into space. This topic interests both boys and girls equally. Children bring their dreams to life in their drawings or crafts. Dear Colleagues! I bring to your attention a master class on making postcards using the isothread technique. In this master class we will embroider a picture on the theme “Space”. This master class can be used both by teachers of preschool institutions with children 6-7 years old, and by parents in joint activities with children.
Purpose of the master class : Using embroidery using this technique, you can decorate a postcard, a wall panel for a thematic exhibition or interior decoration. Goal : To consolidate the ability to create images with thread. Objectives: - Develop fine motor skills, attention, imagination, eye. — Develop strong-willed qualities (perseverance, patience, ability to complete work). — To develop children’s aesthetic perception and independent drawing with thread. Rocket That's the rainbow in the sky - Silk pattern! Hey and a rainbow in the sky, Like a colored carpet! And over the rainbow - a rocket soared to the skies. I will build the same rocket myself. And on the starry path I’ll fly on it, I’ll pick up a basket of stars for my Mom. Grigore Vieru. For this embroidery we will need:
- sewing threads (white, yellow, orange, red);
- sewing needle with a wide eye; - a sheet of cardboard (dark purple); - graphite pencil; - ruler; - short awl; - scissors; - a piece of foam for lining when piercing with an awl. Stages of work:
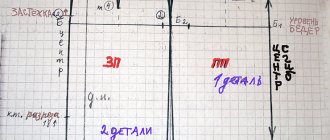
1. On the reverse side of a sheet of colored cardboard we apply a drawing of a rocket and a meteorite (straight and sharp angles). All right angles have identical sides equal to 3 cm. Two acute angles (fire) with a side of 2.5 cm, the third - 3.5 cm. The sides of an acute angle (meteorite tail) have different lengths: 8 cm and 5 cm. By Apply markings for holes along the lines on the wrong side (along a ruler, 5mm between markings). The number of holes on both sides of the corners should be the same.
2. Place a foam plate under it and use an awl to pierce holes along the markings. There will be holes on the front side that repeat the pattern on the back.
3. We proceed to depicting a right angle using isothread according to the diagram. You can start from any side. In the figure, the beginning is shown on the left side.
From the wrong side, insert a needle and thread into hole 1. From the front side, we direct the needle to the top of the corner, into hole 2. From the wrong side, we insert the needle into the second hole (3) from the top of the left side of the corner, from the front side we insert the needle into the second hole at the bottom right (8). From the wrong side, from the second lower hole on the right side, we insert the needle into the third hole from the bottom on the right side (9), on the front side, from the third lower right hole, we direct the needle into the third hole from the top on the left side (4), etc.
4. In the same way, we embroider all the right angles on the rocket according to the pattern.
5. Then let's start embroidering sharp corners. They are embroidered in exactly the same way as a right angle.
6. We embroider the tail of the meteorite according to the pattern in exactly the same way as the previous sharp corners.
7. Next we embroider the right corners of the meteorite, first with yellow threads, and then with orange threads. 8. Let's design the card by gluing it onto larger white paper.
I present options for panels for the design of a thematic exhibition. Blue meteorite Somewhere in space a blue meteorite is flying. You are walking, and he is flying. You are lying, and he is flying. You fell asleep, But everything flies In space Meteorite... Roman Sef
I wish you success!
We recommend watching:
Plasticine application for Cosmonautics Day for kindergarten Crafts for Cosmonautics Day. Middle and senior group Non-traditional drawing in the senior, preparatory group on the theme of Space Paper crafts for Cosmonautics Day for kindergarten
Similar articles:
Crossword on the topic Space
Quiz with answers for 8th grade schoolchildren on the topic Space
Isothread for beginners
Isothread Horse. Master Class
Isothread. Master class for beginners
Description of basic techniques step by step
The essence of this type of needlework is that punctures are made on a sketch drawn on cardboard with a needle or awl. Threads are threaded through them using special algorithms. The result is a colored drawing.
Several techniques (motifs) are used in isothread. When making a drawing, it is recommended to combine them.
to contents ^
Corner
To create a pattern of the specified shape, draw an angle: obtuse, acute or straight. Its sides must be divided into equal intervals and holes must be made. In this case, leave the top untouched.
For beginners, it is recommended to use patterns and diagrams with numbers indicating the order of actions to fill the corner.
Thread the thread into the holes from the inside out, using the first or second version of the diagram - the algorithm is the same for them, the pictures differ only in the numbering order.
Experienced craftsmen do without numbers. The drawings are different for obtuse, acute, and right angles.
to contents ^
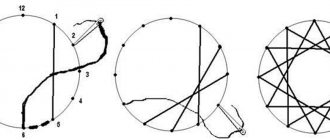
Circle
Using a compass to draw a circle. For beginners, it is recommended to make a figure of small diameter. Make holes in the same places as on the watch dial - there will be 12 of them.
The figure shows how to connect the numbered points with a thread: thread it through number 1 from the wrong side and stretch it to hole 5. Then connect 6 and 2, 7 and 3, and so on.
You can stretch the thread between any points, forming different patterns. However, the distance should always be less than the diameter of the circle. (For example, 6 and 12, 3 and 9 and others do not connect).
The picture shows options for forming a circle using the isothread technique.
to contents ^
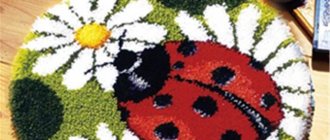
Fan
This pattern is often used for embroidering flowers, petals, and leaves. Weaving is done gradually, as in the picture, connecting the section from below with the holes on the arc along the path indicated by the numbers.
to contents ^
Arc
For openwork patterns, embroidery is used in the form of an arc, which is drawn in various shapes (spirals, drops, and so on). Holes are made on it at equal distances from each other.
The holes are connected with thread in various ways, but it is important that the distance between the points does not exceed the length of half the drawn arc.
A master class on how to make an arc is presented in photos and videos.
to contents ^
Christmas tree using isothread technique
A postcard showing a Christmas tree is the most common New Year gift. Usually these are glossy paper pictures with congratulations. The isothread technique will help you make your own special product from threads and colored cardboard that will look no worse than a purchased postcard.
In order to make a themed New Year's card using isothread technique, which depicts a Christmas tree, you need to be patient, as well as simple materials and tools for work:
cardboard (you can take any color). For our winter card, white or blue material is best suited. Instead of cardboard, you can use white watercolor paper. Isothread embroidery also looks very beautiful on colored velvet paper.- an ordinary sheet of paper for translating a diagram with holes;
- threads of a suitable tone. The Christmas tree does not have to be green; show your imagination and make an interesting New Year’s beauty, for example, in blue or golden shades;
- satin ribbons of different colors for additional decor;
- various sequins;
- snowflakes: large, small, medium - different in shape and color;
- scheme;
- paper clips;
- an awl or a thick needle for piercing holes;
- scotch;
- glue.
We will do embroidery with a Christmas tree based on the proposed scheme:
First you need to print the diagram on plain paper and attach it to cardboard using paper clips.
Read
We study the technique of isothread embroidery
Next, using an awl, a thick needle or another suitable tool you have, you need to transfer the image of the Christmas tree onto cardboard or special durable paper.
Take a needle and thread it. You can take floss or cotton thread and make several folds.
On the wrong side, you need to fix the thread by gluing its tip with glue or using tape.
According to the diagram, in steps 1 to 5 we begin to sew the first three upper levels of the Christmas tree. We fill the next fourth and fifth tiers in steps 1-7 (8).
Having finished sewing the Christmas tree, we will begin decorating the product using the sequins and snowflakes prepared for this. You can cut out snowflakes yourself or make them using a special shaped hole punch.
Additionally, the surface of the cardboard can be coated with glue, and foil can be placed over the gluing areas. By removing this material, we get an interesting decor with silvery patterns that vaguely resemble frost on the window.
The resulting Christmas tree using the isothread technique can be further decorated at your discretion: sequins, beads, sequins, beads. Any similar decor is suitable for decorating a New Year's card.
The wrong side of the product is sealed. All that remains is to make a congratulatory inscription on the New Year holidays.
Experiment with the design theme, select different colors of the material used and you will get your own original New Year’s card, on which a Christmas tree is embroidered using the isothread technique.
Templates and examples for children
Isothread is used in technology lessons for children; simple patterns are suitable for elementary school students (grades 1, 2, 3, 4). Older children and adults can create more complex and fancy patterns by combining several needlework techniques.
to contents ^
Chick
This chicken is made using a template and a simple diagram.
A detailed master class is presented in the video.
to contents ^
Butterfly
to contents ^
Fish
How to make a simple fish is shown in a step-by-step master class. For the base, use a template or draw an image of a fish with dots yourself.
Other schemes:
to contents ^
Christmas tree
There are many options for how to make a Christmas tree.
to contents ^
Snowman
to contents ^Snowflake
to contents ^