Stitch embroidery: what does it mean?
So, the hardanger technique began with stitch embroidery. This technique is one of the types of needlework, originally common among the peasants of the Middle East and Asia.
In the Middle Ages, stitch embroidery was adopted by European needlewomen, giving it their own characteristics and subtleties of work. Closer to the twentieth century, it became widespread in all European countries and America.
See also: How to embroider with satin stitch?
Initially, hardanger embroidery was used to decorate clothes - shirts, skirts, aprons, hats, and scarves. Later, embroiderers began to receive orders to decorate bed linen, curtains, towels, and tablecloths. Linen, which was originally used for hardanger, was embroidered with undyed or bleached linen thread.
Principles and features of embroidery
Not every needlewoman will be able to explain what hardanger is or how to embroider clothes in the Scandinavian style. The main features of this type of craft, without a doubt, include the orderliness of the quantity and size of each smooth stitch. This art form has similar trends in other cultures :
- Hemstitch.
- Lattice sewing.
- Cypriot lefkaritika.
This type of embroidery can be classified as a counted type. Mostly the entire surface of the clothing is filled with Norwegian embroidery.
Main characteristics of the style:
When choosing fabric for sewing, it is best to give preference to a material that has a regular weave. The main element will be a 4 by 4 square.- Each group of satin stitches in this technique should consist of five elements, which are located on four cells.
- Alternating the horizontal arrangement of stitches and its vertical counterpart is a prerequisite.
- When starting to work with embroidery, it is best for beginners to line the canvas. After all, technology is inherently very complex.
- If necessary, the thread can be moved. To do this, the needle is wound under the stitch. In this case, the reverse side of the embroidery will also look neat.
What tools are needed to create products using the Hardanger technique?
Let's look at what tools you need to do hardanger embroidery. In principle, a hardanger kit is not much different from any other embroidery kit. You will need:
- A sewing needle with a blunt (rounded) tip and a large eye.
- Thin tweezers for pulling threads through fabric.
- Scissors with thin and sharp blades.
- Magnifying glass or magnifying glass.
- Adhesive for textiles.
- Embroidery hoop.
In the process of work, each master determines the need for certain tools. Some people get used to doing without glue, while others find that they don’t need a hoop. One way or another, this set is recommended for a beginning embroiderer.
Making tablecloths and napkins
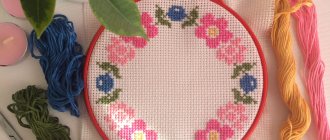
Hardanger embroidery is used to create napkins, tablecloths, towels, towels and other textile products. Using this technique, you can decorate a piece of fabric of any size. So, the skillful hands of a craftswoman will turn a small piece into a napkin, and a long and wide piece of cloth will become a tablecloth with openwork edges.
To begin with, it is better to use the simplest possible embroidery patterns. Hardanger mostly consists of three types of elements, so it won't be difficult to figure it out. The main thing is to follow the conventions exactly. You need to look at the basic element - the square. So, if a thick line runs along the contour, this means that the block is embroidered with looped (split) seams. The eyes in the diagrams are depicted as stars. If parallel lines are drawn inside the square, then this area is embroidered with a satin stitch.
You can master the basic elements in 2-3 lessons. Having learned how to embroider the simplest details, it’s time to move on to complex designs. Hardanger is great for decorating tablecloths, napkins, pillowcases and other home textiles.
What kind of seams are used?
What seams are used to create products using the Hardanger technique? It is impossible to describe all types of seams used in this technique within the framework of an introductory article.
In hardanger, brid seams, stitch meshes, loop (slant), loin, and picot seams are used. The basis is satin stitches.
They are embroidered at the rate of 5 stitches per 4 squares. The next row of stitches should be perpendicular to the first. That is, if the first row goes horizontally, then the second row is embroidered vertically.
With the help of stitches, openwork patterns characteristic of hardanger embroidery are created and the edge rows are processed.
Hardanger involves embroidering according to a counting table. The cell indicated in the diagram is considered to be a hole between the threads of the fabric. The height of the seam is determined by the height of the stroke.
Embroidering should begin from the outer edge along the entire perimeter of the product. A langet suture (or loop suture) is used, which is carried out along sections of tissue. Only after this seam is completed can you begin to embroider the central part of the product.
What seams and stitches are used
Hardanger embroidery uses a large variety of stitches and seams . The main ones present in almost every scheme are considered. These are the ones that beginners should master right away.
- Smooth blocks or closters. The simplest seam, in which all stitches are placed in the same direction and of the same length. A thick thread is used for work. A standard block has five stitches across 4 warp threads (stitch length).
- Brides entwined or interlaced. The stitch is made using 2 or 4 warp threads and is combined with other embroidery techniques. With this technique, 2 or 4 warp threads are pulled tightly together with a working thread, which makes it possible to obtain a mesh with rigid jumpers.
- Interlaced brids. Execution occurs on only 4 threads. With this technique, the thread is threaded in such a way that 2 warp threads remain above it, and the next 2 below it. The stitches are placed as close to each other as possible.
- Pigeon eye . This pattern is performed when three sides of the square are already completely entwined, and the fourth is half entwined.
- Maltese cross. First, a two-strand brid is made. Afterwards, 2 threads are intertwined with it according to the figure-eight principle, which form an angle with the finished brid. Then the same next element is performed and further in a circle.
The remaining numerous stitches of Hardanger embroidery are used less frequently; they are mastered as needed when working on a particular pattern.
Master Class
Master class on embroidery using the hardanger technique for beginners:
- Prepare the materials necessary for work: fabric, thread, scissors, hoop, glue. Place the fabric on the hoop and select a pattern (embroidery pattern).
- Using a buttonhole stitch, sew the edges of the future product. Insert the sewing needle from the wrong side into the place where the embroidery element will begin. Pull the thread to the right side and leave a small piece on the wrong side. Secure this “tail” with a drop of textile glue.
From the point where the needle is inserted, you need to count 4 cells along the tissue, move one square to the right and insert the needle into it. Next, count down 4 squares, insert the needle and thread it through the resulting loop. Repeat the seams as many times as necessary according to the pattern. Make sure that the stitches are located at a minimum distance from each other.
- Start with satin stitch embroidery. Make a seam vertically, using a size of 4 squares as a basis. Repeat 5 times, making a single block. The length of each seam should be equal to four squares of fabric. When you have finished embroidering this block, pull the needle into the adjacent square and sew a horizontal seam of the same length. Repeat again 5 times.
Try not to pull the working thread out from under the block. All rough work must be completed strictly under the embroidered area.
- After embroidering the main satin stitch elements, slits are made in the design. The cuts should be made in areas free from embroidered patterns. Don't be afraid to cut the threads at the embroidered edges: they are well secured and will not unravel. In the spaces between the embroidered blocks you need to leave whole threads.
For cutting, use sharp scissors with thin edges. The ends of the cut threads are lubricated with textile glue.
The threads that remain between the cut voids are braided with a thin thread, this gives the product even more sophistication. Threads that have been cut can be removed or pulled out with tweezers.
So, the “hardanger” embroidery technique allows you to create beautiful interior items with openwork patterns and beautiful finishing. Embroidery requires perseverance and the ability to handle the necessary materials. To create products with hardanger embroidery, you need to learn how to select fabric and threads and use ready-made patterns.
Using a hardanger you can decorate any towel, dress, skirt, scarf or scarf, as well as create unique napkins.
Preparatory work with fabric
When working with this type of sewing, it is best for a novice master to pay special attention to preparing the material. The stages of preparatory work for beginners include :
- Full-size printout of the required embroidery pattern.
- Determination with the dimensions of the fabric itself according to the picture.
- Cutting out a piece of material. It should be 2 cm larger on all sides than its intended counterpart.
- At the beginning of the work, you need to retreat a couple of centimeters from the edge, and then sew all the edges of the embroidery with a seam called “forward needle”. Each stitch should be spaced on 4 squares with gaps of 4 squares.
The edges of the product (napkins) are most often treated with textile glue (a few free centimeters at the perimeter of the fabric).