Material advantages
Cones have a lot of different uses: some use them for kindling, others mulch flower beds and beds, and others make healthy jam. But since childhood, they have been firmly associated with the New Year holidays and a decorated Christmas tree. It is not surprising that they are readily used to decorate the interior, and not only in winter; The advantages of pine cones as decoration are:
- Availability. That rare case when high-quality (and environmentally friendly) natural material is absolutely free, and you can stock up on it by taking a walk in the park or in the forest. Some lucky people have coniferous trees growing near their house (or in their country house), which makes decorating almost inevitable.
Decor from nothing Source xn--80afdb0cbapl
- Rarer species can be purchased in specialized online stores of floristry and decoration, hobbies and creativity, or in flower and gift packaging stores.
- Ease of manufacture. Original crafts are easy to make with your own hands, and they will look no worse than store-bought ones. You will need a little patience and ideas gleaned from the Internet after watching a couple of master classes.
- Durability. Decorations will last for more than one season.
Waiting for the holiday Source cdn.homedit
Varieties
The most accessible types of cones include the following types of natural material:
- Pine and spruce. Medium in size, pine cones are round in shape, spruce cones are oblong. You will most often find them in interior decoration, among table decorations at a special event (wedding, anniversary).
- Fir. They resemble spruce, but with smaller scales.
- Cypress cones. Widely used for floral winter decoration, it has small sizes (20-40 mm) and a bizarre shape. They are great not only for New Year's, but also for wedding decor: decorating glasses, tables, bracelets for bridesmaids.
Candlestick fragment Source cs7.pikabu
- Larch cones. The shape is similar to balls, slightly flattened at the poles; wide figured scales resemble flower petals, size - up to 30 mm. The compositions have the elegant appearance of neat little roses.
- Cedar. A wonderful natural material, which, due to its solid size, is used both in interior and garden decor, but in most regions it is almost exotic. More exotic cones of coniferous trees growing on different continents are not readily available.
Polar rose (larch) Source i.pinimg
Preparation of material
To ensure that crafts and decorations do not lose their shape over time, you need to use only prepared material in your work, which will be helped by knowing the following tricks:
- Collection time. If closed specimens are needed for decoration, raw materials are collected in the fall. From wet cones collected at this time of year, blanks with both closed and open scales are obtained. Spring cones (from last year) do not change shape, but still need to dry.
- Treatment. A cotton swab and alcohol will help remove dried resin from the scales.
Decor ideas Source cdn.mycrafts
- Soak. Helps get rid of small insects. For the procedure, prepare a mixture of water and vinegar (6%) in a 1:1 ratio. The raw materials are soaked for half an hour to an hour, as a result of which the scales may close. After drying, they will return to their original state.
- Keeping the bud closed. To maintain a neat appearance, the future decor is treated with glue before final drying. PVA or carpentry is suitable for the procedure, into which the workpiece is lowered for 30 seconds. Dry it with the scales down (upside down); Thanks to this, the scales stick together and retain the desired shape. Sometimes only half of the cone is soaked in glue, then it becomes like an exotic flower.
Bumps and a little bit of imagination Source architectureartdesigns
- To make original decor from pine cones for your home, you may need to lighten the scales. The material is soaked for 18-20 hours in white, after which it is washed with soap and water and dried. Due to the reaction to moisture, the buds will close, but once dry they will open again. The procedure may need to be repeated.
- Form adjustment. The required specimens are soaked in boiling water until elastic. Then they are bent to the desired shape, which is fixed with a harsh thread; then dry.
Space for creativity Source decoratorist
See also: Catalog of companies that specialize in designing country houses
How to handle buds
Before you start working on your future masterpiece, you should first prepare the cones. If there are large stains, they should be washed and dried in a well-ventilated area, but not near heat sources. If there is no heavy contamination, then you can simply thoroughly clean the cones with a stiff brush from soil and debris, shake them off, and, if necessary, dry them.
If the cones were collected unripe and not completely open, then it is permissible to place them in a slightly heated oven, but it is imperative to leave the door a little open so that moisture can escape. This is required for the buds to open and the fruit to fall out. Having opened, the scales will begin to resemble spruce branches.
This must also be done to dry the buds if they are wet, otherwise the finished product may quickly deteriorate.
The resulting blanks can be left in their natural form, selectively or completely painted, varnished, or decorated with artificial decor, for example, using artificial snow. Everything will depend on your imagination and ingenuity.
Drying
The final stage of the preparatory work is drying, due to which the scales completely open, taking up their final position. There are the following methods for drying cones for crafts:
- On air. The slowest method takes 2-3 weeks, depending on the moisture content of the raw materials. The cones are placed in a basket or box lined with newspaper in a layer of 10 cm (half opened - up to 20 cm). Important conditions are dry air and good ventilation.
- Express method. To speed up the process, the cones are boiled for an hour and then dried on a radiator.
Drying in the oven Source img03.rl0
- In a frying pan. Dry in a cast iron frying pan without a lid, keep the heat to minimal. The future decor is laid out in one layer, loosely, and periodically turned over. Drying may take an hour and a half.
- In the oven. It is heated to 250°C. Place the material in one layer on a baking sheet wrapped in foil and dry for 50-60 minutes. The oven door is left ajar to speed up air exchange.
- In the microwave. The raw materials are laid out in one layer on a flat plate and dried at maximum power for one minute. If necessary, turn the cones over and repeat drying.
Simple craft options Source i.ytimg
Norway spruce or common spruce
Cones are collected from the second half of September or from the beginning of October until the onset of spring thaws. In the eastern part of the range, where the hybrid form is widespread, the collection of cones begins in early - mid-September and ends in September - early October.
During early harvests (September-October), spruce cones of the basic form are stored for two months in a layer of 30-50 cm, periodically shoveled, and processed no later than three months after their harvesting. The seeds are extracted from the cones in pin dryers at a temperature of 40-50°C.
Seed yield is 2-5%. The method of storing seeds is in hermetically sealed bottles with “cobalt” paper inserted into them. Recommended seed moisture is 6-7.5%. Shelf life - 4-5 years.
What you need
In order for the work to progress, you need to prepare for it. To create the decor, in addition to pine and fir cones, you will need the following materials:
- Glue. Carpentry is better, but for simple (and not heavy) crafts, PVA or silicone is suitable. Hot-melt adhesive is very easy to use - the pine cone can be carefully attached to any surface: wire, burlap, tape, glass.
- Gypsy needle, scissors, awl, tongs.
Preparing for work Source thesprucecrafts
- Strong threads, fishing line. You can take threads and cords used in scrapbooking for decorative finishing and as fastening material. They come in different textures and colors.
- Multi-colored glitter powder (sparkles, powder), decorative tape with ornaments - in the departments for creativity.
Hot melt adhesive is especially convenient to work with Source modernplace
- Rhinestones, beads, beads, sequins.
- Velvet and fiber (felt) paper, cardboard, pieces of polystyrene foam (packaging can be used).
- Artificial snow (loose and spray), cotton wool.
- Paints, aerosol and regular (with a brush), varnish with glitter.
- Optionally - wire, burlap, decorative ribbons and cords.
Applying glitter Source driedflowercraft
See also: Catalog of companies that specialize in the installation of fireplaces and stoves
How to paint
For painting, use dried, fully opened cones; The following methods exist:
- Dye. Acrylic or gouache, applied with a sponge or brush. The sponge speeds up the work, but does not affect the entire surface of the scales. A brush allows you to get a better result, especially if several shades are used.
- A tin of paint. At the same time the fastest, easiest and most expensive way. The cone is hung on a fishing line, dipped into a jar of alkyd enamel, and hung to dry.
Painting with a brush
- Paint on a sponge. If there is a large amount of work to be done, the sponge is placed in a container and thoroughly soaked in paint; the cone is pressed against it on all sides.
- Aerosol enamels in the form of a spray. The paint is applied from a distance of 15-20 cm.
- Hairspray and glitter. Treat the surface with strong-hold varnish and immediately sprinkle it with glitter. The excess is shaken off and, if necessary, processed again.
Spray painting Source ariae
- PVA glue and glitter. Mix glue and water in a bowl deep enough to dip the pine cones into. Repeat several times, allow excess to drain, dry. Then apply glue in the right places and sprinkle with glitter.
- Wax. It can be purchased in the craft department (in the form of flakes), or replaced with cheap candles. The wax is melted in a water bath, a dye (food or oil) and aromatic oil are added to the solution. The cones are dipped in wax and dried several times until the desired result is obtained.
After spray painting Source previews.123rf
How to paint pine cones white with your own hands in MK
First of all, we note that the process of choosing cones should be approached as seriously and responsibly as possible, since in the future they will have to become part of the decor in your interior. Yes, and for crafts you will need beautiful, even and neat pine cones.
So, open cones will look best, but if you are lucky enough to collect closed ones, do not be discouraged: everything can be fixed. In this case, you will simply need to dry the buds in the oven over low heat. The signal for the end of drying will be the moment when they all open.
If it’s time for the New Year, then the pine cones will take on a truly festive look if they are painted white. To do this you will need the following materials:
- Pine cones;
- a can of white paint (alkyd enamel is best suited for such work, since it dries quickly and has a rich color);
- a piece of steel wire;
- ordinary newspaper.
The materials have been collected, you can get started.
- First you need to prepare the wire for painting. We bend one end of it so that the bump can easily fit onto it. And we bend the second one in the shape of a hook, like on clothes hangers. With the help of such a hook, it will be convenient to hang the wire with the painted pine cone to dry.
- In the place where you will dry your pine cones, lay out the prepared newspaper. The consistency of the paint is quite liquid, so drips are guaranteed. Before opening the can, be sure to shake it well.
- Next, put the cone on the wire and slowly lower it into the paint. After complete immersion, slowly remove the cone back. It’s better to hold it over the jar for a minute so that all the excess paint drips off.
- Now all that remains is to hang the cones over the newspaper until they dry completely. Then carefully remove the resulting beauty from the wire.
In order to paint pine cones gold (or silver), it is best to use spray paint. In stores offering various products for creativity, you will see a fairly wide range of such aerosols.
In general, the action plan is similar to the previous one. It is best to hang the cone on a hook and thoroughly coat it with spray paint. Try to get it into all the cracks and gaps. After complete drying, the cone can be used as a Christmas tree decoration or any other decorative option. You can get some interesting ideas on this matter from the collection of video materials we offer below.
Another common option is to paint the pine cones with gouache. Yes, yes, ordinary gouache for children's creativity. In this case, you only need pine cones, paints and a brush. Moreover, it should be noted that when using a brush, you have more opportunities for creativity, because the pine cones can be painted not completely, but rather in a pattern or partially. For example, you can color only the tips. The result will be these funny decorations:
But, of course, you can do it simpler (or more correctly, traditionally) by painting the bump “from the heels to the top” in a strictly defined color. This way you can make a kind of colored pine “assortment”, which can become part of the decoration of the New Year tree or just a composition in a vase or wicker basket.
Multi-colored pine cones will look especially beautiful mixed with candies and tangerines placed on spruce branches on a large beautiful dish.
To summarize, we would like to give you some important tips on the topic:
- It is best to use more durable paints, such as acrylic. Ideally, you should purchase a set of acrylic dyes, paints in cans (you can, by the way, use specialized automotive enamels), metallic aerosol paints, finishing varnishes and dyes with special effects (“frosty” coating, sparkles, etc.) .
- The technology for working with paints and varnishes, especially for aerosol and automotive paints that have a strong odor, requires their use in well-ventilated non-residential premises, and better yet, even in the open air.
- If creating a craft involves painting the pine cones in several layers, then each new layer should be applied only after the previous one has completely dried.
By tradition, we offer you several interesting videos on how you can paint pine cones at home. Here you will also find many ideas for inspiration.
What can be done
Of all the natural materials, pine cones have perhaps the greatest potential. There are an unimaginable number of ways to use them. It’s especially nice that all family members, young and old, can take part in this exciting work. The result of joint creativity will be a good mood and beautiful jewelry.
Elegant decor Source latestjobs
Express decor
The creative rush begins in the fall, when competitions for the best hand-made autumn toy start in kindergartens and schools. Having mastered simple options, many children (and parents) get a taste for it, and then figurines of various birds, animals, and fairy-tale characters appear. Moms and dads who find out that they need to bring a craft tomorrow morning will appreciate the following simple products:
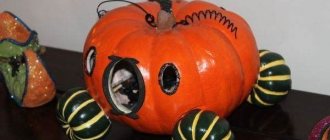
- Owl toy. One of the simplest options: the base (body) will be an open pine cone. Paws are attached to the wide base, which are most easily made from plasticine. Wings, eyes, nose are made of paper (preferably felt) or cardboard; the main thing is to glue them more securely.
Owl Source i1.wp
- Family of hedgehogs. Several cones of different sizes are mounted horizontally on plasticine feet. A muzzle with a nose and eyes is made from plasticine. You can look up the shape of the muzzle on the Internet, and choose any color of plasticine - it will turn out bright and original.
Hedgehogs Source i0.wp
- Squirrel. You will need three cones: for the body, head and tail. For the head, choose a small bump and make a muzzle from orange plasticine (like a hedgehog), add eyes and ears (we check the shape on the Internet). Secure all the cones with glue and add plasticine paws.
Toy ideas Source i.pinimg mensup
- Dinosaur. Fundamentally no more complicated than previous crafts, but it looks much more impressive. For the body, a pine cone is chosen; the paws, tail and head on a long neck are sculpted from multi-colored plasticine. To complete the picture, the tail and neck can be decorated with separate scales.
Worth the time Source alwaysbusymama
Video description
About decorating ideas using pine cones in the following video:
Home decor
Decor made from pine cones for the home does not fit into every style, but it will add coziness to many modern trends. Outside of the winter holidays, your home interior can be diversified with interesting designer items:
- Candlestick. Use a glass or small glass vase. The candle is placed in the center, along the edges there are several cones without any decoration. Simple, stylish and all-season.
Grace in simplicity Source 1.bp.blogspot
- Decorative jar. Choose a jar of unusual shape and fill it with pine cones, painted in the color palette of the room - white, black, gray. A container of a more original shape (for example, a vintage candy bowl with a lid) can be filled with pine cones painted in an acid color. Option: the jar is filled to a third with pine cones, a skein of garland is placed on top, which is powered by a battery hidden at the bottom.
For owners of glass containers Source i.pinimg
- If you are lucky enough to get a particularly large specimen of a cone (for example, from a Coulter pine), no additional decor is required. Designers prefer to use such specimens in their natural form - natural motifs are now in trend.
- Frame. Small cones of cypress or larch can be used to frame a photograph or a child’s drawing, and hang the finished composition on a ribbon. The craft is left in its natural form, or painted in a suitable color - it will be cute and original.
Particularly large specimens Source media.angieslist
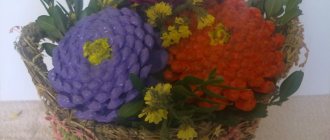
- Decor in a pot. The pot is filled with moss (or, for example, straw). Cones are laid out in rows on top and secured with glue for reliability. The structure can be given any shape - spherical, elongated, cone-shaped.
Simple and elegant Source xn--80afdb0cbapl
Important rules for working with pine cones
It is clear that in some places around the world it is not the time to collect pine cones, but many have made blanks and are actively using them in their creativity. Therefore, I would like to remind you of some rules for working with natural materials.
1.Procurement of raw materials . There are resin residues in the cones, and there is a lot of dirt and insects between the scales. Therefore, when collecting cones, wear rubber gloves and work clothes. Once you bring them home, sort them by shape and size.
2.Cleaning . Each master has his own secrets for preparing pine cones for work. We will look at the classic version.
- Clean the collected material from coarse dirt, seeds, moss and pine needles using a brush and tweezers.
wikihow
- Now it's time to wash the pine cones. Immerse them in warm water and vinegar (2:1) and make sure they are completely covered with water. Keep it like this for 20-30 minutes. Once wet, the scales will close. Don't worry, they will open again when heated. Place the washed cones on newspaper and dry.
3houses
- Roast the pine cones in the oven. Cover a baking sheet with parchment paper or foil and place the pine cones at some distance. This will allow hot air to circulate better, and space is also needed for the flakes to open. Heat in the oven at a temperature of 95 - 120°C for 30 minutes until the cones are completely open. You can dry the buds in the fresh air, but this will take up to three days. If there are a lot of cones, process them in batches of several pieces. During heat treatment, most of the pine resin crystallizes. After turning off the stove, open the door slightly so that the buds cool gradually. Please note that the processed material is very fragile, so remove it very carefully.
3.Formation of the form . One option is to remove excess scales to obtain the desired shape for a flower or toy. The second option is to cut off part of the cone using a jigsaw.
marthastewart
4.Use of scales . Do not throw away the cut scales; this is an excellent material for creativity. In the photo you see an example of using scales. The foam cone is covered with scales, resulting in a creative Christmas tree decor. You can make flowers from the scales, decorate photo frames, mirrors and much more.
bystephanielynn
5.Securing the loop . This process is very simple. Buy a screw with a loop and screw it into the lump. Such cones are used to make garlands, Christmas tree decorations, and souvenirs.
scontent-a-ord.xx.fbcdn
6. Bleaching of cones . To do this, use white. Fill clean buds with white and leave for at least 24 hours. Then rinse and dry in a draft to remove the smell of whiteness. Place the buds in bags and add a drop of your favorite essential oil, which will fill the buds with a pleasant aroma.
ehow
7.Choose the finishing method with varnish or paint:
- Cover the buds with acrylic sealant to make them stronger and have a nice appearance. Select a non-yellowing varnish for the finish. Place the pine cones on their side, spray with varnish, wait until dry, turn over and continue varnishing. After about thirty minutes, cover with a second layer. The spray sealer comes in matte, satin and gloss. Choose the one you like best. However, matte usually gives the most natural look. If you don't have a coating spray, you can try using hairspray. If you plan to use the buds for a long time, then use yacht varnish.
- If you want a thick layer of paint or varnish, dip the pine cone into the jar. To allow excess paint to drain, the cone needs to be hung. This is not always convenient and there is not always room for it in the house.
town-n-country-living
8. Cones with paraffin .
Melt the candle in a bowl, add dye. Dip the pine cone into paraffin, twist it and pull it out. Paraffin dries quickly. You will get the original and thick color of the buds. hellolow
Video description
About the New Year's wreath made of natural materials in the following video:
For the New Year holidays
Homemade New Year's decor is a common thing in all countries where family holidays are valued. Cones occupy one of the main places in it; many original decorations are made from them:
- Fairy lights. The main condition for an excellent result: the denser (more crowded) the cones are collected, the more impressive they will look. To collect the garland, use a thread or fishing line; the holes at the base are pierced with an awl or needle. The finished ribbon is decorated with snow. Garlands are used to decorate the upper part of the room (beams, hangers), where they have a solemn appearance and do not disturb others.
Garland at the entrance Source hgtvhome.sndimg
- Christmas decorations. An owl, a hedgehog, a mouse, a gnome and Santa Claus, sprinkled with sparkles and equipped with loops, will take their rightful place among purchased toys. Your children will remember fabulous evenings spent decorating the Christmas tree for the rest of their lives.
For the forest beauty Source modernplace
- Wall decor. The easiest way to organize decor from pine cones in the country is to hang them in clusters of five to ten pieces and decorate them with everything that is at hand: ribbons, serpentine, fabric bows.
It couldn't be simpler Source xn--80afdb0cbapl
- Christmas wreath. A traditional decoration for the front door in Catholic culture, it has also taken root in our country. As a frame, choose strong branches, cardboard or wire twisted into a ring (the base can be purchased at the store). Balls and cones are strung on a fishing line and wound onto a base. Optionally add ribbons, figures, sweets, dried fruits.
Wreath with fir and pine cones Source dizain
- Single decorations. If you don’t have time at all, hang individual cones, painted and covered with artificial snow. To make them look truly festive, coat them with a thin layer of gold or silver spray paint or glitter varnish.
- Candlestick decor. The combination with sprigs of pine needles, beads and glass balls looks festive.
New Year's candlestick Source mirlandshaft
- Three-dimensional star. Five pine cones are placed around the sixth, secured with glue and fishing line. The star can be painted at any stage and hung in a doorway or on a chandelier.
- Holiday table decor. Cones on a ribbon are useful for decorating the back of a chair (from the outside), decorating a napkin, a candlestick, or a small gift (for example, in combination with a candy cane).
Table decoration Source web-studio.pp
- Composition. One of the fastest ways to decorate your interior. The basis will be a tray, box, dish or three-tier candy bowl. An attractive art object is obtained from a combination of candles, balls, tangerines, fir branches and, of course, pine cones.
There is never too much gold Source tapeciarnia
How to make crafts from pine cones with your own hands
Complex autumn crafts that require attention and skills are best offered to schoolchildren. He will be able to cope with the task on his own. But preschool children cannot do without the help of adults. And here it is better to give preference to simple autumn crafts. There are a lot of ideas, so as not to get confused and clearly explain the sequence of actions to the child, you need step-by-step instructions.
Crafts from pine cones and twigs
Simple natural material is suitable for beautiful autumn crafts. If the child is puzzled by the fact that he needs a job made from pine cones for school tomorrow, then a funny forester is quite suitable. Difficulty is for 1st grade.
For autumn crafts you need:
- open lump;
- plasticine;
- dry twig and leaf.
Progress:
- The body of the old forest man will be made from a cone.
In the upper part you need to make a face out of plasticine. Sculpt the eyes, nose and mouth. Attach legs to the bottom of the body. Prepare material for work and decorate the upper part of the arborist - Make arms from twigs and attach them to the body with plasticine.
Assemble hands for the old forest man from thin branches - The dry leaf will serve as a forest guardian's cap.
To do this, it is carefully fixed with plasticine on the top of the head. Cover the craft with varnish so that it does not gather dust.
The finished autumn figurine can be placed on cardboard. Secure with plasticine. If you want to collect trees from the remains of branches, then you will get a whole picture.
With older children, you can make an autumn craft from pine cones and branches in the form of a tall bird - a peacock. The complexity of the work is designed for 3rd grade. The child will be able to cope with it on his own.
Materials needed for the toy:
- cones;
- dry branches;
- plasticine;
- chestnut or acorn;
- paper, glue.
Instructions:
- Use a closed spruce cone for the body of the bird; it is denser than a pine cone.
Select material for work and prepare it - Make legs for a peacock from branches and glue them to the body with plasticine.
The neck is also sculpted from it, the head is made from a small chestnut or acorn. Decorate the beak. The main parts are made from plasticine and other materials - Cut the peacock's tail from thick paper or cardboard.
Carefully remove the scales from the pine cone and paste them over the workpiece. Let dry and attach to the body with hot glue. You can make crafts of varying complexity depending on the age of the child.
The finished autumn figurine can be placed on a flat stone or cardboard or plywood. Secure with hot glue or plasticine.
When the child learns to make simple peacocks, you can complicate the task and offer to first paint the blanks in the chosen color, and only then take on complex work. It is better to design the tail from beautiful feathers, which need to be prepared in advance.
Advice! If you paint the blanks pink, you may well end up with a flamingo. Girls will like this autumn idea more.
Crafts made from walnuts and cones
Together with your child, you can make entertaining children's crafts on an autumn theme using pine cones and nuts. And then perform a whole performance from the characters received.
Kids will love the funny little voles who collect various supplies in their burrows. It doesn't take much time or material to make them.
What do you need:
- closed long cones;
- small nuts;
- jute thread;
- glue.
Progress:
- For autumn crafts, fir cones are more suitable, as they hold their shape better.
They will be the basis of the body. The nut will serve as the mouse's head. Prepare everything for work - Use large scales to make ears and paws for a mouse, which are placed on glue.
The tail is made of jute thread, also gluing it to the desired place. Connect individual parts using glue
The finished autumn craft is left to dry. The toy can be used for its intended purpose or as a pendant. To do this, you need to glue a small loop to the upper part of the body where the head is attached.
You can make funny sheep from an open pine or cedar cone. For work, halves of nuts are useful, they are used to make the face.
Materials:
- cones;
- halves of nuts;
- glue;
- plasticine.
How to do:
- Glue half a nut to the body to create a muzzle.
Let it dry. Make a lamb blank - Make the eyes, nose and paws of a sheep from plasticine.
Place small parts on hot glue
You can play with your finished autumn craft right away. Decorate the work with available materials. You can use acorns for the face.
Crafts from pine cones and cardboard
In kindergarten, together with the kids, you can make autumn crafts from pine cones and cardboard. The teacher will hang the finished panel in a visible place in the children's corner.
For the autumn panel you will need:
- scales;
- multi-colored cardboard;
- dry branches;
- glue.
Progress:
- Take white thick cardboard as the basis of the panel.
Draw the outline of the design on it with a pencil, then seal everything with scales, maintaining the shape of the parts. Prepare a panel layout - Make eyes, beak and paws from cardboard of a suitable color.
Glue the parts with glue. In order for the bird to sit on a branch, it is placed under its paws. All parts are glued. Frame the panel and varnish it
The finished painting should dry well, after which it can be placed in a frame and put away in a children's corner.
You can make not only autumn panels from cardboard and pine cones. These materials are suitable for creating an unusual turkey.
Materials:
- cones;
- multi-colored cardboard;
- plasticine.
Step-by-step instructions:
- Attach the head of a plasticine turkey to the body.
Cut out a beak, eyes and beard from cardboard. Attach the parts in place. Prepare all parts for work - Cut triangles from multi-colored cardboard and make a tail.
Glue all the parts together and attach them to the bump. Connect the individual parts into a whole figurine, secure with glue
Fix the finished craft on a piece of thick cardboard.
Crafts from pine cones and glue
On the theme of autumn, you can make not only crafts in the form of animals from pine cones. A cute fall basket for mom would also work. The work will require:
- a lot of cones;
- hot glue;
- any decorations.
How to do:
- Glue the cones together, giving them the shape of a deep basket.
Let it dry. To make it easier to shape the basket, it is better to paste it on a deep plate, and then remove the layout - Make the handle separately and then glue it to the base.
To do this, glue the cones together as in the photo. Varnish the well-dried basket
Decorate the finished work with acorns, chestnuts, dry leaves or other natural materials.
To decorate your interior, you can make an autumn craft candlestick. It will not gather dust on the shelf idle; on autumn evenings the whole family can gather for tea by candlelight.
What do you need:
- cones;
- glue;
- cardboard;
- decorations.
Progress:
- Cut a round blank from cardboard to the diameter of the future candlestick.
Cover it with pine cones and prepare a model of a candlestick - Glue a candle in the center.
The work can be decorated or left as is
Dry the finished decor. To add elegance, you can pre-paint the blanks in any color.
Warning! Scented thick candles are better suited for this craft than others.
Crafts from cones and needles
You can make simple autumn crafts from pine cones and needles to decorate your interior. In this case, you will need a little material and imagination:
- cones;
- plasticine;
- fir needles;
- glue.
Assembly instructions:
- Glue the cones together to make a vase.
Then fill its upper part with plasticine. Dry the workpiece well, then decorate - Carefully insert the spruce needles into the workpiece so that there are no gaps.
The finished composition can be decorated as desired
The craft can be supplemented with various little things, for example, a sprig of viburnum, rowan or dry leaves.
Autumn is a reason to prepare for winter and the upcoming holidays. While there is time, you can make a beautiful interior decoration. To do this you need to take:
- cones;
- fir branches;
- satin ribbon;
- cinnamon sticks;
- dry lemon or orange peel.
Work plan:
- Glue fir branches to the top of the cone with a glue gun.
Make a loop from a strong thread and place it in the center of the structure. Dry the craft. For hanging you need to make a strong loop - Garnish with cinnamon sticks, dried citrus peels, and ribbons.
Secure all parts with glue. Dry the toy well. You can decorate the decor at your own discretion
It is better to make such a pendant together with your child as a gift to your grandmother or relatives.
Original crafts from pine cones
Topiaries are interior decoration; they can be made from different materials. Cedar, spruce and pine cones are suitable for autumn crafts. The complexity of the work is designed for children 10-12 years old. But younger children can do it together with their parents.
What you need to prepare:
- plastic bucket for base;
- gypsum;
- foam ball;
- wooden stick;
- different cones;
- spruce branches;
- viburnum berries or others for decoration.
How to do:
- Paint the bucket in the desired tone.
Dilute the plaster according to the instructions and fill the container with it. Insert the barrel exactly in the middle so that the work stands well and does not fall. Let the plaster dry. For topiary, fill the container with plaster so that it does not tip over - Cover a foam plastic ball for crafts with cones in any order.
Decorate with beads or dry berries, spruce branches. It is better to glue with a glue gun - Also decorate the junction of the gypsum and the trunk with moss and other material.
Dry the craft. A variety of materials are used to decorate topiary.
Advice! The finished work can be coated with aerosol varnish to protect it from dust and dirt.
A simple and no less original craft from cones - an ant, suitable for children 5-7 years old. To make a toy you will need:
- cone;
- dry leaves;
- acorns;
- twigs;
- eyes for toys.
Build process:
- Connect two cones together.
Make insect arms and legs from twigs. Secure all parts with glue to the body. Cones can be glued together with a glue gun or regular PVA - Make a head from an acorn with a cap.
Attach eyes, design a muzzle. Place all parts on glue
If desired, it is better to secure the finished toy on a hard surface.