Necessary materials
Creating an origami owl is quite a complex and time-consuming task. In addition, you will need to watch the origami owl master class for beginners and the following materials:
- blanks measuring 4 x 7 cm from colored paper, of which 368 blanks are blue, 59 are white and 1 is yellow;
- thick paper of white, black, blue colors - 1 sheet of each color, respectively, for the eyes, pupils and wings;
- PVA glue;
- office clips (binders) – 6 pcs.;
- glue gun and rods;
- scissors.
The modular origami technique involves creating a variety of shapes by folding modules, i.e. small paper elements. In some cases, their number can amount to hundreds or even thousands of small parts, especially for 3D crafts. The photo clearly shows what elements an origami owl consists of.
A voluminous origami owl made by yourself can be added to your collection of original hand-made crafts.
Master class: how to fold an origami owl?
This option is considered the simplest and most understandable, so it’s perfect for children. You can now read an approximate step-by-step explanation of the actions:
- You need to take a square shaped paper and fold it in half.
- Next, you need to fold the corner to the center of the sheet, fold a small fold and fold the edges.
- Form a corner at the bottom of the sheet, and also move part of the small corner down.
- The side of the sheet should be folded and then unbent.
- Make an additional fold on the side.
- Now you need to form the bird's wing.
- The workpiece should be turned over, and then the side should be bent.
- The corner should be directed towards the top, and the small one towards the bottom.
- We form a pocket and turn the made figure over.
- The last step is to fold back the corner of the paper.
- The next creative task is to decorate the owl (draw the eyes, stick on the characteristic beak, outline the feathers, make the paws).
- In the end you will have a beautiful origami owl, very similar to the real queen of the night.
How to make an origami owl with your own hands
To create an owl out of paper, you will need special folding patterns. The operating procedure is as follows:
Creating Modules
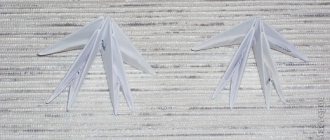
At the beginning of work, you need to prepare a paper sheet 4 cm wide and 7 cm long. Fold it lengthwise strictly in the center, then similarly across. Open the pocket and fold the corners inward diagonally.
Now do the same steps, but on the opposite side. And bend it in two. The first modular element is ready, there are still 427 pieces left to make (blue - 367, white - 59, yellow - 1).
From a cardboard core
The main thing for such an owl is a round cardboard cylinder onto which all other elements are glued. There is huge scope for imagination; you can come up with as many finishing options as you like. Let's consider one of them.
We will need:
- a cardboard cylinder or tube on which toilet paper was wound;
- colored paper;
- scissors;
- glue;
- gouache or watercolor;
- pencil.
Let's look at the workflow.
First of all, we process our cardboard blank sleeve. We bend both upper edges inwards as shown in the photo to create “ears”. This part of the workpiece must be pressed and ironed with your fingers so that the base is as neat as possible.
After this, we choose the color of the future owl and paint it with gouache or watercolor. The base should dry well.
While the paint dries, we will have time to cut out eyes, beak and feathers from paper. We select paper of the desired color, fold several sheets of paper together, draw small circles on the back of the last sheet with a pencil and cut them out - these will be the feathers on the owl’s chest.
Next we make the eyes - two white circles with a diameter of 4 cm and two black circles of a slightly smaller diameter. You can make a highlight from one more small white circle - for expressiveness.
Cut out a small triangular beak from brown or burgundy paper.
Related article: Crochet finger theater: master class with photos and videos
We make feathers in the form of “tongues” from paper of the same color as for the breast circle feathers. These feathers are suitable for an owl's tail.
Now you can start gluing the base with all the decorative elements. We do this in the order shown in the photo:
The paper owl is ready, but you can show your imagination further, for example, by decorating the owl’s head with a bow, a bug, etc.
Beginning (creating the zero tier)
To do this, you need to glue together 5 prepared modules with non-opening edges using a glue gun. To tightly fix the glued elements, it is necessary to clamp them with binders (stationery clips) and leave to dry.
Create 4 more sets similar to the previous one and one of 3 units. This should only take 28 pieces. All glued elements must dry, only after that you need to remove the clamps.
Next, apply glue to the ends of the small elements and glue them together to form a circle. Secure with clamps, dry and remove the clamps.
Creating the first four tiers
To do this, the craft must be securely fixed, add the first row of glued models on top of the zero one, as described in the diagram for folding an owl from paper: 1st: consists of 10 pieces of white and 18 blue elements.
The next row (second) includes 9 units of white and 19 units of blue. For the 3rd, there are enough white ones - 10 pieces, blue ones - 19, for the 4th one: white ones - 9, blue ones - 19. After this, the structure is slightly compressed towards the bottom.
Step-by-step master class Smart owl
This bird is made using the classic origami technique. To fold it, take a square sheet of paper. Both sides of the sheet are visible in the finished product, so it will look especially good if you take colored paper with sides of contrasting colors.
If at a certain stage you have questions about what to do next, how to fold an origami owl, the video instructions will be your faithful assistant. Look for it at the end of the article.
First of all, we make diagonal folds on the square sheet and turn it over.
Fold the corners of the worksheet towards the center.
Bend the top corner up like this.
We repeat similar steps in the other direction.
We bend the sides of the square parallel to the center and unfold them.
We bend the upper part of the workpiece so that the fold line passes through the intersection points.
On the side triangles we bend the vertices, which will later become the owl’s wings.
Turn it over. Bend the side.
Straighten the triangles on both sides at the top.
The folds must meet exactly in the center of our workpiece. We form the owl's eyes in this way:
We hold the center of the workpiece with our finger, and unfold the lower part on one side.
Iron the resulting diagonal fold.
Let's do this for the other side. We tuck the owl's wings along a line running perpendicular to the central one.
We turn the owl over with its back to us. From the middle of the bottom line of the workpiece we bend it to the center of one of the sides.
We iron it, make it symmetrical on the other side.
Turn it over again. We bend the top corner like this.
By tucking the tip under the lower part of the “eyes”, we form the owl’s beak.
Let's enlarge the owl's eyes by expanding the triangles to the maximum and turning away their edges.
Smooth out the paper.
This is what the owl will look like after this.
Along the diagonal fold, we place the left one on the right side of the workpiece.
We fix the owl. We bend the small triangle under the wing down. He will become a paw.
We unfold the owl's tail as in the picture.
In this case, the foot should be on top. We repeat on the other side.
We turn the owl over with its back up and unfold its wings. Press your finger on the small triangle at the base and smooth it in this position.
Let's make our owl ears. To do this, you need to straighten the upper triangle and turn the narrow strips inward.
It should look like this.
Turn the corner of the eye inward.
Let's do it on the other side.
To make the wings look neater, fold the paper.
We form the ears by first bending them back and ironing them, then returning them to their original state and making another fold close to the previous one.
We add volume to the product by slightly bending it along the back.
You can sit her on a branch or perch. This is how a smart paper owl turned out, the master class and video, we hope, were useful to you.
Video tutorials of some other ways to make such a bird.
But such a cute owl can be made from modules.
An origami craft - an owl - can be made in two ways. The first one is simple, using one piece of paper. The second one is more complex. The result will be an owl of modules. We invite you to familiarize yourself with these two methods.
Master class on how to make an origami owl from one leaf:
- Prepare a square piece of paper and bend it diagonally twice (Illustration 1).
- Straighten the paper.
- Fold the top corner by one third of half the sheet (Illustration 2).
- Fold the bottom corner to the folded one so that their tops touch (Illustration 3).
- Wrap the right and left sides of the figure (Illustration 4).
- Unscrew the corner of the inner triangle (Illustration 5).
- Draw the eyes and make feathering on the “wings” (Illustration 6).
Assembling the next 10 rows
For the 5th row, use white modules - 8 units, blue - 20. For the 6th: white - 7, blue - 21, and for the 7th: white - 6, blue - 22. To create the 8th row you need only blue modules in the amount of 28 pieces. The 9th row consists of 28 blue modules laid on the back; this row is the owl's neck.
Next 5 rows (from 10 to 15) contain only blue elements in the amount of 28 units, which are stacked face up. The design of the owl's body and head is ready.
Assembly diagrams
There are a lot of origami owl patterns; you can change them or supplement them at your discretion. The descriptions are quite detailed, so even a beginner can cope with the task; some of the simplest schemes can be assembled together with children.
Little owl
This is a simple step-by-step instruction for an owl from origami modules. You will need 228 modules: 157 primary colors, 62 white for the chest, 7 orange for the legs and beak, 2 black for the eyes.
Number of modules in each row:
- 13 modules of primary color and 5 white;
- 6 white and 12 basic;
- From the third to eighth rows, 13 main and 5 white alternate with 12 main and 5 white;
- 1 orange, 2 white and 13 basic;
- 4 white, 2 black, 12 basic;
- 4 white, 14 purple;
- 8 main;
- 6 main;
- 2 main;
- 6 orange and two main ones for the legs and tail, 6 main ones for the wings.
The number of different colors alternates up to the eighth row, so the breast turns out to be a zigzag. If you want to make it even, then you can not change the number of modules of different colors:
- The first row needs to be made in a closed circle to get the shape of an owl.
- In the first three rows you need to place them with the short side out.
- After the third row, turn the craft inside out.
- In the fourth, fifth and sixth rows, the modules should be with the long side outward.
- In the seventh row it’s short again.
- In the eighth, place two white ones again with the short side outward, and all the rest with the long side.
- In the ninth, you need to place orange in the center, white on the sides, and make everything else the main color. The long side should be outward.
- The tenth row is made with the long sides of the modules facing out. There are two white ones in the center, one black one on either side, then one white one. The rest are the main color. The eyes and beak are ready.
- Now you need to put two primary colors in the center, two white ones on each side, and the rest a primary color.
- The twelfth row is the completion of the owl's head. They need to be secured in the center.
- Making ears. You need to put three modules of the main color on the sides on the previous row, and one each in the next row.
- We make the paws and tail. To do this, you need to turn the figure over and attach three orange ones on each side and two main colors on the back.
- The last stage is the wings. They just need to be inserted on the sides.
Creating a crest and tail
The crest is constructed as follows: take a couple of blue modules and insert another one on top of them, fix it and add another one to these two from below.
- The Japanese art form of origami as a way of child development
Origami vase - master class on assembling modular structures for beginners
Origami frog - step-by-step master class on creating modules, diagrams for beginners and professionals
Attach the resulting crest to the owl's head with glue. The tail consists of 2 blue modules, on top of which another one is worn. It is attached to the lower part of the owl's body. You can fluff it up a little.
Beak and wings
Make a yellow module and attach it to the right place on the owl's head, this is the beak. Wings can be drawn or copied from the Internet, cut out and attached to the owl’s body with glue.
Eyes
To do this, you need to cut out two ovals from white paper and two pupils from black paper. Glue the pupils to the white ovals and fix them on the owl’s face.
The three-dimensional craft in the shape of an owl is ready. We hope our instructions helped you, and now you know how to make an origami owl correctly.
Owl made of paper triangular modules
Prepare lilac, beige and red modules. A total of 252 of them are needed. You will also need plastic eyes.
Assembly diagram:
- The first and second rows are 7 beige and 9 purple. In the third - 6 beige, 10 purple. Close it in a ring.
- Turn the workpiece inside out. The long side of the modules should face outward.
- 4th row – 7 beige, 9 purple.
- 5 – 6/10.
- 6 – 7/9.
- 7 – 8/8 short side out.
- 8 – 7/12 KS.
- 9 – 6/13 DS.
- 10 – 6/12. In the middle between the beiges there is 1 red.
- 11 – 8/11.
- 12 – 6/13. Above the red is 1 purple.
- 13 – above the single purple there are 4 of the same, on each side there is 1 beige, the rest are purple. Total 2/17.
- Next row – In front, 4 purple ones for eyebrows. Then 2 purple ones for the ears.
- Glue on the eyes.
- Make wings - 2 purple chains each.
- Make paws from 6 red modules.
- The owl is ready.
