Home stores offer a huge range of different textile items for the kitchen: towels, aprons, potholders, napkins, seat cushions. All these little things are practical, decorate the interior, and can add comfort and charm to even a faceless room.
This is not to say that finished products are very expensive, but why not save on something that you can do yourself and without any additional costs? It is best to start sewing experiments with basic things.
For example, first, study the question of how to sew oven mitts for the kitchen, and then begin to implement it. The simplest ones in shape - round or square - do not require any special sewing skills, or even a sewing machine!
Patchwork potholders
A simple option for beginners
To tack patchwork you need:
- textiles in two colors;
- padding polyester or batting;
- bias binding for ribbon;
- threads, sewing tools.
How to sew
To implement the idea, we will need to make a template from cardboard. It should be a square with a side of 7 cm. Cut out a window in it, leaving a wall 1 cm thick.
Using the template, cut out 9 squares. These blanks already take into account a perimeter allowance of 1 cm. In the finished form, the squares will have a side length of 5 cm. When cutting, keep in mind that in the finished product we need to ensure alternation of different squares by color.
Sew the squares together, placing them right sides together.
Pairs of blanks can be stitched together without cutting the thread.
We prepare three stripes.
Press the seams and press the allowances to one side.
We sew the second side of the potholder in the same way.
Place the finished parts with right sides facing each other. We sew on three sides. We cut out the corners.
Having turned the product inside out, we tuck two layers of padding polyester or batting inside.
We make a loop from bias tape. We insert it into the corner of the potholder and sew the remaining side.
All we have to do is quilt the tack. This can be done manually or by machine.
We sew potholders without a sewing machine
To sew potholders from scraps with your own hands using a pattern, you need:
- remnants of fabric of different colors, 100% cotton;
- thermal insulating gasket, you can use synthetic winterizer;
- thread, needle, scissors and other tools.
Description
Draw the pattern of the future potholder according to the required dimensions. We have hexagons with a side length of 27 mm. We need to prepare 19 of them. For ease of cutting, it is advisable to cut out the hexagon template immediately with allowances. The allowance is about 1 cm around the perimeter.
We prepare 19 hexagonal blanks.
Now let's take a step-by-step look at how this original item is sewn.
We place the workpiece with the wrong side up, and place the template on it. Secure with a pin.
We wrap the seam allowance over the template and sew it with a basting stitch. We do the same with the rest of the blanks.
Place two hexagons with right sides facing each other and sew them together with stitches over the edge.
The front side of the seam is shown in the following photo.
We continue to sew hexagons.
The product will turn out more interesting if you combine printed and plain fabrics.
The assembled mosaic needs to be ironed, the basting threads removed and the paper templates removed. Now we cut out square pieces of fabric for the back and front sides of the product. We also cut out an equal-sized piece from padding polyester.
We assemble sequentially: lower part, padding polyester, upper part, mosaic patchwork. We chop off the “sandwich” with pins.
We quilt all the hexagons around the perimeter with a “forward needle” seam.
We cut out the facing to process the outer edges of the tack. Its width should be 5.5 cm, and its length should exceed the length of the perimeter by 10-15 cm. We make two counter turns on the facing and iron it.
We sew the facing with a “needle forward” seam, first along one side of the potholder, then along the reverse. You need to start the seam from the middle of the potholder side.
Pay attention to get beautiful corners when turning.
Finally, we make a loop and carefully hem the ends of the facing.
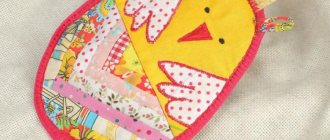
patchwork product
With the onset of the warm season, the kitchen also requires bright colors. A rustic kitchen pot holder patchwork will be the best summer kitchen interior decor idea. In addition, the remnants of scraps of fabric that zealous housewives would be sorry to throw away will be used.
Patchwork potholders made in the applique style look extraordinary.
Recently, it has become fashionable to purchase sets of oven mitts: one large oven mitten and two smaller square models. Made in a beautiful colorful combination, they will become a real decoration of the kitchen.
Of course, this technique requires incredible perseverance and patience, because you need to sew the scraps together, after selecting the combinations, cut out the shape, sew, and decorate. But the result is worth it: your kitchen will receive a worthy element of decor.
The kitchen is decorated with various products and things, trying to give the room coziness and comfort. Sometimes things are completely useless. Kitchen oven mitts are not only beautiful, but also functional. They are used to remove hot dishes from the heat and to remove molds and baking sheets from the oven. They can also be used as a stand for hot pots and pans.
Buy these useful accessories for your kitchen, or better yet, sew them yourself, and your hands will be protected from burns and injuries.
Potholder Owl
For creativity we need to prepare:
- fabric of three types of colors (we recommend using a special fabric for patchwork);
- seal;
- bias tape;
- threads, sewing accessories.
How to sew oven mitts for the kitchen with your own hands
We will cut the details of the product according to the pattern presented below. You need to print it to life-size scale.
We take all the details separately and cut out the patterns.
Mark the contours of the parts on the fabric.
We cut out according to the markings.
All you need to find is:
- wings - 4 parts made of fabric and 2 parts made of sealant;
- dark details of the eye - 2 reinforced details;
- light details of the eye - 2 reinforced parts;
- body - 2 parts made of fabric and 1 part made of sealant;
- beak - 1 piece made of fabric.
We fold the blanks for the body with their right sides facing each other, placing a seal between them.
We place the beak part on top, making sure the cuts match. We pin all layers together with pins.
We sew the two sides of the beak with a zigzag seam. The third side of the part remains open for now. At the same time, we stitch together all layers of material.
Place the light details of the eyes in the right places and secure them with pins.
Sew a zigzag stitch around the circumference.
Let's attach the dark details of the eyes, having previously secured them with pins.
We fold the fabric blanks for the wings with the wrong sides facing each other, placing a seal between them.
We lay a decorative seam in the center, grinding down three layers of material.
We process the sections of one side of the wings with bias tape. To do this, unfold it and attach it to the wrong side of the part.
Then we turn the binding to the front side and sew it along the edge.
We assemble the potholder by attaching and fixing the wings.
We apply the unfolded binding with the front side to the wrong side of the product. We attach, leaving the upper portion of the tack untreated.
We turn the binding to the front side and sew along the edge.
Cut off 0.3 m of tape, find and mark the middle. Aligning this point with the middle of the upper open area, we attach the facing. We turn it to the front side.
We make a machine seam, grinding down the edges of the binding and at the same time processing the open upper section of the potholder.
We fold the free ends of the binding into eyelets and sew them on using a hand or machine stitch.
The potholder bird is ready!
Types of potholders
Every kitchen has its own version of an oven mitt. They can be purchased or made by yourself. They have a wide variety of shapes and appearance:
- potholder;
- in the form of different shapes: triangle, square, circle;
- floral theme: sunflower, chamomile, leaves;
- fruit and berry motifs: pears, apples, lemon, orange;
- animalistic theme: mice, piglets, kittens, puppies, owls, etc.
The potholders that housewives sew with their own hands for the kitchen are decorated with decorative stitching, appliqué, narrow satin ribbons, and decorative cords.
Note!
- Melamine sponge - how to use correctly? All the pros and cons of the miracle sponge
- How to descale a kettle: vinegar, citric acid, soda, brine, soda. TOP most effective cleaning methods!
Blinds for the kitchen: how to choose, what they are, photos of new designs
Some needlewomen achieve such mastery that potholders turn from a functional item into masterpieces of decorative and applied art. Flights of imagination and creative ideas give birth to products that are completely unique in beauty and functional properties.
Calyxes
For production we will need:
- two types of fabric;
- batting;
- bias tape;
- threads, sewing accessories.
How to sew oven mitts for the kitchen with your own hands using a pattern
We cut out four rectangular blanks from the main fabric. Dimensions 16.5 x 21.5 cm. Cut off two corners on the short side, creating a smooth line.
From the finishing fabric we will prepare 4 strips measuring 5.5 x 16.5 cm and 2 strips for future handles measuring 5.5 x 20 cm.
We cut out two blanks 3 x 5 cm from the binding. We cut off the corners on the blanks.
We cut out two pieces of 15.5 x 22 cm from the batting. On the short side of the pieces, we cut the corners, following the contours of the pieces made from the main fabric.
To seal the handles, we prepare two strips of batting or fabric coated with padding polyester. The dimensions of the strips are 1.5 x 20 cm.
We adjust finishing strips 5.5 x 16.5 cm to the main parts.
We fold the blanks for the handles in half with the wrong side out and sew along the long side.
Turn inside out using a wooden stick.
We thread the seal into the handles, using a pin for convenience.
We quilt one piece from the main fabric and the batting so that the latter does not get confused during use.
On the second piece of the main fabric we sew a rectangle of tape, imitating a tea bag. We hand embroider a thread from it. If you wish, you can do this on a typewriter.
We begin to assemble the potholder completely. We place a handle on the main fabric piece quilted together with the batting - see photo below. Please note that the main piece is face up.
Place the second piece of main fabric on top, face down. We machine stitch on three sides.
Turn the potholder inside out. We process the upper sections with bias tape.
We embroider “Thea”.
The potholder is ready! The product is viewed from both sides in the photo below.
Options for using oven mitts for the kitchen
The main and main purpose is to protect your hands while cooking. But its possibilities are wider: home decor, implementation of creative ideas, teaching sewing skills to small children, gifts.
Potholders made using the patchwork technique are an excellent souvenir that you won’t be ashamed to give to colleagues, friends and relatives for any occasion. A New Year's potholder can be sewn from fabric with a themed print or in the shape of a Christmas tree, snowman, or symbol of the year.
Making potholders with your own hands is a creative process that brings pleasure, and, importantly, can distract us and our children from endless sitting in front of gadgets. Perhaps the first potholder you made yourself will be a step towards diversifying or completely changing the interior of your kitchen.
Butterfly
For production we will need:
- fabric of several colors that can be combined with each other;
- bias tape - 1 m;
- padding polyester;
- buttons;
- decorative braid;
- threads, sewing accessories.
How to sew a potholder
This cute butterfly pot holder is made using the pattern below.
We cut out from the main fabric - 2 body parts, 4 wing parts.
We cut out 2 large and 2 small parts from padding polyester. We provide 5 mm allowances on the inside of the wings.
We strengthen the outer part of the wings with padding polyester. Having folded the blanks for the wings with the right sides inward, we grind them along the inner edge. We make cuts according to the allowances and turn the wings inside out. Sew along the edge at a distance of 3-5 mm from the fold.
We strengthen one main part with adhesive synthetic padding. Having folded it with the second part with the right sides facing each other, we fix it with pins. We cut out antennae from two pieces of braid and pin them. We attach two lines. In the photo these lines are highlighted with red lines. We cut the padding polyester at the base of the wings in two places and turn the body inside out.
We quilt the body.
Since decorative seams are practically invisible due to the pattern on the fabric, they are shown for clarity in the photo below, on a product made from a different fabric. If you sew the layers of the product according to your stitching pattern, deviating from the diagram, then this is quite acceptable. The main thing for potholders is that the pattern is symmetrical.
For the appliqué on the wings, cut out the part in the form of a drop with an allowance of 5 mm. We sew it on with a hand stitch. For the second decoration, we cut out a round blank using a template. Its diameter should be twice the diameter of the finished decoration. We place the blank and the template on the wing and sew it around the circumference.
We sew around the circumference using hand stitches.
We pull it towards the center, fix it, and close the sections with a button.
We sew on a couple more buttons for decoration and perform decorative hand stitches. You can use felt or drape for decoration.
Fold the wings and the main part. On the binding we make two counter turns of the cuts and iron them. We apply tape along the edge and pin it.
We turn the binding over to the other side of the potholder and baste it. Please note that the width of the binding on the wrong side of the potholder should be 1-2 mm greater than the width on the front side. We sew a line along the front side, passing along the stitching seam. If you wish, you can sew the other side of the binding by hand using blind stitches.
When doing the edging, we need to remember to make a loop.
Kitchen oven mitts "Bell"
Such original caps are very useful for a teapot.
They can be made stylized as a Christmas tree, eggplant, or pear.
Let's sew a bell - a strawberry.
We will need:
- green and red fabric;
- fabric for lining;
- heat-resistant gasket;
- finished narrow binding;
- threads, sewing equipment.
How to sew unusual potholders
We cut out the pattern according to the proposed drawing. Please note the required allowance of 5 mm.
We cut out the blanks.
Sew on the sepals using an appliqué stitch. You can simply sew a zigzag seam.
Then we collect all the layers of the bell and quilt it.
We outline the top of the bell.
Using a compass we draw a circle from it (see pattern).
Trim the excess fabric around the circumference.
We process the cuts with binding. If you do not have a suitable ready-made trim in color, you can cut out the desired strip of fabric. Just keep in mind that cutting must be done on a bias.
We trim the edge of the product by cutting off the excess trim.
Fold the piece in half, after inserting a loop of braid into the corner. We sew a machine seam.
We sew the cuts.
Turn the finished bell inside out.
Cake
For sewing you need to take:
- fabric of two types of colors;
- tape;
- button;
- padding polyester;
- threads, sewing accessories.
Description
Let's draw a cupcake pattern. Sizes and shape are arbitrary. The main thing is that the product is symmetrical.
Fold the fabric in half, mark and cut out the piece - see photo below. We repeat the process for the padding polyester.
We sew the unfolded parts in the center with two lines. Fold in half. Sew around the perimeter, leaving a small open area.
Turn it inside out and stitch along the edge, retreating 2 mm. At the same time, we will stitch up the remaining open area.
We cut out two blanks for the hat. We fold them right sides together, after inserting the loop. We stitch together, leaving an open area. Turn it inside out and stitch around the perimeter at a distance of 1-2 mm from the edge.
Fold the main part and the cap, aligning the edge. Sew along the edge.
Sew on a bow and button.
Potholder "Mouse"
It’s easy to sew an interesting oven mitt in the shape of a mouse yourself.
To work you need to prepare:
- textile,
- filler,
- threads,
- beads for decorating the muzzle (buttons),
- finishing tape,
- needles,
- scissors.
Operating procedure.
- Make or copy a product pattern.
- Cut out parts and filler.
- Sew and attach a bow, decorate the face.
- Fold and stitch all parts of the product.
- Cover the mouse with braid along the contour and attach a loop.
The product is ready.