Materials and tools
A small number of items are used as materials and tools to create a wallet. Be sure to purchase the main fabric and lining material, of which you will only need a little. It is important that the wallet has a zipper, so you will need to buy a short zipper. You can use beads, rhinestones, appliques and other decorations as decoration. During the work you will need to use threads, needles and pins.
Sewing tools
Wallet made of paper and felt
When thinking about the question “What other materials can be used to create a wallet?”, the word “paper” comes to mind.
This option can be created for a children's game by simply folding a piece of paper using the origami technique.
But a wallet made of ordinary office paper will not be a practical thing even for a child. How to make a paper wallet with your own hands so that it is strong and remains beautiful?
You can combine materials: make a cover from felt, which does not require any processing, and replace the paper for the internal compartments for cards with a thicker one and laminate it yourself using ordinary tape.
Felt makes the wallet easy to make. In addition to the option of combining felt with paper, the wallet can be made entirely from this material. As for processing the edges of felt: there is no need for it, because the material does not crumble.
Two pieces of felt can be joined using a machine, manually with an overcast stitch or glue (on fabric, hot glue gun, crystal and others).
What material should you choose to create a practical wallet?
For a coin holder, scraps of absolutely any material are suitable. It would be more practical to use leftover fabrics or old clothes that you would hate to throw away.
Flaps for sewing
It could be:
- cotton;
- leather;
- felt;
- linen;
- atlas;
- velvet;
- corduroy and more.
Note! Do not use worn, damaged fabric. So the wallet will not have a beautiful appearance, and will also last very little time.
Suitable fabric
On the Internet there are a large number of patterns for a denim wallet that you sew yourself. The material is considered the most practical, and you can take it from old trousers or shorts.
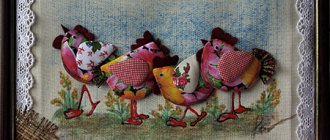
Cat wallets
Soft wallets are very convenient to use for small change or as a cosmetic bag, and if they are funny enough, children will really like them. We offer you a selection of master classes on creating such accessories with your own hands: we will sew wallets in the shape of cats. With these tutorials you can make cute, useful little things that you can use every day or give to someone.
We have prepared for you step-by-step photo instructions on sewing wallets. In the material you will also find patterns of cat faces and other necessary details. It’s easy to change each master class to suit yourself: use other stencils, change the size, choose a different fabric, etc. Choose any lesson you like and feel free to get down to business.
Option number 1: wallet-pencil case
A pencil case wallet with a voluminous cat's face can be sewn for a child or an ardent fan of these cute pets. The accessory will be convenient and quite roomy, so it can easily be re-qualified as a pencil case for an office or a cosmetic bag.
We will need:
- natural fabric for exterior decoration;
- fabric for lining;
- lightning;
- stuffing material;
- buttons;
- floss threads.
For work, it is best to choose cotton, linen or denim fabric. For interior decoration, it is permissible to take any material, but do not forget to take into account the capabilities of your sewing machine. If you plan to sew the parts of the wallet with your own hands, and not using a sewing machine, then take only natural fabric.
First of all, we need to make fabric blanks. The pattern of a fabric wallet with dimensions is as follows.
Use them or change them as you wish. Make two identical patterns from the lining fabric and sew them together, right sides facing out. If you want to sew a soft wallet, then place a soft backing made of padding polyester or batting between the fabric.
Next, we make patterns for the voluminous parts of the cat wallet. We need to cut out 2 front and 2 hind legs, 2 parts for the ears, 2 blanks for the head, 2 for the tail and 2 for the “hairstyle”.
Now let's prepare the main part of the wallet for further sewing. To do this, cut out a 4 cm wide ribbon from the lining fabric. It should go around the entire contour of the previously prepared part for the body and intersect in the central part with an overlap. We apply the front part of the tape to the front part of the main part.
We sew at a distance of 1.5 cm from the edge.
We take the fabric for the outer lining of the wallet (its pattern will be the same as that of the fabric for the lining). We sew it to the main body with a hidden seam.
Next we pin the zipper with safety pins. We sew it at a distance of 0.5 cm from the edge.
Now you can start decorating. We begin work by sewing cat ears. We put them together, sew them inside out, turn them inside out, and stuff them with padding polyester. We first sew a “hairstyle” to the cat’s head blank, and then sew the two parts of the head together. We stuff and sew up the hole.
Repeat the procedure with the paws and tail. We sew everything to the main part of the wallet. At the same stage, we attach the buttons, using floss threads we embroider the mustache and claws.
Ready! As you can see, sewing a voluminous, cute wallet with your own hands is quite simple. This master class can also be mastered by beginning craftswomen. By the way, you can make a mini-wallet or key holder in a similar way.
See also: cat patterns and stencils
Option number 2: coin wallet
A soft wallet for coins can be sewn from a very small piece of fabric. If desired, you can increase the size and transform it into a cosmetic bag or children's handbag.
We will need:
- main fabric;
- lining;
- lightning;
- buttons;
- embroidery floss threads.
Even a very young craftswoman can make such a wallet with her own hands. The most important thing is to make the pattern correctly, and the rest will be very easy to do.
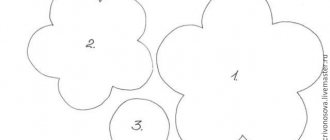
The pattern of the cat-wallet looks like this.
Build it first on paper and then transfer it to fabric. The wallet is sewn from two halves, so patterns for it need to be made in duplicate.
We stack the parts on top of each other using the “sandwich” principle. We sew the parts from the wrong side. You can insert a thin layer of batting or soft synthetic padding inside.
Take a look at what it looks like from the inside out.
When everything is ready, we trim off the excess fabric, leaving just under half a centimeter around the edges.
We turn the parts inside out and sew up the hole by hand.
At this stage you need to sew on additional details and make a face for the cat. Use thread and buttons.
Using safety pins, attach the zipper, sew it from the inside at a distance of 0.5 cm from the edge.
Ready! A homemade cat wallet can be padded with cardboard if you like to store your change in accessories with harder edges. Try combining bright colors and making the faces funny and the mustache sticking out. In a word, experiment; This craft is difficult to spoil. Add decor to the back side or embroider the wallet with beautiful beads.
Option number 3: jeans wallet
This is perhaps the simplest master class on sewing a soft cat wallet. To create it you will need a simple pattern and old jeans. As a result, you will get a very beautiful accessory in the form of a cat's face.
We will need:
- jeans pocket;
- finishing fabric;
- flap for lining;
- buttons, embroidery threads;
- lace;
- padding polyester;
- lightning.
Carefully remove the pockets from your old jeans. We will use one of them entirely. From the second, along the edges, you need to cut off two triangular parts, from which we will make ears.
Jeans wallet patterns look like this.
You can add additional trim fabric to the pocket to change the color and style of the wallet. If you are happy with the denim, only hem the inside trim. Whatever you choose, the second fabric is cut according to the pocket patterns.
Place a synthetic padding pad between the fabric for interior or exterior finishing and the jeans. Sew from the front side. You will get two blanks for the future wallet, which need to be folded with their front sides facing each other and sewn together.
Leave room for a zipper at the top. It must first be basted with thread, and then sewn with a hidden seam inside the wallet.
Embroidery can be done on a ready-made wallet or at the preparation stage - whichever is more convenient for you. Sew a lace braid to the finished wallet to make the craft even more beautiful.
This accessory can also be used as a cosmetic bag. It will be convenient to sew a mirror in it using braid. This “cat” wallet can also be easily converted into a child’s handbag or phone case. Embellishments can be added to suit your taste: it could be a decorative lock, fancy embroidery, satin trim or anything else.
See also: bag made from old jeans
We hope that you have found your version of a soft wallet and are ready to sew it yourself. Supplement ready-made master classes with your own ideas: your imagination will help you create truly unique accessories that will delight you every day. You can give such crafts to someone without any hesitation, as they look really cool.
2+
We sew a wallet with our own hands
For a comfortable women's wallet, you will need to take the main material, a seal and a zipper.
No. 1 wallet pattern
In this example, we will consider a master class on creating a coin holder, for which you need to have:
- front part made of main fabric - 20x30 cm;
- fabric seal, divided into 3 parts: 2 of them - 20x9 cm, and the other - 20x7 cm;
- the same amount of sealant on the glue for bags;
- inner part - 20x30 cm;
- lining - 20x30 cm;
- clasp, clasp or magnetic button.
You might be interested in this: The procedure for sewing a bedspread for a sofa with your own hands
Pattern No. 2
Step-by-step instructions for sewing are presented below.
External part:
- Seal the front part with non-woven material and iron the adhesive seal for bags to the inside.
- Sew the parts together and secure with a longitudinal stitch.
- Proceed with installing a magnet or button to close the wallet. To do this, you need to bend the front part and the lining, install the fastener, bend the seal and fix the fastener on the lining and the front part.
- Sew the product on a machine to create a blank for the wallet.
- Round the corners of the model.
Interior:
- You will need to take 2 rectangles measuring 18x18 cm and cover them with non-woven material.
- Make small rectangles measuring 2x4 cm for the fastener.
- Shape the zipper so that 18 cm remains.
- Place the rectangles with right sides facing each other and place the zipper between them. Place the large rectangle on the front and the smaller rectangle on the back.
- Sew the parts together and do the same on the other side to make a figure eight.
- Turn the pocket inside out and iron.
- Place the structure inside the outer wallet blank and make sure everything fits.
- Make membranes that will act as an accordion for the compartments of the wallet.
- Sew the membranes to the inner section with the zipper and make serif folds.
- Sew the inner and outer parts together and trim the entire perimeter with tape.
The wallet is ready to use.
Interesting! To the popular question of what fabric a Turkish wallet is made from, the answer is simple - often genuine leather.
Fabric wallet-cosmetic bag - master class
Not everyone likes small coin holders; many are looking for master classes on large wallets. Here is one such capacious product - a cosmetic wallet. Wallet size 21/24cm. Parts are given with seam allowance.
To work you will need:
- Main fabric – 2 pieces 16/22 cm.
- Polka dot fabric – 2 pieces 4/22 cm, 1 piece 10/22 cm.
- Zipper length 20 cm.
- Lining fabric – detail – 22/50 cm.
- Threads to match, scissors, iron.
- Adhesive dublerin – 22/50 cm to give rigidity to the product (optional).
Pattern of a purse-cosmetic bag.
Slowly sew together all 5 parts of our wallet. We iron the seams in one direction.
Next, take a 22/50 cm lining and apply it to the front side of the resulting large part. We sew 2 lines at the top and bottom, departing 1 cm from the edge. If there is a dublerin, glue it to the main part using an iron.
Turn it onto the face and iron the workpiece. If you use a sewing machine, make finishing stitches 0.3 from the seams.
Apply the zipper to the edge of the large piece. We pin it with pins.
We sew the zipper first to one side of the part, and then, opening the zipper, to the other.
We turned it inside out and sewed the side seams, leaving 0.7-1 cm from the edge.
In order for the product to take the desired shape, you need to cut out a 2.5/2.5 cm corner on one side and the other. Sew the edges, retreating 0.5 cm from the cutout. This will give you the bottom of the wallet.
We turn the product inside out. The wallet is ready.
In the video, a DIY wallet for beginners:
Master class on working with leather. The simplest wallet. Leather simple wallet.
How to sew a wallet for men
Leather products look especially beautiful and stylish. This will be practical if there are some leather boots, a jacket or a bag left that are no longer worn. Working with leather is quite difficult, so among other things, you will need to find a hammer or an awl.
Wallet for men
Since you cannot pierce the skin with a needle, you will have to use instant glue. In addition, you will need to take a pencil, a ruler, leather threads, a zipper and the material itself.
- First you need to decide on the sizes. In this case, an accessory will be made in the form of a 20x15 cm rectangle.
- Draw 3 rectangles on the skin. The dimensions of one are 20x15 cm, the second - 20x5 cm, and the third - 8x4 cm.
- Cut out the details.
- Apply glue to the edge of the first piece and attach the zipper to it. Press the clasp tightly and wait until it dries.
- Do a similar step with the second rectangle.
- Sew a zipper to the parts for a more secure fastening.
- Apply glue around the perimeter of the two rectangles and fold them together.
- Using a machine, go around all edges of the product.
- The result is a wallet that is basically ready for use.
- As an addition, it is worth creating a brush for the runner. On the small remaining rectangle, use scissors to make several strips, not cut all the way. Apply glue to the upper part, where there are no cuts, and twist the part to form a tassel.
- Attach the fringe to the zipper and enjoy the beautiful accessory.
You might be interested in Interesting patterns for children's T-shirts for boys and girls
Pattern for a purse
It can be supplemented with decorative elements, but it is best to leave the design minimalist.
Material
When thinking about what you can make a wallet out of with your own hands, the first thing, of course, you pay attention to is a leather wallet - and for good reason. This model is expensive, looks serious and lasts a very long time. Working with leather is not as difficult as it seems at first glance.
In addition to the already listed advantages - quality, strength and appearance - this material is perfect for making female and male models. The most important thing is to choose quality material. Thick or thin leather - it is important that it is tough, then the wallet will last for many years.
But even such a minor obstacle as finding material can be solved simply - just look into the most secluded places and find the oldest or most unnecessary leather products - and you can safely get to work.
Next comes ordinary fabric - but there are many options here too. The most common of them, as well as the easiest to work with, pliable and pleasant to the touch material is felt, or one of its varieties - felt. A felt wallet can be made in almost any shape without any special skills. It will be especially pleasant to hold in your hands in winter.
Felt is one of the varieties of felt - a thinner and softer fabric. It can be used to make the most original wallet ideas, and felt is ideal for beginner craftswomen.
In a separate group you can place fabric with a print - that is, a pattern already applied. Such a product certainly looks more beautiful, but its manufacture will require more patience and skill, as well as additional material for interior decoration.
After the option with ordinary fabric, you can consider denim. The principle of working with it is completely identical to the previous version - it is simple and does not require special tools or skills.
Denim fabric, unlike regular fabric, is denser and more wear-resistant, but in terms of elegance it is perhaps inferior to felt. You can use it to make a simple and good bag with a zipper or drawstring for small items.
Now there remain two of the most exciting, most beautiful and at the same time the most difficult options. The first one is a knitted wallet. Making such a wallet with your own hands is done using special sewing patterns.
The second one is made of beads. To do this, you need to be able to weave well. But with due patience, diligence and perseverance, knitted wallets, or, in particular, those woven from beads, turn out to be the most beautiful.
DIY children's wallet: diagram
A coin holder for children can be made in the shape of an animal, cartoon character or other interesting figure. A girl or boy will be happy to receive such a cute accessory as a gift.
Children's version of the wallet
To sew a children's wallet with your own hands, you will need to take a brown main fabric, light material for the muzzle, felt, a clasp, lining fabric, buttons and padding polyester. To embroider the muzzle, you may need wool or floss. The wallet template will be made on paper using a pencil and ruler.
A pattern for a fabric wallet, which is easy to make with your own hands, can be found on the Internet and printed. It consists of 5 parts that will need to be transferred to paper. The main thing is not to forget about the seams and make allowances for them. You can draw the details for the dog wallet as you wish. There must be ears, eyes, muzzle and back.
Pattern for children's version
The size of the coin purse will be small, but you can increase the wallet at your discretion.
- Cut the fabric according to the pattern, leaving the ends unrounded.
- Place a zipper between the back wall material and the front part.
- Sew the fastener to the two patches.
- Cut out the lining and sew it to the product from the wrong side.
- Place the padding polyester on top and outline the boundaries of the pocket.
- Connect the parts with pins and sew along the contours, leaving a small hole at the bottom for turning the product inside out.
- Turn it over to the front side through the hole and begin to shape the dog’s face.
- On the fabric to create the dog's face, embroider dots for antennae, a mouth and sew on a nose in the form of a button.
- Sew padding polyester to the ears made of the main fabric and turn them right side out.
- Sew the ears and muzzle to the wallet.
- Add button eyes.
This completes the creation of the wallet. The result is an interesting accessory in the form of an animal that will definitely delight your baby.
Adorable wallet made of cotton fabric - MK
It's impossible not to fall in love with such a cute fabric wallet. It is not at all necessary to make it from a light fabric - if you are afraid that it will become soiled, make it from a darker fabric. For the wallet you will need the main fabric, lining, braid, button and padding polyester (can be flogged from any old jacket).
A sewing machine will certainly make the task easier, but you can also sew by hand (if you mark all the lines with a ruler and sew along them, it will be more accurate). A master class on how to sew a wallet, handbag and tablet case and all patterns are included.
To work you will need:
- Wallet fabric (2 different colors).
- Fabric for lining.
- Sintepon.
- Round button – diameter 35 mm.
- Scissors, threads to match, ruler, pencil.
- Bias tape for finishing (from any fabric or knitwear).
- Tailor's pins.
Wallet pattern – 2 main parts, 1 part – lining.
Pattern of padding polyester, how to sew a button, how much braid is needed.
Patterns are given without a seam allowance of 0.5 cm.
We begin the master class by cutting out parts of the required size. Then we put the 2 main parts right sides together and pin them together.
Sew, departing from the edge 0.5 cm. Iron the seam.
We straightened the resulting part and pinned 11/12 cm of braid and fabric along the top of the part. Step back 0.3 cm from the edge. Sew 0.5 cm from the edge.
We sew the padding polyester and lining 0.5 from the edge.
We take the lining piece and place the large main piece face down on it (the braid is on top, inside the work). We pin and stitch, departing from the edge 0.7 cm.
This is what our workpiece should look like. If any edge protrudes, simply cut off the excess with scissors.
Sew along the edges of the entire workpiece, departing 0.5 cm from the edge. If you sew by hand, simply sweep with small running stitches. We will later cover the ugly edges with bias tape. We measure 0.7 cm from the bottom edge, then another 10 cm 2 times. The valve we get is 5 cm.
This is what the back of the product looks like.
Fold the workpiece right side out along the stitched line. Sew on 6.5 cm of braid - this is a buttonhole.
Next, we take our binding, fold it 4 times (0.9 cm each) and iron it with an iron. This way you will get an even edging of the wallet.
Fold the binding 0.5 cm and sew front to front 0.5 cm from the edge.
We bend the binding along the entire cut of the product and pin it with pins.
We sew, bending the edge of the binding inward. For a button, cut out a circle, place the button, and tighten the section of fabric with a needle and thread. So we covered the button with fabric.
So the master class on the topic of how to sew a wallet has been completed. In addition to the wallet, we suggest making a wallet-case for your iPad.
Wallet-case for tablet
The case for the tablet is sewn in the same way; patterns are included:
Wallet and tablet bag
A handbag that closes with a button is sewn using the same principle. The bag is made of two types of fabric, with lining and padding polyester inside. The patterns are the easiest
How to decorate a wallet with your own hands
The finished wallet can be decorated in different ways. Rhinestones, beads, stripes, appliqués and brooches are used as decoration. If the main fabric for the accessory contains a pattern, then it is not recommended to add decorations to it. The location of the decor is chosen independently, based on your wishes.
You may be interested in this Rating of the best sewing machines for home use
Beautifully decorated wallet
A wallet is a practical accessory that will become a useful thing for everyone. If you have no ideas for a gift to a friend or loved one, then you can sew a small wallet yourself and present it for any occasion.
We sew a stylish wallet from old jeans using a step-by-step tutorial
To make a wallet from old jeans with a drawstring, we will need:
- Fabric with large mesh;
- Cotton fabric for lining;
- Velcro fastener
- Zipper;
- Bobbin of thread;
- Needle;
- Scissors;
- Denim;
- Lace.
We sew the materials according to the diagram above. This is the outside of the wallet.
We sew denim to the wrong side of the product, connecting it to the previous part on three sides - the sides and the bottom.
We place cotton fabric inside, sewing it on the mass of denim seams and along the edges on top on each side.
We close the wallet with a zipper, sewing it on the wrong side.
We make a small outer pocket from denim, attaching a Velcro fastener to it.
When finished, add a long cord to the wallet to make it more convenient to carry it on your shoulder.
Made from the box:
You will need:
- Colored box with screw-on plastic lid;
- Scissors;
- Ruler
- Cardboard;
- A simple pencil.
To begin, cut out a template from cardboard (it is shown in the figure above). Using the template, we make a pattern on the box so that the lid is located in the center at the top.
We push through all the bend lines, after which we bend them and iron them well using a ruler. We assemble the wallet and close it with a plastic lid.
You can make wallets from anything, the main thing is to use your imagination! Detailed videos on the topic can be found below.