Recently, many housewives who have free time are choosing various exciting activities for themselves. For example, some people are interested in bead weaving, others like creating unusual decorative refrigerator magnets. All family members are involved in such activities, gathering together in the living room, discussing pressing problems and concerns.
Weaving baskets from plastic bottles can be considered not only as a hobby, but also as an option for additional income. Craft various
make baskets from plastic bottles with your own hands together with children, while organizing joint leisure time.
For those summer residents who do not want to buy ready-made products to decorate their gardens, weaving a basket from a plastic bottle will be an excellent option for creating unique decorative elements.
Sequencing
In order to make a basket of plastic bottles beautiful and original, it offers a certain algorithm of actions.
- First you need to decide on the color that the original basket of plastic bottles will have. The color of the source material depends on this.
- Next, you can move on to cutting the bottle.
- From it we make strips of the same length and width.
- We bend them into “corners” blanks.
- We intertwine them with each other.
- We connect individual rows with each other.
- We attach a handle to the product.
- The final step will be attaching the bottom to the finished product.
This handmade basket of plastic bottles will be an excellent decorative element for any suburban area.
Advice! It is better to prepare in advance a sufficient number of strips, the width of which is 1 centimeter. Depending on the size of the product, a different number of such strips will be required.
Each piece is folded in half so that there is a fold towards the center. Then the halves are bent again, obtaining a strip whose length is four times less than the original sample.
A beautiful basket of plastic bottles with your own hands can be made from bottles of different colors. For example, the bottom of the product will be brown, and the sides will be green.
Designers offer a variety of options for creating such decor; it is quite possible to choose the method that seems most understandable and accessible.
To prevent the product from spreading, you can arm yourself with a fishing line.
Advice! If the finished basket will be used outdoors, it is best to glue the individual parts into one product with a glue gun.
Cardboard will quickly lose its performance characteristics when exposed to moisture, and the appearance of the product will be lost.
How to quickly and easily weave a bracelet from plastic tubes
The wicker bauble is traditionally considered an attribute of the hippie subculture, popular among young people 60-70. The very idea of creating such jewelry came from the Indians - the indigenous population of North America. They believed that two people who exchanged these woven attributes would be bound by a special bond until the end of their days. This is where the symbol of peace and goodness came from.
Nowadays, a bauble is considered a fashionable decoration in an ethnic style. It is not difficult to understand how to weave a bracelet from tubes. Here you will learn how to weave from tubes. Weaving baubles is a very exciting process.
Contents of the material
Start of weaving
Before you start, prepare all the necessary materials, here's what you'll need:
- Plastic tubes, they can be thick or thin, plain or colored
- Beads from any material, matching color and corresponding to the thickness of the tubes
- A small decorative ring, preferably gold or silver
Now you need to be patient and you can start making the product. To prepare the base for the future decoration, you need to fold the tube in half and cut it into two halves. One of them should be put aside, we will return to it later. We also divide the part remaining in our hands in half. As a result, you should end up with two short twigs, the length of which is slightly larger than the circumference of your wrist.
If you want to make a multi-colored top, then cut several pieces of multi-colored twigs of the appropriate size.
To start weaving, bend two small twigs together in the middle and tie their ends into a strong knot.
Gallery: bracelet made of plastic tubes (25 photos)
Braiding the workpiece
You have four working threads; they need to be laid out on a table or any other work surface so that they do not get tangled. One bead is strung on the leftmost tip. However, if its hole is quite wide, then you can thread it through two twigs.
Then you need to take a long tube, it is tied in a knot around the workpiece, this must be done in such a way that the ends of this twig are approximately the same in length. Then you should wrap it around the remaining twigs and secure it with another knot. After this, the tubes are pulled forward. The bead is now firmly in place. Check that your first node matches the image in the diagram.
We also recommend reading:
Tie another knot without using beads, then start stringing them again and securing them with knots until the base of your future decoration is finished. At the end, tie a strong knot. If you wish, you can braid the remaining couple of centimeters of twigs into a fishtail braid, so the bracelet will look much nicer and tidier.
In addition to the braid, you can decorate the clasp of the bauble with a small golden ring prepared in advance. It will help make the fastening more durable, your bracelet will not break or fall off.
Square weaving technique step by step
Weaving such a bracelet is not difficult, you just need to strictly follow the instructions; even a beginner can cope with this task without any problems. The blank for the square bracelet is made in the same way as the previous one. It is important to note that the length of the threads should be three to four times the expected length of the product.
To get started you will need:
- Colored plastic tubes
- Working surface
- Scissors
- A small decorative ring in gold or silver color
Secure the ends of the twigs with a strong knot - this will be the beginning of the bauble. Pinch the knot with your index finger and thumb. If you are just starting to weave bracelets, it will be unusual for you to hold the product this way. You can hold the knot between your knees and work with both hands; later you will learn to handle it with one.
So, straighten the tubes and pull the ends in different directions so that they do not get tangled. Now place the workpiece on the work surface; for convenience, the beginning of the weaving can be pressed with something so that it does not slide off and slow down the manufacturing process.
The colors of the tubes can be absolutely any, but in the diagram you can see two bright and contrasting ones, so the square weaving technique will be clear to you.
Let's start weaving from the top tube, you need to bend it in half from left to right, and put it on top of the other, carefully check the diagram. We fold the lower tube in a similar way, also from right to left. You should end up with two loops lying on straight twigs. Now we bend the two remaining straight tubes from left to right. As a result, the four ends will lie on top of each other in a zigzag pattern. Start pulling the ends gently and evenly, you should end up with a square knot. Check if your square knot matches the image in the diagram provided.
We start weaving the next row from the bottom tube in the direction from left to right. To get a more beautiful bracelet, start each row with a different color and alternate directions. We continue to weave square knots until the end of the base.
You can complete the braiding with a careless but strong knot or make a fishtail braid. You can also thread a clasp ring through one of the ends of the weave, then it will have a neater and more finished look.
Here are some unusual and simple tube baubles you can weave in just a few minutes. We hope that you were interested in learning how to weave baubles from tubes.
Attention, TODAY only!
1igolka.com
Second option
A basket from a plastic bottle can be made with your own hands using the “chess” method. This weaving is much more complex and requires the master to have certain skills.
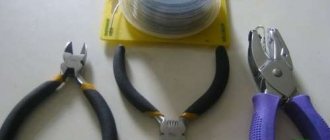
For work you will need the same tools as in the first case. A cardboard box is used as additional material.
First, long strips are cut from a plastic bottle. The middle part of a plastic bottle is optimal for this.
Advice! To make such strips even and uniform, you can first stick electrical tape onto the bottle, and after the process of cutting the strips is completed, remove it.
The cardboard box will serve as a model for the basket being created, and it can also be used as a basis for creativity.
You need to turn the box upside down and fasten two plastic strips side by side in a horizontal or vertical direction. For this you will need tape. Then new plastic strips are attached in a checkerboard pattern, they are threaded between those that are already attached. Similar actions can be carried out without a box, for example, on a table.
After the bottom is woven, the side parts of the product are made in the same way. After completing the work, you need to carefully bend the edges of the plastic and glue them inside the basket.
If desired, add a handle to the created accessory. Such a basket will not be empty; for example, you can put flowers in it. Among the many advantages of such products, we note:
- ease of care for them;
- minimum cost of the product;
- aesthetic appearance;
- basket mobility
With the right color selection, you can create a real work of art with your own hands, which will become a source of pride in front of your guests.
Useful tips
Decorative items offered in stores are not always interesting and unique. That is why many summer residents try to create decorative elements on their own. Any craft you make yourself will be much cheaper, and no one else will have such a product. For example, wicker baskets made from old plastic bottles can be turned into original containers for country small items.
Modern designers consider plastic to be a universal and inexpensive material, so they are increasingly turning to plastic bottles in their work.
Advice! If you plan to use a plastic basket to place flower pots, you will need soil.
Lately, you can increasingly see homemade polyethylene flower pots at your summer cottage, which are not inferior in appearance to ready-made flower pots.
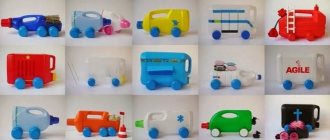
Nowadays, many craftsmen create unusual products in the handmade style, which involves the use of a variety of improvised means. Plastic bottles have become the most popular.
They are not only available, but will also be completely free, which is a significant plus. Three types of plastic are suitable for creating crafts. We have already talked about the plastic from which bottles are made. The second type of raw material for creativity is packaging polymer. Its main advantage is its length. It is much easier to divide a wide ribbon into narrow fragments than plastic bottles.
You can also make unusual decorative baskets from polycarbonate, milk packaging boxes, paper folders, and plastic cups.
Such materials are much denser than packaging polyethylene, so the finished basket will have a more impressive and presentable appearance.
How to make beautiful storage baskets from plastic bottles
The basket is made of PET bottle tapes, ideal for storing or transporting items and food, a great tool for camping, fishing or emergencies.
Browse products for inventors. Link to the store.