68965
To creatively decorate your apartment, as well as add personality to it, you can make furniture from cardboard with your own hands; the patterns and diagrams are so simple that even a beginner can make the products. A variety of options will allow you to choose the right piece of furniture and make it, involving all family members in the process.
Cardboard rack
Have you accumulated unnecessary boxes and want to get a new shelving unit? A video tutorial will help you turn boxes into shelving. The process is labor-intensive and time-consuming, but the result is worth it. At the first stage, it is necessary, without making a mistake in the accuracy of the calculations, to draw a diagram (dimensions of shelves, side walls, drawers). All parts are carefully cut out with a stationery knife, assembled into one whole, and glued together with thermal and Moment glue. For strength, the cardboard is folded in four layers. The product is decorated with self-adhesive film with a wood pattern and is decorated with handles made of acrylic decorative stones. The finished product is suitable for books, toys, and storing small items.
Provence style
The author of the channel “Your Own Magician” gives a master class on making an elegant kitchen rack from large packaging boxes from household appliances. The main stage includes cutting out parts with marking the locations of future shelves. It is advisable to number the cut out parts so as not to confuse the sequence during the work process. To seal, the cardboard is glued together in four layers and dried under pressure for 24 hours. When assembling, it is recommended to use Super PVA glue. Hiding the unevenness of the entire product is achieved with finishing putty. To create the effect of aging and shimmer, acrylic paint is applied in several layers, first golden, then the color of baked milk, and finally varnish.
Materials and tools used
For a house or other toy structures, single-layer material is suitable. In this case, high strength is not needed. For more practical furniture, with durability in mind, one layer will not be enough. At least three-ball raw materials should be selected. If this is not available, you can glue together several sheets of thin cardboard, which will increase its strength. Corrugated cardboard products are considered to be the highest quality and most durable.
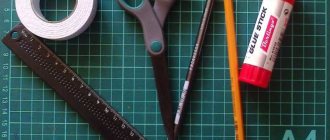
In the process of making cardboard furniture, a standard set of tools is used:
- roulette (ruler);
- pencil;
- scissors;
- construction and stationery knife (for thick and thin cardboard);
- PVA or wallpaper glue;
- scotch;
- construction stapler;
- sandpaper for processing cuts.
You can use a square to accurately measure angles. Moment glue is used as a fixative. It is better to take transparent or brown tape.
Single-layer cardboard Three-layer corrugated cardboard
Tools for work
Cardboard computer desk
Step by step process for making a small computer desk. Pre-cut parts are shown with exact parameters and required quantity. Cardboard for strength is folded in several layers. To connect the parts, depending on the function, the author uses three types of glue: thermo-, “Athlete”, PVA. The process of strengthening the legs and tabletop with strips folded in the form of geometric shapes is shown in detail. The internal content includes more than 100 parts. The finishing touch is decoration with self-adhesive film with a marbled pattern. The video is without commentary and is soundtracked by a musical composition.
Types of cardboard
Cardboard varies in density and characteristics. Each type of material has its own purpose. It is mainly used for packaging to preserve the integrity of the contents. It is also used to make packaging containers, decorative boxes, gift boxes, and individual sheets. Based on composition and purpose, cardboard is divided into the following types:
- Packaging. They are used in production for packaging products of any group and size. Corrugated cardboard is divided into classes depending on the number of layers and their density. It has high levels of strength and shock absorption.
- Printing. Folders, booklets, bindings, and various layouts are made from it. The surface of the cardboard is perfectly smooth and whitened. The products have increased resistance to mechanical damage, do not press when pressed without force, and do not delaminate.
- Chromersatz. This type of cardboard for boxes is made from purified wood and plain or bleached pulp. Mainly used for packaging retail goods (jewelry, perfumes, detergents, confectionery, etc.). It is inferior in popularity to corrugated cardboard due to its high cost. It has good density, despite the small number of layers (maximum 4).
- Decorative design. Produced from high-quality expensive raw materials. The material can be of different shapes, sizes, colors. It gained the greatest popularity in advertising. It is used to make business cards, flyers, booklets, and personalized invitations. Also used for packaging luxury coffee, alcoholic beverages, and sweets.
- Shoe. Used in shoe factories and repair shops. Insoles, backdrops, and half-insoles are made from it. It is made from synthetic materials and tanning waste.
Chest of drawers for needlewomen
After watching the video, you can learn about a simple way to make a small chest of drawers from four unnecessary boxes installed in one row. To connect them together, you need wide double-sided and regular tape; to strengthen the structure, pasting is done with a second layer of cardboard. Handles made from small square boxes of the same size are attached to the drawers. The product is decorated with gray tape to match the color of the working material, colored stripes are made with red insulating tape. The author recommends using a chest of drawers for storing needlework and knitting supplies.
Manufacturing stages
Products made from thick paper differ in shape, size and complexity of assembly. Regardless of the purpose of the design or the number of components, the manufacturing stages for each of them are the same. The step-by-step instructions include several mandatory points.
Create a drawing
The first step is to take measurements of the place or room where the furniture will be located. According to the parameters, calculate the dimensions of the desired product. Next, draw a drawing of the future furniture on an A4 sheet, be sure to indicate all the obtained values, observing the scale. You can do all this in a special program if you have experience working with it.
You can take ready-made drawings for furniture manufacturing and adjust them according to your wishes and measurements.
Regardless of how the diagram is executed - manually or using a program, it must contain a three-dimensional image of the object, general view projections from above, side, back, as well as separate projections of the constituent elements indicating the exact dimensions. Then the drawing is transferred to sheets of cardboard using a pencil, tape measure and ruler. You can use ready-made patterns; just place them on a sheet of cardboard and trace them with a pencil.
Instructions for making furniture from chipboard with your own hands for beginners
Before starting work, it is important to make a drawing of the future product
Manufacturing of parts
The raw materials for the manufacture of all elements must be smooth and without creases, since it will be impossible to straighten them later. Each detail is drawn separately using a pattern or projection from the main drawing. Then it is cut out with a stationery or construction knife. The sections must be wiped down and covered with paper or tape.
The patterns should mark the folds and grooves, which are also cut out.
Strengthening the structure
Many novice craftsmen are interested in how to make cardboard furniture durable. To do this, you should follow simple rules:
- protect the finished product from moisture and increase its strength by applying parquet varnish to the surface;
- maintain symmetry, since asymmetrical furniture is less stable;
- take dark cardboard - it is stronger than light cardboard;
- increase the number of transverse inserts, as well as the layering of the part by adding sheets;
- cover the edges with craft paper;
- if necessary, use stiffeners to strengthen the structure.
Kraft paper is a type of wrapping material that is made from wood and is highly durable.
Parquet varnish will protect the surface of the product from moisture and increase its strength.
Dark cardboard is stronger in operation than light cardboard
You can strengthen the structure by gluing the edges of the product with kraft paper
Assembly
Before assembly, you should check all parts for possible defects. If there are dents in some places on the cardboard, they need to be filled. Further finishing will hide all inaccuracies. During the assembly process, all parts can be glued, inserted into grooves or extended. The latter method is used to strengthen the structure and give it optimal thickness. Elements assembled from several layers of cardboard must be placed under a press after gluing and left to dry for a day. Upon completion of assembly, the resulting ribs are treated with kraft paper.
Grooves and stiffeners must be coated with glue, thereby extending the service life of the structure.
Insert parts
Glued elements
Extended design
Dent putty
Pasting the edges of the product with kraft paper
Decoration
Having completed the assembly, you should start working on the external design of the structure. Decor options are selected individually:
- finishing with fabric, patterns (decoupage), decorative stone;
- painting with acrylic paints;
- pasting with wallpaper, colored paper.
Methods for painting furniture, necessary materials, tools
Possible options can be used individually or combined. After finishing decoration, it is recommended to coat the product with varnish to secure the result.
Fabric finish
Painting with acrylic paints
Pasting with wallpaper or colored paper
Mezzanines made of cardboard
Sergey Khristich recommends an easy way to make a budget version of mezzanines for organizing the space above the closet. Blanks of the required size are cut out of cardboard boxes, and a bend is formed by pressing. The parts are connected using a glue gun. The finished product consists of spacious boxes with shelves and doors. Decor – white thick paper. Two options are shown: a cluttered top of the cabinet and a more aesthetic one, with mezzanines and small items hidden in them. Video with musical accompaniment, without comments, with text explanations.
Shelves and small chest of drawers
An interesting idea for making a shelf in the hallway for storing packages and small items from Yana Matveeva. The base is formed from ordinary cardboard ice cream boxes - the box and shelves are attached to narrow slats. Joints, corners and rough edges are covered with paper. Decor – double coating with acrylic paint. Using this principle, you can make a pencil case or a hanging shelf for children's toys. Yana recommends using decorative paper to mask minor defects. In addition, he shows a miniature chest of drawers, reminiscent of a box, with a hinged lid and pull-out compartments, made with his own hands from small packets of washing powder.
Cardboard furniture in the house
as an idea - great, as an art object or a summer veranda, a playground for one or two times - too. But there is no environmental friendliness here...
Firstly, the cardboard here is not recycled - the cardboard used in the works presented is new.
Secondly, recycled paper is also almost a myth. I will not describe in detail the technology for manufacturing cardboard and paper, both primary and secondary. But for now I’ll say briefly - this process is energy-intensive, water-intensive and waste-producing, and a lot of water is formed, which cannot be used in a closed cycle, nor can it be completely purified. I will also add that recycled paper/cardboard can only be 5-70% recycled, due to the destruction of cellulose fibers, simply put - paper is not plastic or metal that can be melted down, the quality, density and strength of paper depends on the length and "smoothness" of cellulose fibers. A number of resins and plasticizers are added to paper, which give it a marketable appearance, but interfere with recycling. So if we calculate the entire production cycle of furniture made from fast-growing wood, cardboard and plastic, then cardboard will be in last place in terms of environmental friendliness. Not all paper products can undergo the third processing due to the loosening and shortening of the fibers, contamination of the material, and the addition of a number of substances. we can get a product like egg trays and coasters at McDonald's; recycling of this product involves high-temperature combustion without access to oxygen.
This substitution of the concepts of real and imaginary environmental friendliness, introduced into the mass consciousness, is very offensive to the eye. After all, if you analyze the technological cycle of goods sold under the guise of “environmental friendliness,” it becomes clear that good and competent PR of consumer goods is sewn with white threads and has nothing to do with environmental protection.
Cut down a tree and make a table out of it - much less resources will be spent, cut willow branches and make a wicker piece of furniture - even the tree will remain alive, about durability and the absence of the possibility of unnecessary chemicals getting from such furniture - there is no question at all, press sawdust and small branches and use it either on plywood, or on chipboard, or for heating. And this furniture will last longer than we use 10 trees to make cardboard for one table, which will lose its consumer properties in a maximum of half a year.
Sorry for the long comment not about art, the professional deformation has gone wrong, but maybe someone will be interested. I won't delete it.
Overall an interesting post)
DIY coffee table
The author of the video suggests making a small table at home using a minimum of materials. In sheets of working material glued together for density, four circles are cut along the edges along the diameter of the bushings, which act as legs. If you do not seal it and leave the sleeves open in the upper part of the homemade tabletop, you will get something like a cup for storing office supplies. Decorated with colorful stickers. Can be used as a laptop stand, while drinking tea, or playing board games. When covered with self-adhesive film, you get a convenient stand for indoor flowers.
Master class: creating furniture with your own hands
The fashionable hobby of usefully recycling waste material at home has become very popular. You can create with your own hands not only furniture for your home or garden, but also large-scale playrooms, attributes for recreation areas, cozy armchairs, and functional shelving. You can use the most unimaginable idea. Furniture made from cardboard is not a simple quick-fix craft, but a long-requested trend in modern design. Before starting work, you must carefully study the master class you like and perform all the described steps step by step.
Necessary materials and tool kit
Cardboard furniture will be functional and attractive if you use high-quality materials for its manufacture. Beginning craftsmen will have to work with devices for cutting thick paper and teaching aids with patterns and detailed diagrams. You can create full-fledged items from boxes using the following raw materials and tools:
- Cardboard. This could be old packaging, custom-purchased sheets, or shipping boxes;
- Scotch tape of different widths (transparent, colored, double-sided);
- Stationery knife, scissors;
- Large ruler (minimum 50 cm), tape measure;
- A simple pencil, a grater;
- Glue (PVA, superglue, glue gun);
- Kraft paper, tracing paper;
- Emery for sanding cuts.
Product diagrams and drawings
The process of preparing for work includes not only the selection of material, its cleaning and disassembly, but also the creation of drawings. First of all, you need to decide on the type of furniture and model. Then choose the most successful scheme. You can find a detailed description in any master class.
The next step is to measure the area of the room in which the piece of furniture will stand. Based on such data, you should adjust the drawing so that the table or sofa looks harmonious in the room. Now you can make a three-dimensional layout with transfer of patterns and detailed drawing of all elements.
Forming parts and assembling products
Regardless of the complexity of the drawing and dimensions, features of the future design, cardboard furniture is made according to a single algorithm. Paper patterns are applied to the main raw material, traced with a pencil and cut out. The resulting parts must be prepared for assembly - the cut areas must be cleaned with sandpaper. The peeking texture of corrugated cardboard can be covered with tape or decorative paper.
After careful processing, they begin to assemble and fasten all the elements together. You can connect cardboards using special grooves, tape and glue. In order for the product to have a neat appearance, uneven areas in the places of cuts and joints are sealed with putty.
All elements, glued in layers, are placed under a press for the drying period. It is necessary to apply pressure on all areas with equal force. To do this, you can use large books and other weighty objects with a flat surface. Irregularities formed after gluing are masked with kraft paper. After the furniture has completely dried, you can begin to strengthen and decorate it.
Strengthening structures
Each piece of furniture needs varying degrees of strengthening. Children's houses for dolls, chests, and crafts for games can do without such a procedure. Shelves for TV, tables, sofas, shoe racks must be durable.
Additional fixation is given to all parts of any design by stiffening ribs. You can’t do without them when making a cabinet, rack and other large items. The joint grooves of such items must be coated with glue during assembly. This will extend the service life of the products and protect the items stored in them. The following techniques will also help increase the strength of structures:
- Parquet varnish will protect cardboard furniture well from moisture. They cover the already assembled, decorated structure with it.
- Symmetrical furniture is more stable than irregularly shaped objects and does not require additional fixation of supports;
- The strength of structures is affected by the number of transverse parts. The more there are, the more stable the cabinets, tables or sofas;
- Two-layer parts will be much more reliable, especially if you connect two parts with different directions of cardboard waves.
Decoration
At the final stage, the finished items are decorated. You can use a variety of methods - purchase special finishing materials or use improvised means. The right decor and methods of applying it will also help strengthen the furniture. The following techniques are used to decorate cardboard structures:
- Fabric upholstery. The material can be glued, stapled or placed on special pins;
- Finishing with paints. Using acrylic compositions, you can paint pieces of furniture in one or more colors, apply any pattern using a stencil, or create a custom painting;
- Decoupage. The method will not only give the furniture an original look, but also strengthen the paper material with an additional layer of glue and varnish;
- Pasting with film, decorative paper, wallpaper. You can use the same color or pattern that is present on the walls, ceiling, other surfaces, or print any pictures;
- Applying varnish and glitter. Shining houses for dolls, miniature towers in the nursery will look fabulous if their roofs are decorated with beads, beads, and natural materials;
- Glaze. With the help of various compositions, a deep transfusion of several shades is achieved.
Shelf rack for children
How to make a stylish shelf-rack that will decorate any children's room? This video shows two options in the form of funny animals: an elephant and a sheep. They are made according to the same layout, but in different shapes. Figures without sharp corners that could injure a child. It is shown in detail how to make a strong frame, work with patterns, calculate the length, and connect the parts into one. Painted with thick acrylic paint. After drying, it is fixed with varnish for greater rigidity. The model has an unusual, interesting shape, convenient for storing books and toys.
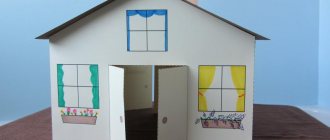
Bathroom and toilet
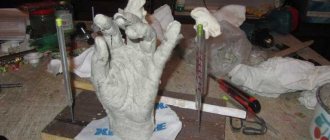
For the toilet room we needed a toilet, sink and bathtub. It was necessary to make them quickly and simply.
And I decided to just sculpt them from modeling material. Which is what we subsequently did with our daughters (photo 30).
They may not be ideal, but they were made together. Our works took about a day to dry. Next, we painted them with white acrylic paint and coated them with glossy acrylic varnish. After drying, the tank turned out to be quite heavy, then I replaced it with a lighter one (cut it out of cork and painted it). To keep the sink stable on the wall, I glued a nightstand underneath it. The bedside table was painted like all the furniture in the house. Next, I glued the bedside table to the wall and floor of the house, and then glued the sink. A tap (made from modeling clay) and beads are glued to the sink. There was no ready-made mirror, and ours is also made of cardboard.
The toilet is made of several parts - the base, cockerel sticks, a tank (made of cork), chains and beads. This entire structure is complemented by a seat - cut out of cardboard and covered with plain fabric. In photo 32 the entire toilet room is in color.
So quickly and cheerfully, together with our daughters, we built
our dollhouse from scrap materials. Such crafts always bring joy to children.
It may be quite simple for now, but my daughters are quite happy with it and enjoy playing together.
And another video on how to make a house for dolls with your own hands from plywood:
Thick packaging from household appliances and other products can be an excellent material for creating not only original crafts, but also practical accessories for the home. You can design cardboard furniture with your own hands using simple diagrams and master classes. A variety of drawing options will allow you to bring the most extraordinary idea to life. Cardboard has a lot of advantages that allow you to make many functional things. Handmade creations will be suitable for use and will last a long time if you choose the right material and method of processing it.
Children's furniture made of cardboard
Video for those who want to please their child with toy furniture. The basis of the kitchen is three medium-sized boxes, the length of the synthesizer. Partitions and multifunctional side walls are made of thick cardboard glued together. Wide tape is required to connect the parts. Next is the creative process: doors are made for cabinets, an oven made of transparent plastic, a sink made of a metal bowl, and an imitation of a stove burner. Decor – brick-like colored paper, marble-like tabletop. At the end of the video, a beautiful finished model with toy kitchen utensils is shown.