DIY headband
DIY hair jewelry is always attractive, unique, and original. You can independently make real masterpieces that will not only complement and complete the image, but also add a special twist to it and add individuality.
In addition, the manufacturing process itself gives craftswomen a lot of pleasure, distracting them from everyday worries and troubles.
What and how to make flowers for the headband? Any available and easy-to-process material is suitable for work, for example, felt, foamiran, satin ribbons, fabric, and so on. We present to your attention simple and understandable master classes on making hair accessories with your own hands.
Embroidery for decoration
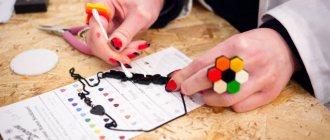
Creating such a headband is a little more complicated than the above master classes. To create it, again take a wide hoop, felt and beads, and double-sided tape.
The felt will serve as the basis for the head decoration. We draw the desired diagram and suitable patterns on it.
We sew small parts onto the hoop, and glue large ones. To sew on beads, take transparent fishing line or thread and a needle. You can put several beads on a thread and sew them on, or you can sew each one separately.
When you have sewn on all the matching elements, cut the felt to fit the width of the rim. We glue it to the base with double-sided tape.
Also glue a small flap on the wrong side. This is what you should get using the embroidery technique.
You can also decorate the headband with flowers, petals and other available materials.
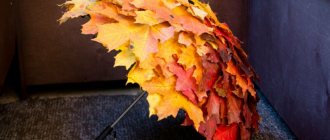
Related article: DIY garlands and wreath of autumn leaves
A couple of small tips. It is better to sew on beads, because glued ones quickly come off. You can also use a headband that is covered with something. Handmade decoration always looks much better than ordinary one. For work, it is best to use Czech beads, because they are of much higher quality than ordinary Chinese ones. Also decorate your headbands with glass beads, stones or pearls.
In our article you can also look at a beautiful selection of photographs of beaded head jewelry.
Petals for a flower
From white foamiran you need to cut 8 squares of equal size. To make the flowers realistic and not bulky, do not make the blanks too large; 5 by 5 centimeters will be enough.
We recommend reading:
DIY hairpins: step-by-step guide + instructions. 100 photos of finished hair jewelry. Master class for beginnersDIY brooch - the best step-by-step instructions with description. Photos of finished products, as well as a master class for beginners
How to weave rubber band bracelets with your own hands - a review of the best weaving patterns. TOP 100 photos of different methods and beautiful weaving patterns
Eight squares are needed to make one bud. The more colors you want to glue to the headband, the more squares you need to prepare.
Next, from the square blanks you need to cut out the petals of the future bud in the form of droplets. To give the petal a beautiful and pleasant shade, you need to paint half of it with red wax crayon.
There is no need to paint over the entire workpiece. To give the petal a delicate pink tint with a smooth transition, take a damp cloth and rub the chalk over the entire surface of the part.
Heat the iron to a temperature of 30-35 degrees Celsius and carefully apply all 8 petals to it one by one. Heated foamiran becomes even more plastic and elastic and in this form it can be given any shape.
Our task is to make the petals more realistic; for this we will slightly bend their wide part inward.
We recommend reading:
- DIY satin ribbon bows: TOP-200 photos of the best options. Step-by-step instructions + master class with description (video lessons + diagrams)
How to make a box - an overview of the best ideas for creating a box from different materials. 150 photos of new designs, instructions, diagrams, execution techniques, video
DIY pendant - step-by-step master class with instructions. Photos of finished works with an unusual design. Schemes, new items, recommendations from craftswomen
Main part of the work
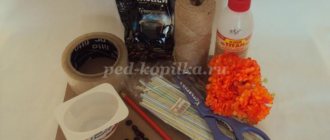
The most important step is assembling the rim. As a basis for decoration, you can use either a simple headband without decoration, or an old headband freed from decorative elements. Master class on making a headband with flowers:
- The first step is to cover the base headband with satin fabric. To do this, use a glue gun. Monitor the amount of glue applied, as excess glue can negatively affect the appearance of the finished product.
- Now we need to paste over our headband with the resulting colors in random order or creating a specific composition.
- You can use pearl beads, rhinestones, satin ribbons and lace to decorate the product.
Simpler techniques
If the kanzashi technique seemed a little complicated to you, simpler options for weaving and decorating headbands with your own hands are suitable for you. For example, cross braiding. To transform the headband you will need:
- Narrow or medium width satin ribbons.
- Lighter or candle, scissors.
- Glue or double-sided tape.
- The basis.
As in the previous case, you first need to prepare the materials. If necessary, sand the surface of the rim, remove the teeth, heat the ends of the ribbons and secure them to one of the ends of the base with glue or tape so as to close the edges.
Now let's start braiding . We place and glue both ribbons “crosswise” on the inside. Leave a small tail (a couple of centimeters) on one of them to hide the attachment point. Next, you need to repeat several steps: take tape No. 1 to the top, wrap the rim with tape No. 2, and pass it under tape No. 1. Then do the same thing, swapping them. Continuing to braid the base, alternating ribbons, we will get such a beautiful pattern.
All that remains is to cut and process the ends of the tapes and secure them with glue.
Just like that, with the help of satin ribbons and the master class “How to make a headband with flowers with your own hands,” you can transform your image and create a unique decoration.
Flower headband
The method described above is far from the only option for designing a handmade headband. The best ideas for making a headband with flowers:
- Made from artificial flowers;
- From flowers sewn from satin ribbons;
- From flowers sewn from fabric;
- Of lace flowers;
- Their knitted flowers;
- Made from plastic flowers.
Satin flowers
Even a novice craftswoman can sew a flower from a satin ribbon. All you need for this is a satin ribbon, scissors, matches, a needle and thread to match the ribbon.
The volume and size of the finished bud will depend on the width and length of the ribbon. So, first of all, fold the ribbon lengthwise and sew the edges with small stitches. Next, we highlight two ways to make a flower from the resulting blank:
We recommend reading:
Paper orchid: the best step-by-step instructions with real examples. Master class + video lessons for beginners (100 photo ideas)DIY beaded jewelry - an overview of the most beautiful options (120 photos). Instructions and techniques for making original beaded jewelry
- Hair jewelry - 120 photos of original ideas. Instructions on how to make a beautiful decoration with your own hands (master class + video lesson)
- We roll the workpiece into a roll, gluing it with glue for strength;
- We sew the bottom edge of the product with a “forward needle” seam and tighten the thread.
The middle of the resulting flower can be decorated with a bead. You can complement the bud with leaves made of green satin.
Small beads
To make such a delicate and sophisticated accessory for a girl, you will need very little materials and time.
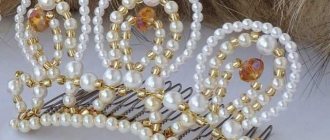
In order to make the decoration, you will need plain beads of delicate colors, a base for the headband in the form of a hoop, fishing line and scissors.
The complete job will take about an hour. Cut a long piece of wire and attach it to the base of the hoop. This is how it should be, as shown in the photo:
On the front side you need to hide a small piece of wire. We put a couple of beads on the long end of the wire. Their number depends on the width of the rim. We wrap the decoration with fishing line along the length of the workpiece.
Related article: Types of patchwork for beginners in pictures with videos
The fishing line was chosen specifically to make the decoration look more reliable and voluminous.
We fix the second end of the wire, like the first. This is what the rim should look like at the end.
Photo of DIY headbands with flowers
Did you like the article?
0