Despite the wide variety of modern toys, clay modeling does not lose its relevance. It contributes to the development of the child’s rhetoric, captivates parents, and creates common interest for the whole family.
There is an opportunity to make unique crafts. To do this, you need to figure out how to make polymer clay with your own hands and what ingredients you will need.
Polymer clay recipe
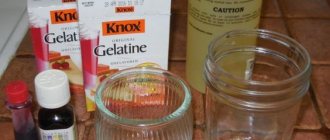
We make polymer clay with our own hands correctly. To do this you will need the following ingredients:
- PVA glue - 2 tablespoons;
- cool water - 1 glass;
- glycerin - about 15 drops;
- potato or corn starch - 1 cup.
Preparation consists of the following steps:
- Take a pan with a thick bottom. Glue and 1/2 cup of water are placed in it, everything is thoroughly mixed and simmered over low heat for 4 minutes.
- In another pan, the starch is dissolved in the remaining water.
- The contents of the two pans are combined and thoroughly mixed with the addition of glycerin.
- Balls are formed, placed in film and placed in the refrigerator for several days.
- After reaching the condition, polymer clay is ready for use. It is baked at a temperature of 110°C - 130°C.
How to make polymer clay at home
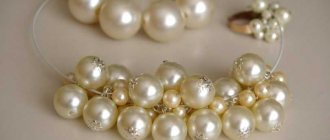
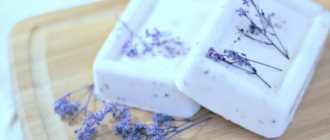
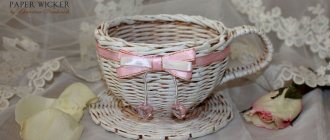
From a material called polymer clay or plastic, you can create the most unexpected elements. It is often used as a basis for jewelry, making bracelets, rings, headbands, or brooches. All these decorations will shimmer with the bright colors that you choose for sculpting. Jewelry on the neck looks especially beautiful - these are pendants, necklaces or just beads. In second place comes dishes that are decorated with polymer clay with your own hands. Glasses, mugs, teapots or spoons - they can decorate your table for months.
- New rules for purchasing train tickets
- Swing style knitted socks
- The secret behind the low incidence of coronavirus in Russia
You can make toys in the form of jointed dolls entirely from polymer clay or make a small dish set for them: its modeling will be especially interesting for a child. Today, skilled craftswomen make from this material everything that their imagination allows - from key rings to a bouquet of flowers, while there are already many recipes according to which polymer clay is prepared with your own hands. If you buy it in a store, the composition contains polyvinyl chloride and liquid additives, i.e. plasticizers. For self-production, the basis is starch, glue with glycerin and soda.
- How to calculate pension indexation for non-working pensioners in 2019
- How scammers deceive pensioners over the phone
- Noise in the head and ears
Polymer clay for modeling from potato starch
The first recipe for making polymer clay with your own hands is based on potato starch. Often corn is used instead. The only difference is that the appearance of potato starch products turns out to be a little grayish. If they used corn for the craft, then they look whiter. The recipe itself will require the following ingredients:
- Vaseline or hand cream – 1 tsp;
- baby oil – 2 tsp;
- PVA glue – 100 g;
- lemon juice – 2 tbsp. l.;
- potato starch – 100 g.
To work you will need an enamel pan. Pour about 1 liter of water into it and put it on fire. While the liquid is boiling, follow the instructions below:
- Take disposable cups. Pour glue into one of them, pour starch into the other.
- Place the glue in another enamel container. Add butter with cream and lemon juice there, mix well.
- Next, heat the mixture over a pan of water, i.e. in a water bath. Just don't do this for too long, or the clay will overheat and become stiff.
- After this, add starch to all ingredients. With such small proportions, you can do it all at once rather than gradually.
- Stir vigorously so that the mixture does not stick to the bottom of the container.
- Lumps will begin to appear in the mixture, it will become like cottage cheese, and then turn into a large lump. At this point, remove the container from the water bath.
- Lubricate your hands with cream and start kneading the mixture.
- Roll the clay into a ball shape, cover it with a layer of cream and wrap it with film to prevent air from getting inside. So the material should ripen in about 12 hours.
Recipe from glue and glycerin
The following instructions assume the addition of glycerin at one stage of the work. This substance helps to avoid cracking of finished products. For this recipe you will need materials in the following proportions:
- PVA glue – 2 tbsp. l;
- cold water – 1 tbsp.;
- glycerin – 10-15 drops;
- potato or corn starch - 1 tbsp.
To prepare polymer clay according to this recipe, follow these steps:
- Arm yourself with a saucepan with a thick bottom. Mix glue and half water there.
- Cook the mixture over low heat for about 3-4 minutes, stirring constantly.
- Take a separate container where you combine the remaining water and starch.
- Place the starch mixture in a saucepan with water and glue, add glycerin there, then mix thoroughly.
- Turn off the heat and leave the pan to cool briefly.
- Place the clay on a table sprinkled with starch.
- Knead the “dough”. It will be sufficient if it becomes pliable and its surface is smooth.
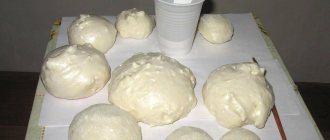
- Form a ball of clay as shown in the photo. Then wrap it in cling film and place it on the refrigerator shelf for a couple of days.
DIY self-hardening polymer clay
Using the latest recipe, you can prepare self-hardening clay. This option will require the following materials and tools:
- baking soda - 2 tbsp;
- water – 0.25 tbsp.;
- corn starch - 1 tbsp;
- spatula for kneading dough;
- waxed baking paper;
- non-stick pan.
Self-hardening polymer clay is prepared according to the following instructions:
- Combine all the listed ingredients in a saucepan.
- Heat it over the fire, stirring constantly. When the mixture has dispersed a little, add a couple of drops of any aromatic oil, such as cinnamon. This way the finished raw material will have a pleasant smell.
- Keep the mixture on the fire until bubbles appear and a large lump forms. All this time, do not forget to stir, scraping the mixture from the bottom.
- When you see that the mass has begun to resemble mashed potatoes, turn off the heat.
- Pour the contents of the pan into another container, the bottom of which is lined with waxed baking paper.
- While the “dough” is cooling, grease your hands with rich cream.
- Knead the mixture into one large lump. Keep it in an airtight container to prevent the edges from hardening.
- The raw materials are already ready for modeling. Roll out thin sheets of it, cut out any shapes with molds, make patterns on them with a toothpick, and then dry in air or in a radiator.
Fireclay clay recipe
Now let's look at how to make fireclay clay with your own hands. In a hardware store you can buy fireclay clay in the form of a dry powder with different sizes of acceptable fractions.
To create the final composition you will need to perform the following steps:- fireclay powder is sifted through a sieve, large fractions are extracted;
- water is added to the crushed fireclay powder;
- the resulting mass must be kneaded until a homogeneous mass with plastic properties is obtained.
In its finished state, fireclay clay can be used for various crafts.
After a few days in a dry place at a temperature from +10°C to +25°C, the material hardens. The final hardening of the craft occurs within a month.
Analogue of clay from starch
This version of the modeling material is based on two main materials - starch and PVA glue. The production is not complicated, and the ingredients are available in any home, and they are not at all expensive. Its properties are extremely similar to natural polymer clay, but when it dries, the volume of a product made from it decreases by a third.
When sculpting from this composition, products should be made taking into account this feature. This material dries within 24 hours. Let's figure out how to make such polymer clay with your own hands.
Epoxy resin will expand your capabilities for making products; it can be used both independently and for pouring products from polymer clay.
This composition is considered the simplest to prepare. Preparation of an analogue composition will require the following components:
- Corn starch - 200 grams.
- PVA glue (any will do) - 180 grams.
- Baby oil - 2 tbsp.
- Lemon juice - 1 tbsp.
- Container for making (which you don’t mind).
- Gloves for work.
Let's start preparing a clay analogue. To begin with, starch is poured into the prepared container and glue is added.
Everything should be thoroughly mixed without heating. Next, add oil and lemon juice in the indicated proportions. Everything is mixed well until completely homogeneous.
Then everything heats up very well and is kept on fire until it reaches a mass similar to puree. Remove the container from heating, add another half tablespoon of oil and place on the table.
The slightly hot mixture is kneaded well on the table with your hands. Be sure to wear gloves as the mixture is still hot. Once cooled, you can make figures from the resulting composition.
Remember that this mass only repeats all the properties of polymer clay. But it is much cheaper and more natural than store-bought. Polymer clay contains a large number of different plastics, which makes it harmful to health. This is just one way to make your own polymer clay.
Craft “Doll”
Let's look at how to make a clay doll with your own hands. A certain sequence should be followed:
- You need to start with a drawing of the future craft. We select a sketch or make it ourselves.
- We make the frame from wire, which allows us to achieve the integrity of the craft.
- We prepare the clay, knead it and bring it into an elastic state.
- From the prepared clay on top of the frame we sculpt a doll according to the appropriate proportions.
- After finishing the modeling, we start baking it in the oven.
- We paint the finished craft using paints.
When working independently, a person receives many advantages. He can make a unique craft that will become a real decoration for your home interior.
Ideas for polymer clay products
We figured out how to prepare good clay for crafts. Here are some ideas for some fun DIY projects at home.
Decorations
Probably the most popular products made from polymer clay are jewelry. It is very easy to fashion any decoration from a plastic, pliable mass, be it earrings, beads or a bracelet. And the product itself made from such material will last up to 7 years. There are many techniques for creating jewelry or its elements. Let's look at some of them.
Most jewelry will require beads. With this material, the design of the beads can be any, as well as color combinations. But there are two main execution techniques. The first is suitable for making round beads. The technique is very simple. We roll small neat balls of polymer clay and pierce them with a needle of a slightly larger diameter than the one on which we will then string them. Remove from the needle. Once again, slightly level the shape and you’re done. You can put it on the windowsill and leave it to dry. In about a day, the bright, light beads are ready to become part of the decoration.
The second option is similar to the technique of making glass beads or rolling candy. First, we select the appropriate colors of clay and roll them together in random order. Then we roll a long thin tube from this mass. Be sure to make sure that the entire tube is approximately the same diameter. Then, using a knife, cut off a centimeter from both ends of the tube; this excess material can be removed. Cut all the remaining clay into neat small discs. We make a hole in the center of each with a needle so that they can later be strung on fishing line or elastic. If this technique seems too easy to you, and you already understand how the pattern is laid out in such beads, you can try to create not just an arbitrary ornament, but a real pattern that will be repeated on each bead. To do this, each individual colored element will consist of many thread-thin pieces of polymer clay. They are then stacked on top of each other to form one block, which is then cut.
At first glance, creating jewelry from polymer clay may seem too complicated, but such an activity simply requires imagination and dexterity, which will gradually come with experience in this matter. So don’t be afraid to experiment and you will definitely succeed.
You can also try to create unique earrings from polymer clay. Most often, the design of such jewelry comes in two versions. Or it repeats the model of beads, that is, it is made from exactly the same beads. Or various figures are molded. You can even make two different earrings, but in the same theme. By the way, this is a great gift idea for friends or decoration for yourself for the summer. Most often they sculpt animal figures and emoticons. birds, fruits and sweets. These shapes are quite simple and almost anyone can make them. But in the end they look very unusual and fun.
Other crafts
Let's look at thematic sites to see what you can do with your own hands from clay. The following options exist:
- easy-to-make toys in the form of a cube, ball, house;
- more complex options in the form of a car, a Christmas tree, a man;
- several toys that correspond to the general theme.
This way you can make toys yourself and teach your child how to do it.
Advantages of modeling clay
You can watch a video on how to make clay with your own hands. This will provide some benefits:
- a person clearly sees in what sequence the craft is made;
- there is an opportunity to familiarize yourself in detail with each stage of the production process;
- in each instruction the number of necessary elements is calculated in advance;
- a person gets the opportunity to watch a video of the production process several times and see the final result.
Using video lessons allows you to independently learn how to prepare the desired type of clay and sculpt the desired craft.
A person has the opportunity to familiarize himself in advance with the list of necessary tools and possible pitfalls.
Having studied the technology in detail, you can begin baking your craft and applying appropriate painting to it.
As a result, you get the desired craft, which can be used to decorate your home interior or as a gift. As a bonus, a person gets a lot of pleasure and saves on the family budget!Clay is an amazing material that allows you to achieve its elasticity and create any craft with different geometric shapes. Then it is baked and decorated with paints.
Polymer clay (composition, properties, safety precautions)
Using polymer clay - this magnificent and amazing material, I didn’t think for a long time about how it affects me, what it consists of and how to handle it. But over time, I began to ask myself this question, then I spent a long time delving into the Internet, translating various articles, and now I want to share this with you.
Polymer clay
Polymer clay (plastic, plastic, polymer, clay, etc.) is a plastic material based on polyvinyl chloride for sculpting small products (jewelry, sculptures, dolls) and modeling, hardening in air or when heated (depending on the type of plastic).
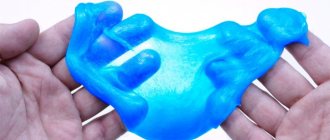
Types of polymer clay are usually divided by the name of the manufacturing company: fimo, flower, Sculpey, Cernit, Kato, etc. Basic properties of polymer clay Polymer clay is a plastic mass, in appearance and It resembles plasticine to the touch, but has a characteristic odor. To impart plasticity, plasticizers are used, which are completely absorbed into the base material when heated from 100 to 130 °C. This can be done at home by baking it in the oven. Some craftsmen boil plastic in water, for example, this method is used in the “salty” technique when salt is pressed into the upper part of a plastic bead; during cooking, the salt dissolves and beads with indentations are obtained. Some types of plastic can be baked in the microwave, BUT ATTENTION, such baking can only be used for a special type of plastic, for example, FIMOair maicrowave.
As a result, the material loses its plasticity and ability to change shape. Hardened products can be painted with various paints, mainly acrylic, glued together and with other materials, sanded, cut, cut into the desired shape, etc.
The plastic is produced either colorless or transparent, or pre-colored. For special effects, glitter and fluorescent substances are added to them. Composition of polymer clay Polymer clays consist of a base and a plasticizer, which gives the clay plasticity. Polyvinyl chloride is the basis of polymer clay. PVC particles, like gelatin, have enormous absorbency when heated, and it is this property that underlies polymer clay. When plasticizers with PVC powder are heated, a gelatinization process occurs: the plasticizers are absorbed into the particles of the powder, the particles swell, move closer to each other and, having complex irregular shapes with tubercles and outgrowths, adhere tightly to each other. The more plasticizers there were in the original mass, the softer the finished product is. The resulting substance is called "plasticized PVC". In industry, most of the insulation of electrical wires, plastic windows, medical instruments such as IV tubes, dishes, toys, and household items are made from it. Polymer clay also contains various pigments. Talc, kaolin or chalk can also be used as fillers and surface modifiers. The material may also contain stabilizers that prevent gelatinization during storage at normal temperatures. The plastic begins to slowly harden already at 60 °C; the presence of stabilizers slows down this process significantly. Safety precautions when working with polymer clay The safety of polymer clay remains a topic of controversy. Various American institutes have conducted research into the effect of phthalates contained in polymer clay on the human body. In 2009, the European Union and the State of California adopted a ban on the use of phthalates in the production of polymer clay, and all manufacturers brought the composition of their products into line with the decision.
All polymer clay manufacturers unanimously claim that their products are harmless, however, based on information about the composition of polymer clay, I would still adhere to the safety rules I described below. Especially if your children also work with this material.
Always follow these rules when working with polymer clay:
1. Do not let children play with wet polymer clay. If your child touches the clay, be sure to wash their hands immediately to prevent any particles from getting into their mouth.
2. It is advisable to work with polymer plastic using rubber gloves. If you do work without gloves, ALWAYS wash your hands as often as possible, because plastic particles on your hands can enter your body and cause poisoning.
3. Do not bake polymer clay in the same oven with food!
4. If you nevertheless baked plastic in a food oven, before cooking, ALWAYS place a bowl of water (preferably a large area), heat the oven to maximum, change the water two or three times and ventilate thoroughly. You can even leave it open for 10-15 minutes without turning it off.
5. Pay special attention to the temperature when baking; do not bake polymer clay at more than 130 degrees. If the clay burns, ventilate it IMMEDIATELY and leave this room until it is completely ventilated. When polymer plastic burns, it releases harmful gases that can cause acute poisoning.
Baking tricks:
If you do not have an accurate thermometer in the oven, set the approximate mode, heat it up, put the product to bake and open the door slightly. If the door does not hold, then you can fix it with something. I inserted a plastic ladle between the oven wall and the door. You can bake this way for a long time and not be afraid that the plastic will burn.
I hope my article is useful!
Happy creativity!