What materials can a photo frame be made from?
First of all, you need to choose the material that will become the basis for the future frame. Let's look at the most popular materials and their characteristics.
Today, photo frames are considered one of the most functional decorative items.
Cardboard photo frame
This is the simplest and most affordable material; a child can also take part in the production if the cardboard photo frame is made with your own hands for children.
They not only allow photographs to be transformed, but are also a worthy interior decoration that attracts the attention of guests.
You can use ready-made colored cardboard or a box as a basis. The main thing is that the material is dense, without cracks or abrasions. In addition, you will need a small set of tools and components. This includes glue, scissors and a stationery knife, as well as material for finishing and decoration.
Many people prefer to make them with their own hands, as it is much cheaper and allows you to turn any design idea into reality.
From paper
This material can also be used in manufacturing, but you need to take into account that the paper is quite soft and it alone will not make a strong and stable frame. You need to use an additional base, such as cardboard, or glue several layers together.
Such an exclusive craft as a photo frame made from cardboard with your own hands is considered a very interesting decorative item.
It is better to choose colored paper. The stores offer a wide range of different products: glossy, matte, glitter, patterned, velvet, metallic, various colors and so on.
Such a frame will not only adequately complement a modern interior, but will also make a good gift for relatives and friends.
Made of wood
Wood is most often used, as it has good characteristics, which allows it to be used for the manufacture of various items.
Wooden boards or slats should be 25 mm or more wide.
It is equally important to pay attention to choosing the right wood. Conventionally, rocks can be divided into two groups: soft and hard. The first includes cedar, pine, thuja, spruce, alder, aspen, and linden. The second includes birch, ash, oak, beech, walnut and maple.
Both soft and hard varieties have certain advantages and disadvantages. Let's take a closer look at the most popular solid wood.
You can make such a frame with your own hands, of course, having experience in carpentry.
- Alder. It has a low price. When using it, do not use nails, as it may crack severely. A significant advantage is resistance to moisture;
- Pine. Low cost, but it cracks quickly and cannot withstand high loads. The advantages are that it has antiseptic properties, disinfects the air and does not deteriorate under the influence of pests;
- Linden. Deteriorates quickly under the influence of negative factors: sun, moisture and too dry air;
- Oak. A very durable and wear-resistant material that can withstand almost any load. It is also resistant to aggressive environments. But oak is a rather expensive material, so few can afford it;
- Ash. It quickly deteriorates under pressure, but does not bend under weight and is not deformed at all. Quite a high cost, but the durability of the material is worth it. In order for it to last a long time, it must be frequently treated for bugs;
- Birch. No cracks form, so you can safely hammer nails into it. It is characterized by high strength and durability. The price is not very expensive, so you can safely use it when making savings on the purchase of finished products. The only significant disadvantage of birch is that it must often be treated with a special agent to prevent fungus from forming;
- Beech. It has a high density and, if properly processed, has a fairly long service life. With strong temperature changes and high humidity, the tree loses its characteristics. Under the influence of gravity, beech can be greatly deformed.
This frame will be a wonderful gift for significant events such as anniversaries and weddings.
The choice of one or another wood depends on the available funds and personal preferences. It is advisable to choose one that does not deform and does not require too frequent processing. You don’t need a lot of material for a photo frame, so you don’t have to rely on low cost.
What you need to make a cardboard photo frame
The second stage of preparation is the selection of tools and accessories. If cardboard is used as a basis, then production will be quick and simple. You need to prepare in advance:
- Cardboard. You can choose regular or already decorated;
- PVA glue and a brush for applying it. If possible, it is better to use a glue gun;
- Pencil or marker for marking;
- Scissors and stationery knife;
- Accessories for dyeing - beads, buttons, ribbons, paper flowers, etc.
Note! It is necessary to focus on the quality of the cardboard, since it will be the basis of the entire structure. Avoid scuffs and cracks; you also need to choose a dense and hard material, without softness.
Paper photo frame
Do you have a desire to do handicrafts, but no ideas on how to materialize your dream? Take a look around. There will probably be remnants of wallpaper from renovations in the house. You can use them to build a magnificent three-dimensional frame for a photo.
Do you know the art of origami? Then you can make more complex versions of products that are assembled from several sections. It is worth involving children in such an exciting activity. Give them a home workshop on how to create a photo frame. For origami, you can take the most inconspicuous paper and subsequently decorate it at your discretion.
Is there nothing in the house but newspapers? But they, too, may well be put into use. By the way, this material is the easiest way to create unusual photo frames. You can work with newspapers using a variety of techniques. For example, they can be rolled into tubes, from which frames for photographs are then woven.
Photo frame made from newspaper tubes
Step-by-step instructions for making it yourself
Now you can proceed directly to production. Let's consider various installation options.
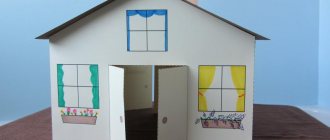
Regular cardboard frame
DIY photo frames made of cardboard can be simple or with complex decor.
First you need to take two sheets of cardboard on which the markings will be made. To do this, you need to attach a photo and use a pencil or pen to draw a diagram.
You need to cut out the front and back of the frame from a piece of cardboard.
Keep in mind that marks should not be made strictly according to the size of the photo, but two to three centimeters larger. And if large-scale decoration is planned, then it is better to retreat 5-7 centimeters. The frame can be rectangular or square.
The craft should be deep enough so that the photograph or painting looks good. To do this, you need to glue the cardboard strip so that it is between the first and second layers.
You should end up with blanks like the one in this photo.
Important! If you use a corrugated base from a box, then the need for a strip disappears.
Now you need to start making the legs for the frame. To do this, you need to draw it and then cut it out using a stationery knife. The leg is attached to the back side. If the frame is hung on the wall, you need to attach a thread or a small hook. Done, now you can start decorating.
All that remains is to decorate the photo frame to your taste.
Volumetric frame
Such designs look very attractive and elegant. To make them you will need everything the same as for a simple frame. The manufacturing steps are identical.
Those who have learned how to make simple photo frames can make more voluminous compositions from cardboard, ready-made templates for which can be easily found in any stationery store.
There are only some exceptions: you need to cut the pieces a little larger than necessary, bend the edges and connect the two parts so that you get a three-dimensional structure. Such a voluminous frame will look great if decorated with voluminous flowers or buttons. This method is good for making kindergarten frames for text and pictures.
Using this method, you can make your own chic photo frame-book.
Photo frame made from cardboard egg boxes
The frame can be made from almost any available materials, including an egg carton. It can be used for decoration, but it is not suitable as a base.
Egg trays are an excellent material for creativity.
Flowers are made from an egg carton. To do this, cut out the cells so that you get petals. From other cells, cut out smaller petals and fasten the elements together with glue to form a rose. Ready. Now the flowers can be glued to a simple or three-dimensional frame.
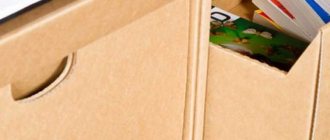
Every home has at least one cardboard box and glue with scissors.
Roses will look great if you paint them or cover them with glitter; you can additionally use green ribbons as leaves.
Frame decoration options
We must not forget that an ordinary cardboard frame must also be decorated to make it unrecognizable. There are a great many ways to do this.
- You can stick something on the frame. These could be beads, buttons, old postcards, coffee beans, lentils, peas or cereals, eggshells, shells or pebbles and much, much more. Limitless space for imagination!
- The frame can be covered in decoupage style.
- The frame can be painted, but not just covered with paint, but using modern painting techniques.
Unnecessary things are very suitable for decorating photo frames
Eggshell decor
One of the simplest and cheapest ways to decorate a photo frame is to paste it with eggshells. A real mosaic is made from seemingly unsightly scrap material.
The material at hand is cheap, but looks rich
How to decorate a frame with eggshells?
- We cover a photo frame made of cardboard with acrylic paint, say blue.
- We paint egg shells (dry and cleared of white film) in different shades of blue.
- After the shells are dry, break them into smaller pieces.
- We begin to gradually, in small sections, glue the shells to the cardboard. It is recommended to press them lightly for better adhesion. It's okay if the shell cracks a little.
- You can paste over the entire frame, or just certain areas, in any case it will be beautiful.
Decorating with cereals
Decorating a frame this way is easy. For decoration you can use millet, buckwheat, semolina.
- The cereal is glued to the outside of the frame with PVA glue. If the grain is large, each grain is glued separately.
- After the glue has dried, the cereal must be varnished.
- Then let it dry again, paint it in the color you choose and apply another coat of varnish.
Interesting options for decorating cardboard photo frames
When making a frame at home, you need to follow some rules that will help achieve harmony in the interior. These include:
- The style of the frame must match the photograph or picture. For example, if the photo shows a family vacation at sea, then it is better to decorate the product in a marine style;
- Consider also where the frame will be located. If this is an office, then it is better to avoid bright and colorful patterns, but in a children’s room, on the contrary, it is better to focus on this;
- Keep in mind that the main thing is the image, not the frame itself, so don’t go overboard on the decorations;
- Unusual shapes will look great: rhombus, heart, and so on.
Once the style and color of the frame have been chosen, you can begin decorating. For this purpose, painted eggshells (laid out in the form of a mosaic), multi-colored buttons, satin ribbons, corrugated paper flowers, beads, and shells are usually used.
The frame can also be decorated in decoupage style if wood is used.
Making a frame with your own hands at home will help make the room more comfortable and attractive. Particular attention should be paid to the material from which it will be made and the decor, since it is this that creates the appearance of the entire product.
Cardboard frame: principles of use
Any framed photo will look different, but there are a few things to consider.
- The photo frame should emphasize the advantages of the photo; for this, they must be combined with each other and complement each other.
- But combining does not mean merging, so first you need to carefully think through the color of the future frame.
- The size of the frame should also correspond to the size of the picture, be a little larger, otherwise the picture will simply be lost in the frame.
- Do not forget that the frame is selected specifically for the photo, and not for other interior items.