Needlework
05/01/2018 Anastasia Prozheva
Beaded boxes always look very feminine and elegant. They come in different shapes (circle, triangle, square, heart, etc.) and will be a nice gift for every girl. It is in these boxes that you want to hide your most expensive little things. In this article we invite you to create such a small but very elegant box of beads; the master class will help you complete the task faster. This weaving method is suitable for everyone and even beginners.
Triangular box
The process of making a box from beads can be traced using the example of a master class for beginners who have at least a little experience working with beads.
To create such a box you will need beads in the colors of the rainbow. If you take Chinese beads, then the size of the beads is tenth, and if you take Czech beads, then 6-8. We will also need scissors, needles, fishing line, wire, a diagram and tweezers.
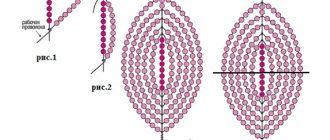
This type of box has a double bottom, so according to the pattern below you need to weave a couple of triangles. One will consist of 15 rows, and add one bead to the other. It is also worth remembering that on a larger triangle you need to collect one bead at the corners.
These are the triangles we got:
Now we must connect them by weaving beads one by one. After we have connected the bottom, we begin weaving the inner wall. On the 13th row, which is indicated by red dots, start casting the first row, which is shown by white dots in the diagram.
We make the inner wall using the mosaic weaving technique, so you shouldn’t be surprised that the rows will move to the right. In the photo, small green dots show the first beads of the first and second row, and also indicate the correct path of the needle.
Related article: DIY satin belt: master class with photos
In total we need to weave about twenty-six rows. Next, you can make a small “bridge” between the walls of the box. It will add some rigidity. It is necessary to string white beads along the entire length of the inner and outer walls, and two pieces at the corners. This is how it should turn out:
After we have woven 26 rows, we need to make two more. And after them you need to make an external jumper. Then we finished weaving the inner wall, we begin to make the outer one. Its weaving begins not from the 13th, but from the 15th row on the bottom.
Next we weave 26 rows again, up to the inner bridge of white beads. Now look at the photo below. It shows the jumper itself, the 26th row of the outer wall and the 28th row of the inner wall. We need to connect the outer wall to the lintel. The location of the needle is also indicated in the photo in red.
We collect two more rows and connect the walls again.
The fourth step will be weaving the lid for the box. We need to weave two triangles again according to the pattern, but the number of their rows should be two more beads.
We sew them together, you can also glue a bead if you wish.
On the 9th row you need to weave a side.
On the 11th row we also weave 4 rows of beads for the side.
Next you need to connect them together.
You can sew three large beads on the bottom.
So our box is ready. By experimenting with bead colors, you can get original colors for the box.
And you can decorate a cute box not only with flowers and ribbons.
Box-chest made of beads
I was inspired to create this little thing by a publication dedicated to the work of David Chatt (thanks to Yulia Pavlenko for the story and photographs!), namely his installation of a box with pencils. My box is made in a similar technique (as far as I guessed from the photo) - my hands were itching to finally use the remains of beads, which have accumulated a lot during my creative activity))) This box can be bought in my store)
To work you will need:
1. copper wire (or fishing line, or thread - whichever is more convenient to work with, I used both wire and fishing line)
2. multi-colored beads - a lot)
3. black beads 400 g
4. wire or thick wire for the frame (giving a rigid shape to the edges of the box)
5. magnetic or other fastener (you can do without it)
6. bag of patience))
First you need to weave multi-colored elements - I began to call them “bricks”, and you need a lot, a lot of them (depending on the size, of course, my box is small - I needed 304 “bricks”: 66 each for the front and back walls, 100 for cover and 36 on each side)
By analogy, we weave until we get a strip of seven rows:
We bend the strip along the central, fourth row, and begin to braid the perimeter of the brick:
So we moved on to braiding the next side of the perimeter of the “brick”, we turn it so that it faces us, the ends of the wire are at the top:
At the moment, we have braided three of the four sides of the perimeter of the brick (it is not visible in the picture, it is located below). Turn its last unbraided side towards you - the ends of the wire will be at the top.
Additionally, let's pass the wire through several beads and trim the ends:
Our “brick” is ready!
Actually, we need a lot of these) I recommend first making all the “bricks”, then weaving them into the walls of our box - in order to evenly distribute all the colors over all parts of the box. We take the “bricks” prepared for the side of the box and lay them out, evenly distributing the color accents:
We will weave them together in three stages (that is, we will first prepare three large fragments and then weave them together).
By analogy, we continue to weave in “brick” after “brick”:
We weave the fragments together.
By analogy, we weave all the edges of our box:
We weave the bottom from black beads (I wove it on a fishing line):
We begin to put together the parts of our box.
You can weave a wire (or wire with a diameter of 2-2.5 mm) into the folds of the lid.
We make the main frame of the box from thick wire - I have aluminum with a diameter of 6 mm:
We weave a ribbon with black beads for lining the edges of the box:
We insert a wire of smaller diameter to braid the 2 remaining upper edges.
I made the frame of the lid from three parts: the top (the top of the box, on the folds) - first I made a wire, but then replaced it with copper wire with a diameter of 2.5 mm, plus I sewed a rib in the center from the same wire so that there was no sagging: beads - heavy material)) The bottom one is made of aluminum wire with a diameter of 6 mm - as a base, and copper wire 2.5 mm - in order to connect the lid frame to the box frame and allow the lid to fix the opening and closing levels (aluminum wire is not suitable for this, it cannot be bent from side to side very often, but it holds its given shape perfectly).
We fasten the lid by carefully inserting the ends of the copper wire into the braided frame of the box:
We weave together the edge of the box and the remaining edge of the lid:
We cover the connecting wire with weaving:
So, the lid is fixed at a given level when opening and closing:
Side view (the wire prevents the lid from closing tightly):
Back view:
In order for the lid to be closer to the box when closing, I decided to add a magnetic clasp.
Using your fingers, carefully align the edges of the box frame.
Hooray! Our box is ready! Only a month has passed since the start of work... But it's worth it! If you don’t want to spend a lot of time and effort on such a beauty, you can buy it in my store!)
Cute hedgehog
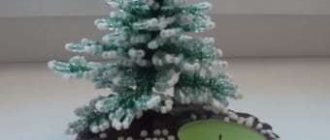
You can also make figures of various animals from beads, for example, a hedgehog. We propose to consider weaving patterns for such a figurine.
How to do this kind of work? Looking at the first drawing, you need to weave a hedgehog belt, then according to Fig. 2 you need to make a tummy, and using the diagram in figure 3, you need to weave the back. Then fasten the ends of the belt and put it on the blank. Next, we begin to weave the second part indicated in figure 1. The weaving is exactly the same as the belt weaving pattern; we make decreases as necessary. The nose needs to be woven using the pattern in figure 4, making a smooth decrease. Now you need to sew the eyes and nose onto the hedgehog’s face.
Related article: How to make a leather bracelet with your own hands: master class with diagrams
How to make thorns? We string 9 black beads and 1 white, overtake the last bead and insert the thread into the black beads. It turns out a kind of thorn that needs to be attached to the back of the hedgehog. Using the brick stitch technique, make a leaf. And you will get such a cute hedgehog. It will be a wonderful decoration not only for the box, but also for the desktop.
Master class on weaving a square box
To weave such a box you will need a minimum set of materials, namely black and white beads; you can use simple Chinese, just so that it is the same size. Also useful are scissors, a needle and fishing line, wire, a weaving pattern and tweezers.
Once everything is ready on your desktop, you can begin this process. In the first photo you can see how the square rope is made, and then there is a weaving knot in which the fishing line is added. Lock four beads into a ring so that there are no tails left. Use a lighter for this. Continue weaving, just try to tighten the beads tighter at the end of each new strip. Then the product will keep its shape.
Weave ten links, and then turn to a new strip. You must make the bottom of the craft measuring ten by ten links. After this, begin to form the walls of the product, which should have the same size as the bottom, that is, ten by ten. Bring the needle out of the beads into the bottom. If necessary, you can help yourself with tweezers, this will make it easier to pull it out. It is better to weave the inner strip in the monastic way, and then the outer one. After that, connect them together at the top.
Form the wall of the product in a circle. The lid is woven in exactly the same way as the bottom. After this, connect the bottom with the lid in a monastic way directly to the beadwork itself, precisely from the outside. This is important because it will open without any obstacles.
Read
Technique of bead weaving of the flag of Ukraine in the form of a keychain
The craft is not ready yet, because now you will need to weave the outer part with beads of a smaller caliber, but also black and white. Work starts from the corner of the lid. Unwind a fishing line one and a half or two meters long, and tie beads in the center. You should use one half to decorate the lid and the other half to decorate the wall. As a result, you will be stitching small white beads through large ones. Bring the needle to the very top of the lid, and then go over the white pieces of glass again with exactly the same ones. You will now have a trimmed edge and 1 square of white beads.
Now we move on to weaving a black square, which is braided in a similar color, but not in a circle, but in parallel. If you don’t have such a desire, you don’t have to do the braiding at all, as described in the article.
The master class is coming to an end. Burn with a lighter and hide all the ends of the fishing line visible to the eye, and you can assume that everything is ready for all the most valuable things to be placed in it or various little things that you do not want to get lost.