The time has come to choose which wreath to make from pine cones for the New Year, or maybe not from pine cones at all. Today I not only have the wreaths themselves, but I also want to show the principles of how to design them, how to decorate them and what materials are suitable for this.
From photos, videos and descriptions, I made a very colorful collection, which includes:
- Ribbons on spruce branches;
- Tree branches;
- Yarn;
- Vegetables, fruits, citrus fruits;
- The tapes themselves;
- Cones;
- Wreath in the shape of a Christmas tree;
- Stuffed Toys;
- Fatin;
- Candles.
And in my collection you will find a collection of tips on what to make the base for a wreath from. This is where I'll start!
Basis for construction
Before we start talking about how to decorate a wreath, let's see what all the beauty will be based on. There are 7 great options. And I will introduce you to them now. I will voice the principles why you should choose one option or another. Perhaps you can come up with something yourself! Then I’m waiting for your comments, share your ideas and offer your options!
a) Braid made from thick knitted strips
Very bright! There is a background for the future drawing. In addition, you can not only knit such a base from yarn, but also weave it from strips of fabric. The advantage is that such a base is itself elegant, which means it can be decorated for someone else.
b) Made of wire. Or from a hanger.
wreath base
If you have a wire tramp, you can shape it into a circle. This foundation is solid. It already has a hook for hanging. How to hang decor on a thin wire:
- The wire can be thickened with paper or cloth.
- Twist 2 of these warps. Make one smaller. Connect with a bandage. You will get a fairly wide base.
- Cut the wire from one side of the hook. String the toys. Make a hook at the end of the free end to hook onto the other end of the large hook.
And it’s even faster and easier to make a structure from the wire itself.
c) Pipe insulation
Base for a wreath made of insulation
Choose the thickness yourself. The most optimal thickness is for thin pipes.
We connect the edges. We tie the “pipe” with ribbon to make the background attractive.
The advantage of this option is the simplicity and lightness of the model.
d) Cardboard
Cardboard wreath base
Cut out 2 stencils from cardboard, as in the photo . This is enough for the model to be strong. But you can also add volume if you supplement the design with rolled newspaper. And then tie everything together with ribbon.
e) Branches
Willow branches bend well. You can cut them in advance, give them a round shape and dry them. What to do if there is no willow, birch or willow nearby? You can use straight and even dry branches. Only it will be a rectangular model (but you can make a triangle or a star).
There is also one simple way to make the base quickly - boil the branches and leave them to cool in the desired shape. More details in the video
- e) Hoop
And one more option, but from short sticks, which we attach with a glue gun.
They already have the shape we need. Only the wreath of them will be small.
g) Newspaper
I have already started talking about how to make a base out of cardboard and newspaper. But the newspaper itself will make a good and solid foundation.
Roll up several layers of newspaper tightly. Make a circle. Wrap with fabric to secure.
All these tools are available. They will not weigh down the structure. And they can be made durable.
And now the top 10 wreaths and ideas for them
Here are only the most beautiful crafts made from different materials!
Bright ribbons on Christmas tree branches
A wreath made of branches, toys and ribbons.
The emphasis in this wreath is on a bright bow made of beautiful ribbons.
How to make this wreath:
- Christmas tree branches can be either natural or artificial. Cut into small ones, approximately 10-15cm in length.
- Glue them to the base to make the wreath “fluffy”
- Glue snowflakes and toys on top.
- Make a voluminous bow from two ribbons and fix it on the model.
Very elegant! Any color scheme can be used. The thickness of the wreath is your choice.
White toys on willow branches
Freshly cut willow branches are easily twisted into a ring. If you do this in advance, you can end up with a beautiful wreath.
- Choose white and silver toys and balls.
- Create interesting decor from them.
- Glue in small spruce branches.
Focus on the color and shape of the toys that you have in stock. You can even come up with a non-monochrome ornament.
Pompoms
step by step how to make pompoms :
- We will need 2 cardboard circles of the same diameter. They should have a hole in the middle and be cut on one side. This slot is needed to pull the thread through and wrap it around the stencil.
- We connect these rings so that the cuts coincide.
- We wind the yarn. Pompom on a cardboard circle
- Move the rings apart a little. And we cut the yarn between them.
- We spread the rings a little, tighten them with thread and tie the yarn.
- We remove the cardboard and straighten the pompom so that individual threads do not stick out.
These are the pompons our ornament will consist of.
The second option is to make pompoms on threads. They turn out small, just to diversify our wreath.
Pompom on a fork
Here are the fruits you can make:
Dried oranges
Dried orange wreath
It is not important to use oranges or only them. You can dry round pieces of apples, lemons, grapefruit, etc.
Ribbon bows
New Year's wreath made of bows
It couldn't be simpler! These bows are so easy to make.
- They are simply forced onto a form.
- Interesting colors of several ribbons.
From felt or napkins
- For this wreath, you can use napkins or felt, depending on what material you like best.
- Fold the strip in half lengthwise and twist it into a “rose” and glue it to the base.
From the cones
There are a huge number of ideas for this design:
The main rule to remember is that the easiest way is to combine natural materials with other natural materials to create a harmonious composition. Not everyone, even experienced florists, can beautifully combine pine cones with balls or shiny garlands. But combining pine cones with branches, acorns, nuts, sisal, and twine is much easier for a beginner. The easiest way to glue pine cones is with hot glue.
Wreath “Flowers from cones”
But I want to show a special master class . There are cut cones here!
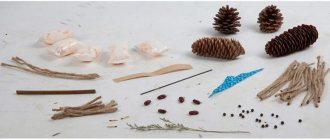
We will need:
- Glue;
- Secateurs;
- Sackcloth;
- Circle made of insulation;
- Cones.
Making:
MK flowers from cones
- First of all, cut the pine cones with pruning shears. We will need a lot of such preparations.
- Wrap the circle in burlap. We fix the fabric with glue along the edges and along the entire base.
- We glue the blanks onto the burlap in a tight pattern.
- We paint some blanks like a flower. Or we can also decorate the wreath with berries.
- We make a loop from an elegant ribbon.
All! You can hang it on the door! Author MK
Christmas tree made of ribbons and thin fabric
- It's all about the huge number of folds that we will make from the fabric.
- Take:
- a triangular base with threads wound along it along and across it;
- a large piece of fabric;
- small decorations made of beads, small cones, dried berries or twisted roses.
Making:
- We attach the fabric to the top of the triangle.
- And then, going down, we make a lot of horizontal folds. We fix them to the thread base.
- We turn the edge of the fabric inward so that it does not crumble or bulge.
- We decorate with “toys” and attach a “star” on top!
It is very interesting to make such a craft with crumbs.
Made from fabric and felt
You can sew toys yourself, patterns can be found here, or even make toys from socks. But it also looks great with store-bought ones! I wrote how to make a wreath here.
- Even plots are created using this model:
Autumn leaf wreaths
A wreath of leaves is an indispensable attribute of autumn photo shoots. The two most popular options are rowan and maple. We have prepared step-by-step master classes for you, from which you will learn how to weave such wreaths on your head with your own hands. This process requires perseverance, but is not as complicated as it might seem at first glance.
Instead of maple leaves, you can use any other leaves, and rowan berries can easily be replaced with viburnum or even artificial bright berries. The base for the wreath can be prepared in advance or you can use a regular hairband. However, you can do without everything altogether. Some people use this autumn craft several times – it won’t wither, but it will dry out a little. And if you plan to make a wreath for photo shoots for a long enough period, the base must be strong.
See also: autumn wreaths for the door
Wreath base
The first step is to decide on the base material. In this selection you will find several options: choose the most convenient one.
Option No. 1: from twigs
To make the basis for an autumn wreath on your head, select young branches. Willow, birch, pine and other trees and shrubs are suitable, from which thin, strong twigs can be easily cut.
We strip the branches of bark and make them smooth. To make a wreath of leaves beautiful, you need to make the base correctly - it should not be too big or too small. Measure the circumference of your head, but constantly estimate the size of the workpiece as you work.
Use twine to tighten the twig ring. Then start wrapping rods around this frame. Build them up gradually and constantly reinforce them with jute.
Make a tight wrap when you finish braiding the branches and achieve the desired thickness of the rim for the wreath. Place the workpiece under the press overnight.
Option No. 2: made of paper and nylon
This basis for an autumn wreath on your head will be made of lightweight materials, but you can rest assured of the strength and reliability of the design.
We have previously told you how to work with newspaper tubes. The principle is the same here. Cut magazines and newspapers into strips and roll them into tight tubes. Twist them together or simply glue them together. You can also make the base for the wreath using tape or sew these strips together.
To finally fasten the structure together, take nylon tights and wrap them tightly around the headband.
On such a blank you can glue or apply leaves, berries or other accessories from which you want to make your autumn wreath.
Option No. 3: made of wire
The good thing about a wire rim is that it turns out thin. This means that you can make the autumn wreath on your head more elegant and light. This is ideal for assembling small leaves in one or two layers.
The wire must be folded into one, two or three layers and intertwined with each other, twisting it into a bundle. Select the degree of winding depending on the thickness of the material.
Intertwine the ends of the wire and hide them. Wrap the top with twine or tape. This is necessary so that the craft turns out smoother and does not tangle the hair.
This wreath can be braided with leaves on top or the material can be glued directly onto it.
To make the wreath on your head more convenient, you can form peculiar loops at the ends of the wire. Then we will tie ribbons there and tie it with a bow. You can make this a unique decorative element: for example, add a wide red ribbon and leave its ends free.
Weaving pattern
As a rule, all head wreaths are woven according to the same pattern. It looks like this.
You can use flowers, autumn leaves, grass, dried flowers, rowan branches or any decorative material as a basis.
Additionally, the spaces between two adjacent leaves can be fixed with fishing line, thread or twine. You can also use satin ribbon to make the wreath more colorful.
Maple leaf wreath
The most popular autumn option is a wreath of maple leaves. You can do it yourself quite quickly. Choose a warp from those described above, or weave without it.
The first step is to collect as many maple leaves of different sizes as possible. Dry them a little if it's humid outside.
The thickening near the stem must be cut off from each leaf.
We take the first leaf and bend the bottom edge so that we get a parallel line with the “stem”.
Using a branch of the second leaf, carefully pierce the first one as if making a stitch with a needle and thread.
We fold the second sheet in the same way as we folded the first sheet before. Take the third maple leaf and repeat the procedure.
So we go around the whole circle. To finish the wreath, you must first try it on your head, and then pierce the first and second leaves with the stem of the last one.
If desired, you can make one or two more rows.
Rowan wreath
Weaving an autumn wreath from rowan berries with your own hands is also quite simple. To make it perfect, we suggest you watch the clear step-by-step video instructions. With its help, you can easily repeat the process of making this beautiful autumn accessory.
This wreath can be additionally decorated with any autumn leaves to make it even more elegant. You can also make it from only one rowan - large clusters look very beautiful.
We hope that now you can weave a wreath on your head yourself, and your autumn photo shoots or competitions will be even more beautiful. By the way, leaves made of colored paper or foamiran are often used for school crafts. If you need to make something similar, use the instructions provided and our selection of leaf stencils.
5+
Pine cone wreaths for the New Year and Christmas
Wreaths of pine cones decorate the house and fill it with an atmosphere of magic. They are associated with cheerful winter holidays and create a special mood. By the way, making such a wreath with your own hands is not at all difficult. We bring to your attention options for its production.
Hanger as a base
This option is the simplest. Take a clothes hanger made of bendable wire. The hook should be left unchanged, and the hangers themselves should be given the shape of a circle. One end of the hanger will have to be untwisted in order to string the pine cones onto it.
By the way, they can be painted, for example, with gold paint. Glue small plastic rings to the pine cones. String cones with rings onto a circle. Twist the free edge of the wire.
Attach a large satin ribbon bow on top to cover the hook and decorate your wreath.
Newspaper wreath base
Make a ring base from newspapers, rewind it so that it is held tightly with thin wire, thread or rolled paper. Cut a strip of organza (width 15 cm, length 1.5 m), wrap it around the frame, and secure with a glue gun. Wrap the frame with green rain that imitates spruce branches. Glue pine cones, small fake vegetables, flowers and leaves.
We use ready-made materials for creativity
You can take a ready-made base for a wreath. They are sold in abundance in departments for handicrafts. Glue acorns, halves of walnut shells, small cones and beads to it, and make bows from brown linen rope (this is how bags used to be tied). Your wreath is ready!
Twigs as a base
Tie pliable thin branches so that you get a base that resembles a nest without a bottom. Attach pine cones, decorative twigs and beads to the base. Paint the pine cones with silver paint.
To make the wreath look impressive and elegant, you can paint it with spray paint, sprinkle it with glitter, decorate it with satin ribbons, bows, small Christmas tree decorations, beads, etc. The more decorative elements, the better. Arts and crafts shops sell beautiful twigs, stars and flowers for decoration.
You can make a wreath that will be combined with the overall design idea, for example, decorate it in the same color scheme as the Christmas tree or, on the contrary, make it as natural as possible. It is very convenient to fix decorative elements with transparent silicone glue, a glue gun, or using thin wire.
- Most often, such wreaths decorate the front door, or it is quite possible to decorate one of the rooms.
- Here are some photo ideas:
Source: https://new-year-party.ru/novogodniy-venok-iz-shishek/
Christmas wreath with pine cones and candies
Everyone is free to decorate their New Year's pine cone wreaths with a variety of materials, even such as dried citrus peels or cinnamon sticks. But a New Year's wreath decorated with candies will look tastiest. Kids will especially like it; they will simply be delighted; they will agree with interest to take part in its making, during which time the little one will definitely receive several candies.
Materials and tools
- Cones.
- Caramel or chocolate candies in bright wrappers.
- Decorative elements (bows, ribbons, beads, etc.).
- Plastic Christmas balls of different sizes and colors.
- Double sided tape.
- Scissors.
- Thick cardboard.
- Bandage.
- Foam rubber.
Manufacturing
- First, cut out the base for decoration from a sheet of cardboard, and then glue foam rubber onto it.
- Carefully smooth out the unevenness formed along the edges of the ring with scissors.
- Then wrap the ring with a bandage, leaving no gaps.
- Spray glitter onto the pine cones and then glue them to the base.
- Secure the balls and ribbons between the cones using tape.
- It is most convenient to use truffle candies as a sweet decoration - it is easy to stick a piece of double-sided tape on their flat base, and the opposite side with a twist will additionally decorate the New Year's wreath.
Or another version of the master class for a New Year's wreath made of pine cones:
How to make a Christmas wreath from pine cones. Step-by-step instructions, photos, videos
Simple steps for making a Christmas wreath will allow you to make a festive attribute using available natural material - pine cones. The step-by-step instructions are schematically presented in the table. Cheap consumables and simple technology make the manufacturing process accessible to everyone.
| Events | Target | Consumables | Tools |
| Preparatory | Sketch sketch, choice of design and color scheme | Paper | Pencil |
| Making the base | Forming the basis for attaching decorative elements | Wire of various diameters, cardboard, polystyrene foam, threads, glue, paints, paper, tape | Pliers, brushes, glue gun, scissors |
| Processing of decorative elements | Preparing the required number of parts of the required size and color | Pine cones, tinsel, candies, toys, ribbons, branches, sparkles, paint, threads, varnish | Brushes, knife, scissors |
| Creating a Layout | Arrangement of decorative elements based on | Ready-made decorative elements | — |
| Wreath installation | Fixing decorative elements on the base | Glue, knitting or transformer wire, thread | Glue gun, pliers, scissors, |
The history of the tradition of decorating a house with Christmas wreaths
In modern terms, the patent for the inventor of the Advent wreath could have belonged to the Lutheran priest Wichern Johann Hinrich . The pastor's students, children from poor families, always looked forward to the main holiday of the year.
To clearly show the passage of time, and at the same time develop counting skills, the clergyman created a practical guide that allows you to count down the days until the Great Holiday. The wooden wheel was decorated with candles. Their number corresponded to the number of days remaining before the holiday and decreased as it approached.
The last candle showed the kids that the long-awaited celebration would come tomorrow. I liked the pastor's idea. From that moment on, the tradition of decorating your home spread throughout Germany, and later throughout the world. This beautiful attribute has received approval from Christians of all denominations. The invention received creative development.
The tradition of decorating your home for Christmas with a wreath of pine cones originates from Germany.
Today there is a competition of ideas on what materials can be used to make a holiday decoration. But the winners will always be wreaths made from materials created by nature itself.
How to choose buds
When making a Christmas wreath, cones of available species of coniferous trees are used. The most common are pine and spruce. Less - larch and cedar, cypress and fir. Raw materials are assessed at the time of collection. Broken scales, asymmetry, rot are grounds for discarding. Cones can be of different sizes.
First stage of work:
- cleaning from dirt;
- boiling in water;
- drying;
- giving the raw material the desired color.
One of the stages of preparing pine cones for crafts is soaking them in water
To paint the cones, use brushes, pieces of foam rubber, and cans of paint. You can hold it by the tip and completely dip it into a container of dye. In all cases, when drying, the scales should be directed upward. If you want to leave the natural color, but make it a little lighter, the cones are soaked in bleach for 4-5 hours to wash clothes.
Cones decorated with sparkles look impressive. Such decorations are often attached to artificial trees before being sold. To get the result, PVA glue is applied to the tips of the scales. Before it hardens, the cone is sprinkled with glitter. Those that do not stick are shaken off for reuse. Fragrance additives or oils give the product the desired aroma.
Master class on making a wreath using only pine cones
Depending on the material used to make the frame, pine cones are attached to the Advent wreath using different methods. The most common options are wire and cardboard (plywood) bases.
In the first case, a frame resembling a cut torus (donut) is made from soft iron wire with a diameter of 2.5 - 3 mm. The diameter of the inner ring is 15-20 cm. The distance between the rings is 3 cm. Pliers are used for this work.
Christmas wreath made of pine cones: step-by-step instructions
To give the structure strength, the 4 rings are fastened together with stiffening ribs made from the same wire. The frame will be more attractive if it is painted green.
Next, the cones are laid out in the 3 formed paths. The inner row is filled first. For fastening, use a thin wire (knitting or transformer). It is threaded between the lower petals, fixed with an overlap and attached to the main frame.
It is important that the tops of the cones have approximately the same angle of inclination to the plane of the wreath. The second row, the one furthest from the middle, is filled in the same way.
By varying the sizes of the cones to position them as close as possible to each other, the void between the outer rows is closed. If desired, decorative elements are added to the design. For this frame, it is advisable to use pine (cedar) cones.
Wreath with fir cones
Fir cones look attractive when placed on a flat surface - a ring (torus) with an internal diameter of 15 cm and an external diameter of 24. The presence of a sheet of plywood with a thickness of 3 mm and a jigsaw simplifies the task. Their absence is not an obstacle to the goal.
New Year's wreath based on newspapers
In this version, newspaper or magazine paper is used to make the base of the wreath.
- Several sheets of paper need to be twisted, closed in a ring and wrapped with tape.
Try to keep the thickness of this ring the same in different places.
- Using a glue gun, cover the entire ring with a paper towel.
- Cut a 1.5-meter strip of 15 cm wide from organza. Wrap the base with this ribbon and secure its ends with a glue gun.
- After this, wrap the frame with green rain imitating spruce branches.
- Attach larger specimens of cones with a glue gun in the center of the base, and smaller ones are suitable for the edges.
You should not try to glue the cones tightly, since other decorations can be placed in the gaps between them: Christmas tree decorations, beads, cinnamon sticks, ribbons, and complete the decoration with a large beautiful bow.
another master class using the same principle.
step by step New Year's wreath of pine cones: