Pine cones are a traditional material for New Year's decorations. It's best to assemble them yourself. You can start stockpiling much in advance - for example, in the summer. It’s easy to find them in forests, parks, and arboretums. Autumn is also good for harvesting natural materials.
When snow falls, finding and obtaining pine cones will become much more difficult. However, you can buy them at landscaping or craft stores. You can purchase cones of different sizes, decorated or natural looking.
Try to choose symmetrical, beautiful specimens that are suitable in size for decoration. The ideal option is smooth, defect-free fruits from coniferous trees (pine, cedar, spruce).
Additional materials for DIY crafts from pine cones
To create jewelry you need to prepare:
- PVA glue;
- wire;
- felt;
- scotch;
- paper, cardboard, newspapers;
- salt;
- glue gun and rods for it;
- dry snow;
- twine, threads;
- brushes;
- pieces of foam rubber;
- acrylic paints, gouache, nail polish, spray paint.
Preparing for work
If the cones are collected in the forest and not bought in a store, then they must be pre-processed. You need to get rid of resin and bacteria.
First, pour water into a container with the addition of dishwashing detergent. We immerse the selected specimens there and leave for 20-30 minutes. Afterwards, rinse well with running water and boil for 3 hours. In this case, the water must be changed periodically - 2-3 times during the event.
You can place the buds in chlorine bleach (for example, White) for a day, and then rinse thoroughly with clean water. After this procedure, they will become significantly lighter and will be easier to dye.
The next stage is drying. You can do this on a radiator or in the oven at minimum temperature (just cover the tray with foil). During this process, the buds open up.
If you need them to be closed or partially open, wrap them with thread before drying.
To keep the pine cone in shape, take it with tweezers and dip it, base down, into wood glue (Titbond, Titanium, etc.) several times. It is necessary that the adhesive mass covers all the scales. Place the pine cone on the oilcloth, and after 15 minutes turn it over to the other side. After this treatment, it should dry for three to four days.
If you have a well-opened cone, but you need a closed one, do not despair - place it in water and hold it until the scales close. After this, dip in glue and dry.
To get a beautifully curved shape, place the beauty of the forest in boiling water and cook until it becomes soft and pliable. Give the desired bend, tie with thread and dry. At the end, be sure to treat it with glue.
Sometimes you need to drill out a lump. This should be done very carefully. Direct the drill clearly to the center of the rod, trying to deepen without strong pressure. Otherwise, there is a risk that it will fall to pieces.
Coloring
In winter, you especially want a riot of colors. You can start by painting the cones.
The easiest way is to cover them with acrylic paints or gouache. Several layers can be applied. Then after the first painting, take a break of at least half an hour to allow the paint to dry.
If you purchased a can of paint, bend a piece of wire so that it securely holds the workpiece at one end and looks like a hook at the other. Submerge the pine cone completely in the paint. Take it out and hold it over the jar for a few minutes to let the excess drain off. Hang the craft above the newspaper. Once dry, remove the wire and your gorgeous winter decoration is ready.
To quickly paint only the ends without brushes, you can do the following. Take a can of water-based paint and a piece of foam rubber. Be sure to wear gloves! Apply a little paint to the foam and roll the pine cone over it in a circular motion. You will get a decoration with evenly colored tips. If you add golden or silver grass to the paint, you will get a sparkling decorative element.
Sometimes white cones are needed for a composition. There is an opinion that they can be bleached with Whiteness. However, experienced needlewomen refute this version. It’s better not to waste your energy, time and health (chlorine is a rather dangerous substance). Immediately use white paint (acrylic, gouache, spray paint, etc.).
You can easily and quickly cover the composition with spray paint. All you need to do is place the cones on newspaper/paper/oilcloth and spray paint from a can from a safe distance, evenly covering the craft.
If painted cones are coated with wood varnish, they will acquire a glossy shine.
Interesting options are also obtained after using artificial snow.
Buy dry artificial snow and PVA glue. Pour snow into a paper plate. Apply PVA to those flakes on which you want to see white flakes, and lower the workpiece into the snow. You will get such a miracle.
You can also create snow using fine salt. You can add sparkles to it and it will turn out even more impressive. Apply glue with a brush and sprinkle with mixture. Wait until it dries completely and shake off anything that doesn't stick.
Forest wonders
Forest materials are arranged very beautifully among themselves. You can decorate pots with small twigs, like a small fence, and acorns instead of beads. Small master classes on topiary from cones and acorns of various variations.
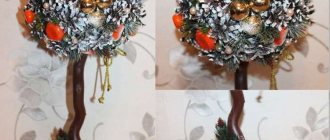
1) Cones, rowan berries and juniper branches, a straight stick for the trunk, acorns, moss.
The basics we have are a foam ball and a mayonnaise bucket, plaster and glue. Small branches are collected in a fence. We line the bucket with it. Glue the acorns on top with hot glue. We attach all our natural ingredients with glue or insert them into a foam ball. We attach the ball to the trunk and send it to the pot. Pour the gypsum mixture and wait for it to harden, then put the moss in the pot and plant acorns on the glue.
2) Cones, acorns, chestnuts, nuts can be coated with paint, and tree berries can be coated with transparent varnish.
The shelf life of such topiary will be extended, the appearance is not so natural, but in some interiors, in modern design styles, it is sometimes appropriate to use imitations of living nature.
3) Topiary made from forest materials can be combined with spices; such trees retain their aroma and I feel nature next to them. It will create a very warm atmosphere not only in the kitchen at home, but also in restaurants and cafes. This is an excellent gift for lovers of nature and environmentally friendly materials, complemented with natural fabrics in confirmation of pure intentions.
4) It is important to decorate a house with such a tree at the beginning of autumn, as a symbol of productivity, fertility, adding berries and leaves. And decorated with bright glossy boxes and balls, it will become a replacement for a bulky Christmas tree.
Related article: Crochet bags
Christmas trees made of pine cones
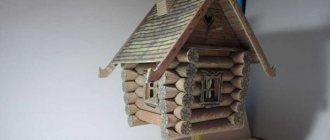
The simplest forest beauty will be made from a large symmetrical cone (best of all - a cedar cone). The main thing in this craft is to install and secure the “Christmas tree” evenly. This can be done using a stand and a glue gun. The craft will stand well in a flower pot of suitable diameter.
As decoration, use colored beads of different diameters, small pompoms, pieces of cotton wool, and other interesting little things. All this is attached using hot glue.
If you attach a star to the top of such a tree, you will also get a Christmas decoration. It looks great on a holiday table, fireplace, windowsill, etc.
A more labor-intensive process is creating a Christmas tree from individual elements. They are attached to a foam cone, which can be purchased at a craft store.
You can use a regular glass bottle as a base. A paper cone will also work. To give stability, the inside needs to be stuffed with crumpled newspapers.
We begin to attach the cones using a glue gun - from bottom to top in a circle.
Trees made from cones glued with the tops down look unusual.
You can build a Christmas tree without an internal cone. To do this, you should make a base of thick cardboard (like for a wreath) and glue the cones from the base in a circle upward, making the diameter of each next level smaller than the previous one. The main thing here is to make such a “herringbone” symmetrical.
Another option is a tree made of scales. First you need to carefully cut off the plates with a sharp knife.
Then carefully attach each element to the cone with hot glue.
The result will be such an extraordinary miracle.
All that remains is to paint the resulting “tree” and decorate it in a festive way.
A large spruce tree needs a stronger frame. It can be purchased at a flower shop.
We carefully screw a screw into each cone and fasten it to the cone with wire.
You will get a real New Year's tree that you can show off to your neighbors and guests.
New Year's crafts and toys made from pine cones
If you are lucky enough to not only walk through a coniferous forest, but also bring back a few pine cones, then make beautiful New Year’s crafts out of them.
Making toys for the Christmas tree
From a pine cone you can make not only a New Year's toy for the tree, but also the tree itself, as in the photo. To do this, paint it green and wait until it dries. Attach bows, beads and snowflakes, flowers cut from white lace to the miniature Christmas tree. Don't forget to make a stand for the New Year's tree.
If you show your imagination, you can create creative crafts from pine cones in the form of squirrels, deer and birds, but you will have to make their heads and legs, and the pine cones will serve as a body.
If you simply paint the cone or cover it with glue and sprinkle it with glitter, you will get an unusual decoration, to which all that remains is to attach a loop.
Candlesticks made from natural materials
The glow of holiday lights lifts your spirits, so during the holidays you want to see them as often as possible. Don't limit yourself to just garlands, make New Year's candlesticks from pine cones, and they will add brightness and coziness to the interior.
The easiest option is to decorate ready-made candlesticks, decorating them in the spirit of the holiday with pine cones, twigs and Christmas tree decorations.
Interesting candlesticks can be made from glass jars if you pour artificial snow (or ordinary salt) on the bottom. Glue a strip of lace to the top of the jar, tie a couple of cones sprinkled with “snow”.
Make candlesticks from flower beds, as in the photo, decorating them with artificial pine needles. For decoration, use small New Year's toys, cinnamon sticks, beads and pine cones.
Wreaths on the door
Christmas wreaths are currently popular; they are not difficult to make. The main thing is to prepare a reliable base in the form of a circle. The frame base can be made from:
- wires;
- bendable wire clothes hanger;
- thick cardboard;
- buy a ready-made circle at a handicrafts store.
Decorative elements are attached to the base: cones, ribbons, bows, nuts, leaves, etc. To make the product look more impressive, some parts can be coated with gold, white paint imitating snow or sparkles.
Decor for table setting
Don’t forget that not only the New Year tree should be elegant, but also the festive table. Let cute pine cone gnomes hide between the plates or bright owls peek out. Make nice souvenirs for each participant in the feast: glue bright feathers to the pine cone and write the name of the person for whom the cutlery is intended.
- Each master class presented is interesting and undoubtedly deserves to be implemented.
Source: https://new-year-party.ru/novogodnie-podelki-iz-shishek-foto/
New Year and Christmas wreaths
Thick cardboard is suitable for the base. Draw a circle on it. You can use two available bowls of different diameters. Attach them to the cardboard and trace them with a pencil. Using a knife or scissors, cut out the base for the wreath. To add volume, we tape the crumpled paper to it with masking tape.
This is what the result should be.
We take a wide burlap ribbon and wrap it around the prepared base. Periodically secure the tape with a glue gun.
We attach the decor tightly to the base.
If you want to add glitter, spray the wreath with adhesive spray and sprinkle it over it. The result will please you.
You can make a simpler version where wire hangers are used as the base. Unbend the trempel so that you get a circle with a hook. Glue plastic rings to the cones and string them onto a wire. It couldn't be simpler. Add a wide satin ribbon bow.
A ready-made foam base will greatly simplify the work. They are usually sold in white. You can make the base gold or silver. We attach the decorative elements using hot glue. You will get such a wonderful wreath.
The base can be created from ordinary newspapers. Take a few pieces, twist them into a tube, and close them into a ring. Wrap in white paper. You can also decorate the top with colored mesh and New Year’s rain. We attach the decorative elements using a glue gun. It turns out simple and tasteful.
Christmas wreath
A wreath of pine cones is made in different ways. For example:
- Make a frame using thick wire in the shape of a circle.
- String fruits on it, you can glue the second row.
- Decorate the wreath with ribbons, bows, nuts, paper leaves, beads or other decor.
- Elements can be coated with gold paint and silver sparkles.
The base can be foam rubber or paper rope. They are wrapped with tape to maintain their shape. Then cones of different sizes are glued on. You can limit yourself to this - it already looks impressive.
You can decorate the wreath with twigs, leaves, bows. Or cover it with white gouache - then the fruits will look frosty from frost.
Bright paint in a can will make the decoration especially impressive.
And if you add dried flowers, various thorns, nuts and other forest gifts, you will get such a luxurious wreath.
The shape of the Christmas decoration can vary. For example, in the shape of a heart made of pine cones - this can be hung on the front door of a private house.
Fairy lights
This is another traditional New Year's decoration. A garland of gilded or white cones looks very stylish.
Before starting work, you need to purchase small self-tapping screws with rings at a hardware store. Screw self-tapping screws into the parts that attach the cones to the branch. String them onto the base, securing each with a knot.
You can attach decorative elements more tightly. In this case, it is better to use thin ribbons or strong threads or twine.
These garlands look gorgeous.
Christmas balls
It is best to use round foam blanks. They can be purchased in different diameters in stores that sell decorative or handicraft products.
Select cones of approximately the same size and shape. Using a glue gun, attach them to the ball, circle by circle, placing them as close to each other as possible.
We get this result.
To fill the gaps, you can use twigs, beads, fancy flowers, berries, etc.
If you don’t have a foam blank, you can make do with improvised materials. Inflate the balloon, wrap it in toilet paper soaked in a solution of water and PVA glue (2:1), and dry for about a day. Paint the workpiece and dry it again. Glue the cones as described above. But keep in mind that such a blank is much more fragile than polystyrene foam. You need to work very carefully.
New Year's decor from pine cones
Of course, here you will find decorative ideas from pine cones, Christmas crafts for children, winter decoration ideas and a way to bleach pine cones for decoration. It is noteworthy that you can do all this in the shortest possible time. But the best part is that pine cone crafts and decor are usually incredibly inexpensive! This way you don't have to shell out a lot of money, just use what you find in the forest.
New Year's decor from pine cones and Christmas tree toys
You can also make small figures from pine cones yourself. Moreover, by making easy and quick crafts from pine cones, you can also attract children. Ask them to put in a little effort and work with you to make decorations from pine cones, for example, these cute gnomes.
You can also make such funny little people.
You can also make Christmas tree decorations from pine cones in the shape of different animals.
You can also make a New Year's deer using fir cones for decoration.
Or such cute faces.
In addition, you can make decor from pine cones in the shape of an owl.
You will get very cute Christmas trees if you paint the pine cone green. It must be painted with brilliant green diluted with water. Simply dip the cones into the solution and lay them on oilcloth until completely dry.
Another option: cones decorated with colored pompoms. Pom poms look adorably like jelly beans, making them the perfect choice for a Christmas craft. Glued to pine cones and hung from backyard trees, they instantly create a cheerful winter scene.
If you don't have pompoms, you can replace them with brightly colored beads. This little bump looks very gentle and festive!
Stars
For this decoration we will need elements of different sizes, strong wire, and wire cutters.
The most important thing is to make the base. Using wire cutters, cut off 5 pieces of wire of the same length. We form a five-pointed shape by bending each piece in the center.
Now it's time to string the prepared cones. This is not easy to do, so choose very strong wire.
Another option for an asterisk. Pick 6 approximately identical cones. Fold the thin ribbon in half and tie the loose ends in a knot. Pierce one piece from the base to the top, stretch the tape so that the knot is at the base. Glue the pine cones together with hot glue to form a five-pointed star. To hide the junctions, attach another pine cone, flower or snowflake right in the center of the composition.
New Year's gnomes
To make these cute fairy-tale characters we will need:
- pieces of felt;
- open cones;
- large wooden bead;
- glue gun;
- brushes for washing nipples.
To cut out the cap, draw a circle on paper. Cut it out, fold it in half, and roll it into a cone. We try the resulting figure on the bead and adjust it so that the cap fits tightly. Using the adjusted pattern, cut out the cap from felt and carefully sew the edges together.
We attach the beads with hot glue to the top of the craft. If you don't have beads, you can make a chestnut head.
Glue the cap to the bead. Let's start making handles.
We cut out two parts in the form of mittens from felt. We cut off the handles of the nipple brushes. We attach the fleecy parts to the scales using hot glue, and attach mittens to them.
You can make handles from thin rope, and instead of mittens, take wooden beads of small diameter. Make a knot at one end and put on a bead, glue the other end to the scale as close to the rod as possible.
Cut out the legs from felt and glue them to the pine cone.
The final touch is to paint the face with a thin brush and acrylic paints. This is your imagination - the gnome can smile, be sad, stick out his tongue and even sleep.
You can decorate the gnomes with felt scarves.
If you sew a bead to the cap, you can thread a thread through it and hang the gnome on the tree.
You can make gnomes without arms simply by attaching, for example, a gift, a Christmas tree, mushrooms, etc. to the scales. The beard and hair can be made from synthetic fluffy material (sintepon, holofiber, etc.).
But such a gnome is very easy to make. Sew the cap wider, pull it lower over the pine cone, and secure it with hot glue. Also use a glue gun to attach a nose bead or a small cotton ball. Pull the thread through the top of the cap and make a loop. The magic man is ready.
Fantasize, and you will get your own unique New Year's gnome that makes wishes come true.
Crafts from pine cones for the New Year
How can we create a special coziness and romantic atmosphere at home if we plan to celebrate the New Year in a close family circle? We are talking about candles, and we decided to make candlesticks - crafts from pine cones for the New Year . Since we are talking about a material that can easily ignite upon contact with fire, it is therefore necessary to protect the materials from the candle itself. For example, a candle can be placed in a jar or glass, and the outside of the container can be decorated.
Even an ordinary half-liter or liter jar, which we usually use for preparing winter preserves, will become an original candlestick, especially if you decorate it with cones. We will need two or three cones, a jar with a capacity of 0.5-1 liter, jute rope, artificial snow and a piece of tulle to decorate our jar with a “skirt”.
Our main task is to decorate the carving that is on the top of each jar. For this we will use jute thread, but first we will decorate it with a “skirt” of tulle or lace. You need to cut a piece of tulle that would encircle the jar. The tulle must be gathered from above and secured to the neck with a white thread, and wrapped on top with jute thread in several layers and tied at the ends with a bow. In order for the bow to hold, it must be fixed with glue. You need to attach two small cones to the ends. To fix them, you first need to screw a screw with a ring into the bottom. This way we can beautifully decorate the carving on the neck.
To find other original ideas for crafts from pine cones, you can look at the photos on our website. A step-by-step master class will tell you how to properly make this original candlestick.
There is another way to decorate a glass jar; for this we will again use tulle or lace with a pronounced pattern, and we will also need a sponge and white paints. You need to attach the lace to the glass surface, and apply gouache on top with a sponge, without pressing it. Then we carefully remove the lace, and the design will remain on the glass.
DIY New Year's crafts from pine cones
We have already made New Year's crafts from pine cones with our own hands , which served as decorations for the Christmas tree; we attached a bow and strings to the bottom, sometimes painted them or decorated them with artificial snow. But now we will make original figures based on the cones - Santa Claus, an owl, a gnome, which will also become toys on your Christmas tree.
For such an unusual toy you will need felt, from which we will cut out additional elements. We will create an owl, so we need to cut out the wings, beak and eyes. You can first find a pattern online or draw the elements on paper yourself.
For each wing we will need two teardrop-shaped blanks of different sizes. You can also glue several small circles onto each wing to replicate the variegated colors of the owls. You can use any color for the wings, two similar shades.
We will cut out the beak from yellow felt, and for the eyes (base) you will need white, blue for the iris and black for the pupil, or you can decorate it with a bead. All elements must first be outlined on felt with a pencil, and then cut out along the contour with sharp scissors.
The two wing parts should be glued together with a glue gun, then three circles should be glued on top. On a white base (you can see what shape it should be in the picture) you need to glue a round iris and a black beady pupil. We will glue the beak directly onto the bump, the eyes on top, and the wings on the sides. All that remains is to fasten the loop on top so that the toy can be hung on the Christmas tree. And if you like to make crafts from autumn materials, then you can make wings for owls from oak leaves.
Even a child studying in primary school can work with felt; besides, this material does not need to be further processed, its edges do not crumble, so you can cut out small elements and glue them together.
New Year's crafts from pine cones for children
Children will love DIY New Year's crafts made from pine cones - little gnomes that will decorate your Christmas tree in an original way. To create the gnomes, we will also use felt to sew a small cap, and cut out mittens and felt boots. And to make the head, we need a small wooden bead.
Before attaching the head to the cone, you need to cut off the scales on the very top of the head, then you need to glue the bead to the remaining tip with glue. For the cap, we need to cut out a sector equal to a quarter of a circle and sew it with hand stitches along the edge, now you have a cone-shaped cap that needs to be glued to the bead on top. All that remains is to design the head, draw the eyes, nose and mouth with a thin marker.
You also need to cut out a pair of small felt boots and mittens from the felt, and glue them on the bottom and sides, respectively. In this case, we glue the felt elements directly to the surface of the pine cone, but you can make arms and legs, onto which you can already glue mittens and boots. The handles can be made from toothpick halves, and for the legs you can use a small piece of lace. You can also decorate our gnome with a scarf.
In addition to the bead for the head, you can also use a ball of plasticine or make it with salt dough.
To make New Year's crafts from pine cones for children , you can use chenille wire; it is fluffy and soft with short fibers, flexible enough to give it different shapes. For example, it can be used to create a “Deer” craft. Using chenille wire we will make branched antlers for him. You also need to make a fluffy pompom of small diameter that will serve as a nose. You can make eyes from beads or buy doll eyes at the store.
For the horns, you need to cut the chenille wire into four pieces of the same size, 4-5 cm each, and another piece for the base, so for just two horns we need 10 parts. Attaching the parts will be very simple; to do this, you just need to twist the ends around the base segment.
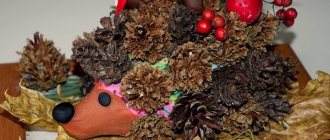
All parts are glued to the cone with a glue gun, which ensures reliable fixation, and your Christmas tree decoration will serve you for many years if treated with care, but the next year you will be able to bring other creative ideas to life. A hedgehog made of pine cones can also be a toy for the Christmas tree, and the face can be made of plasticine.
Crafts from fir cones
As always, if you want to find new ideas for making New Year’s crafts from pine cones with your own hands, you can look at photos for inspiration on our website. For example, here you will find many interesting and easy-to-follow ideas.
Other options for making crafts for the New Year will appeal to young children who love working with plasticine. All the missing elements can be made from plasticine, giving them any shape. You can sculpt a head, paws, wings, use not only cones, but also spruce branches and needles in one craft.
Crafts made from fir cones allow you to develop a child’s imagination and fantasy; working with plasticine and other plastic materials has a positive effect on fine motor skills of the hands. In addition, this type of creativity can be classified as non-standard, since we will use improvised and natural materials, and not paper or cardboard that is familiar to a child. In this way, the child will learn to look for unusual ideas that can be applied to ordinary objects.
The main thing is not to forget to dry the cones before making the craft, because we often bring them from the forest wet. When it dries, they open up, and such decorative elements will last longer.
Animal figurines for the Christmas tree
The pine cones make wonderful funny little animals and birds.
For example, an owl. You can make many variations of this bird. For creativity you will need:
- felt scraps;
- plastic eyes;
- glue gun
From pieces of felt we cut out droplet-shaped wings, a triangular beak (if we want to get an open version, we cut out a diamond shape), and round “bowls” for the eyes.
We attach it all to the base with hot glue.
This is the basis. And then - your imagination: you can replace the plastic eyes with buttons, add a few natural feathers, cut out paws, eyebrows, a hat, etc. from felt.
New Year's peacocks look no less impressive. They are very easy to make. Use hot glue to secure the eyes and triangular beak made of felt (choose the color yourself). We place the tail feathers in a semicircle at the base of the cone. To cover the places where the feathers are attached, cut out a circle of felt of the appropriate diameter and glue it to the base. These are the bright magical birds you get.
You can also please children with little mice. We make sharp faces from acorns, antennae and tails from threads (floss, silk, etc.). We cut out the ears from felt or use pistachio nut shells. The eyes and nose are large black beads.
We cut pieces of thread of the same length for the mustache. We put it together, pull it through the bead, and drip PVA glue inside the bead. We wait until the nose hardens. During this time, cut out the ears from felt.
Glue the ears, eyes, and nose to the acorn. To make a beautiful bang:
- without tightening, wind the floss threads onto the ballpoint pen refill;
- coat one side with glue;
- attach to the acorn, press down, carefully remove the rod;
- wait until it dries completely.
Attach the finished head with hot glue to the body - the bump. Fold several strands of floss in half and twist to form a ponytail. Attach it with glue to the base. Adorable mice are ready.
There is nothing easier than making a moth. You need to cut out heart-shaped wings from felt. Make a head out of a wooden bead, painting it at your discretion.
Fold the thread, secure the ends with a knot and thread it through the bead so that the knot is at the bottom of the head. Attach the blanks to the pine cone with hot glue.
You can complement the moth with a beautiful headband and a felt heart.
Alternatively, you can make wings from wire for decoration. You need to bend it in the shape of wings and attach it to the pine cone with hot glue.
What would New Year be without deer! You can quickly make such an unusual head using twigs, felt, a long pine cone, plastic eyes, and a glue gun.
We cut out two blanks for the ears from felt. As a nose, you can use a square dark bead or a piece of the same felt. We attach the blanks to the “head” with hot glue. We place the branches under the scales at the base of the cone, trying to make horns. Secure with glue. The work is finished.
This is how you can make any animal from scrap materials. Work together with children. You will get extraordinary pleasure from creativity.