Materials
To weave rhombus beads we will need:
- Beads of several colors
- Thread or fishing line
- Needles
- Scissors
Choose beautiful colors of beads so that the pattern does not turn out to be too colorful. Therefore, we weave diamond shapes from matching shades of beads. It is better not to use more than three shades in one product. Select the thickness of the thread or fishing line depending on the size of the beads.
Return to content
LiveInternetLiveInternet
Quote from enol's message
Read in full In your quotation book or community!
Master class “Bead earrings “Volume diamonds” https://melodiabisera.ru/workshops/master-klass-sergi-iz-bisera/
In this master class we will learn how to make diamond-shaped earrings from beads.
You can watch a video master class of this composition on the “Melody of Beads” channel on YouTube. Thank you for liking it. Subscribe to our channel - we are constantly adding new master classes and video lessons on beading (including for beginners).
To make earrings we will need:
- beads of two shades;
- thread for beads;
- bead needle;
- ear wires;
- round nose pliers;
- scissors;
- ruler.
We take a piece of thread 2 m long, thread it through a needle; for ease of work, you can fold the thread in half (not in half - one piece should be 30 cm longer than the second). We collect two white beads, move them to the edge of the long thread so that there is a free segment of about 15 cm (we will need it at the end of weaving the earring). We pass through both beads with the needle again.
We pass through only one white bead.
We collect two white beads and insert the needle into the adjacent white bead.
We collect 4 red beads, 4 white beads and 4 red beads, pass the needle through two white beads, completing the work.
We pass through 2 white beads.
We collect 1 white bead, skip 1 red bead, and pass into the second red bead.
We collect 1 red bead, skip 1 red bead, go to the last red bead (before the white one).
We collect 1 red bead, skip 1 white bead and go into the next white bead.
We collect 2 white beads and, without missing anything, insert the needle into the adjacent white bead.
We collect 1 red bead, skip 1 white bead and insert the needle into the first red bead.
We collect 1 red bead, skip one red bead and insert the needle into the next red bead.
We collect 1 white bead, skip 1 red bead and go into the white bead.
We have finished the row, move on to the next row
We will go through two beads. Now the beads into which we will pass the needle can be seen better - they protrude.
Let's make an empty passage (without beads) from one side of the work to the other.
Now the row begins and ends between two white beads.We came out of white beads, pick up 2 white beads and go into the adjacent white bead.
Next we go along the protruding beads, pick up 1 red one and insert the needle into the protruding red one.
We collect 1 red bead, go into the protruding red bead.
We collect 1 white bead, go into the protruding white bead.
We came out of the third white bead on this side and are entering the third bead on the other side of the work.
At this stage, you can “flatten” the work.
We collect 1 white bead, go through the protruding red bead.
We collect 1 red bead, go through the protruding red bead.
We collect 1 red bead, pass through two white beads.
We've completed another row.
Let's start the next row
We collect 2 white beads and go into the adjacent white bead.
Next, we weave all the rows in the same way; the beads should lie like bricks.
We need to weave 26 rows, we can count them by the white beads (do not forget that we count the rows when we have passed through two white beads and thereby completed the row).
Now we need to form a corner so that the work changes its direction. To do this, we pass without beads into white beads.
We collect 1 white bead and pass the needle through the protruding red bead.
We collect 1 red bead and pass into the protruding red bead.
We collect 1 red bead and pass into the white bead.
We come out of the white bead.
We collect 2 white beads and insert the needle into the adjacent white bead.
We collect 1 red bead and insert the needle into the protruding red bead.
We collect 1 red bead and insert the needle into the protruding red bead.
We collect 1 white bead and insert the needle into the white bead.
Now we will again make an empty pass along the beads on one side of the work, so that the rows begin and end at the bottom of the work.
The angle is formed, the direction of work is changed, we weave further.
Let's start a new series
We collect 2 white beads.
We go into the adjacent white bead. Then we weave according to the pattern.
On this side of the work you need to weave 25 rows (the 26th row will be the first row of the other edge of the work).
Now we sew the earring
We take the work so that the working thread with the needle comes out of the far white bead (pictured on the left).
We insert the needle from the bottom up into the distant white bead from the other edge.
We pass into the second white bead from the same side of the work.
We pass into the second white bead from the other edge of the work.
We carefully tighten the thread and pass one by one through all the protruding beads, on one side and the other.
The middle is sewn, we move to the outside.
We bend the work so that it is convenient to connect the outer parts, and we go one by one along the protruding beads.
It should look like in the photo.
We have come out of the top white bead and are going under the thread between the top two white beads.
We form a loop on which we attach the earring
We collect 6 white beads and pass again between the beads, under the thread.
We make several such passes (3-4 passes - depending on how much the beads allow).
We go into the other top white bead.
Next, we close the remaining ends of the thread in a random order in different directions (here you need to take the time to sew the earring several times - this way it will hold more securely, and the ends of the thread will not be able to get unraveled).
We fasten the earring and the earring is ready. We make the second earring in the same way.
We wish you pleasant creativity! Author: Evgenia Volkova
Diamond "in a cross"
1. Start stringing beads from the middle of the diamond. Do one side first, then the other.
2. Weave a chain “in a cross”, the length of which is equal to the diagonal of the rhombus. We weave the base of half a rhombus, that is, a triangle, from beads.
3. Go back along the weaving process two crosses and bring the needles into the right bead of the second cross from the top. Make a turn. This is how we weave the second row for the diamond.
4. String the entire row according to the pattern. We weave it from the same beads to the edge of the rhombus.
5. Move to the third row as you moved from the first to the second.
6. Having finished weaving one side, secure the ends of the threads.
7. Having threaded a new thread into the needles, we weave another part of the diamond out of beads. Secure the ends of the threads.
For greater rigidity, you can use fishing line instead of thread.
Such rhombuses or their halves (triangles) look beautiful in various products. We weave rhombuses from different beads and get the basis for creating various compositions and patterns. As an example, we suggest weaving a napkin ring.
Return to content
DIY bead earrings step by step
How often do you have to grieve when one of a pair of earrings disappears! But if you learn how to make earrings from beads with your own hands, then a missing piece of jewelry can always be restored by collecting a new one to replace the lost one. Choosing a set in the form of a pendant or bracelet for such an accessory is also a feasible idea, because everything can be done independently, the main thing is that you have suitable materials and tools at hand.
Materials and tools
To start making beaded earrings with your own hands, you need to prepare wire cutters, scissors, wire, pliers, beads, beads, natural stones, earring hooks or earring hooks. Threads, ribbons and other auxiliary materials may be needed. The tools you will need are a glue gun.
In order not to lose a single bead, you will have to lay a special tablecloth. It should not spring, otherwise the beads will bounce onto the floor. A smooth surface is also not recommended for small parts.
The most suitable material would be matting, linen or fleecy cloth.
If you don’t have such materials in your home, you can use a plain wool blanket, but the pile on it should be small so that you don’t lose small beads in it.
How to make simple earrings from beads step by step
It is enough to string and twist several arches of beads or glass beads into a rosette, and you will get interesting beaded earrings. You just need to pick up earrings like “cloves” for them. It is good to glue a round backing of a contrasting tone to such arcs from below with liquid polyethylene.
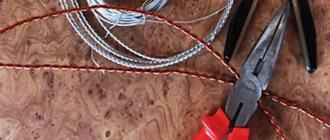
Another option for long beaded earrings
:
- collect several small wire beads in the form of long loops;
- fasten all the wires at one point;
- put a metal fitting cap on this place;
- stretch the wires into its hole and screw them to the hook;
- Mount the second earring in the same way.
The junction of the wires can be covered with a large bead, and then the accessory will have a different appearance. You can also make earrings from beads with a metal cap on top.
DIY bead earring patterns
There are various concepts for beaded earrings. Craftswomen create the most successful options and offer diagrams of these solutions. Let's look step by step at how to make different versions of interesting earrings, and not only from beads, but also from auxiliary materials that add charm and originality to each work.
Long beaded earrings
These earrings are made of beads on earrings in the form of hooks or an English lock. Long earrings look interesting if they have dangles on them that can be played by the wind, and which move in time with the steps when walking.
They can be made in both flat and volumetric versions. Flat beaded earrings require a flat top, traditionally shaped like a triangle. It can be made openwork if you weave it using the “monastic cross” technique.
Dense weaving will be ensured by the “brickwork” technique.
For simplicity, consider the top of the earring in the form of a solid triangle.
If you need to make an element colored, you can draw a diagram with a picture in advance and assemble the part according to it
:
- We begin to thread the beads from the bottom row according to the pattern from left to right;
- we pass the second row in the opposite direction with an offset of half the bead;
- we continue to form a triangle until we reach one bead at the top;
- we take the fishing line up from it;
- Next you need to attach the triangle to the hook. Here you can insert a large bead of a contrasting tone, a stone with edges, a metal ball, or make a ring from the same beads that make up the triangle - as your imagination dictates;
- we will bring out the fishing line in the center and attach the wire to it;
- if there is a long fishing line left, then it should be passed through one of the sides of the triangle to the bottom and brought out to assemble the first pendant;
- We string beads, glass beads and a bead at the end onto the fishing line;
- after the bead there is a bead that secures the pendant, after this element we pass the fishing line back to the triangle itself, pass it through two adjacent beads of its base and form another pendant.
- continue until the bottom of the triangle is finished.
It should look like this
:
Earrings made of beads and seed beads
Once you've assembled long beaded earrings with your own hands, it's time to move on to more intricate designs that include beads. The beads here play a supporting role, while the bead serves as a center that attracts attention.
It’s not difficult to create such earrings if you have a weaving pattern in front of you. Work begins with the hook, to which the fishing line is attached. A long pendant of green beads is strung.
The thread ends with a large mother-of-pearl bead, after which the line needs to be turned in the opposite direction, string 3-4 beads for the outline, pass inside the finished thread, pass a couple of beads there and bring the needle out. Here a couple of green beads are strung, a large mother-of-pearl bead and a green bead at the end as a turning element.
Napkin ring.
Determine how wide and what diameter you want to make the ring. In accordance with this, select a fragment of the pattern (we present a repeat of the entire pattern).
1. Prepare a pattern according to the size of the ring, taking into account the repeat of the pattern if a fragment is being made. We weave rhombuses and triangles from beads, according to the drawing.
2. Select beads of the color you need.
3. Make a fabric from simple chains “in a cross” with two threads. This can be done either as a whole or element by element, connecting them together.
4. Connect the side beads of the first and last rows of the fabric together, introducing connecting beads so that this row does not “fall out” of the ornament. If we weave elements from beads and connect them into diamonds, then it will not be in a straight line, as is the case with a solid fabric.
Make sure the weave is tight.
This is how we make great, interesting products. Showing our imagination, we weave diamond shapes from beads that can combine in unexpected ways.
Return to content
Step-by-step instructions with photos
So, let's start learning the techniques of weaving a beaded bracelet for beginners.
Step 1: Make the first row
First, decide on the desired pattern for the bracelet. Below are several options for schemes with different patterns.
Ornaments for a beaded bracelet “Rhombus”
Apart from this, with the below template you can customize the bracelet the way you like with your favorite colors and shades, which you just need to download and color to apply as a pattern.
Pattern for weaving a beaded bracelet “Rhombus”
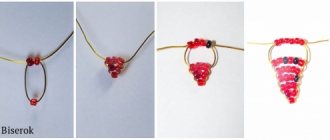
Cut 1 m of bead thread. Insert a fine beading needle into each end of the thread.
Thread 1 bead onto the thread and insert both needles and fishing line into it in opposite directions. Pull both ends out and place the bead in the middle of the threads.
We will start weaving a diamond from the central row. Insert a total of 12 beads according to the pattern, crossing the needles in opposite directions each time through the holes in each bead.
Step 2: Add Row 2
To build the next row, thread 2 beads onto the needle according to the diagram below. Next, pass the needle under the thread that connects beads 2 and 3.
Pass the needle and thread back through the added 2 beads. Pull the needle out of the second bead for now.
Bring the needle from bottom to top into the second bead, which will even out the weaving and put the beads in place. Using this pattern, you will form the beginning of each row.
Add the next bead to the thread according to the pattern. Pass the needle under the thread that is between the 3rd and 4th beads. Re-thread the needle inside the added bead from the base to the top. Repeat this technique along the entire length of the weave.
Step 3: Continue Weaving
Turn the diamond to the left and insert the first two beads for the next row. Repeat the same steps in each row according to the diagram.
Step 4: Finish the Corner
When you have woven half of the diamond and you only have 3 beads left in the row, add 4 beads to the thread and insert the needle into the last bead attached. Pass the thread several times in two directions inside the attached beads, forming a ring that will strengthen the craft. To hide the thread, thread the needle inside the beads, changing direction several times.
Step 5: Weave the other half of the diamond
The other half of the diamond, starting from the second row, is woven in the same way.
Materials and tools
To start making beaded earrings with your own hands, you need to prepare wire cutters, scissors, wire, pliers, beads, beads, natural stones, earring hooks or earring hooks. Threads, ribbons and other auxiliary materials may be needed. The tools you will need are a glue gun.
In order not to lose a single bead, you will have to lay a special tablecloth. It should not spring, otherwise the beads will bounce onto the floor. A smooth surface is also not recommended for small parts. The most suitable material would be matting, linen or fleecy cloth. If you don’t have such materials in your home, you can use a plain wool blanket, but the pile on it should be small so that you don’t lose small beads in it.