How to sew children's trousers for a boy? How to sew pants for a child? This master class will help you quickly and efficiently sew trousers for your child with your own hands. You will learn how to sew trousers for a 6 year old boy from old trousers. How to sew beautiful classic trousers for a boy for a holiday or for school. Just follow the descriptions below and you will succeed!
You will need:
- Main fabric = pants length + 20.0 cm.
- Lining fabric 20.0 cm.
- Adhesive fabric 10.0 cm.
- Trouser braid 50.0 - 60.0 cm.
- Trouser zipper 1 pc.
- Button 1 pc.
- Threads 3 - 4 pcs.
- Sewing supplies
We are creating a pattern for children's trousers (for preschool children). Step-by-step instruction.
The topic of this article is “Pants for preschool children” .
Our children grow very quickly, so mother needlewomen should master several techniques for creating patterns for children. In the previous article we learned how to create a pattern for a little fashionista, today on the agenda are trousers for the little ones. This will be a basic pattern, from which you can model different styles of trousers, overalls, shorts... First take measurements of your naughty girl (however, these trousers fit perfectly on girls too), arm yourself with paper, a pencil, a ruler and get to work.
There are a large number of methods for designing clothes of varying degrees of complexity. Some are more difficult to execute, some are simpler. We offer one of them. In the following articles we will bring to your attention several more different techniques so that each of you can choose what he likes.
We are creating a pattern for children's trousers (for preschool children).
You can use this pattern when sewing trousers for boys and girls of preschool age.
To create a pattern drawing, you will need the following measurements:
Measure vertically from the side to the desired length of the trousers. The measurement is recorded in full.
Pants length to knee Dbrk
Measure simultaneously with measuring the length of the trousers. From the waistline to the middle of the kneecap. The measurement is recorded in full.
Half waist circumference St
Measure at the narrowest point of the waist. The measurement is recorded in half size.
Half hip circumference Sat
Measure horizontally along the most protruding points of the buttocks, taking into account the convexity of the abdomen. The measurement is recorded in half size.
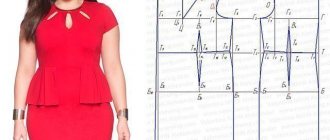
The front half of the trousers. In the upper left corner of the prepared sheet of paper we draw a right angle with the vertex at point A.
Length trousers. From point A downwards we set aside the length of the trousers Dbr and put point H. In our example it is 60 cm, and you set aside your measurement.
Rice. 1
The length of the trousers is to the knee. From point A downwards we set aside the measurement of the length of the trousers to the knee Dbrk and put point K. In our example it is 34 cm, and you set aside your measurement.
From points A, K and H to the right we draw horizontal lines of arbitrary length.
Rice. 2
Waistline. From point A to the right, set aside 1/2 of the hip circumference measurement Sb plus 1 cm and place point A1. AA1=Sb:2+1cm=32:2+1=17 cm.
Rice. 3
Step line. From point A downwards we put aside 1/2 the measurement of the half-circumference of the hips plus 2 cm and put a point C. AC=Sb:2+2cm=32:2+2=18 cm. From point C to the right we put off a distance equal to the segment AA1 and put a point C1. We connect points A1 and C1.
Fig.4
Hip line. We divide the segment AC into 3 equal parts. We denote the lower division point with the letter B. From point B to the right, draw a line until it intersects with segment A1C1, and place point B1. We will denote the upper division point with the letter B; we will need it when creating the side seam line.
Rice. 5
Bow line. From point C1 to the right we set aside 1/10 of the hip half-girth measurement Sb and set point C2: C1C2 = 1/10 Sb = 32:10 = 3.2 cm. Divide the angle at point C1 in half, set aside 1.5-2 cm along the bisector of the angle and denote the point with the number 1.5 From point C1 upward we set aside 4 cm and denote the point with the number 4. Points 4; 1.5; We connect C2 with a smooth curve. The bow line runs along points A1; B1; 4; 1.5; C2.
Rice. 6
Fold line. We divide the segment CC2 in half and draw a fold line through the division point parallel to the line AN. The point of intersection with the waist line is designated by the letter A2, with the knee line - K1, with the bottom line - H1
Rice. 7
Width of trousers at the knee line. From point K to the right we set aside 2.5 cm and place point K2. From point K1 to the right we set aside a distance equal to the segment K1K2 and place point K3.
Rice. 8
Width of trousers along the hem line. From point H1 to the right and left we set aside a distance equal to the segment K1K2, and place points H2 and H3. Note: The width of the bottom of the trousers may be wider or narrower than the width of the trousers at the knee level. You yourself determine this value based on your own considerations.
Rice. 9
Side cut line. We connect point B with point K2, divide this segment in half. At the division point we set aside 0.5 cm to the right. From point A to the right we set aside 1 cm, mark this point with the number 1 and connect it to points B; B; 0.5; K2; H2. The distance from point 1 to K2 is formed by a smooth curve, and from K2 to H2 by a straight line, thereby forming the line of the side cut of the trousers.
Rice. 10
Step line. We connect points C2 and K3, divide this segment in half and set aside 0.5 cm to the left. We make a step cut by connecting points C2; 0.5; K3 is a smooth curve, and points K3; H3 – straight line.
Rice. eleven
Bottom line of the front half of the trousers. From point H1 upward we set aside 0.5 cm. Points H2; Connect 0.5 and H3 with a smooth line.
Rice. 12
Dart at the waistline. From point A2 we set aside 6-8 cm downwards and denote this point with the number 8. The size of the dart opening of the front half is 2 cm. From point A2 to the right and left we set aside 1 cm and connect these points to point 8 (the top of the dart). Instead of a dart, you can add a fold.
Rice. 13
NOTE. From point A1 to the right we set aside 2-3 cm and parallel to line A1B1 we draw a fastener line. If you plan to sew pants with elastic, you don't need to do this.
Rice. 14
The back half of the trousers. The back half of the trousers is built on the basis of the front half. You can build on the same sheet of paper, and after completion, copy each half of the trousers separately. Or transfer (copy) the construction grid and the outline of the front half of the trousers without darts onto a separate sheet of paper and continue building the back half. In this case, each half of the trousers will be on a separate sheet of paper.
Rice. 15
Seat line. Divide the distance A2A1 in half, marking the division point with the number 3. From point C1 upward through point 3, draw a straight line, continuing it upward beyond the waist line by 3 cm and place point A3. The point of intersection with line BB1 is designated by the letter B2. From B2 up along this line we set aside 2.5–3 cm and put the letter B3.
Rice. 16
From point C2 to the right we set aside 4 cm and place point C3. We put 1 cm down from point C3 and put point C4. On the bisector of the angle from point C1 we set aside 2-2.5 cm. We draw up the seat line by connecting points A3; B3; 2; C2; C4.
Rice. 17
Waistline. We extend segment A1A to the left by an arbitrary length. On this segment we make a mark with a compass from point A3 with a radius equal to 1/2 of the half-circumference of the waist plus 3 cm (for darts) and place point A4. A3A4=St:2+3 cm =28:2+3=17 cm. Width along the knee line. From point K2 to the left, and from point K3 to the right, set aside 1 cm and place points K4 on the left, and K5 on the right. Width along the bottom line. From point H2 to the left, and from point H3 to the right we also set aside 1 cm, and place points H4 and H5, respectively.
Pattern of children's sports pants for 104-110 cm
Now I will schematically describe the construction of the pattern.
Construction of the front of the pants:
- Draw vertical (side seam) = 53 cm
- From the top point downwards we measure 12.5 cm and from it we draw a horizontal line = 20.5 cm (this is the seat line)
- From the top point of the side seam, set aside 16.5 cm to the right and 1.5 cm upward. Draw a flexible line for the top of the pants under the pattern. We connect point 1.5 under the pattern with the extreme point of the seat line (20.5). The upper part of the trousers along the front is ready.
- We set aside 16 cm from the horizontal line of the seat along the side seam - this is knee level. To the right, horizontally measure the knee 15.5 cm.
- We measure the width of the bottom of the pants horizontally = 14 cm. We connect the points of the knee and the bottom along the inner seam with a curved line under the pattern. The front part of the pants is ready.
Construction of the back of the pants:
We build the back of the pants in the same way. I will not describe in detail what to put where, I hope that everything will be clear from the photo, just use other numbers to construct.
The back piece is always slightly larger in width than the front piece.
Cuffs and belt
The finished width of the elastic = 5 cm, so when cutting I took 11 cm (allowances of 0.5 cm).
Cuff height when cut = 11 cm, width = 20.5 cm.
The height of the belt when cut = 11 cm, the length of the belt = 39 cm. When cutting out the belt, measure this elastic band for your child, since everything is individual.
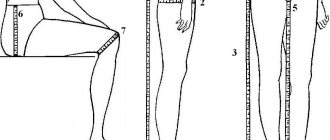
Taking measurements
In order for the product to fit perfectly and not interfere with movements, you need to have the exact dimensions of the child. This means you will have to take measurements.
The boy for whom the pants will be created must stand still during the measurement process..
IMPORTANT. When taking measurements, you need to use a measuring tape correctly: it should not be too tight or sagging.
Here are the measurements that need to be taken from the boy.
- Waist circumference. For those who have a large tummy, you need to take the measurement slightly below the middle of the stomach, so the trousers will not fall down.
- Hip girth.
- Posterior midline. Measured from the waistline to the bottom of the buttocks.
- Anterior midline.
- Leg height (internal).
- The height of the product is from waist to feet.
- Leg circumference. Measure at the widest point of the leg.
Measurements
Required measurements:
- The first thing to determine is the length of the trousers (Db) from the beginning of the waist - to the required length, depending on the height of the child.
- The same measurement is taken, but up to the knee joint (Dbk).
- Half-waist circumference (St) is measured at its narrowest part, the value is divided by two.
- The semi-hip circumference (Sb) is also divided in half, measured along the most convex areas of the buttocks and abdomen.
- The seat height (Sc) is determined by the person sitting on the chair. From the waist to the seat surface.
- The width of the bottom of the trousers (Wbn) depends on their style and is not measured.
How to take measurements
Important! Determining the dimensions for creating a pattern must be done quickly and accurately, because children are extremely mobile.
You might be interested in: Creating patterns and sewing men's shorts of different models
To make it easier to detect the waist, it is tied with a ribbon or elastic band. The waist in childhood is difficult to determine, so you can give your child permission to move so that the ribbon is in the right place. Before taking measurements, it is advisable to dress the baby in close-fitting clothing items.
We are building a pattern for sewing simple trousers with an elastic band
Although the model of pants with an elastic band is quite simple, it also needs a pattern. The construction can be performed with the following data.
- We measure the length of the trousers on the side.
- Calculate the semi-circumference of the waist.
- We calculate the semicircle of the hips.
After you have made the calculations, you can transfer them to the drawing.
Work algorithm
1) Draw a rectangle and label it ABCD. Width (AB and DS) = hip semicircle + 6 cm (this is a special seam allowance).
IMPORTANT! For those who need tighter pants, the seam allowance should be less than 6 cm.
2) The length of the rectangle (AD and BC) is the length of the trousers.
3) From point A you need to mark 1/2 of the semicircle of the hips + 2 and this will be the step line of the trousers (W).
To create a bow line, you need to set aside 4 cm (make a projection upward with a point T) from the step line point W and then up 4 cm. Connect T and W: make a typical smooth line.
4) The knee line for trousers will be in the following place: it is necessary to divide into 2 lines Ш1С + 6 cm up. Draw a line from 6 perpendicular to line AD.
5) The arrow line of the trousers is calculated according to the following rule: you need to take the line ШШ1 and divide it into two equal segments. Connect with the upper and lower lines (C AB and DS). Where the intersection with the waist line will be is point T2.
6) Make a back pattern with a more prominent bow line. It should be 6–7 cm longer. Depending on the expected width of the trousers at the bottom of each rectangle, you can reduce the DS size. Then smoothly connect everything along the side seams.
Pattern of trousers for a girl or boy
One of the options for creating a pattern with your own hands will be discussed below.
Construction of the front half
Draw a right angle at the top and left. On the vertical line, mark the height of the seat, the distance to the kneecap and the length of the product. Create perpendiculars to them (to the right): lines of the seat, knee and bottom, respectively.
On the horizontal side of the corner, mark 0.5 half-circumference of the waist, on the line of the seat 0.5 half-circumference of the hips. The extreme points of these lines connect. The seat line is extended to the right by 0.1 Sat +0.5, the entire line is divided in half, and a vertical line is drawn through the point to the full length of the product.
Constructed mesh
Note! Along the waistline, you can add a 3 centimeter increase in folds.
The width of the bottom of the pattern is determined by the style of the item being made. For the front half it is calculated by subtracting the number two from the average desired width, for the back half by adding it.
The vertical dividing the seat line in half is called the ironing line (arrows).
Additional length and width constructions
Let's build the remaining pattern elements based on the mesh.
Side seam line
The half-girth of the knee is measured, the resulting figures are divided in half and laid in both directions from the arrow line on the knee line. The pant leg width measurement is also divided in half and measured from the ironing line of the trouser leg.
Along the trajectory of the waist from the upper left corner to the right, 2 centimeters are set aside. From the resulting point, build a curved curve to the line of the knee, and then down.
Additional constructions
Middle seam
From the bottom point of the line connecting the segments of the seat and waist, a value equal to 0.1 Sb + 0.5 is laid upward. This point is connected by a concave line to the rightmost point of the seat segment.
Inner leg seam
The extreme right points of the horizontal lines of the seat and knee are connected by a dotted line, then a slightly concave main line is drawn along the line. It is continued to the lower contour of the trousers, drawing straight.
You might be interested in this: Step-by-step instructions for sewing in a zipper for women's trousers
The lower border of the trousers is raised in the center by a centimeter (made arched).
Constructing the back half of the trousers
The grid for constructing the back half is similar to that described above.
Side seam
The straight seat is extended 3 centimeters to the left. The half-girth in the knee area and the lower edge are increased in width by 2 centimeters in each direction, the extreme side points are connected to each other in a straight line.
Building the back side
The segment described above continues upward until it intersects with the segment indicating the waist (passes through the left end of the seat line). At the border of the waist, this straight line bends a centimeter to the right.
Waistline
From the place where it intersects with the vertical, the arrows are laid 3 centimeters upward and connect this peak with the leftmost edge of the waist segment. From this edge, along the resulting straight line, a value of 0.5 St + 2 is laid down. And in the found place, a dart is drawn 2 centimeters wide and 8 centimeters deep.
Median suture
From the rightmost point of the seat line, lay 0.1 Sb + 0.5 to the right and 1 centimeter down. From the rightmost vertical line connecting the waist to the seat line, step a centimeter to the left and draw a line measuring 1/3 of the seat height at an angle. The resulting points are sequentially connected by an arc.
The inner seam of the trousers is drawn in the same way as on the front surface.
The bottom edge is extended by a centimeter in the center and drawn with a concave curve at the top.
Product processing
Product processing sequence:
- 4 parts are cut out with a 1 centimeter allowance at the edges and the 5th - 6th for growth.
The pattern of the front half is pinned on the right, the back half on the left, with an ironing line parallel to the direction of the grain.
Location of pattern pieces
- The edges are processed.
- The darts are sewn together.
- Sew along the sides and in the area of the step incisions.
- The trouser legs are placed facing each other, and the middle seams are laid.
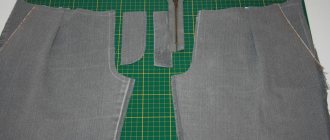
- Fastener sewn in
- A belt is created from a strip of fabric 9 cm x length of the top of the trousers + 5 cm.
- Parts to support the belt are cut out and sewn on, 6 pieces 2.5x5 cm.
- A clasp and loop are attached to the belt.
How to build a pattern for the base of trousers for a boy
In order for your son’s clothes to be varied, the styles of trousers need to be varied. This means you will need a base pattern on which you can model.
It is built according to a similar scheme, which was already given above.
The model can be complemented with a front pocket. For them you will need to additionally make 2 patterns: the front and back walls of the pocket. Their depth can be at the discretion of the seamstress.
IMPORTANT. It is better to transfer the basic pattern onto special paper and only then copy it onto fabric.
It is better for a beginning seamstress to first create a regular pattern for the base of the trousers according to measurements, and then change the pattern according to the desired style. The result should be two front and two back trouser pieces. Plus patterns for pockets, two for each.
The stitching sequence starts with the pockets. Next is the front seam, back seam and crotch seam.
IMPORTANT! There is no need to rush to cut out and rather sew the parts together. It's better to check everything before the fabric is cut.
Pattern drawing for the front half of the trousers.
On the base grid, Figure 1, we build a drawing of the pattern for the front half of the trousers. Figure 2.
Waist Width
From point T1 to the left we retreat the amount calculated by the formula: ½ Half waist circumference (W) plus the increase in folds (Ps), set G.
T1G = (Pot / 2) + Ps = (34cm / 2) + 3cm = 20cm
Increase on folds (Ps) = 3 cm (for all sizes)
Arrow line (iron)
We divide the seat line CC2 in half. From the division point we build a vertical line of the arrow (iron) A4H5.
Pleats at the waistline
From point A4 to the right, set aside the depth of the fold, which is equal to 1.5 cm, and place point A3.
Divide the distance from A4 to point G in half and set A1.
From A1 to the right, set aside a fold depth of 1.5 cm and place point A2.
When sewing a product, we sew the fold from the waist line down to a length equal to 3 – 5 cm.
Bow line design
Bow line
- this is the middle smoothly concave line on the front and back halves of the trousers.
We set aside 4 cm from C1 and place C3.
С1С3 = 4cm
From the corner with points C3, C1, C2 we build a bisector 2 cm long (for all sizes). We put point C4.
С1С4 = 2cm
We draw a concave bow line through points T1, C3, C4, C2.
Step line
From point H1 we retreat 2 cm to the left and place H3.
H1H3 = 2 cm
We draw up a step line by connecting points C2H3 with an inclined straight line.
Side cut line
In a vertical straight line from T downwards we retreat 17 cm (value for all sizes). We put point G1.
T G1 = 17 cm
From point H we retreat 2 cm to the right and put H2.
НН2 = 2 cm
We draw up the side cut of the upper section G, G1 with a straight line and a slightly convex line through points G1, C, and connect the section between points C and H2 with an inclined straight line.
Pocket line
On the inclined GG1, we retreat 3 cm down from point G and mark the top point of pocket G3.
GG3 = 3 cm
Pocket length
Pocket length (Dkarm): from point G3 down the inclined GG1 we set aside a value equal to ¼ of the semicircle of the hips (Pob) plus 5 cm (for all sizes).
(Dkarm) = (Pob /4) + 5cm = (40 /4) + 5cm = 15 cm
Bottom line
We draw a straight line through points H2, H3.
Codpiece length and width
From point C2, along the concave line of the bow, we put 2.5 cm upward.
from
From T1 to the left and top we set aside the width and height of the codpiece by 4 cm.
We design the width of the codpiece as shown in Figure 2.
Codpiece
- This is a piece of clothing with overcast loops, which is necessary for processing the fastener of trousers or skirts with a zipper, loops and buttons. It is also a fastening opening or flap at the front of trousers, skirts or underwear.
Modeling lesson: Pattern for children's trousers
Evgenia Rodina
Fashion designer
Added: 10/5/2018
This fall, nature is generous with gifts. It's our third Indian summer in our city. Everything is buried in bright, rich colors. The mood is wonderful, joyful and I want to create! But first, I decided to write a useful and informative article for you. Let's start the day with good deeds!
Of all my creative activities, sewing is my favorite. And I love sewing most of all for children. First of all, they are so cute that any outfit looks great on them. Children have no complexes about their figure. Secondly, children are very positive and cheerful. Communicating with them recharges you with energy. Plus, the clothes don't require a lot of fabric. You can always combine something interesting from leftovers, and even... from old parental things.
Ready-made patterns for pants with elastic without a side seam for boys from 3 months to 11 years
Hello. Here is a ready-made pattern of pants with elastic for boys for every age from zero to 11 years. I drew the patterns according to the algorithm that I described in this post. There is no side seam, so it is best to sew pants from knitted and stretch fabrics.
If your baby fits into a standard size, you can simply take the pattern from the chart below. If not, then you can draw a pattern yourself, according to your measurements.
Pattern in PDF file in full size. When printing, set the scale to 100%. After printing, you need to glue the sheets end to end, without overlapping the sheets and without cutting off the margins.
In the end you will get a pattern like this
If you want to sew cuffs, then up from the bottom line the height of the cuff minus 1 cm of allowance.
If the stitched belt
If you sew the elastic directly to the pants without a belt, then set the height of the elastic up from the waist line and, if you plan to make a hem under the elastic, up another 1 cm.
Afghani trousers pattern
Afghanis (harem pants) are spacious trousers with an unusually low inseam. This is a great option for summer knitted pants.
Pattern for Afghani trousers
You can draw the pattern yourself, or you can print it out.
The desired length of the pants (to the knee, to the middle of the shin, to the ankle) is equal to the length of the side of the square.
You might be interested in learning how to sew leather goods by hand and on sewing machines
Manufacturing:
The red line is stitched to the red line, and the blue line to the blue line. In this case, the green outline becomes the new waistline. Holes for the legs are formed in the area of the corners; they can be processed with cuffs.
Afghani's appearance
Plain pants
There is nothing easier than sewing trousers for a boy with an elastic band. The pattern consists of only two parts. Accordingly, the product will need to be supplemented with wide elastic bands that will support the pants at the waist and be fixed at the ankles. In such trousers, a boy can walk and walk around the house. They do not restrict movement, and the child will feel comfortable in them. But such pants are not suitable for a festive event. They are too simple.
The pattern for children's trousers for preschool children is shown above. To sew such pants, you should scale the picture and print it in the desired size. To do this, you need to measure the length of the child's trouser leg, as well as his waist circumference. Based on these dimensions, we scale the pattern. Now you need to cut it out on the fabric. There is nothing complicated here. We trace the pattern on the material and cut out the details. We make side seams. You need to sew a wide elastic band into the upper part of the product, as well as into the legs. If desired, the trousers can have patch pockets.
Long pants
It is good to sew such trousers from waterproof fabric, and use synthetic padding as a lining. These pants will protect the child from cold wind and slanting rain. And sewing them will not be difficult at all. The pattern of trousers for boys with elastic is presented in the article. It needs to be scaled, printed, and then transferred through the window to tracing paper. As a result, you should get two shelves - back and front.
We transfer the patterns onto fabric. You should have 4 parts. Don't forget that the right and left legs should be cut in a mirror image. If you plan to sew trousers with a lining, then you will need to cut out 4 more parts from padding polyester and from the lining material. Now you need to sew all the parts together in pairs. First of all, we lay the side seams on all the legs. If the product is sewn with a lining, then the inner part is assembled first, and only then the outer part is wrapped. The last stage is sewing in the elastic. It should be inserted into both the waistband and the legs.
These trousers will be similar to those that appear in the first paragraph of this article, but the difference will be in the middle seam, or rather in its presence. In this model it is assumed. Why make an extra seam at all if you can do without it? The fact is that clothes consisting of a large number of parts and having constructive darts always fit better. Therefore, you should not waste time creating a product.
The pattern for boys' elastic trousers is attached above. We will sew such pants from denim material, since guys often fall, and the thin fabric will quickly become unusable. We cut out 4 parts from the fabric and begin to sew them in pairs. First we make the trouser legs, and then attach them to each other. The elastic should be sewn in last. In this model it will be a decorative element, so it is worth choosing it to match the fabric.
Pattern drawing for the back half of the trousers
We start constructing the pattern by drawing the base mesh. The process is similar to that described above for the front half (Figure 1).
On the base grid we build a drawing of the back half of the trousers. Figure 3.
Waistline
From point T1 to the left we set aside 4 cm (for all sizes) and place point T2. From it up we put 3.5 cm (for all sizes) and put T3. We connect point T3 with an inclined straight line to C3.
From point T to the left, slightly extend the waist line.
From T3 to the left we build an inclined straight line, which is equal to 1/2 of the half waist circumference (Pot) plus 6 cm (for all sizes). At the intersection of two lines emanating from points T and T3, place T4.
Т3Т4 = ½ Pot + 6cm = 34/2 + 6 cm = 23 cm.
Waistline dart
Dart length.
We divide the waist line T3T4 in half and get point B. From this point down at a right angle we build a line 7 cm long and get point B1.
BB1 = 7 cm
The opening (width) of the dart.
From B on straight line T3T4 we put 1.5 cm to the right and left and get points B2 and B3.
BB2 = BB3 = 1.5 cm
We design the sides of the dart by connecting points B2, B1, B3.
Bow line design
From C2, extending to the right, set aside 7 cm and place C5.
С2С5 =7 cm
Arrow line (iron)
We divide the seat line CC5 in half. From the dividing point, we build straight lines up and down until they intersect with the waist and bottom lines - we get straight line T2H4.
Knee line
From point K1 to the right we extend the knee line by 3 cm (for all sizes), place K2, which we connect to C5 with an inclined straight line.
K1K2 = 3cm
From point C5 we put 1 cm down an inclined slope (for all sizes) to get point C6.
С5С6 = 1cm
We draw the bow line smoothly, with a curved concave line, through points C3, C2, C6.
Bottom line
From point H we retreat 2 cm to the right (for all sizes) and put H2, then connect it to point K of the inclined straight line.
НН2 = 2 cm
From H1 to the right we set aside 2 cm (for all sizes) we get point H3, we connect it with a straight line to K2.
Н1Н3 = 2cm
The bottom line is formed through points H2, H4, H3.
Step line
The step line is obtained with points C6, K2, H3.
Side cut line
We draw up the side line through points T4, K, H3.
Short trousers
Making these pants will be quite a difficult task. After all, this style is a complete copy of the adult model. The pattern of children's trousers with elastic for a boy is not difficult. First, you need to adjust it to the child’s height. When this action is completed, you need to transfer the pattern onto paper. You should cut it along the dotted lines, that is, separate the front and back pockets. They will require separate patterns.
Now you need to start making fabric parts. When they are ready, you can move on to sewing the trousers. The big parts are assembled first. Then the front and back pockets are sewn to the legs. And only after this the trouser legs are ground together. Lastly, the elastic is sewn into the waistband. Be sure to trim the edges of the pants. There is no need to sew an elastic band there; you just need to tuck them in and stitch them.
The finished pattern of trousers with elastic for a boy is presented below. You can use it to sew both full-length pants and shorts. Everything will depend on the size and length that you give to the product. We scale the pattern and then cut it out. Now you need to transfer all the details onto the fabric. You need to choose a dense material, even for summer. Why? Most boys are quite active, so they cannot sit still and run around all the time. From constant friction, pants quickly become unusable.
After all the parts are cut out, you can proceed to sewing. First you should sew on the decorative overlays. Then you need to sew the pant legs. And only after this can the product be stitched. You can see the belt on the pattern. You must first sew the fabric to the elastic band, and then attach it to the top of the trousers. If desired, the pants can be decorated with an applique of your son’s favorite cartoon character.