Materials for work
The dot painting technique involves the use of acrylic paints; they fit perfectly on any surface and dry fairly quickly.
Traditional brushes are rarely used for work, with the exception of brush strokes. For dots, you need something more or less pointed so that the pattern comes out even and neat.
So, for example, you can take an old dry marker and dip it in paint. However, it is most convenient to use special tubes from which the liquid is squeezed out with light pressure.
The tube is equipped with a nozzle with a sharp spout, from which droplets come out absolutely even and identical to each other.
Spot painting technique
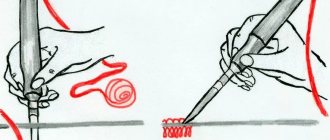
The contour is placed in the hand like a handle: wrapped around three fingers and held approximately in the middle. It is brought to the surface to be decorated perpendicularly or with a slight inclination. Under a strong slope, the points will float and merge into one line. The hand draws with support on the table, but with caution, avoiding smearing the dry areas. You should keep a napkin, sponge or cloth nearby to periodically remove paint that has accumulated on the tip of the tube.
Point technique
A droplet can be not only round, but also of any other shape: diamond-shaped, pointed, etc. If problems rarely arise with the application of round dots, then the shape and size are a matter of technology.
Masters of spot painting have fine-tuned this process to the point of automaticity, and beginners, before taking on a project, can additionally practice on something. It is recommended to start your creativity with simpler, single-contour drawings on plates or glasses. The most important thing is to feel how the paint applies, understand its properties and get used to them.
Rules for drawing
Initially, in Rus', the “dot to dot” painting technique was used to make coinage. After a while, it began to be called “drip”: paint was taken using a straw and dripped onto the drawing. Today, the dot painting technique, which combines the techniques of stained glass patterns, the use of mosaics and graphics, has reached its peak and attracts more and more people with its ease of execution, as well as the attractiveness and elegance of the finished products.
This popular type of technique is also called “point-to-point”. The method of making the contours of the drawing is hidden directly in the name: the image is obtained by applying a large number of dots. Each of them has a different size and color palette. Yes, and they can be applied with various paints.
Simplicity is the main advantage of dot painting. Absolutely anyone can make their own masterpiece, even if the person has never held a brush in his life and has absolutely no idea how to paint. Dot contour painting schemes are the simplest decoration option; with it you can update old things or products that have lost their attractive appearance over time.
The execution technique will be determined by the shape of the object itself, as well as the characteristics of the material used. Using the described technique, you can decorate absolutely any surface: the outside of laptops and smartphones, document covers and jewelry boxes, cutlery and dishes.
Process step by step
So, if you decide to try yourself in the dot drawing technique, you need to remember a few basic principles:
- Before starting to apply the pattern, the working surface, no matter whether it is glass or leather, must be cleaned of grease. Alcohol-containing liquids, triple cologne or alcohol are used for this. If you skip this step, the paint will peel off very quickly, and only memories will remain of your creativity.
- Check whether the characteristics of the contours match the material on which you are going to draw. The fact is that some paints correspond to certain surfaces, while others are universal.
- To make the surface smooth and as convenient as possible for spot painting, it can be coated with a special primer and painted in the required shade.
- And, of course, it is important to remember that you can always remove a failed painting element with the same acetone. Soak a cotton swab in the liquid and carefully wipe off the crooked drop.
As you can see, there is nothing difficult about dot painting for beginners! So let’s stock up on some paints and start creating excellent and unique decorative elements!
Bottle decoration
Spot painting on glass can transform various objects, making them unique interior items. Using this technique, you can easily turn an ordinary bottle into a flower vase or a unique vessel. The most important thing is to choose the right paint color and texture so that the finished item fits harmoniously into the specific interior of the room.
To make an original vase, you need to prepare:
- degreasing composition;
- bottle;
- acrylic based paints;
- universal primer;
- varnish for fixing the image;
- flat brush.
When choosing the shade of a glass surface, you must remember that dot painting looks best on a surface of a dark shade.
To apply painting on dishes, it is advisable to select flat bottles. Creating a background on them is necessary only if the transparency is not suitable or the shade of the glass is not suitable.
Preparing the base
The bottle must be cleaned of labels and thoroughly degreased with an alcohol-containing composition. Apply the primer with a brush, spreading it evenly over the surface.
A pattern and master class for decorating bottles can be found on thematic websites, look at various ideas on forums, or create it yourself. In order for the image to be symmetrical and uniform, you need to secure a strip of notebook paper to the outer wall using regular tape. Its width will determine the size of the picture. Then you need to draw the center line of the image along the edge of the piece of paper.
Drawing
After this, the actual painting begins. Along the top of the leaf it is necessary to apply a strip of several points along the contour. While working with the contour, the tube must be held in a vertical position. This will result in symmetrical and even points.
Recommendation: Inaccuracies and marks that often appear during drawing can be easily removed using an ear cleaning stick, which is pre-moistened in alcohol. The cells on a notebook sheet can help create an even line and calculate the required distance between points.
When creating dot painting with the contours of oriental patterns, you can use stencils. You can make them yourself if you cut out a template of the required size from a notebook piece of paper. To calculate the size of the semicircles, you need to divide the circumference of the bottle by the number of elements.
Recommendation: It is necessary to regularly degrease the glass surface again using a cloth soaked in alcohol, since hand marks appear on the glass during painting. Applying the stencil to the surface of the bottle, make an outline of small dots.
Creating a Pattern
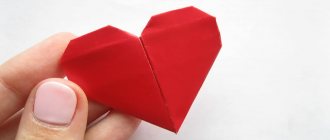
To get an openwork and ornate pattern, you need to apply dots of various sizes, alternating them with each other. By creating flowers or hearts, you can give free rein to your imagination.
What can be decorated
Based on the purpose of acrylic contours (on fabric and leather, wood and plastic, glass and paper), you can decorate any household item. Usually ladies' accessories are used: passport covers, wallets, clutch bags, phone cases. The second group of things is dishes. Plates and mugs, glasses and cans for bulk items. A beautiful patterned jar for the kitchen can be made from an ordinary glass jar or leftover coffee jar. Painted plates can be used for their intended purpose or to decorate a wall.
How to fill your hand
Starting to paint your favorite thing right away is a rash step. A beginner is almost 100% likely to ruin his work with smudges, smudges, and asymmetry. First you need to practice in several ways.
- In a regular notebook in a square, honing the ability to dot at the same distance. Optimal location of points: small - 4 pieces, large - 1 piece per cell.
- Go to a blank sheet of paper and do the dotted lines according to the same principle.
- Draw test pictures on colored cardboard. Samples can be taken from the Internet.
Acrylic contour paints for three-dimensional drawings and dot painting
Rating 4.21 (7 Votes)
| Acrylic outlines are acrylic paints in tubes with a fine tip. This form allows you to apply thin lines of paint, which, when dry, turn into a dense and voluminous decor. Acrylic contours are used in decoupage, painting of various objects, stained glass works, as well as in painting on fabric. Using acrylic contours you can create amazing pictures from multi-colored lines and dots. Let's find out in more detail what they are, what types there are and how to work with them. |
A small tube of acrylic paint is a modern tool for painting on surfaces, gaining increasing popularity. By lightly squeezing the paint, you can apply the design without using a brush. The dispenser (thin tip of the tube) can be of different diameters, and even of different shapes - the lines turn out to be very thin, but dense and convex. The use of special dispensers-nozzles on tubes expands the possibilities of the contour: the paint line becomes flat, double and even triple.
Types of acrylic contours
| Depending on the thickness of the acrylic paint, contours are divided into liquid (suitable for painting fabrics), standard (for drawings on hard surfaces) and paste gels - for creating large dots (“pearls”) and imitating beads in decoration. Fabric outlines contain the most fluid acrylic. When painting textiles, the paint must not only maintain an expressive line, but also spread a little and penetrate the fibers of the fabric so that the design is well fixed. Working with acrylic contours on fabric is similar to painting with a thin brush. Shades of fabric paints can be very diverse - classic, metallic, glitter, neon, and even glow in the dark. Among the popular acrylic contours for fabrics are the Decola series from Nevskaya Palitra and contours from the Tair brand. |
Standard acrylic contours have a more viscous consistency and are designed for drawing on any hard surface. The lines are applied to a previously cleaned surface and retain volume and convexity after drying: a durable relief pattern is obtained. Thin lines and dots can be used to fill both large areas and to paint small souvenirs and crafts. Universal contours Decola, Tair and Marabu are produced in small volume tubes, convenient for uniform extrusion, and are sold in sets and individually.
| Acrylic gels are dense contours with which you can make large round decorative elements (“pearls” and beads). The main advantage of thick gels appears after fixing the pattern: beads and pearls do not lose their original round shape, since the paste does not shrink when drying (if you try to make a “pearl” with a standard acrylic contour, then when it dries its middle will sag and the acrylic drop will lose its beautiful spherical shape form). The Pearl Art contour series from Tair was created specifically for drawing smooth pearl hemispheres that are perfectly attached to almost any surface. |
| Techniques for working with acrylic contours The very first thing a decorator needs to do before starting work is to get used to the type of acrylic contour that he will be working with. The contours of different brands and manufacturers differ in consistency, so you first need to practice drawing lines on drafts to find out how smoothly the paint goes, how hard you need to squeeze the tube, whether the dispenser is suitable (or you need to take a thinner/volume one). Once the desired contour with a suitable diameter has been selected, it is necessary to prepare the surface for application. Glass and ceramics can be pre-degreased with alcohol, leather or suede can be cleaned of dirt, and fabric can be washed and ironed. The future drawing can be marked with a simple pencil; before application, it is advisable to secure the fabric on a flat and rigid stand. |
Consistent drawing of lines requires great patience and maximum accuracy from the artist. However, do not worry if some point or line is applied unsuccessfully: newly applied acrylic can be easily removed with a cotton swab or brush, and an already dried element can be lifted from below and removed with a stationery knife. Alas, such work on mistakes is suitable for universal contours and hard surfaces - it is almost impossible to remove unwanted elements from the fabric.
| The finished drawing with acrylic contours requires a long drying time. Initial setting occurs after 2-3 hours; complete drying requires at least a day. Working with contours can be done in stages: each element of the pattern is dried, secured, and only then the next pattern is applied. Most acrylic contours can be fixed thermally (this is indicated on the packaging) - heat to a temperature of 130-150°C (using a hair dryer or baking in the oven), and iron the fabric from the wrong side. After drying, acrylic remains bright, does not fade or crumble. To further protect the design, it can be treated with a thin layer of acrylic varnish (glossy or matte) so that the original relief and convexity of the image is preserved. |
| Spot painting technique (point-to-point) Acrylic outlines are literally made to create dot painting designs. This technique does not require special artistic training, but it always looks impressive and literally transforms ordinary things and objects. Filling the surface with sequential application of dots requires only accuracy and inspiration - you can create patterns of any complexity and intricacy. Try it out, come up with unique patterns and color combinations, experiment with the size of the dots, and acrylic contours will help make the process more convenient and give you pleasure from working. |
Visitors to this page most often choose from the online store:
| Set of metallic contours for fabric | Mother-of-pearl acrylic contours Tair |
Variants of dot painting patterns
Schemes can be quickly found on the Internet. Among the variety of samples, several groups stand out noticeably.
- Geometric pattern is the simplest for beginners, only strokes broken at different angles, geometric shapes (squares, triangles, circles).
- Floral motifs - leaves, twigs, flowers. Requires more experience and skill.
- Fantasy patterns are the interweaving of different elements in one piece of art. May resemble Indian painting, fantastic flowers, etc.
- Imitation lace – done with white or beige paint and reminiscent of lace fabric.
- Simple drawings - animals, cartoon characters, silhouettes of insects and birds, space objects, household items.
Decorating a mug with dot painting
A great way to create an original gift for loved ones is to paint an ordinary mug. A suitable sketch or inscription is printed and transferred to the ceramic using tracing paper and a soft pencil. The drawn line is covered with dots of the desired shade. Options with a metallic effect look the most rich, especially in gold and silver shades. The work is painstaking and requires perseverance, but a few minutes, less than an hour, is enough to trace a simple sketch.
Elements of dot painting
The simplest element is straight lines. They can be from more concentrated points, at a small distance, or vice versa, with a larger amplitude. A more complex and interesting option is gradual transitions from small to large points within one line.
Double and triple lines with staggered dots provide dense canvas coverage and a rich pattern.
Zigzags, meanders and waves allow you to create fantasy patterns, different types of braid and edging, and add variety to the composition.
The modified shape of the dots (drops, commas) add texture and depth, making the work look more complex and professional.
Work process, all steps
The process consists of several stages.
- Degreasing with a sponge soaked in an alcohol-containing solution. A well-cleaned surface of the product is the key to the durability of the decor. To keep the material in a grease-free state until the end of work, it is recommended to wear gloves.
- Transferring the sketch through a stencil using transparent contour gel. The elements are outlined with a thin and flat line.
- Drawing with colored contours, first large details, then small ones. For faster drying, you can blow with a hairdryer.
- Varnishing. It is carried out 24 hours after applying the decor. One layer of varnish is enough to keep the design in its original form for many years.
Artistic techniques
The more different elements in one work, the more interesting the result looks. Professional craftswomen use additional tools. For example, a dots is a manicure tool, a metal rod with a small ball tip. Helps turn dots into elongated drops and commas. It is most harmonious to alternate rows with small and large dots two after two. When choosing colors, it is better to focus on contrasting shades - it looks brighter and more interesting.