What is dot painting
Dot painting with contours (diagrams and stencils can also be used in it) is the art of drawing, with the help of which a drawing is applied using dots.
This technique of applying patterns is more than 40 thousand years old. The first finds that contained traces of dot painting were found in an Australian Aboriginal settlement. Later, its patterns began to be found in Persia, China, Indonesia, India and Thailand.
The dot painting technique can be seen in the works of C. Pizarro, P. Signac and J. P. Seurat. The dots, merging into the overall picture, create incredibly beautiful landscapes. Most often, this direction is used when painting decorative objects, mirrors and dishes.
Drawing styles
Contour dot painting (diagrams, stencils and templates are included in kits for beginners) has evolved from Aboriginal rock paintings to modern fashionable art. Based on the variety of possibilities for using this drawing technique, it was divided into several styles.
Pointillism
The name comes from the French words “Pointilisme” - dottedness and “Point” - dots. This is the most popular style, which is used both in painting and in everyday graphics. The first option uses round or rectangular brush strokes.
The colors do not mix to create a transitional shade. It is reproduced using dots that allow you to draw the illusion of volume, as well as convey a light shadow. It was in this technique that the artist Paul Signac worked in the 19th century.
Dot art
The name of this style comes from 2 English words: “Dot” and “Art”, which means point and art. This direction is more modern. It uses dots to create a three-dimensional pattern. Also, in dot art there is a direction called “Dot hyperrealism”. It is used to create a drawing that looks like a real photograph.
To achieve such a realistic effect, applying the dots will require a lot of skill and painstaking work. Contemporary artist M. Endara works in this style. In its simplest forms, dot art is used in doodling and zentang to apply ornaments.
Point to point
This style involves dot painting. Translated from English, it translates as “point to point.” Point-to-point is a decoration technique using dots. Its difference from pointillism is that the dots are applied along certain lines, which form a single ornament.
This trend originated in the tribes of Africa, Australia and Polynesia. Both adults and children can learn this technique. Point-to-point can be seen on painted boxes, dishes, interior items, and wallets.
Dotwork
The name of this style comes from 2 English words “Dot” and “Work”, which are translated into Russian as dot and work.
In addition, dotwork is a trend in the art of tattooing. There are thousands of tattoo designs that are made in the form of geometric shapes, mandalas and plants.
Drawing by points
This direction is familiar to many people from children's developmental copybooks, where after tracing the dots they merge into a single drawing. Dot art can be seen in makeup elements and simple abstractions.
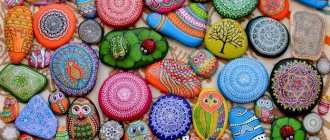
In addition, dot painting has many branches. Khokhloma painting is one of the areas of dot painting. The only exception is the drawing technique. If in dot painting the elements will be in the form of a drop, then in Khokhloma - strokes with a brush. Another branch is painting on stones. Used to decorate both decor and garden plots.
Mascara: dot technique
This post is a continuation of the article about the main techniques used in ink graphics. Simply put, dotting technique is drawing with dots. It is known under different names: pointel, pointillism, as well as dotwork and stippling - in English.
The reason I want to focus on the point technique is because of the enormous benefits that can be gained from using this technique.
Firstly, the dotted technique is usually very popular with beginners in ink graphics.
The fact is that it gives total control over what is happening on a sheet of paper; If not entirely correct use of strokes can playfully upset the balance somewhere in the most delicate part of the drawing, then this will not happen with dots.
In addition, at first it can be difficult to understand how to achieve uniformity of an object (or background), and strokes, even quite thin ones, “climb” too much into the foreground, this is especially noticeable in a scanned work.
Secondly, dots can add very small details - sometimes this is important, especially if the drawing is small.
Thirdly, dots can be indispensable when creating certain textures , especially velvety and smooth in feel, and when drawing materials of natural origin.
Fourthly, the dot technique is great for depicting light objects . Although the shadow can be greatly enhanced and accentuated by dots.
Fifthly, dots are the best technique for any blurry, blurry, foggy objects .
And finally, dots allow you to create very smooth and beautiful light-and-shadow transitions .
Are there any disadvantages to this technique? Perhaps there is only one – time consumption. You need many, many dots to cover a more or less sane area of paper. And, of course, there’s no need for patience.
To help yourself with endurance, you can distract and attract your attention with something interesting, for example, an audiobook, background video or music. 
I rarely use just dots, as that would still be too time-consuming and laborious. In addition, the combination of both strokes and dots gives greater clarity and variety of textures in the drawing.
Basic techniques
In point technique, a lot depends on the nuances. For example, dots and the objects they create look very different depending on the maximum line thickness of the tool used to make the dots.
In the illustration below you can observe this relationship. A separate liner was used for each circle, so that the diameter of the dots becomes larger and larger.
The last circle is made with several liners (0.4, 0.5 and 0.8); the points in the center are very small compared to the points on the periphery.
Thus, a combination of dots of different diameters can look more than impressive. This technique is worth using!
Some tools leave a mark on paper of quite predictable size - of course, this applies to ink liners and rapidographs. Other tools (such as pens) can vary the size of the dots depending on the pressure and angle of drawing. Therefore, it is important to train your control over the pen, because not in all cases dots of different sizes located nearby look at least somewhat attractive.
To train your skills in relation to the dot technique, you can draw some geometric figure on a sheet of ordinary writing paper and fill it with dots. To do this, you can use a liner of any thickness (for example, 0.3) or a pen.
You can also use my sample - there are enough empty figures for training.
In the video below you can watch how the volume effect using a regular pen and ink.
All points are approximately the same, and the darkening effect is achieved due to the density of their location. The closer the points are to each other, the darker the area you are working on.
In addition, you can use liners of different thicknesses or simply vary the size of the dots to achieve interesting effects.
In the illustration below you can see just such an effect. I started the strip with liner 0.1, continued with liners 0.3, 0.4, 0.5, 0.8 and finished with liner 1.0.
It looks like it turned out to be a very interesting texture in itself!
The Best Tools for Spot Techniques
We already touched on this topic a little above - essentially, you can use anything that can leave dots on paper. As a rule, I work with liners (disposable, non-refillable), and less often with a pen.
I don’t recommend using refillable technical pens (rapidographs, isographs). The fact is that repeated “pecking” of paper with the tip of the tool can, over time, “trample” it and make it dull. But in the case of refillable instruments, which are usually quite expensive, you still want to extend their life.
Some useful tips
1. Pay attention to the little things and their impact on the result. The kind of points you get depends not only on the tool and pressure, but also on the angle of drawing, its speed, the position of the sheet of paper relative to the table and your hand.
2. Find a nice rhythm. The points are a kind of meditation.
3. Try not to press too hard - it is better to work in a lighter pressure mode. The longer you draw, the more fatigue sets in, and then the temptation arises to “print” the paper well. However, this puts unnecessary stress on the arm and should be avoided.
4. Breaks are very important.
5. Try to place the points a little chaotically, working within the framework of some object or texture. This way the drawing will look more natural. Situations when the points must be located exactly in a row do not occur very often.
6. If you want excellent results, make every effort to learn how to fill the texture pattern with dots uniformly. This means no large, conspicuous spaces. Gaps attract attention, so it’s worth introducing them into the drawing deliberately. If you combine this point with the previous one, it turns out that you need to combine spontaneity with an accurate understanding of where the next touch of the pen or liner should happen.
Examples
I've already mentioned that I rarely use only dots when creating drawings; More often they form an alliance with various kinds of strokes and lines.
For example, this drawing of a perch consists mostly of medium and large dots (drawn with a pen).
Below you will find a slideshow of several drawings where the inclusion of dots achieved excellent results.
This slideshow requires JavaScript.
Finally, it is worth saying that the best way to master something is to practice a lot. I hope this article and the bonus exercise sheet help you do just that!
Thank you for your attention. If you have any questions about drawing with ink, please write in the comments - I will try to help!
Share:
- Click here to share content on Facebook. (Opens in a new window)
- Click to share on Twitter (Opens in new window)
- Click to share on Pinterest (Opens in new window)
- Click to share on LinkedIn (Opens in new window)
- Click to share posts on Tumblr (Opens in new window)
- Click to share on Skype (Opens in new window)
- Click to share on Telegram (Opens in new window)
- Click to share on Reddit (Opens in new window)
- Click to share on WhatsApp (Opens in new window)
- Click to print (Opens in new window)
What colors to choose
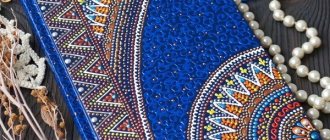
Spot painting with contours (patterns for which stencils are often sold without color transfer) is carried out using acrylic paints contained in them. Most often they are a tube with a thin tip containing a dye inside.
The palette of acrylic paints is quite diverse. In addition, they are sold with various additives that allow you to add shine or an unusual shade to the future design. To ensure that the applied image is not subject to time and continues to retain its original appearance, you need to choose baked acrylic paints.
Spot painting with contours is done with paints specially designed for this purpose.
You can recognize a tube of baked paint by one of the notes applied to it:
- dishwasher resistant;
- dishwasher ability.
You can find paint with a baked effect from the following manufacturers:
- Pebedo Vitrali.
- Hobby Line Kreul.
- Marabu.
- Decoola.
Paints can be created on the following bases:
- Water.
- Organic.
The first can be wiped off with plain water, but in the second case you will need a special solvent.
A short overview of acrylic contours, which are most popular among fans of dot painting:
| Manufacturer country | Name | Peculiarities |
| Italy | "Maimeri", line "YEA Vetra" | Stained glass dyes in a tube of 20 ml each. The dispenser is very narrow, so you can get small dots. A small cut at its end allows you to make thin and pointed patterns on one side, and wide and flat ones on the other. The consistency is thick. It will be ideal for point-to-point work. The paint does not spread, but retains its shape. Drying takes from 10 minutes to 1 hour. To wait until the product is completely cooked, it must be left for 1 day. There is no need to burn (bake) the finished work. The palette is represented by chromatic shades: silver, light gold and platinum, dark Gold, copper, steel, rust effect, bronze. Achromatic colors: colorless, gray and black. The only drawbacks of the paint are a small defect, which is sometimes present in the tube (there is a plastic residue at the tip of the dispenser, which can be removed without losing the performance of the paint). |
| Italy | "Ferrario" | This manufacturer produces 2 lines of contour paints: “Piombo lmitazione” and “Craft rilievo”. The first has colors: steel gray, simple gray, iron gray, copper, bronze, silver, ducat and simple gold, platinum. They have rich color and shine. In the second line, the palette consists of the following colors: blue, white, dark blue, yellow and golden yellow, sea wave, purple, red and bright red, green. Also, this line has a wide variety of opaque contours in color. Paints in both lines are produced in tubes of 20 ml each. The disadvantages are the same as in the Italian "Maimeri". The coloring matter is homogeneous, with sufficient density. Complete drying of the product is achieved in 1 day. Drying from half an hour to 1 hour. Firing of products is not necessary. |
| France | "Pebeo" | The volume of paint tubes is 20 ml. The range includes transparent and opaque colored contours. The Porcelaine 150 and Vitrea 160 lines are used for working with water-based substances that require baking. "Vitrea 160" can withstand a baking temperature of 160 degrees. You can use these paints without firing. The line includes colors: pearlescent white and steel. In addition to these 2 types of acrylic paints, there is a non-bake series called “Cerpe relief”. It contains colors: lead, gold, copper, gilding and royal gold. However, these circuits can withstand incandescent temperatures of 130 degrees for half an hour. |
| Russia | Tair | The consistency of the paints is quite liquid, which creates difficulties when applying patterns. Those located close to each other can merge into one whole. |
| Russia | Gamma | The contours of this manufacturer can be purchased either as a set or individually. The tubes are inconvenient to use. The dispenser spout is too large, resulting in large diameter dots. These products are attractive for their budget prices. |
The paint should be chosen based on the base on which the future drawing will be applied.
The density of acrylic coloring matter can be:
- Liquid. Suitable for applying designs to fabric.
- Helium with a paste-like consistency. This thickness of paint is suitable for applying convex dots to give them the appearance of pearls or beads.
- Standard. It will be ideal for painting on a hard surface.
The prices for acrylic outlines are very high, so they can be replaced with regular acrylic paint. However, it will not be so convenient to use, because it does not have a tube with which you can easily apply a design. To paint with regular acrylic paint you will need a dots or a homemade outline.
Materials for work
The dot painting technique involves the use of acrylic paints; they fit perfectly on any surface and dry fairly quickly.
Traditional brushes are rarely used for work, with the exception of brush strokes. For dots, you need something more or less pointed so that the pattern comes out even and neat.
So, for example, you can take an old dry marker and dip it in paint. However, it is most convenient to use special tubes from which the liquid is squeezed out with light pressure.
The tube is equipped with a nozzle with a sharp spout, from which droplets come out absolutely even and identical to each other.
Preparation of materials and tools
The key to good work is the right set of tools for chiseled painting.
Acrylic contours
Spot painting with contours (diagrams, stencils with the pattern you like can be printed yourself) with acrylic paints makes it easier to apply the ornament to the surface of the product.
The dye itself is in a tube that has a thin end. The tube can be made of soft plastic, but most often it is metal. Thanks to it, you can easily apply small lines in width, which, after drying, are transformed into a three-dimensional decorative element.
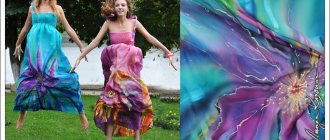
The contours must be selected in accordance with the surface on which the drawing will be applied. Acrylic paints for textiles allow you to maintain the clarity of the applied patterns, while the dye penetrates through the cells of the fabric, allowing the image to stick well to it. Choosing a shade for textile painting is not difficult.
Now there are different color variations for this matter:
- Neon.
- Classic.
- Glowing in the dark.
- With glitter.
produces a special series of acrylic contours “Decola” for painting on fabric. Also, the necessary substances can be found under the Tair brand.
For painting on a hard surface, acrylic contours with a viscous consistency are suitable, which allows you to maintain convex lines and the volume of the design.
You can find materials for working on hard surfaces at.
If the design contains three-dimensional elements (pearls or beads), then they should be applied with acrylic gels, which do not sag after drying. The applied pearl drops will retain their sphere shape, and its middle will not fall off.
This happens if volumetric parts are applied with standard acrylic contours. You can find gel-like acrylic contours in, which produce these products labeled “Pearl Art”.
Types of contours:
- Universal, which are suitable for painting various surfaces, with the exception of textile products and those that will be burned (baked).
- For painting fabric.
- For working on ceramics and glass.
- A contour that increases in size when heated is swollen.
- Contour for products that require firing or for those that will be often used in everyday life (dishes, glasses, cases of mobile phones, mice, laptops).
- Stained glass.
A large number of contours with different properties allows you to paint almost any surface.
Painting without contours
If there are no contours, then regular acrylic paint will do. A small life hack to turn an ordinary tube of such a substance into an easy-to-use painting tool.
Spot painting with contours can be replaced with painting with a brush
It is enough to select a nozzle from any glue-moment for an existing jar of paint and screw it onto the thread instead of the lid. The hole in the spout will be ideal for applying patterns.
Before you start painting, you need to check the consistency of the paint. If it is too viscous, it needs to be diluted with a little water until it becomes thick sour cream. Using this method, you can adjust the thickness of the substance depending on the surface to be painted.
Surface preparation
A properly treated surface for painting is the key to the durability of the design. Before you start applying patterns, the future product must be treated with a primer.
Priming is the application of a special coating to the top layer of a product. This process allows you to level the surface and improve the adhesion of coloring materials to the substrate.
Priming allows you to level the surface
Primer materials can be:
- Mineral.
- Alkyd.
- Acrylics.
The soil must be selected based on the surface of the product that needs to be painted. Apply primer mixtures with a sponge, from a spray can, or with a brush.
There are 2 main categories of surfaces that need this stage:
- Smooth products - tiles, glass, glazed ceramics, metal.
- Porous - cardboard, wood, fiberboard and MDF products, papier-mâché, unglazed ceramics.
Priming materials whose surface is porous will reduce the consumption of acrylic paint by filling the pores of the product. Processing smooth materials allows you to avoid detachment of the future pattern.
The soil, depending on the surface, can be:
- Adhesive – for processing glass, tiles, glazed ceramics. The surface must be treated until a characteristic sound – a creaking – is heard.
- Colored aerosol primer. Used for metal work. During the priming process, you need to apply 1 or 2 layers of this substance to the product, having previously degreased its surface.
- Anti-corrosion primers. They are used if the working surface is covered with corrosion. Apply directly to the rust itself.
After priming, the surface on which the painting work will be carried out must be varnished, this will allow:
- Improve the adhesion of acrylic paints to the surface.
- The future drawing will look more presentable.
- A coating that is resistant to external influences is formed on the working surface.
Due to the fact that varnishes can have a very strong odor, they are very difficult to work with in enclosed spaces.
Therefore, among their large assortment, the most suitable and safe varnishes are:
- Finnish "Tikkurila Kiva". Does not turn yellow, suitable for internal procedures.
- German "Poly-R". It differs in that it dries quickly and has no color, it is absolutely transparent.
Varnish should be chosen based on the desired effect. A high-quality varnish coating is achieved by applying 2-3 layers of the substance. Each of them needs to be applied only after the previous one has completely dried.
Items that will be used for their intended purpose after painting (dishes) cannot be coated with regular varnish. This may cause toxic poisoning. To avoid this, you need to omit this process or choose a varnish that will not harm human health.
Additional materials
In addition to the contours and the product that will be painted, you will need the following tools:
- Rough sheet for test strokes.
- Sponge or its equivalent for primer.
Spot painting with contours: materials and tools
- Pencils for drawing lines.
- Water to remove errors from the product. If the paint is caked, use acetone.
- Wipes or a sponge to periodically clean the dispenser spout in the circuits.
- A needle or pin to clean the inside of the dispenser from dried paint.
- A cotton swab for erasing unnecessary elements in the drawing.
- Tweezers, a toothpick or a stationery knife to remove the caked on unnecessary point.
- A brush for applying varnish to a product.
- An alcohol-containing liquid or acetone to degrease the surface.
You can also keep a hair dryer on hand so that you can dry your work at any time.
Templates for painting
You can come up with a drawing using dot painting yourself, or draw it using ready-made templates. This option is suitable for beginners in this business.
In dot painting, the following is used to create a pattern:
- Scheme.
- Stencils.
- Templates.
For working on an opaque surface (leather, wood, metal or plastic), stencils that are sold in craft stores will be suitable. You can make them yourself from thick cardboard or plastic folders. Working on a transparent surface is much easier. Any diagram can be applied from different sides.
Templates that are suitable for spot painting can be:
- Patterns for embroidery in cross stitch style.
- Examples of patterns for embroidery with beads.
- Patterns on fabrics stylized as folk art and ornaments.
- Openwork embroidered shirts.
- Cards for decoupage.
Any of the above templates can be redrawn or printed. Then it will be enough to attach it to the product and start working.
Geometric figures
Geometric shapes in a large cluster can create a beautiful pattern.
You can come up with your own image of the diagram, or choose any template you like. Patterns made from geometric shapes are distinguished by their simplicity in execution, which at the same time looks great on the product.
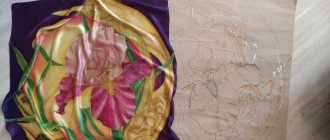
Flowers
The use of patterns in the form of flowers is the most colorful and beautiful design option of all possible. Their various variations provide enormous potential for the development of imagination.
From individual colors you can create various patterns and play with the palette of colors and lines. Each flower must be drawn from the core to the edge. By drawing in this way, you can avoid the fact that all the points can merge into one whole.
Abstraction
The abstractions on the pieces give it a surreal look. They can be used to decorate bottles, boxes, and equipment cases. There are many options for abstractions that will look great on almost any product.
The only negative is that working with them is very difficult. A beautiful result depends on painstaking and professional work. When applying abstraction, you must strictly observe the contours and lines of the drawing, because the quality of the work depends on their clarity.
Animals
Patterns with animals are the least popular among dot painting lovers. They are difficult to beat in the overall picture. Drawing such an image requires an appropriate environment.
At the same time, animal motifs will look very beautiful if you choose the right background and other elements of the design.
Second option
The boxes are somewhat more difficult to paint, since all sides and edges need to be processed. This may take some time, but the result will definitely please you.
Article on the topic: Forget-me-not from beads according to patterns: master class with photos and videos
It is not necessary to take the box directly for painting. It can be any tin or wooden box with a lid. Beautiful and original painting will help transform a simple box into a real box.
Progress:
- Make a stencil to size. It is necessary to select round, square or rectangular patterns for the lid and walls of the box. Then the pattern is transferred to a plastic corner folder and carefully cut out with a stationery knife.
- Attach the finished stencil to the box and mark the contours of the design elements with rare dots. Let the paint dry and remove the stencil.
- Proceed with spot painting, focusing on the designated points. It is advisable to fill the pattern with dots in different colors.
- Also paint the sides of the box and leave to dry. Afterwards, you can coat the product with varnish to better fix and protect the paint.
Such an elegant box can be an excellent gift and a convenient place to store small items.
Below are examples of stencils of patterns and designs for dot painting.
Work according to schemes
A drawing that is applied from any original template will not be 100% identical to it. When patterns are transferred to a product, its central part is initially marked. It is most often not identical with the geometric one.
After this, the contour lines of the drawing and its main lines are applied. They are applied with a regular slate pencil or a special one for drawing on glass, with a brush with a thin tip. If the lines are drawn using acrylic, then you need to take into account how they will look in the finished product.
To prevent the lines from hurting your eyes, you can do them:
- Inconspicuous paint that does not contrast with the main background.
- When drawing a line, you need to use paint that is several tones lighter than the main drawing.
The sequence of actions should be from the central part to the sides, and then from top to bottom. If you start doing work from the contour of the pattern to the center, there is a risk of not guessing with the dimensions and then any error in performing the work will be fatal and spoil the result.
Placing templates on different surfaces
Painted surfaces may not always be smooth. Even an ordinary saucer has a hemispherical shape, and therefore it is almost impossible to attach a stencil to it. To ensure that the drawing does not become distorted, you need to devote a lot of effort and time to ensure that the desired pattern lies as evenly as possible and retains its original appearance.
Smooth surface
It's easier to work with a flat surface. Therefore, beginners in dot painting should start with it in order to get their hands on it.
For beginners, spot painting should only be done on a flat surface.
It is enough to place the desired diagram or stencil under the transparent surface, secure it with tape and start working. If the working surface has a color, then the pattern is applied to it using copy paper of the opposite color.
Glass painting
Painting glasses with dot painting is not as difficult as it seems at first glance. The prepared template or stencil must be placed inside the glass, securing its ends with tape. Use cotton wool or paper napkins to completely fill the glass.
This will allow the template to better fit the convex walls of the product. All that remains is to paint the product, because the lines of the patterns will be perfectly visible through the glass.
Decorating plates
It is difficult to paint the plates because of their curves.
There are several options for attaching templates to this product:
- Each element of the pattern is cut out and applied to the plate individually.
- The template is applied completely to the surface, and in the place where the paper is distorted, it is corrected.
- The center of the pattern and its main contours are drawn on the plate. After this, outline the remaining details of the drawing.
Decorating plates in the style of dot painting starts from the center of the plate.
A small life hack for painting plates:
- You need to take 2 identical transparent plates. Between them you need to clamp a stencil or fabric template that will lie tightly to the surface. The transparent top will allow you to transfer the pattern of the pattern onto the product without distorting its outline.
In addition, you can paint the plate based only on your imagination.
Bottle templates
To dot painting bottles, you need to use stencils or templates that will have an elongated shape. You can use circular patterns , but in order for the finished product to look beautiful, the diagram must be attached very clearly. The main difficulty is the ends of the drawing that need to be connected.
There are several ways to solve this problem:
- Do not connect the ends of the drawing at all. Paint the space formed between them yourself.
- Try to calculate the diameter of the bottle and adjust the template to it.
- For work, you can use patterns that consist of repeating and small fragments. If the pattern does not match closely, you can adjust it by playing with the details of the ornament.
If the template is large and complex, it must be applied in stages. This will make it possible to adjust the drawing at any stage.
Spot Painting Tips for Beginners
Anyone can learn dot painting.
A number of small tips will help beginners quickly master this craft:
- The first spot painting work is best done on a flat surface.
- Before you paint any product, you should first get your hands on any rough sheet. This will help you understand how hard to press on the tube to get points of the desired diameter.
To learn the art of dot painting, choose simple templates
- Don't despair if you don't succeed on the first try. This art requires special skill, which comes with experience.
- It is best to start working using a ready-made template or diagram. Over time, you can come up with a design yourself and apply it to the product.
- Always have a cotton swab, solvents and water on hand (depending on the paint used) so that you can correct blots at any time.
- Don't be afraid to go beyond the lines of the template or diagram. You can always play up a drawing in your own way by adding additional elements to it.
Spot painting has come a long way in its development. Modern achievements of science make it easier for both beginners and experienced craftsmen. Thanks to acrylic contours, applying dots will be easy and simple, and ready-made diagrams and stencils with ornaments will allow you to create a beautiful pattern even for those people who do not know how to draw.
Article design: Natalie Podolskaya
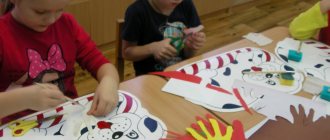
Creativity for children
For parents, this type of decoration will be very useful in terms of developing hand motor skills, perseverance and imagination in their precious children. Give him colored paper or paint over regular gouache, preferably black, so it will be easier for him to see the dots. Then cut out a simple stencil, a starfish, a bird, a fish. Let him outline the outline with large dots and, if desired, paint over the inside of the drawing with flowers.
Related article: How to fold paper for snowflakes: a master class with diagrams and videos
Your child’s imagination may run wild and at the end of the process a sun or a worm may be next to the bird - an indicator that the goal has been achieved, and he has shown himself by creating an element that was not asked for. So if your child has lost faith in his abilities during art lessons, dot painting for children will restore his faith in his creative powers!