What is known about mosaic?
Mosaic, as a type of finishing art, has been known to man since ancient times. From the times of Ancient Sumer to the present day, mosaicists - masters and amateurs - have been creating highly artistic compositions from a wide variety of materials.
In general, creating a mosaic and laying it are two different things. The first involves several operations at once:
- creating a foundation;
- applying soil;
- selection of components and mixing of the binder;
- template development;
- as well as the production of mosaic elements from the selected material.
As for styling, we are only talking about creating a composition from a complete store-bought set. This is done by amateurs and professional finishers, even those not endowed with artistic talent. A finished plot is cheaper than a custom-made work by a master. But if you want something truly original in your interior, you can create a mosaic piece with your own hands. If you do everything strictly according to the instructions and carefully, and also use your imagination, it will turn out really beautiful and original.
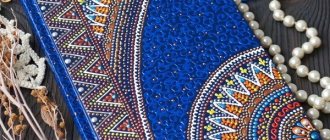
DIY canvas for diamond mosaic
Plastic or canvas is usually used as a base. The first option is cheaper and easier to work with. The second is more expensive, but looks more professional and richer. An alternative option is a homemade base from a master of diamond embroidery and the author of a thematic channel. It turns out to be much stronger than plain paper and noticeably cheaper than its fabric counterpart. Having learned how to make the base with your own hands, you can safely create your own, original embroidery kits.
What is mosaic?
Mosaic is a durable typesetting pattern made up of solid small elements and fixed to the surface using a hardening binder. Due to the lack of hardness, works using patchwork, quilling and kanzashi techniques made from paper, thread, film, ribbons, etc. cannot be considered mosaics. All of these are only appliqués, but they can also be used in interior design.
Mosaic, unlike stained glass, inlays and intarsia, does not carry a semantic load in each of its elements. This is, in modern parlance, “pixel graphics”. Each fragment of it is just a piece of a certain shape and color. Looking at it separately, it is impossible to say which part of the design or pattern it is.
Mosaic also differs from metal “prefabricated” technologies - filigree, granulation and filigree. Its parts are made exclusively from non-metallic materials.
How to make a mosaic from tiles
Do-it-yourself tiled mosaic is quite simple. An ordinary tile is taken and cut into pieces using tile cutting nippers; experienced craftsmen can do this work using a regular hammer. Professional masons use whole tiles, which are pre-sorted by color and thickness, and our Kulibins are usually formed from parts of any mined materials.
Tiles... To pieces... You can't get enough of the Nikulins...
It all starts with a graphic picture, on the basis of which a tiled panel will be born. Materials of the right colors and the right surfaces are selected. The work is quite painstaking, but also very exciting. Laying tile mosaics in the interior of a house is no different from laying tiles. Use tile adhesive, notched trowel and grout. Do-it-yourself tiled mosaics can be laid in any part of the house, even at the entrance.
Ceramic mosaic palette for DIY installation
A video was selected specifically for this material, which clearly shows this technique.
What is tile mosaic used for:
- For interior decoration;
- For decorating objects.
Do-it-yourself decorative mosaic also has its place, but the process of preparing it is more painstaking, it is more expensive and it is better to entrust its installation to a professional craftsman.
There is a jewelry-like technique for laying mosaics - “mili fiori”. It was invented by a court artist. To do this, he pulled smalt into sticks and then laid them in a mosaic landscape.
A little history
The truly ancient Sumerians were the first to reveal their mosaic patterns to the world. They laid out ornaments from baked clay pyramids on an unfired clay base.
Their initiative was intercepted by the ancient Greeks: they invented smalt - dense and viscous glass that could be chipped in a frozen form without cracking. The Greeks laid out their mosaics from its fragments, sintering multi-colored fragments around the perimeter and into layers along the thickness.
As for the name, the Romans gave it to the mosaic, having adopted the art of folding fragments from their Greek neighbors. It was they who gave the glass masterpieces the name “opus musivum,” which translated means “a work dedicated to all the muses at once.”
Then Byzantium took over the baton of development of mosaic art. Its masters made a significant addition to the layout technique: the background and large images began to be designed with intersecting arcs. At the same time, the drawing lost its “pixel quality” if you looked at it from a certain distance, and became similar to an ordinary one, only more voluminous and “live” a picture.
During the Renaissance, mosaics began to be actively studied again in Italy. And the craftsmen of this country achieved the highest results in its production. In Florence, a new installation technique was invented, thanks to which mosaic images gained perspective. And here a unique binder was developed that holds the mosaic parts incredibly tightly.
During the Rococo period, mosaics became Frenchized. And it was the French who began to lay out panels of shells, beads (porcelain, earthenware), beads, using the “reverse laying” technique, in which the elements were first placed on wax paper and only then transferred to the prepared base. The works “a la francaise” turned out soft, precise, with tints of halftones. Using this technique, it was possible to decorate curved and/or small surfaces with mosaics.
In Islamic countries, masters who laid mosaics could not depict something living in their works (like artists working in other techniques), but they brought mosaic patterns to perfection and began to use new materials to create them: ceramics (tiles), eggshells, etc.
As for the “Russian mosaic”, it is inextricably linked with the name of the great scientist M.V. Lomonosov (although many experts are confident in the existence of ancient Russian mosaics, destroyed during the Mongol-Tatar yoke). Mikhail Vasilyevich was not only a brilliant scientist, but also an extraordinary artist. He was seriously interested in mosaics: he developed new technologies for smalt smelting and founded a mosaic manufactory.
Modernity
Currently, mosaicists are actively using the developments of antiquity. However, they also bring a lot of new things to the technique of creating “pixel” canvases. This applies to new materials (porcelain stoneware, for example), their processing, the creation of adhesive compositions (silicone and PVA, as well as original adhesives are increasingly replacing the traditional chicken egg base) and fixing agents. Mosaics today are becoming repairable. Moreover, they can be disassembled and reassembled in a new place.
As for the artistic side of the issue, the most popular are:
- cubism (as if created as a mosaic);
- pointillism;
- impressionism, etc.
Mosaic laying
You will still have to lay the mosaic - whether it is store-bought or created independently. And there are several technologies (some more labor-intensive, others less) that allow you to transfer a drawing or pattern from small parts to a prepared surface:
- Straight. Here the elements are laid out in virtually the same way as ceramic tiles - face up. In this way, the mosaic is placed directly on the floor without preparation - simply on a base applied to a cleaned surface. And to place it on the wall, the mosaic image is first laid out horizontally on a fiberglass mesh (exclusively with glue), and then transferred to the prepared place. Grouting the seams in both cases occurs only after the entire panel is where it should be. If you are making a direct mosaic of glass and ceramics, then only mortar or glue and grout will be required as consumables. If the mosaic is laid in a bathroom or kitchen, in conditions of high humidity and steam formation, the adhesive composition must be silicone-based. The surface prepared for installation must be absolutely flat, degreased, free of rubber residues, rust, cement laitance, and slightly rough. To do this, it is additionally processed by sandblasting. As a final finish before laying the mosaic, a deep penetration primer is used, choosing compositions for stone or concrete. As for the grout, when laying it directly, use it without sand in the composition so as not to scratch the mosaic fragments, especially if they are made of mirror, glass or pieces of porcelain. Traces of grout after use are removed without pressure with a soft, damp cloth - flannel, calico or felt.
- Reverse. On small curved surfaces, artistic mosaic panels are most often laid in the reverse way. And for this you need a template, which is a future mosaic drawing, but in a mirror image. Beginning mosaicists attempting backlaying should first scan or photograph their chosen design. Then print it out to the required size and break it into pieces (A4), and then print the result in color. All this will make the work much easier. The fragment sheets are laid out on a dry surface to bring together the contours and glued with ordinary office glue. Next, the reverse side of the resulting image is finished with self-adhesive film - with the adhesive side facing up. When laying mosaic elements (face down, strictly according to the design, with pressure), the protection from the film should be removed gradually, since the base quickly loses its sticky properties in air. You can also reverse the pattern by laying it out on plastic wrap, then covering it with egg white. It will be cheaper, but the method will require a steady hand and an accurate eye. Therefore, only experienced craftsmen work in this way. When the composition is completely dry (silicone takes 3 days to dry, the old egg solution takes up to 20), the self-adhesive is carefully removed, and the sticky residue is removed with a cotton swab soaked in alcohol or nitro varnish solvent. If the mosaic was assembled using paste or egg white, the paper is soaked and then the remains are washed off with a sponge.
Making your own mosaics
The process of making a mosaic begins with the selection of elements for it. Most often, they take squares from 1 x 1 cm to 5 x 5 cm. They prepare the pieces for future use, in sets, arranging them by color or fragment of a design, pattern, so that later they will not be distracted while working on the image.
“Pixels” for the future mosaic are pricked (like smalt), and not “bited” with side cutters, pliers, etc. Or you can even buy broken multi-colored tiles at a construction company or store - they will sell it there very cheaply, or even just like that. And on the fence you can quickly and easily make the necessary parts from these pieces.
It’s easier for those who chose porcelain stoneware as the source material. This one shoots just great! Therefore, it is better for beginning craftsmen to choose it for their work. For those who work with a prisoner, we can give some practical advice:
- First you need to break off a particle with a straight edge from the irregular piece. Next, you need to set the movable stop to the selected size in order to pin strips of equal width. And then “crush” these strips into pieces.
- You should never hit against the edge of the wedge. Only with a shift towards the stop (about half the thickness of the material).
- If a glass mosaic is divided on a backsplash, the refraction in this material should be taken into account. Otherwise, the glass will crack and crumble, but will not break.
- The tip of the wedge should be really sharp, without any dents. Otherwise you won't get any pieces.
- To make a wedge, you can use a file or fragments of a guillotine shears blade with a pobedit tip.
How to lay it correctly
There are three possible installation options.
- By color or in a checkerboard pattern. The advantage is a clear gluing order, eliminating image displacement.
- In rows. The main disadvantage is the possible displacement of the pattern. But you can speed up the work by using the stylus for three elements, described above.
- Sectors or stripes. It is very convenient to clear 6-8 cm of space from the protective film. But the process can be tiresome with monotony.
Mosaic binder
Ancient mosaic panels were laid out on a very strong binder. Many masters use it to this day, fortunately the original recipe has survived to the present day:
1 part lime paste + 1/3 part fatty clay + 3 parts quarry or pure mountain (white) sand, washed and calcined + 6 pieces (per bucket of solution) broken eggs with shells.
Sand is sown through a sieve, and after adding eggs, the solution is kneaded until smooth (fragments of the shell should not be visible at all - it is this that serves as an indicator of the homogeneity of the composition).
Eggs in such a mixture did not rot in ancient times, and they do not rot now. They, interacting with clay silicates, only form a strong waterproof impregnation, and putrefactive bacteria are not allowed to develop by lime.
A lime-clay solution mixed with egg gains full strength several years after its use in mosaics. And its reliability has been tested for centuries. However, in order not to transfer the eggs, you can use cement-based tile adhesive. Of course, it has not yet been tested for centuries, but mosaics assembled on it in the open air last for decades.
Glass mosaics must be laid using glue that does not contain cement. If the panel is assembled inside a building, PVA is perfect for glass and stone. For exterior work, ethylene vinyl acetate adhesive (EVA) is successfully used. And when you need to lay a mosaic in conditions of high humidity (kitchen, bathroom, toilet, etc.), there is nothing better than construction silicone glue (aquarium glue is also suitable, but it is very expensive).
Mosaic panels made of beads or small plastic fragments are laid out on PVA or nitro-adhesive - “Moment”, assembly, 88th.
Shell mosaic
If you want to feel like a real mosaicist, you shouldn’t take on complex materials right away. It’s better to show your imagination on something simple and accessible. For example, use shells, and if the result inspires, move on.
Panels made of shells are experiencing a real fashion boom today. Moreover, a design or pattern made from them can easily be assembled onto almost any adhesive base, be it PVA or silicone.
The shells of venerupis and venus, as well as balls, scallops, peas, and freshwater zebra mussels are ideal materials. As for technology, in the case of mollusk shells, bulk and typesetting methods are actively used. In both cases, it is possible to include fragments made from purified sea or river sand, as well as broken shells into small crumbs.
How to make a sketch from a photo
If you want to create your own masterpiece without resorting to purchased kits, modern technologies will help you realize your plan in the best possible way. Today there are special programs for embroiderers that digitize any photographs and pictures, resulting in a color scheme. Most often, craftswomen use the Diamond Embroidery and Pattern Maker programs (originally created for cross stitch).
Material
As for the preparation of the material, the shells for typesetting mosaics should be sorted by size and color. Touch up something somewhere, if necessary.
The sand needs to be boiled several times (a glass or two at a time, no more) until the water underneath becomes almost transparent. Then it will need to be calcined in the oven and sifted several times through sieves with different mesh sizes to separate into fractions.
Sinks are cleaned differently. Large and dark ones - with periostracum with hydrochloric acid, using a soft brush and a mother-of-pearl scraper. Once the cleaning process is completed, the treated sinks are placed in a baking soda solution (2 tsp per 1 l). And then they soak them for several hours, periodically changing the water.
Small shells are cleaned by soaking in a vinegar solution (acid diluted with water twice), and then, if no tinting is required, the acid is neutralized with alkali and the material is washed with plenty of running water.
Toning is carried out using aniline dyes.
It is much easier to prepare material for bulk shell mosaics. There is no need to sort anything here; it will be enough to sort the shells by shade (and even then roughly). And crush more or less finely. And then simply sprinkle the crumbs in a layer over the fresh glue, evenly distributing and adjusting the resulting pattern with your fingers. The final version of individual panel fragments is pressed down with special boards.
As for the adhesive, it is better to use silicone, quick-drying, under the crumbs.
Eggshell mosaic
Eggshell mosaic has a very beautiful name - “crackle”. It looks decent, adding subtlety and sophistication to any interior. And the material for it is prepared as follows:
- First, you need to soak the collected shells in a baking soda solution (2-3 days) to soften the organic matter.
- Afterwards, the remaining protein is carefully removed with a brush (but there is no need to touch the inner film).
- Next, the shells are colored with food coloring for Easter eggs in the desired colors.
- At the very end, the multi-colored shell fragments are thoroughly dried.
The “egg” mosaic technique is not too complicated, but it will require painstaking execution.
First you need to prepare the base - thickly and evenly grease a sheet of paper or plastic tracing paper with PVA, and then leave it for 3 to 15 minutes until it gelatinizes (sticky tack).
The finished shells are laid out on the base with their bulges up, at intervals - you need to achieve the appearance of a certain pattern, pattern. Afterwards, the finished picture is pressed down with a special board so that the shell is flattened and broken into smaller fragments. Then the board is removed and the image is smoothed with a special wooden stick. Then tissue paper soaked in flour paste is placed on the panel and left until completely dry.
After drying, the paper must be soaked and removed with a damp sponge along with the remaining paste. Next, the picture needs to be dried properly - for several days (3-4, no less). And you can begin the final processing of the panel - creating craquelures, that is, beautiful “antique” small cracks. To do this, you need to use mascara consisting of shellac and bile.
You have to drip the mascara onto the dried image from a pipette, then wait a few minutes and remove the remaining ink with a damp sponge. Bile allows the carcass to scatter along cracks in the shell, and shellac polymerizes it there, giving strength to the panel. It turns out very beautiful.
In the end, all that remains is to polish the finished painting with coated paper, without pressing.
Simple lesson
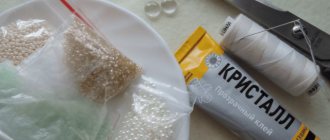
Before starting the master class, you need to prepare an embroidery kit with all the specified contents. And now you can start laying the diamond mosaic:
- Every craftswoman has some tricks that she uses during embroidery and which greatly simplify the needlework process.
Related article: 5 ways to easily starch a napkin
It is better to arrange all the stones by number in ascending order, so time will not be lost searching for the desired color.
- Carefully separate the protective film from the design, but do not remove it completely, because the canvas may get dirty, and gluing will not be very convenient. Therefore, we partially bend the edges of the film.
- In the figure you can see the layout of the mosaic with the code name and colors. We look for the required bag of rhinestones, pour the mosaic into a separate container or a special sorting form and carefully place the stones into the desired square with tweezers.
If by mistake you happen to place the mosaic in the wrong place, you can carefully remove the rhinestone with tweezers and stick it in the right place. The adhesive base will not lose its properties.
Rhinestones are laid out flat on the design.
- When one part of the drawing is ready, you can proceed to the other.
You can lay out the mosaic in rows or by color. Here, each master creates his own technique individually. You can use a ruler to correct the rows so that the lines do not move up or down.
- If work is suspended, it is better to cover the unfinished painting with a protective film, and then start laying the mosaic again.
- When finished, the film can be removed completely.
And now, the diamond mosaic is ready!
- Once again, align the edges with a ruler and frame the picture.
If desired, you can treat the picture with a colorless varnish, for example, acrylic, then the mosaic will look even more brilliant and iridescent.
As you can see, there is nothing complicated in working with diamond embroidery; it is a very simple and entertaining type of needlework. In addition, diamond mosaic has a number of other advantages:
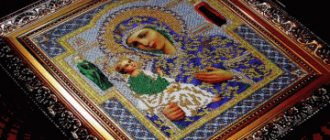
- This diamond mosaic embroidery looks very bright and unusual compared to ordinary thread embroidery;
- mosaic paintings do not tear or wrinkle;
- rhinestones can be used not only for embroidery, but also for decorating objects - boxes, boxes, mirrors, etc.;
- Children from 3 years old can be involved in diamond embroidery; they can look for the right colors and help arrange the details;
- Diamond mosaic work is very addictive, so time flies by, especially suitable for children during vacations or weekends.
Related article: DIY watch strap
There are, of course, small disadvantages that are also worth mentioning. Due to the fact that this technique is quite new, there are very few drawings in the public domain and it will be difficult to find a basis for a mosaic to your liking. In addition, diamond embroidery kits are quite expensive and not everyone can purchase them for creativity.
Something special
Many people would like to create something special with their own hands. And mosaic too. In principle, anything can be used as unusual materials for panels, including:
- various push pins;
- pieces of soft wood and pine plywood;
- small pyramids with multi-colored edges;
- matches with ends and other materials.
( 80 votes, average: 4.80 out of 5)
Artificial stone: independent production and installation
Calculation of the number of wallpapers
Related Posts
How to organize the process
As a workplace, it is most convenient to choose a spacious table, well lit. Having opened the set, you will need to lay out the canvas evenly and pour the rhinestones into a special organizer (each color in a separate cell with a signed color number). For convenience, the color you are currently working with is poured into a tray with grooves (always included in the kit). You need to tear off the film from the adhesive layer of the base in small parts: release a piece and immediately fill it.