What craft to make for Halloween?
Crafts for this holiday can be divided into several groups: decorating the house, creating a themed costume, gifts - souvenirs in the form of Halloween symbols.
The most important attribute is the pumpkin, from which the flesh and face are cut out. In recent years, the jack-o'-lantern has become the most recognizable holiday attribute, known throughout the world.
In recent years, the jack-o'-lantern has become the most recognizable holiday attribute, known throughout the world. It can be scary, or it can look like the face of a cat.
Scary Halloween crafts made from pumpkins have a place on this holiday, because it can be assigned a status - the scarier the better.
Scary Halloween crafts also include all kinds of insects, in particular spiders on the web, ghosts, and bats.
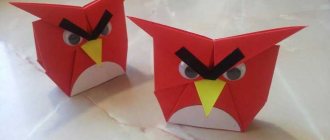
Are you going to visit? Make a gift box for sweets in the shape of a coffin.
Bats can hang directly overhead from the ceiling.
DIY Halloween crafts for visiting should be more serious and you should start preparing in advance. After all, it is important that a person wants to keep your surprise as a keepsake and take it out every year for this amazing and terribly fun holiday.
These could be postcards with images of skeletons, ghosts or witches.
You can also knit a beautiful witch if you have such talents.
Simple Halloween crafts include pumpkins made of felt or paper, face masks made of fabric or paper, and soft toys in the shape of a bat.
If you starch the haze fabric correctly and add eyes to it, you will get a scary ghost that can scare your guests.
DIY Halloween Decorations
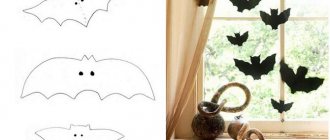
It’s hard to imagine this holiday without flying ghosts, bats, and spiders in the corners of the room. You can make bats from black paper and secure them with double-sided tape on walls, doors, or hang them on a thread from the ceiling.
Halloween Decoration Ideas
If you have some black paper left over after making the bats, you can use it to make footprints from someone's paws.
Pumpkins can look very different. You don't have to leave it orange, you can create a black cat.
Wreaths can be hung on the door not only for Christmas, but also for Halloween. They won't be as cute, because the holiday means scaring and intimidating anyone.
The base of the wreath can be a foam base or cardboard. You can attach various elements to the base - make a web from gauze, stick spiders from paper or felt, funny inscriptions from cardboard.
If you show a little imagination, your holiday wreath can become a real masterpiece and you won’t want to take it off at the end of the holiday.
Balloons and gauze make gorgeous ghosts that you can hang in your room.
Halloween Crafts: Patterns for Bats and Other Decorations
Bats can be different. And they can also be used in different ways as decoration - stick them on the walls, make a garland, decorate a wreath on the door.
Black cats, ghosts and spiders are regular guests at Halloween.
Using various stencils, you can make garlands that can fill up empty spaces in a room. Such elements are usually made from black and orange paper, but purple can also be used.
Since the holiday is celebrated in the dark (when all the evil spirits wake up), it is worth stocking up on candles. But you can not just buy candles, but also decorate candlesticks in holiday style
Decorating your home for Halloween with your own hands is the most fun thing you can imagine. Therefore, it will be very fun to do this with children and involve all family members in this process.
How to make a ghost from gauze with your own hands
You can make one big ghost out of cheesecloth, or you can make many small ones and connect them into a Halloween garland.
Take a round object (the tutorial uses a small pumpkin, but you can use any other round object) and place it on a glass or any other surface that will serve as a base (vase, plastic bottle). The pumpkin should lie steadily on the glass and not tip it over. If this is an issue, you can always tape the item down for added stability.
If you want to make a ghost with “handles,” place two glasses or smaller plastic bottles on the sides. When the base or conditional shape of your ghost is ready, start cutting the gauze. The size of the gauze depends on what size ghost you want. Cut the gauze in half.
Cover your work surface. Place a form in the middle for the future ghost. Take one piece of cheesecloth and fold it in half, then cover the prepared pan.
Place the gauze underneath to give the ghost the desired shape. The ends of the gauze must touch the surface so that the ghost can “stand.” If you're going to hang a ghost, then this is optional.
Once the cheesecloth is laid out the way you want, take your starch spray and spray the liquid onto the cheesecloth to completely saturate it. Check whether the gauze is sufficiently saturated with liquid. Also check the hardening of the ghost as the gauze dries. If the gauze does not become hard, spray more.
How to make liquid starch with your own hands
Liquid starch is usually used for washing or during ironing. To make liquid starch at home, dissolve corn or potato starch in cold water. Make sure to mix the mixture well so that there are no lumps left. After this, set the mixture aside and boil water in a saucepan. When the water boils, add the diluted starch to the pan. Stir the contents of the pan. Continue stirring for about a minute before removing the pan from the heat. Let the mixture cool and only then pour it into a spray bottle.
Once your ghost is firm enough, remove the mold from under the cheesecloth. If done correctly, the ghost should stand without supports. Add eyes and mouth if desired. Black paper, black felt, or a black marker are all great options to add expression to your ghost.
How to make a Halloween pumpkin with your own hands
The most recognizable part of the holiday is the pumpkin. It can be cut out of paper, sewn from fabric or felt, but the tradition of cutting out the flesh of a pumpkin and making different faces cannot be neglected. The most traditional is the appearance of Jack's house from a pumpkin - this is a scary face carved with a knife on an empty pumpkin. But you can also make cute pumpkins, cats, and even your favorite cartoon characters.
Felt pumpkins will turn out smaller, but they can be a wonderful gift, because they do not spoil, unlike vegetables.
How to carve a pumpkin for Halloween step by step master class
The tradition of carving evil faces on pumpkins appeared many years ago in Ireland and Great Britain. It served as an object that was supposed to scare away evil spirits from the home. Also, the pumpkin has become a symbol of the harvest, since Halloween takes place during the peak of autumn days.
To carve your Jack from a pumpkin, you need to choose the most beautiful vegetable on the market.
Materials:
- Pumpkin, preferably round
- Sharp knife
- Marker
- Candle
Wash the pumpkin after bringing it from the garden or market.
The marker will fit better on the surface of the pumpkin if you first wipe it with cotton wool soaked in alcohol.
Cut off the top of the pumpkin and scoop out the pulp with a spoon.
Let's draw Jack's face on the surface.
Using a short knife, cut out the details according to the marker. Wipe away marker marks, or trim so that no marker remains. We place a candle inside the candle.
How to make a Halloween pumpkin out of paper
You can do crafts with small children in kindergarten, or at home. After all, children love to spend time with their mother, so you can use this to create Halloween decor. Young children work best with colored paper. The pumpkin can be made flat or voluminous.
1 option
This option is suitable for decorating walls or windows.
- Orange paper
- Pencil
- Scissors
Fold the sheet in half and draw half a pumpkin. Carve the pumpkin. Bend the sheet again at the place where the mouth is cut out. Draw half of the triangle and cut out the eyes.
Unfold the leaf and get a beautiful pumpkin.
Option 2
You will get a beautiful unusual pumpkin if you make it voluminous. It's quick and easy to make, but it can be a great home decoration for the holidays.
Materials:
- Colored paper: orange, green, black.
- Thread and needle
- Scissors
- Pencil and ruler
- Glue.
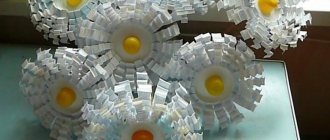
Divide the orange sheet using a ruler and pencil into strips 1.5-2 cm wide and 15-16 cm long. Cut along the lines. You can cut strips with curly scissors.
To make one pumpkin you need about 20 strips.
We put the strips together and pierce the upper part with a needle and thread, while it is necessary to step back from the edge by 0.5 cm. The thread must be fixed and pierced the lower part so that they make an arc. We secure the knot, but do not cut the thread.
Let's straighten the arc, placing the stripes in a circle. Cut out a green leaf and glue it to the top of the pumpkin.
Tie a string to the edge of the remaining thread to make a loop for hanging. We wrap the ribbon around the blade of the scissors and pull it so that it twists. It must be tied to a loop.
From black paper we cut out a triangle for the eyes and nose, and also cut out the mouth in the form of a strip with teeth.
Options for paper pumpkins can be completely different.
How to make a witch hat with your own hands from paper in a step-by-step MK
The easiest and fastest way to make a hat is from paper and cardboard.
It will take very little time, and the result will look impressive and attractive. Necessary materials:
- thick plain cardboard;
- scrapbooking paper with suitable patterns;
- ink;
- PVA glue;
- scissors;
- compass, ruler, pencil;
- decorative elements as desired.
Operating procedure.
To begin with, we decide on the size of the hat: the product can be large enough so that it can be freely put on the head, or small, which can be secured in the hair with clips. We cut out a cone in the form of a quarter circle, for which, using a compass on colored scrapbooking paper, we draw two arcs with increments of 14 cm and 13 cm. One centimeter of difference will be used to form teeth for gluing. We cut out the part with the teeth, carefully roll it up and glue the cone using PVA glue. We bend the cloves outward, as shown in the photo.
We cut out the brim of the future hat from paper and cardboard (you should get two identical parts). We measure the diameter of the base of the resulting cone and divide the resulting number in half. We set the pitch of the compass and draw a circle. Then add 3-5 cm for the margins and draw a second circle, cutting out the part.
We collect the hat. To do this, using the teeth on the cone, glue the top part of the hat to the paper part, and glue a similar cardboard part on top of it. The resulting structure can be placed under a press for a few minutes, pressing down the brim of the hat.
We eliminate visible defects, cut off uneven sections of paper, and tint the edges of the cardboard with black ink. We decorate the hat at our discretion: glue on buckles, ribbons, appliques made of paper or fabric. The witch hat is ready!
Felt Halloween pumpkin
A paper pumpkin is made simply and quickly, and does not require any material costs. But there is also a disadvantage that it is not as durable as crafts made from fabric or felt. Therefore, if you want to make a craft once and for several years, then you can sew a pumpkin from felt.
Material:
- Felt: orange, black, burgundy, green, brown
- Braid
- Orange threads and needle
- Black lace
First you need to cut out the parts from felt
Using a basting stitch, you need to sew all the parts of the pumpkin and pull them together a little along the seam.
Sew a rectangle and sew the bottom to it
Place the rectangle inside the pumpkin and sew.
Attach a black cord handle
We sew on the black felt pieces that will create Jack's face.
From the bottom side, where there is a hole left, fill it tightly with synthetic padding and sew up the hole.
Making a hat for a pumpkin.
Sew the edges of the cone and attach a burgundy edging to them. Sew the circle to the cone with a blind stitch.
We make the leaf with a light tone of the vein threads. Sew leaves onto the hat. We make holes in the hat for threading the cord. The braid can be carefully sewn or glued.
Now you need to sew both circles for the hat together using a buttonhole stitch. This will add density to the hat, because it will act as a lid for the pumpkin-shaped basket.
Pull the cord through the holes and sew on both sides.
This is the kind of basket and pumpkin you can make from felt at the same time.
Now you know how to make a Halloween pumpkin in different ways and you can decorate your room beautifully for Halloween.
Foil roses
As for what other crafts can be made from foil, these are neat roses. To work you will need a ruler, wire and a vase.
First you need to take a sheet of foil and cut long strips. Roses turn out lush and beautiful when they are folded from strips of about 50 centimeters. Each piece must be folded in half, and then carefully rolled so that you get a delicate flower. This is not a difficult job, you just need to roll everything into a loose roll, and then fix the flower on one side and straighten the petals on the other. A wire leg must be attached to each rose. Next, it is wrapped in foil in one layer. Additionally, you can cut out leaves and attach them to the stem.
Several flowers should be made in this way. After this, they can be placed in a vase. Foil roses are perfect for decorating wall panels or carnival costumes. The flowers turn out to be quite strong, so you don’t have to worry about the arrangement falling apart at the most inopportune moment.
Plasticine crafts for Halloween
Children really like this holiday because they can go beyond the limits and make fun crafts. Even using such material as plasticine, you can mold original characters if you are tired of bunnies and squirrels. Any child will be delighted with this idea of a plasticine craft for Halloween.
Plasticine pumpkin.
Previously, we looked at how to make a pumpkin from felt and paper, but plasticine is an equally interesting material for such creativity.
Materials:
- Orange plasticine
- Black plasticine
- Stack
Roll a ball out of orange plasticine. Squeeze it a little, giving it a pumpkin-like shape. Make indentations using stacks
On the back side, press holes for the eyes and mouth. Squeeze pieces of black plasticine into them.
Makes a hat for a pumpkin from black plasticine - a flat circle and a cone, which we connect. The edges of the hat can be frayed a little by making cuts. Attach the hat to the top of our pumpkin.
Ghosts made of plasticine
In the image of a pumpkin you can make a couple of funny ghosts in hats
Make a ball out of white plasticine and drop the shape a little, tilting it to one side. Use a stack to make several indentations. Decorate the face using black and white plasticine.
We make a hat from lilac plasticine.
Plasticine can make funny monsters, cats, and even huge compositions.
Crafts from foil: video master classes
Crafts made from foil always turn out beautiful, shiny and neat. And they usually do not require additional materials. Foil is a pleasure to work with. This material is well suited even for children's creativity. We have collected the 5 best videos with master classes on crafts made from foil. You and your children will love them. All the best is here: beautiful and funny toys, jewelry and even a wonderful painting. These lessons won’t take much time, and your DIY foil crafts will turn out wonderful and durable!
Spider: master class for schoolchildren
Children will definitely like this shiny, cute and not at all scary spider. Especially for boys. Tie a fishing line to it so you can play with the craft. It will become a funny “scarecrow” and will bring a lot of positive emotions.
This foil craft is suitable for a child of primary school age. It's easy to make a spider with your own hands. You won't need any additional materials. It is enough to take a large sheet of decorative foil or two chocolate wrappers. Then simply unroll them and twist them according to the instructions.
Watch the video showing how to make your own tin foil spider. Simply and easily! Sit down for a master class with your child. You'll quickly figure out the sequence and have fun.
Graceful flowers
So beautiful, neat and elegant! Once you make at least one foil flower with your own hands, you won’t want to stop. The accessory can be given to a loved one or placed on your desktop. Collect a whole bouquet to make a beautiful composition.
If you fasten several flowers together, you will get a good curtain holder. They can also be used to decorate shelves or mirrors. Making flowers from foil is easier than it seems - even school-age children can do it. Your child can take their work to the competition.
All you need is aluminum craft or culinary foil. It can be replaced with chocolate wrappers. No additional tools needed. Watch the video in which the author gives a master class and shows step by step how to make a flower from foil with your own hands.
Shiny "metal" ball
Metal balls are very popular now. They replaced spinners and slimes. What to do with them? Spin, throw from hand to hand, toss, juggle, throw at someone. The last option is especially funny: the ball looks heavy, but in fact it weighs like a wad of foil.
Such toys are sold expensively in stores. But they are easy to make with your own hands from ordinary cooking foil. Additionally, you will need a hammer and sandpaper or file. A few minutes of free time - and the craft is ready!
Watch the video in which a popular blogger explains how to make a foil ball with your own hands. School-age children can easily cope with this task. It's too much for kids - you have to hit it carefully with a hammer.
Beautiful picture
How beautiful the foil paintings look! They are shiny, convex, very graceful. Reminds me of some kind of ancient art. You can make foil pictures with your own hands in just a couple of hours. And then it can decorate your home for years. The craft can also be used to decorate accessories. For example, glue it to the lid of a box or decorate a recess in the closet with foil.
What you will need:
- thick cardboard;
- any printed picture;
- glue;
- foil (cooking or chocolate);
- shoe polish.
Watch the video in which the author gives step-by-step instructions and shows how to properly make a picture from foil at home. By following this master class, you will easily cope with this task.
20 easy crafts
A translation painting, a cookie cutter, a cannon with fire, entertaining experiments - this video contains 20 life hacks with foil. Some of them will be useful for children's crafts. The rest will help you out in everyday life. Watch this video to find out how many useful and fun little things you can make with your own hands from ordinary cooking foil.
We hope you enjoyed these foil crafts and want to make them yourself or with your child. We wish you success in your creativity!
2+
Halloween crafts made from cardboard
You already know many symbols of this terribly fun holiday - these are witches, and pumpkins, as well as all sorts of ghosts and bats. But you can make a cool, but creepy gift that will scare the person who receives it as a gift.
Materials:
- Box
- Cardboard
- Buttons
- Colored paper
- Glue
- Scissors
- Pencils
You need to cut a circle out of cardboard, the diameter of which is approximately half the width and height of the box.
Draw the face of your scarecrow and decorate it with buttons instead of eyes, attach a nose. Make a hat from colored paper.
If you have a beautiful hole punch, then you can come up with an interesting decor
From thin strips of light paper we make the scarecrow's hair, which is hidden under the hat.
We make a spring. To do this, glue two strips of paper to each other at right angles. The top one bends down, under the bottom one. But they should remain at a right angle. We further bend the second strip. We do this until the end.
We glue one edge of the spring to the bottom of the box, and attach the scarecrow's face to the second.