/Accessories and decor/Decoration/
Sometimes, in order to decorate the house or keep your child creative, all you need to do is look in the kitchen cabinet where the groceries are stored. After all, from cereals, beans, spices, grains and seeds you can make decor in eco or rustic style, as well as educational children's crafts. The main thing is to show your imagination and set aside some free time. In this material you will find 10 ideas and step-by-step instructions for making DIY grain crafts for children and adults, as well as a master class on coloring them with food coloring.
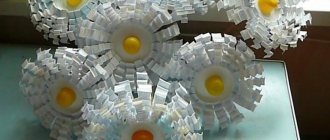
Idea 1. Topiary for table setting or interior decoration
Beans of bright colors are an excellent material for decorating a crown or topiary pot. For example, from green peas you can create such a decorative tree for spring home decoration or table setting for Easter.
Materials:
- 1 package of green peas (split and polished);
- Styrofoam base ball (sold in craft stores);
- 1 package of dry moss (any other material for decorating the “soil” of topiary is also suitable);
- 1 medium sized clay pot;
- PVA glue and hot glue in a gun;
- Brush;
- 1 wooden stick, skewer or simple pencil (this will be the trunk of the topiary);
- Green acrylic paint (for painting the ball to match the peas);
- Paints in the desired colors to decorate the pot (optional);
- Polystyrene foam, floral foam or any hardening mixture like cement or alabaster.
Master Class:
Step 1: If you're not happy with the look of your pot and/or trunk, paint it and let it dry.
Step 2: While the pot is drying, paint one half of the foam ball to match the beans and let it dry. When this happens, paint the other half of the ball and leave it to dry the same way.
Painting the ball
Step 3. When the ball is completely dry, cut a hole in it for the trunk 2-3 cm deep using an awl or knife.
Step 4. Start decorating it with peas. To do this, place it on a plate, use a brush to apply PVA glue to a small area and generously sprinkle peas on it.
Covering the ball with peas
Let this area dry a little and proceed to sprinkle the next part of the ball. Continue this process until the entire ball is covered in green peas, then leave it to dry overnight.
Step 5. Once the resulting crown is dry, work on the gaps. To do this, you need to treat the voids with glue and sprinkle them with cereal again.
Topiary crown
Step 6. Now insert the barrel into the ball, after pouring a drop of hot glue into the previously made hole. To hold the barrel stronger, you can lay pieces of paper around it and fill the hole with glue to the very top. Keep in mind that without the paper, the glue will melt the foam and make the hole too deep. Finally, once the trunk is secured, decorate the area around it with peas (if necessary).
Barrel mount
Step 7. Start creating a fixing “soil” in the pot. In this tutorial, floral foam was used to secure the tree. If you also use foam or polystyrene foam, then you only need to adjust its dimensions to the pot so that the tree stands level and strong. Otherwise, you can dilute any fixing composition according to the manufacturer's instructions.
You can read more about this stage in a separate master class on making topiary.
Step 8. When the base of the topiary is ready, all you have to do is decorate it with moss, sisal, the same peas or any other grain.
Crafts made from legumes
Different varieties of legumes will provide a variety of colors. But if, suddenly, there are not enough tones, then acrylic paints will come to the rescue.
The picture itself is unlimited except imagination. To make crafts from bean grains with your own hands, you can create any picture, and even natural shades of beans allow you not to use acrylic paints and maintain the maximum sense of eco-style.
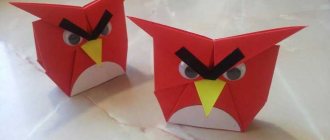
Idea 5. Easter egg decor
Small cereals, grains, spices, star pasta, seeds and dried herbs can be used to decorate Easter eggs. You can simply apply PVA glue to the egg and roll it into grains, or create some mosaic-like patterns by first drawing a marking or sketch on the shell. To depict more precise shapes and figures, use stencils.
To decorate these Easter eggs we used: sesame seeds, poppy seeds, dried basil, cumin, dill, parsley, salt and whole grain mustard.To decorate these Easter eggs we used: sesame seeds, poppy seeds, dried basil, cumin, dill, parsley, salt and whole grain mustard.
Idea 7. Napkin rings
Decorate a mosaic of grains and seeds with toilet paper tubes to create adorable napkin rings, perfect for fall or holiday table settings.
Materials:
- Variety of cereals, seeds, beans and spices;
- Toilet paper tube;
- PVA glue;
- Stationery knife;
- Acrylic paints;
- Brush.
Instructions:
Step 1. Cut the toilet paper tube into three sections of equal width (about 4 cm).
Step 2: Paint each section (inside and out) a neutral or contrasting color. You will have ring blanks.
Step 3: Prepare and sort various seeds, grains, beans and spices.
Step 4. Apply a thick layer of glue to a small area of the ring and sprinkle or dot the grains and seeds onto it. Wait until the glue in this area dries and only then proceed to the next area. Continue these steps until the entire surface of the ring is formed, and then leave it to dry.
Step 5. If you are afraid that the seeds will peel off and fall off, additionally treat them with a thick layer of glue, covering even the spaces between the seeds.
Paintings from cereals - step-by-step master classes and original ideas
An interesting and increasingly popular type of needlework is the creation of masterpieces from materials that can always be found at home or even from food. For example, paintings made from buckwheat or semolina, pasta or other products will organically fit into the interior of any apartment or cottage. Crafts from cereals are not difficult to make, so even a child can create paintings.
It is noted that calm work on the creation of such paintings has a positive effect on mood, helps fight depression and calms the nerves.
Working on paintings requires precision, concentration and helps develop motor skills. And creative work on thinking through a future painting will help develop a sense of style and artistic taste.
In the process of creating a picture from cereals, you can use various types of plants and crops. This could be peas, lentils, corn, rice, buckwheat, coffee and many others.
Also, for decoration, prepare: beads, leaves, ribbons, beads and much more.
Tools for creating a picture:
- PVA glue;
- glue moment;
- tweezers;
- needle or toothpick;
- pencil;
- gouache (if it is necessary to paint parts);
- spray varnish;
- frame for painting.
It is recommended to use thick cardboard for the base so that the base does not get wet or deteriorate during the manufacturing process.
Preparation of materials
To start working on a painting, prepare materials for work. The grains need to be sorted and all impurities removed.
If your painting will use a color other than the color of the cereal, it will need to be painted. Pour the grain of your choice into the bowl and add paint.
Mix thoroughly, making sure it colors evenly. Pour the cereal onto paper, spread it out and let it dry.
Creativity with children
Prepare a craft with your child for kindergarten or school. First, think and imagine what your future painting will be like. You should not use intricate plots or complex drawings in creative work with children. Give your child the opportunity to express himself, his imagination and make a picture with his own hands.
To begin, draw a picture of the painting onto the cardboard, try to draw it as inconspicuously as possible so that the outline of the pencil is not visible in your work.
Prepare different types of cereals and pour them into different bowls.
Start creating the painting. To get started, you need to use a brush to paint over the area that you want to fill with cereal. Now carefully sprinkle it with cereal; if the cereal is large (peas or lentils), then you need to spread it grain by grain with tweezers.
- Don't limit your imagination, improvise with different cereals, pasta or coffee.
After completing the painting, let it dry thoroughly and then spray coat it with varnish. Place the resulting picture in a frame and hang it on the wall.
Picture made from cereals and plasticine
You can make a picture with children not only using glue; if you don’t have glue at hand, ordinary plasticine will do just fine.
Print the drawing and transfer it to a cardboard base. Do not try to print a design with small details; it will be easier to apply plasticine on large parts.
Carefully, trying not to go beyond the contours, smear the plasticine of a suitable color. Fill the fragments of the picture with cereal and press lightly. The cereal will remain on the plasticine. Your painting is ready!
Panel "Mill" made of pasta
There is probably a bag of pasta in every kitchen. But from them you can prepare not only Bolognese pasta, but also a wonderful interior decoration.
To make the panel, prepare:
- base made of thick cardboard;
- PVA glue or Moment;
- cereals of different types;
- peas;
- pasta of various shapes;
- a piece of foam rubber.
- Draw a picture on the base.
- Think about what your drawing will be like, try not to depict too small details, as it will be difficult to decorate them with grains.
Start working by decorating the background of the painting. Using a brush, cover the background with PVA glue and sprinkle with semolina. Use a sponge to press the semolina onto the panel so that the cereal sticks.
You can start decorating the tree and the mill. Coat the tree trunk with glue and place the cereal on it, decorate the crown with twisted pasta.
- Make the blades from long pasta and cover the building with pea halves.
Make trails of their lentils or beans. Let the painting dry, then frame it.
Frame design
From cereals you can make not only a painting or a panel. Decorate a photo frame or picture with coffee beans or other grains, and it will harmoniously fit into the interior of any room in your home.
To decorate the frame you will need:
- frame,
- glue;
- cereals and or coffee beans that have been previously cleaned and prepared.
Before you start, decide how you want to design the frame. In a simplified version, just stick on the same grains and let dry.
You can glue coffee beans and various cereals to the base in a chaotic manner, or decorate each side with one type of cereal.
Show your imagination, and the result will not take long to arrive.
Outline paintings
The most complex panel manufacturing technique, where the cereal does not occupy the entire space, but is laid out along the frame of the picture. But the result will be amazing.
Butterfly and dragonfly
To create a panel we need:
- frame;
- base (cardboard);
- fabric or canvas;
- tweezers;
- glue;
- brush;
- coriander or buckwheat;
- white and brown rice;
- dye;
- dried flowers and herbs for decoration.
Let's start making:
- Wrap the base in canvas and secure on the wrong side;
- Apply the outline of the design to the fabric;
- Using a thin brush, apply a layer of glue to the outline of the design and, using tweezers, lay out coriander or buckwheat;
- Using the same principle, lay out the outline of insect wings, fill in the space of the wings and veins;
- Next, let's decorate the painting. Glue dried flowers and herbs in a chaotic manner.
- To make the picture sparkle with colors, paint the butterfly in bright colors. Apply paint to the cereal with a thin brush and let dry.
To make paintings from cereals, you do not need intricate and expensive materials. Be patient, use your imagination, and all the materials for creativity will be in the kitchen!
Idea 10. Coffee or serving table
Materials:
- Large photo frame;
- A bar stool, the seat of which is slightly smaller in width than the frame;
- Drill and drill bit;
- 4 small screws;
- Primer;
- Dye;
- Paint brush and glue brush;
- PVA glue;
- Epoxy resin (in this case less than 1 liter was required);
- Cereals;
- Floor protection film.
Master Class:
Step 1. Separate the frame from the original back panel.
Step 2. Cut a frame-sized panel from a thin piece of chipboard or plywood and glue it to the frame itself using liquid nails or wood glue. At this stage, it is advisable to seal the joints, for example, using wood putty. This is necessary so that in the future the epoxy resin does not leak through the holes between the frame and the panel.
Step 3. Place the frame on the stool and secure it with 4 screws using a drill (in the middle of the frame). You will end up with a structure that resembles a table.
Attaching the table top to the stool
Step 4. Lay a film on the floor to protect the floor. Cover the table with primer, wait for it to dry completely and paint it with paint in 2-3 layers. Keep in mind that each coat of paint must be allowed to dry before applying the next coat.
Painting the table
Step 5. Draw several sections in the niche of the frame if you want to decorate the table in the same way as in this master class, or draw a sketch of the picture/marking according to your idea.
Markings on the tabletop
Step 6. Using a brush, apply a thick layer of PVA glue to the panel in the niche in a certain section and place the cereal there evenly. Make sure that the layer of cereal does not protrude above the level of the frame. Continue decorating the panel with grain in accordance with the markings.
Applying glue
Decorating the tabletop with beans
Step 7. If you want to prevent the grains from moving when pouring the resin, additionally cover the entire composition in the frame with a thick layer of PVA glue and leave it to dry for about 24 hours.
Step 8. Now it's time to fill the grain in the frame with resin. Make sure the table is on a level surface. Carefully following the manufacturer's instructions, mix the resin components, and then slowly pour the entire composition in one layer. Remove any bubbles that form by blowing on them through a straw. Leave the table to dry overnight.
Step 9. When the first layer of resin has dried, carefully pour the second layer onto the grain, making sure that it does not go beyond the protrusions of the frame. Let the resin dry for another 24 hours and enjoy your new table.