How to make stars from colored paper - step by step instructions
If you need to make not just one star, but a large number, and in the shortest possible time, then this master class will help you. You can make such New Year's decorations with your child, because they are easy to make. For convenience, you can print a star template from the Internet onto the paper of your choice, and then quickly cut them out with your child and connect the parts together. To ensure reliability of the design, the stars should be secured with office glue.
Necessary materials:
- colored paper or semi-cardboard in different shades
- scissors
- simple pencil
On a note! Do-it-yourself volumetric paper stars are very easy to make. To create such decorations for the Christmas tree, you cannot do without colored paper, but it is best to take decorative paper with New Year or winter elements. But if you still decide to take paper or half-cardboard, then choose a material of different shades and be sure to have a double-sided one.
Main stages:
Simple DIY paper star - step by step instructions
If you need a flat star made of paper, then you can make it using the origami technique, as in the master class we prepared. It is easily assembled from simple paper squares, which allows you to make a craft for the New Year in the shortest possible time. For better reliability, you can apply a drop of glue to each element, which will allow the star not to fall apart into separate parts and elements.
For Victory Day, you can make a paper craft with your child in the shape of a three-dimensional star. It should be made using the origami technique from a simple red square sheet. The finished element can be attached to the front of the card, where red carnations and a St. George’s ribbon should be drawn in advance. Also an integral part of the postcard for May 9 is the congratulatory inscription.
The star that we propose to learn how to make in this master class is not at all difficult to make; you will need to perform a few simple steps according to our step-by-step guide.
How to make a three-dimensional origami star with your own hands for May 9 from paper
The origami technique suggests that to make a three-dimensional star with your own hands by May 9, only paper and the talent of the master will be used. The next lesson discusses an interesting craft option that can be done right in the office, using only sheets of notes of different colors.
Scheme for making a five-pointed star using origami technique for May 9
We will need: colored paper of different colors or office sheets for notes.
Progress.
- Fold the square diagonally.
- Roll along the other diagonal.
- We bend the model in the center on one side and the other.
- Bend two opposite corners towards the center.
- We fold the model starting from the center.
- We carry out 5 more of the same blanks.
- We connect the “rays” of the star with each other.
- Fold the corner up.
- Bend the corner down.
- We hide the corner inside the model.
- We attach the remaining rays in the same way.
- The model should look like this.
- We hide the corners at the bottom of each ray under the fold of paper of the adjacent one. Now you know how to make a three-dimensional origami star with your own hands for May 9 from paper.
Star folding steps:
We take a blank in the form of a square sheet of red paper. Bend the bottom part up in half.
Then you should bend the lower right corner up towards the center of the workpiece.
We open it and then bend the upper right corner down towards the center.
Open the bent corner. We get two diagonal fold lines on the right side.
Then we'll work on the left side. To do this, bend the lower left corner directly to the center of the intersection of the two diagonal lines on the right side.
We return the corner to the left side, creating a fold.
Bend the bottom right side up. Between the right and left parts of the workpiece you can see a line that runs at an angle.
It is along this that we bend the sides.
We turn the left side into the upper part of the craft.
Using a ruler and pencil, draw a diagonal line that will go from the right side down to the left.
Using scissors, we cut the workpiece along the marked line.
Turn it over. Check the sides to make sure they are equal to each other. Then the star will have all the same sides. If the dimensions of one of the sides are incorrect, you should immediately adjust the length and shape with scissors.
We open the workpiece.
To get the beautiful sides of the star, you should bend the corners.
Holidays, theme nights, theatrical performances - all this requires certain paraphernalia. And simply decorating your home with interesting items, especially if you made them yourself, is always nice. In our article we will tell you how to make a star out of paper. Everyone will be able to choose their favorite method from the many offered.
Content:
Pentagonal star
Such a star will perfectly dilute your interior, and if there is more than one, it will be very good.
You can make it not only from plain paper, but also from newspapers and magazines, so they will look even more beautiful.
1) Take a square sheet of paper and fold it in half.
2) Now you need to fold the lower left corner to the upper center point and bend it back.
3) Then do the same with the upper left corner, bend it to the lower center point and also bend it back.
4) Then you need to bend the lower right corner to the intersection point, which was obtained after bending the two corners.
5) Now we bend this corner to the right edge.
6) Bend the lower left corner to the resulting workpiece.
7) Turn our workpiece over and fold it in half.
 Cut off the excess to make a triangle.
Related article: Angels, dolls and other felt toys. Templates
9) We tear the workpiece, and we get a pentagon.
10) We make folds along all the lines that were obtained after folding the figure.
11) Combine the points that are indicated on the diagram.
12) Now we perform the same manipulations with all sides of the workpiece.
13) Using the diagram, we begin to add up our future star.
14) This is what a five-pointed star will look like.
If you still have any questions or don’t understand something, you can watch the video, which clearly explains how to make such a star.
Star for cutting: templates, stencils and patterns for printing
Templates
Stencils
Scheme
Volumetric paper star
The presented star looks beautiful in a children's room for interior decoration; on New Year's holidays, you can hang it on a Christmas tree, a wall, attach it to a chandelier, or simply decorate a gift.
The following items should be available at the workplace:
- high-density colored paper (can be replaced with colored cardboard);
- pencil;
- glue;
- scissors;
- ribbon.
To get a beautiful three-dimensional star, follow the algorithm presented below.
| 3D star | |
| Take 2 square sheets of paper and bend them in half, first on one side, then on the other, so that when straightening the sheet you get 2 fold lines - horizontal and vertical. Then fold twice diagonally. | |
| Using scissors, cut the paper a little (about halfway) at the top and bottom along the folds, and then to the left and right. | |
| Following the pictures, fold the edges away from the cut lines. | |
| To fix the craft, take glue and apply it to all the star rays on the back side. Then make the second star according to the previous description. | |
| Glue two stars together as shown in the picture. You can decorate them with sparkles, beads, rain, etc. | |
Do-it-yourself volumetric star
Volumetric stars are one of the most common decorations for the New Year. They are simple to create and look attractive: this is what makes the blank so popular. Let's begin the process of creating a volumetric star:
- On paper, draw the outline of the rays of the future star, print it and transfer it to another piece of paper.
- Fold the paper along the lines and glue along the edges.
- Make five templates.
- Glue the templates together so that they form a star.
By the way, the size of the star depends on the size of the prepared template. Make several multi-colored stars and hang them on a string: this way the star will become the center of attention of the room decorated for the New Year. Of course, the red three-dimensional star will be an excellent craft for school in honor of May 9th.
Crafts help give room to imagination and create truly magnificent objects that decorate the interior of the room. Don’t be afraid to experiment with techniques, materials and the use of certain products.
https://youtu.be/CVcYmY7Zdcchttps://youtu.be/RaI3haEnh88
_
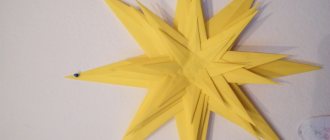
Star of Bethlehem
Method 1
Such a star will become a decoration in any room and not only on Christmas days. But let us immediately warn you that this will take a lot of time, the work requires dedication, scrupulousness and patience. But the result will undoubtedly please you.
Before you begin, you should have the following materials on hand:
- ordinary office paper (can be colored) A4 in the amount of 50 pcs.;
- dense threads;
- PVA glue;
- stationery scissors;
- stapler
Let's get started with the craft.
| Star of Bethlehem | |
| Take the sheets and cut them into 2 pieces lengthwise. | |
| Twist all the paper pieces so that one edge is tighter, the other looser, coat with glue and squeeze a little more. These will be the rays of our future star. | |
| Take a stapler and start with 3 beams. Fix them in the form of a fan. | |
| You should place such fans on a prepared thick thread and pull them tightly. | |
| You will get a ray-shaped ball on a string. This is our star, which can now be hung in any place convenient for you. | |
Advice!
If in your work you do not use colored paper, but regular white paper, then spray paint will help give the star beauty and shine.
Method 2
Making a star that glows in the dark
There is nothing complicated in creating a luminous star, as it seems at first glance. Just take any star template you like and make beautiful holes of any shape (round, diamond-shaped, triangular, pentagonal, etc.). After this, carefully pull any garland with small light bulbs through these holes. When the job is done, the template needs to be fixed with glue. This version of the star is an excellent way to update an old, unsightly garland and add magic to the interior.
Advice!
The stars can be hung separately on ribbons, or you can simply connect them all with a garland and place them on a windowsill or other surface.
Video instructions
Finding a suitable and understandable video is a real gift for handicrafts. We have selected for you the most interesting, in our opinion, video instructions for creating stars in different variations.
Volumetric paper star:
Origami five-pointed star:
Origami star flower:
Star 3D:
On May 9th, people usually make some original crafts that can be used to decorate this great holiday. Now I will show you how to make a three-dimensional star out of paper with your own hands, you will be presented with step-by-step instructions with detailed photos. The creation is very easy, taking about ten to twenty minutes. For originality, use colored paper and your homemade product will look more beautiful as a decoration.
Other technical works
There are many more options for stars that can be made from paper. For example, you can make a very beautiful star called kusudama. Look at the pictures to see what it looks like:
Using this diagram, you can make it yourself.
You can also make such a very beautiful large star from paper, which can serve as a Christmas tree decoration or souvenir.
Here’s another very interesting option: tea star.
Here's a paper New Year's star.
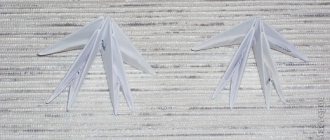
Or a very interesting woven star.
Using the modular origami technique, you can make a very beautiful star, which will also serve as a decorative item, or you can give it as an independent gift, or add it to gift packaging. You can watch the video on how easy it is to make such a star.
Also, using the origami technique, you can make a ninja star or, as it is also called, shuriken. After looking at the photo instructions, you can fold it yourself.
How to make a voluminous five-pointed star
In this master class we will need an A4 sheet of paper and scissors, which we use very rarely, but here we can’t do without them.
Let's make a square from the rectangle. To do this, we bend one corner so that the two edges are connected to each other and lie parallel.
We tear off the excess part.
It turns out to be a square.
We make a rectangle from a square. Press down on the curved side.
Unfold the folded one and fold it into a square in the middle. It turns out like this rectangle.
Fold in the middle.
It turns out to be a small square.
Let's go back a step. Unscrew the fold. Now we have a vertical line down the center.
On the left half we bend the upper corner towards the center. And we immediately turn back.
We bend the bottom part and bend it back.
This is what happened. Two lines crossed.
Now a very important step, we bend the upper right corner to the center of the cross which is on the left side of the workpiece.
We are working with the gateway. Turn the corner to the right so that the lines touch exactly.
The entire left side must be folded to the right. Upper left corner to center.
The lines must touch.
We turn this piece inside out. We bend it in the opposite direction in the center.
This is what happened. Turn the part over to one side, as shown in the photo.
We turn the top corner up.
Let's go back a step. What is important is the trace of the bend, or rather this line itself.
It is along this line that we will cut the made figure in half.
We take scissors. The diagonal is clearly visible along which we make the cut.
Like this. We will need the top part.
From such a small triangle you will get a five-pointed one made of paper.
We begin to unfold gradually.
When we unfold it, we get a figure similar to . Some rays need to be adjusted and the correct creases made. It is not difficult.
This is how you get a DIY paper star for May 9th. Beautiful, original and unusual. Let's decorate the holidays with voluminous crafts.
The star is one of the most important symbols of the New Year and Christmas. No Christmas tree can do without this beautiful decoration. In addition, you can decorate your home, office and any other room with numerous stars. And if you start making stars with your child, it will be doubly useful. Firstly, the child will develop fine motor skills and his imagination. Secondly, you can spend quality time with your baby. In this article you can familiarize yourself with different ways to create a star out of paper.
with your own hands.
Paper happiness
Also, using this technique, we will learn how to make stars of happiness, which will serve as an excellent decor for the home or any holiday. Let's look at the photos and see how we can apply them later.
1) The first thing we need to do is cut a lot of strips from 29/1 paper, if of course you want a lot of stars. The paper can be different: regular office paper, cardboard, newspaper, magazine, colored durable paper, it’s at your discretion.
2) Now we take one strip and work with it.
- make a loop as shown in the photo;
- wrap a short ponytail in it and make a knot;
- tighten it and press it to form a pentagon;
- the tail needs to be wrapped back, hidden inside the pentagon, and if it peeks out, then carefully trim it;
- turn our workpiece over;
- and begin to wrap the star on all sides with the remaining strip;
- the tip that remains at the end of the wrap must be hidden under the strip;
- We hold our workpiece with two fingers, and then with our fingernail we press in each face of the pentagon, trying to get into the middle.
This little star is ready. Now the main thing is to be patient and make a lot of stars, so that later you can make excellent decor from them. They are also suitable for games with children; they can be counted and arranged by color. In the end, show the child how they are made and get yourself a helper. This is a very exciting activity and your child will surely enjoy it.
Related article: Knitting leopards for women on 2 knitting needles: pattern with description
How to make a 3D star out of paper
Paper
- a very popular material for creating various crafts and for making a three-dimensional star this material is indispensable. Moreover, it is not necessary to use paper in its pure form. This could be cardboard, an old magazine or book, colored paper or newspapers. Anyone with carving skills can make such a craft.
Method 1
In order to make a five-pointed star in the simplest way, you need to take thick paper or colored cardboard and use a stencil to cut out two identical five-pointed stars. Incisions are made on each of them
: on one - from top to bottom to the middle, and on the second - from bottom to top to the middle. It remains to connect two stars by inserting one into the other.
Method 2
To create the next three-dimensional star with your own hands, you need to take several sheets of white or colored paper
. Two squares are cut out of them. These squares must be folded in half twice, then straightened and bent diagonally. Then the sheets of paper need to be unfolded again and small cuts made on each side of both sheets of paper. It is important to make the cuts the same length, otherwise the star will turn out crooked. Now they form rays by bending the cut sides to the corners of the square. This should result in 4 rays from each square.
To fix and give volume to the rays, their sides are coated with glue and glued together with an overlap. Finally, both parts are glued together so that each ray is separate.
Method 3
This method of creating a voluminous New Year's star is also very simple. First , print out the template and cut out two parts of a five-pointed star from it.
. Along the drawn lines, it is necessary to bend each part so that the outer corners are curved up and the inner corners are concave down. Places for gluing parts are folded to the wrong side. Next, use glue to connect the two parts and the star is ready.
Method 4
One of the ways to make a five-pointed star is origami
. To work you will need five square sheets of colored paper. Each sheet is processed separately.
So, taking a sheet of paper, fold it along one of the diagonals. Then the sheet is straightened and all corners are folded towards this diagonal. Now take the upper corner of the resulting figure and bend it to the right and then to the left side. After such manipulations, you should get two intersecting lines. The workpiece must be turned over and the lower corner bent up and to the left, after which it must be straightened. All that remains is to bend the upper corner in a similar way and smooth out the part. Using the same scheme, four more blanks are made with your own hands and the finished parts are connected to each other.
Method 5
In order to make such a voluminous star you will need:
- A large amount of paper (about 50 sheets);
- Scissors;
- Stationery glue;
- Threads to match the color of the paper;
- Stapler.
This method is quite labor-intensive and requires some patience. Each piece of paper must be cut lengthwise into two equal parts. Then all the resulting leaves need to be twisted into tubes, one of which has a sharp tip and the other a wide one.
. All tubes should be twisted tightly and the edge fixed with glue. When all the parts are ready, you can start assembling. First, you need to staple three beams, then three more, and so on until all the parts are gone. In the second stage, the resulting fans are strung on a thread and pulled together. Thus, the rays take the shape of a sphere. This DIY New Year's star will look great near the ceiling.
Method 6
One of the options for the previous method is to create a five-pointed star from old and unnecessary books
. To get started, you will need a star template cut out of thick paper or cardboard. Depending on the size of the template, the sheets of the book can be cut into equal parts or left unchanged. Just as in the previous version, the leaves are rolled into tubes with your own hands, but not too tightly. The finished tubes are glued to a piece of paper starting from the outer corners and moving towards the middle. To make the decoration more New Year's, you can decorate it with multi-colored sparkles.
Method 7
The most unusual and interesting option for making a three-dimensional star with your own hands. With this master class you can create small stars that can be conveniently used to decorate cards, gifts or interiors.
First of all, you need to cut strips of colored paper measuring 9 mm by 220 mm. It is important that the stripes are even. Next you need to proceed according to the following scheme:
- Take a strip of paper and fold it into a loop. One tip should be long, the other short.
- The short tip is folded inward and carefully tightened, making a knot. The knot must be pressed down with your fingers to align it. The remaining tip is folded towards the middle and hidden inside. The result should be a pentagonal shape.
- Now you need to wrap the resulting pentagon with the remaining long tip. Wrap each side in turn until the strip of paper runs out. When a short tip remains, it needs to be tucked inside the previous layer of paper.
- At the final stage, take the star with two fingers and press one finger of the second hand onto the middle of one of the faces. This manipulation is done with all faces.
There are a lot of ways to make a three-dimensional star and you can choose the one that suits you. And a handmade craft will always please the eye.