Bauble is a unique bracelet. It has always symbolized friendship and love, so a hand-woven accessory was often given to loved ones. The youth of the hippie subculture completely turned baubles into an analogue of a traditional wedding ring: lovers entered into an alliance by presenting each other with the same bracelet.
Their weaving is not just handicraft. This is real philosophy. A knowledgeable person puts into the pattern his own ideas about love and friendship, his musical preferences and other things that will help others get an idea of his personality.
In this article we will talk about how to weave baubles from floss, what the colors and patterns used mean, how narrow bracelets are tied, and we will help you decide on the option that is right for you.
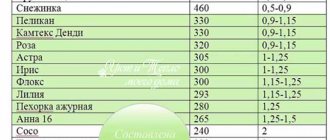
To work you will need threads: the best suitable for weaving stylish baubles are ordinary floss of the brands “Anchor”, “DMC”, “PNK im. Kirov”, “Gamma”, or thin knitting threads - “iris”, “lily”, “poppy” and “narcissus”. If you wish, you can even weave it from lace, so prepare your materials and let’s get started!
Basic weaving knots
You need to get acquainted with the knots on which the weaving is built at the very beginning, so that later you can easily create masterpieces. Each node has its own designation on the diagram, therefore, in order to read the “technical specifications” and understand it correctly, we suggest studying different types of nodes and learning how to work with them.
The main nodes are right and left. These are the simplest loop elements, the difference between which lies in the location of the working thread. In the left one it is to the left of the background, in the right one it is on the right. The paired combination of these elements gives several types of nodes:
- left/right;
- right left;
- left/left;
- right/right.
We will have to work with these four types in the future to weave floss baubles for beginners.
Straight knot
In short, it is a combination of two left nodes. Pay attention to the fashionable patterns of baubles: a straight knot is indicated by an arrow, the tip of which points to the lower right corner. This is where the working thread will go. The finished knot will be the same color as the working thread.
Reverse knot
It is tied in the same way as a straight knot, but in the opposite direction, combining two right knots. In the diagram it is indicated by an arrow that points down and to the left, and shows the direction of travel of the working thread.
Left tatting
Don't let the name of this macramé knot scare you away: there's nothing complicated here. Under the left tatting lies a combination of left and right basic knots.
Tie it as follows:
- the first is a simple left knot, after which the working thread will be on the right;
- Using the same thread we tie a simple right knot, swapping the threads.
It is thanks to the direction of the working thread that such a symbolic designation of the knot appeared: the arrow goes down, to the right, but then changes direction in the opposite direction.
Right tatting
The technique of execution of this knot is absolutely mirror of the previous one.
First we knit the right loop with the working thread on the right, and then the left one. The thread eventually returns to the original side. This can also be seen on the symbolic icon that is used to indicate the right tatting in the diagram.
Try tying the knots listed above: practice will help you choose the appropriate thread tension and weave a smooth, beautiful fabric. In addition, having mastered these knots, you will read the product diagram and can learn how to weave baubles easily and quickly, even from ordinary threads.
Weaving patterns for baubles
It was shown above that the simplest way to weave a bauble is an ordinary braid of three strands with a strong knot at the end. In addition, you can weave a bauble from four threads or a larger even number of threads.
First you need to secure the threads with a clamp. A crocodile clip for paper or a clip from a folder-tablet will do. It is also suitable to secure the threads with tape. When there are a lot of threads, it is no longer profitable to use pins, since you will need a lot of them. Some of them may pop out. Therefore, it is better to press all the threads together with one object and start working.
At each step you need to take two central threads, move the left one to the right edge, and the right thread to the left side, and so weave until the very end.
You can also weave baubles from four threads, so that the three-strand braid seems to wrap around the central thread. How to weave baubles in this way?
Baubles made of four threads
Let's number the threads from 1 to 4. Thread 1 must be thrown from left to right. It will pass over the 2nd thread, and then under the 3rd. Now the threads will be positioned like this: 2314. The 4th thread must be passed from right to left: first under the 1st thread and above the 3rd. Now they stand like this: 2431. Now we have the outermost thread 2. It should be thrown over the 4th and under the 3rd thread.
Next, take the thread on the far right - it now has No. 1, throw it to the left, bringing it under the 2nd thread and passing it over the 3rd. We continue to weave in the same way until the desired length. We tie the threads into a regular knot.
Six-strand baubles
Anyone who has had to make straw braids for sombrero hats has a good idea of how to weave baubles from 6 threads. It's even easier with threads, because you can use them in a different color. In addition, there is no need to form neat folds, since threads are not as rigid a material as straw.
We secure all the threads with a clamp or tape and begin weaving. Take the left thread from the edge (number 1) and move it to the right. First we draw over the 2nd thread, then under the 3rd. It goes into the 4th position and does not need to be carried out further. The thread on the other side - No. 6 - is laid to the left under the 5th, passed over the 4th thread, and under the 1st. Now their order is: 236145.
The left extreme lash (No. 2) is passed to the right over the 3rd and below the 6th. The right outer thread (No. 5) is laid to the left, passing under the 4th, over the 1st and below the 2nd. Now the threads are located like this: 365214.
Weaving continues until the required length of the bauble. When it is achieved, a regular knot is tied, and the excess floss is cut off.
Oblique weave baubles
Another interesting way of weaving is oblique. How to weave baubles using this method:
- The threads are laid out symmetrically by color, then tied into a bun and clamped. Weaving begins from the leftmost point. The first thread is intertwined with the second. A knot is woven from them, tightening to the base.
- Thus, it is repeated on the other side, and subsequently, until all the threads turn into knots. At the end, the two central threads are tightened.
- Next they are laid out according to the pattern. The weaving ends by tying a knot and retreating slightly so that it can be tied and untied as needed.
You can make a bauble with an arrow pattern of 6 threads, which are taken in pairs according to color. Let's take two yellow and two blue threads.
- The tied ends of 6 threads of 3 pairs of shades are secured in the clamp: green, orange, blue. Colored threads are laid in the following sequence: 2 green at the edges, then 2 orange and 2 blue floss threads in the center.
- The leftmost thread (green) is wrapped around the main left knot in succession with the orange and blue threads on the left side. With the right extreme (green) thread, the right orange and blue threads are tied using the right main knot. Connect both green threads in the center with knots. This is done by the main type of node. Now the orange lashes have turned out to be extreme.
- The actions are repeated, only first with orange fibers, then they turn out to be central.
- Then everything is repeated, only this time with the outermost blue threads. This is how the “arrow” pattern is made to the desired length. The end of such a floss bauble is done traditionally with a strong knot.
There are also bauble patterns, woven from 4 threads and performed on the main nodes.
- The blue thread on the far left serves as the working thread. This thread is used to sew the left corner over the right, also blue, thread. It is brought inside the corner, after which the knot is tightened. This action is repeated.
- Using a working thread, the left knot is performed first over one yellow thread, then over the second. In this case, the first blue thread becomes the one on the far right.
- Similar actions are performed with the next leftmost threads. This results in alternating a pair of rows of blue and a pair of rows of yellow. Tighten the knots carefully so that the rows come out even.
- Having weaved the desired length, you should end the bauble with a regular braid, after which you should tightly tie the knot. The excess thread must be cut off.
Colored baubles with straight weave
Baubles woven with straight weaving are very diverse, as they allow you to weave a design or inscription into the product. The beginning is standard here too - you need to fasten the threads to the surface and start tying knots. The difference is that the thread must be immediately pulled to the side and braided through each longitudinal thread. The movement of the transverse thread when weaving a bauble in this way resembles the movement of a chain when knitting Bruges lace. It seems to snake, passing through the longitudinal threads.
The whole process is repeated over and over until the very end. And if you need to make a drawing, then for this you either simply weave an additional thread in the right place, or use a warp thread of a different color. Then you are limited only by your imagination.
Bauble with name
Another way to please a person is a unique bauble with a name. It can be made in the same way as described above, only instead of a drawing, an inscription is woven in. First, you should draw the future letters on paper. Then it will be clearer which knots to make with colored ones, that is, to tie a longitudinal thread (warp thread) over the transverse one in these places. So a knot of a different color protrudes outward, representing an element of the letter.
The main thing is not to make mistakes, not to deviate from the baubles pattern, otherwise you will have to unravel the product and weave it again. If weaved correctly, you will get a wonderful personalized bracelet - a chic birthday gift.
Macrame technique
Anyone familiar with the macrame technique can create amazingly elaborate baubles. The easiest way is to use a double flat knot. Warp threads are taken and braided with this knot over the entire length of the product. If weaving baubles of this type is boring, you can make a few cones, turning the product into a stylish bracelet.
A twisted bauble will be obtained if the double flat knot is not performed symmetrically, but always in one direction. A wide bracelet will come out if you use the Josephine knot, repeating it several times. The more knots the master knows, the more incredible and beautiful the bracelets will be.
How to secure threads for weaving baubles
An important point that you need to pay attention to before starting work is securing the threads. If this is not done, the weaving process will be seriously slowed down: the threads will fall apart, the knots will move out, and the fabric, accordingly, will be crooked and of poor quality. There are fastening methods that are suitable for weaving at home or while traveling. They look like this:
- Distribute the threads on a flat surface and secure with tape, leaving a few centimeters of free edge. If they are too slippery, you can tie a knot on the free part: this way the bun will definitely stay in place.
- If you don’t want to tie a knot, you can do without it: throw the free edge of the threads through a thick notebook or smooth board of a suitable size, and secure them with a regular office clip.
- A slightly labor-intensive, but proven method: each thread that will be used in the pattern should be tied around a regular pin. But the pin can be attached anywhere: to a car seat, to jeans, a tablecloth or any other surface covered in fabric. This is an ideal way for people who prefer not to waste time on the road.
- Another way of fastening is to tie the threads into a bundle and hook it with a pin to the knot.
All that remains is to choose the appropriate option, and you can start weaving a bauble from threads.
LiveInternetLiveInternet
Quote from the message LITERARY
Read in full In your quotation book or community!
In this post, I have collected from various OPEN SOURCES on the INTERNET: a short theoretical course for beginners, a huge collection of patterns (some of them are here and a link to the post with the rest) and video tutorials on weaving baubles from floss. The text is written in places in an awkward language (it looks like a translation) and has errors. I didn't fix everything. I hope someone, like me, needs this. Important! To understand everything that is written here - knots, weaving patterns - be sure to check out the video lessons for beginners at the very bottom of the article.
Baubles are a symbol. Friendship bracelets and baubles have their own history, which is briefly useful for any cultured person interested in this topic to get acquainted with. Their history comes from the North American Indians. Local custom required wearing such a bauble, given as a symbol of friendship and love, until it was completely worn out and broke. The meaning embedded in this custom is simple, as a sign of gratitude to a friend for the work and the warmth and love invested during weaving, it should not be removed at the moment of a spontaneous impulse. It was believed that a bracelet taken off ahead of time meant the end of friendship. Later, the tradition was picked up by American hippies, for whom the symbol of exchanging baubles signified the process of fraternization. So gradually the decoration itself came to the fore, and brotherhood was understood as a self-evident phenomenon.
| Nowadays, it is just a cute, simple decoration, however, knowing how to weave baubles from threads, in addition to history, also has its own secret meaning. For example, different colors of threads in a product and different patterns mean different preferences of a person, that is, they have their own specific symbolism that carries information about the person. Hippies use them instead of wedding rings. Such unique wedding baubles should be the same and are given to each other. Sometimes they make beaded rings. Weaving is a special interest, a special type of macrame. There are many types and styles of weaving. You can start getting acquainted with weaving with the basic knots, which will help you read the patterns for weaving baubles from floss threads. This borrowed scheme is simple and not difficult to understand. Here we used floss threads of two colors. The direction of the arrows indicates where to thread a thread of a certain color. The exercise should be repeated several times until the technique of tying knots is fully understood and mastered; the entire process is built on this. |
Scheme for weaving knots for baubles from floss threads for beginners.
Let's look carefully at the instructions on how to properly weave baubles using knots. A separate issue is securing threads for weaving. Several methods of fastening are known. You need to start practicing gradually. To secure the threads you will need a stationery clip. Method one, to secure the threads. The threads are laid out in order according to the pattern and attached with a clip, for example, to a book. Method two To take notes as you work, you will need a tablet representing a board with a clip. The threads laid out in a certain order are secured by clamping on the tablet. Method three You can use a pin and attach the knotted threads to any convenient object, for example, a pillow or jeans. You need to try to ensure that the canvas is even. You can attach threads and tape to the table. How to start weaving baubles from floss. Straight weaving of baubles for beginners Step 1 Fold the required number of threads and bend them in half. A loop is made on top. This method of starting weaving is convenient for direct weaving of a pattern; beautiful weaving patterns are presented below.
Step 2 You need to tie the leading thread in the place that will be the beginning of the loop.
Step 3 Begin to braid the threads with the knots indicated above. Braid until you get a loop.
The next step involves tying the remaining threads using a straight weave pattern to obtain the pattern shown in the photo below. In the pattern, the background color is played by the leading thread, and it must be used to braid all the other threads.
How to finish weaving baubles from floss threads
It is suggested to braid the braids on both sides of the baubles; for beginners there should be no difficulties; the patterns for braiding braids are known to everyone. Here you need to use another thread, which will be a guide to the place where the fastener is supposed to be made. You will need some additional device to secure the braid temporarily. Scotch tape, strings and other convenient things can be suitable for this purpose. Then the braids need to be folded and secured (this method is suitable for both straight and oblique braiding). Under the braids you need to thread a thread of a different color (in our case, orange)
Now the braids are braided with orange thread in a square braiding knot. You need to try not to tighten the knots too much so that the inside of the braids can move easily. The photo below shows a pattern of weaving with a square knot: As a result, you should get something like the following image, in the photo below:
When finishing, a double or triple knot is tied. The ends of the threads are also cut off and coated with clear varnish to prevent fringes. Blue threads are untied.
Baubles with clasp
If a clasp is to be made on the bauble, the threads are secured in a certain way.
This figure shows how to attach threads in general, and the next figure shows how to attach threads to a buckle to make weaving convenient.
Straight (or oblique) weaving continues according to the chosen pattern (an approximate pattern is given below). When the work is finished, you need to tie the remaining threads together in pairs so that the knots do not unravel. The ends of the threads need to be folded inside out and carefully sewn with small stitches using threads that match the color. After sewing half a centimeter, the free ends of the threads are cut off. The length of the floss bauble should be 2 centimeters shorter than the wrist grip. From some soft, thin leather, 2 identical straps are cut out with a width equal to the width of the bauble. The straps are sewn in such a way as to completely cover the sewn ends of the threads. The strap is sewn on the wrong side first.
Then the strap is applied and sewn on the front side. Thus, the end of a straight weave bauble is sewn between the two straps. This option is equally suitable for both beginners and experienced people. Next, a hole is pierced in the right place. The finished bauble on your hand should look something like this:
Baubles - weaving patterns from floss
In your work, you can use direct weaving patterns such as those shown in the photo below. Don’t forget about the knots of weaving baubles (fenech) in the corners and turns 1) Beautiful six-color pattern, you can try to make your own unique color for each pattern, the main thing is not to get confused later.
2) In the “Yin – Yang” style. Good and evil, as they say, must be at the same level of opposition:
3) Colored geometric shapes, squares and triangles, for lovers of contrasting colors, the end result is beautiful and unusual:
4) In the form of red and blue hearts, beautifully intertwined in a pattern. Suitable for a friendly gift or for a loved one.
5) Another beautiful pattern for a heart bauble with a straight weave, quite suitable for beginners, you can choose the colors at your discretion:
6) Something resembling a pigtail, but for some reason it’s called “Cross”:
7) A diagram in the form of a flame or fire, looks very cool. Medium difficulty:
ANOTHER 62 SCHEMES:
2. 3. 4.
5. 6. 7. 8. 9. 10.
11. 12. 13.
14. 15. 16.
17.
18.
19.
20.
21. 22.
23.
24. 25. 26. 27. 28.
29.
30.
31. 32. 33.
34.
35.
36. 37.
38. 39.
40.
41.
42.
43. 44. 45.
46.
47.
48. 49. 50.
51.
52.
53.
54.
55. 56. 57. 58.
59.
60. 61.
62.
AND FOR CONFIRMATION - A SELECTION OF VIDEO LESSONS Main components
The next two videos are in English, but everything is clear
How to weave letters
How to weave a bauble with siail
How to learn to understand bias weaving patterns
There is a big difference between straight and oblique weaving, and patterns designed for one method are completely unsuitable for the other. It is easy to distinguish them: in oblique weaving, the knots are located between the working threads, as if in a checkerboard pattern. Each knot of the second row is located between the threads of the first. Hence another name for oblique weaving - mosaic.
Look at the diagram shown here. This is the most popular option: each circle with an arrow indicates a certain type of knot, and multi-colored lines represent working threads.
To understand how to weave a bauble from knitting threads according to this pattern, arrange the threads in the indicated order: orange, gray, two yellow, gray, orange. Please note: when weaving obliquely, the threads are tied in pairs. The decoding of the scheme will be as follows:
- First row - here we see a knot: a straight knot with an orange thread on a gray thread, a straight knot with a yellow thread on a yellow thread, and a reverse knot with an orange thread on a gray one.
- The second row contains two nodes - forward and reverse. The gray threads that are located on the sides of the fabric do not participate in weaving: we tie knots only on the central threads.
- Please note: from the third row there are tatting knots in the weaving.
All other rows are woven using the same principle. When the rapport ends, they simply start it over again.
Sometimes when weaving subsequent repeats (especially in geyser patterns), the threads are positioned differently than in the original version. Don't be afraid of this: just continue weaving according to the pattern, in the end you will still get a smooth fabric with the desired pattern.
How to start and end a bauble with candy
Every bauble weaver has probably at least once in his life wondered how to beautifully (and most importantly, neatly) decorate the beginning and end of a bauble. Today I want to tell you how to start and finish a bauble with candy. Recently, this method has been used more and more often, so I wanted to talk about it in detail.
For the lesson I will take this pattern of 12 threads. For each of the three colors you need 4 threads 80cm long. To avoid confusion, I’ll say right away that instead of white we have beige, instead of pink we have red, and instead of black we have blue.
Here's what you need to do to carve out a "candy" beginning from this scheme. We are looking for a central node in the diagram. If there is an odd number of threads in the pattern, then such a node will be in the first row, if it is even, like ours, then in the second. From this node we draw diagonals down to the right and down to the left. We don’t need what is above the diagonal.
Now let's start weaving. As usual, we secure the threads in a convenient way.
For now, the order is not important, since during weaving it will still get confused. But in this photo, for clarity, the threads are distributed in the order in which they will be used. This order is easy to determine. Just look at what threads each diagonal knot is woven from. But I’ll say it again, there’s no need to do this.
So. The first knot at the top of the diagonal is white (beige). We have two bundles of threads of identical composition. First, take one beige thread from the right bundle and tie a knot to the left around the entire bundle.
Similarly, we tie the left bun with a knot to the right.
Now the two beige threads are in the center, and we are ready to make the first knot according to the pattern. At the top of the diagonal there is a knot to the left, so we weave it.
We go down further diagonally and see that black (blue) threads are needed on both sides. Therefore, now we select a blue thread from each bundle and also tie the bundles with them. We no longer touch the beige threads; they remain in the center.
We make nodes diagonally in accordance with the diagram. Both knots are tatting (left-right). We can also make a knot in the center of the next row. This is a knot to the right between the white (beige) threads.
We look at the diagonals again: the next threads should be pink (red).
We weave each row according to the pattern.
Next are blue threads again.
Reds...
...And at some point all the threads were distributed in exactly one row.
From now on, we weave according to the pattern as much as needed.
Finishing the bauble with candy is also quite easy. When the required length has been woven, we again cut out the triangle from the diagram. If you're weaving from memory, you'll have to work a little harder to figure out where you left off according to the pattern.