Published May 2, 2017
For many kids, minions are their favorite cartoon characters. Children simply adore these funny little men and try to get everything connected with them. A hat in the shape of a minion will also delight the child. Even novice needlewomen who are just learning the basics of crocheting can create it.
When creating a “Minion” headdress, you must adhere to the general style of this hero - it is yellow, has unusual glasses on a black strap and blue pants. We create the hat from top to bottom, knitting rows in a circle.
Recent Entries
How to clean a frying pan from carbon deposits in 10 minutes Don’t throw away yogurt cups: 3 cool craft ideas for kids Decorating for pennies: 6 ideas for crafts made from plastic spoons
Crochet minion hat, master class with photos, step by step
Of course, the biggest fans of cartoons are children. But, oddly enough, lately adults have also become connoisseurs of modern cartoons and enjoy spending a lot of time watching them.
Particularly beloved characters among modern cartoons, which have won recognition among young and adult viewers, are minions.
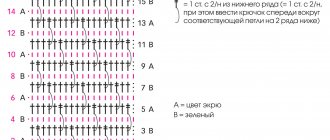
Knitting a hat according to the pattern
After all the issues have been settled, you can start knitting a “Minion” hat for a boy or girl. Read the description carefully:
Knitting is done in a spiral. It starts from the bottom of the cap .
- We form a ring of yellow yarn around the index finger on our left hand.
- Without draping, we crochet the columns around the formed ring.
- To tighten the ring, take the end of the thread and pull it.
- Knitting with a half-column is carried out further in a spiral. Don't forget to do the throwing.
- We knit the number of rows required according to the measurements.
- We attach a black thread.
- Having finished knitting with black thread, we return to yellow again and knit the required number of rows.
- We finish the hat with a coral stripe and ears.
The knitting of a hat for a boy is finished, all that remains is to diversify it with important details to achieve the desired result. Let's move on to knitting the eyes:
- We continue to adhere to the principle of spiral knitting.
- Knitting starts with black color (pupil).
- We close the ring without throwing it on, we must knit a row with columns.
- We knit several single crochets with white yarn to create the desired sparkle in the eyes.
- We complete the knitting with several rows of gray.
Our product is ready! All that remains is to embroider the mouth with black thread and make ties for the cap.
Final calculations to start knitting according to the pattern
For our “Minion,” the crochet pattern has the shape of a circle consisting of a large number of loops. To correctly calculate the number of loops required , we must take a number of measurements. This approach will make the work more professional and may save you a lot, including time.
Coat for women: knitting Crochet vest or sleeveless vest, pattern Crochet knitted blouse for newborns Crochet picot, master class
Any calculations for creating clothes begin with taking measurements. Here you will have to try, because not all children are assiduous. Here are the measurements we need to take for the Minion hat:
- Head circumference (measurements taken slightly above the eyebrows).
- Measure along the most convex part of the head at the back (taken from top to bottom, several centimeters are subtracted from the result obtained).
All measurements have been taken, and you can proceed directly to calculating the loops for the hat. Let's start with theoretical material: any hat consists of a crown and a bottom . First of all, the number of loops is calculated for the elastic of the hat. It is recommended to make a test knitting sample to evaluate not only the number of loops, but also the quality of the yarn, and also to ensure that the tools are selected correctly.
Attention: overstretched knitting has a very short shelf life. If the result is like this, try using a hook with a different diameter. .
Take a ruler to measure the number of loops per centimeter. To do this, divide the total number of loops in the test knitting by its length. We use the figure obtained when measuring the head circumference to calculate the number of loops in knitting. The number of loops per centimeter is multiplied by the head circumference.
In the same way, the quantity for knitting the pattern is calculated, after which the number of loops for the pattern is subtracted from the number of loops for the elastic band. We must distribute what we receive correctly along the entire length of the elastic band.
Master class on knitting a Minion Bob hat - watch the training video:
Crocheted “Minion” hat: do it yourself according to the pattern
In the wake of the popularity of various cartoons, parents have to be very creative in order to truly please their child. It’s difficult to predict what will make him happy today: a figurine with his favorite character, a backpack or mug, or will it be a scarf with the image of his favorite character? Maybe he has another favorite character for a long time, and you don’t even know about it.
It’s not for nothing that they say that the best gift is one made with your own hands. Moreover, it will not only please the child, but may well introduce him to a new hobby.
Let's try to make a warm and funny hat for a boy
The process of knitting a minion hat for a boy is no different. It can also be done by a beginner in knitting. Is it important to choose the appropriate colors? bright yellow, blue, gray. So, you will need the following materials:
- yarn 3 colors;
- hook No. 5 or No. 5.5.
We take a hook and yellow yarn and begin the creative process:
1st row? we knit 12 double crochets into a magic ring, it is also called an amigurumi ring. Tighten the ring by pulling the short tail of yarn. We begin each new row by knitting two chain stitches for lifting.
2nd row? we make an increase, in each loop we knit 2 double crochets, a total of 24 loops.
3rd row? knit with double crochets. (1 increase, 1 double crochet). Repeat 12 times. We get 36 double crochets.
4th row? knit with double crochets. (1 increase 2 double crochets). Repeat 12 times. We get 48 double crochets.
Row 5? knit with double crochets. (1 increase 3 double crochets). Repeat 12 times. We get 60 double crochets.
Row 6? We knit with double crochets without increasing 60 double crochets.
Row 7? We attach a black thread to the work on the canvas. From black yarn we knit a loop, which we knit into an unfinished double crochet of the 6th row. First, single crochet, then double crochet. There are 60 columns in total. Please note that the yellow thread cannot be cut, since knitting with it will continue after the black rows.
Row 8? switch to yellow yarn. We knit another 60 double crochets. You need to finish the knitting process with a connecting stitch in the loop of the last row.
Rows 9-12? There is a complete repetition of the 8th row. Change the yarn to blue.
Row 13? First we knit a half single crochet, then we knit double crochets loop into loop, in total you will get 60 double crochets. Here we start knitting the ears. The process of creating ties is illustrated in the previous lesson, you can use it.
Our minion will have one eye, so the eye knitting pattern can also be taken from the previous lesson, they are absolutely identical. Congratulations on successfully bringing your cartoon character to life! It will make a child's life brighter and more fun.
Knitting a hat
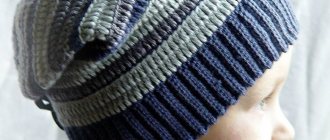
We invite you to familiarize yourself with the crochet minion hat master class. The basic knitting pattern will be given for a general understanding of how to knit the headdress itself. She will help you create a similar hat for both boys and girls, regardless of their age - both kids and teenagers will be happy with such a gift.
Materials and tools
In order to please your child with a minion hat, we will need:
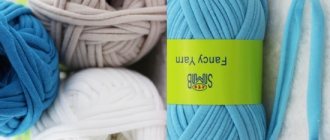
- The yarn is yellow - the color of the minion.
- Blue yarn (can be replaced with another color) is the bottom of the product, symbolizing the character's overalls.
- Yarn in white, black, gray and brown colors - eyes and glasses.
- Hook - pay attention to the instructions located on the label of the skein of yarn, it indicates the required size of knitting needles and hook.
- Needle for sewing knitted items.
- Scissors.
Regarding the choice of yarn composition, I would like to add that for autumn hats it is better to choose children's yarn with the following percentage:
- cotton;
- bamboo;
- flax;
- viscose or acrylic.
Baby's friend
As we promised at the beginning of the article, a little surprise awaits you. Now we will tell you how to knit a wonderful friend in addition to the hat. To do this, prepare knitting needles, yarn, padding poly, and a hook.
Related article: Growing peonies - the secrets of experienced gardeners
Cast on 26 stitches, knit in garter stitch to a height of approximately 12 cm and sew along the long edge. Stuff the product with padding polyester and sew up the remaining bottom and top sides.
Now let's move on to Minion's pants. Cast on 17 stitches of light blue yarn and knit into an even square using garter stitch. Next, from 5 loops we make straps for the overalls of the required length. Do two things. From 8 loops, knit a tiny pocket. From 5 loops, an elastic band for glasses and the frame itself. Now, using a hook and chain stitches, we knit the eye in a circle. Let's move on to the handles, cast on 5 loops, tie a small ribbon and twist it, do the same with the second handle. Use blue to tie round legs for our hero. Sew all the details into place and make a hairstyle using black threads. This soft friend is waiting for his owner!
Final design
The eyes should be sewn on, focusing on the black stripe.
If the cap is small, then a pair of eyes are placed close together, otherwise they will end up on the sides of the head and not in front. You can revive the look of your favorite character with the help of a few stitches of white thread, which will help simulate the reflections on the black background of the pupils. You can place hairs on the top of your head. To do this, first cut several black threads of 20 cm each (the length can be varied). They are folded together and bent in half. A hook is pierced through the middle of the top of the product and a bunch of threads is pulled halfway through, forming a loop from them. The tails of the threads are passed into it and tightened, directing them vertically upward. If desired, such hairs can be placed in several places on the bottom. A girl's hat can be decorated not with hairs, but with a small bow placed in the center of the crown or slightly to the side. These elements can be replaced with a traditional pompom.
Models with a mouth embroidered with several stitches of black yarn look good. It can be straight, oblique, smiling or expressing sadness. You can also crochet a red tongue.
At the end of the work, all that remains is to attach the ties. They are often designed in the form of a braid. To do this, long pieces of threads of different colors used during knitting are secured at the bottom of the ears. These can be bundles of white, black and yellow threads.
The ends of the braids are tied in a knot, and the remaining tassels at the bottom are carefully trimmed with scissors. You can also knit ties with crochet or knitting needles. Sometimes a ready-made knitted cord is simply sewn into the product. If you wish, you can do without ties.