Rules for knitting men's hats
To make a man like a hat, you need to consider the following:
- Natural material is suitable for a hat, especially if your scalp is sensitive. Angora, cashmere, soft wool.
- The optimal knitting density should be determined. A properly knitted hat is tight, but does not cause discomfort and looks neat.
- The model must correspond to the time of year. A headdress with a pompom is good for winter; in spring or autumn it is better to choose a beanie hat.
- The color should be combined with the color scheme and style of the man's outerwear.
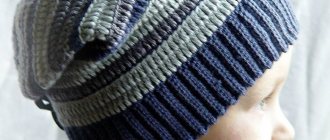
Knitting a simple men's hat in stockinette stitch with elastic
For beginners, it is better to choose a simple model in order to master the stages of knitting and not be disappointed in the process.
Yarn selection
It must be remembered that the hat will be worn by a man who may not like the thread with lint or glitter. The descriptions of most knitting patterns indicate the recommended threads for use and their thickness. If the store does not have the yarn you need, you can choose one with similar characteristics. The composition is also important.
Threads with a predominant content of natural fibers retain the original appearance of the product longer. Often natural and artificial threads are mixed, obtaining an advantageous combination of qualities. The choice of material also depends on the season. In winter, you should give preference to angora, goat down, and mohair.
Knitting needle selection
The main things to pay attention to are the size, shape and material of the knitting needles. The choice is also determined by the knitting style. The fabric is knitted in pairs with closed knitting needles, and both the fabric and products are knitted in the round without a seam. A set of stocking needles is used for seamless circular knitting of small items.
The size of the tools determines the density of the knitting and depends on the thickness of the yarn and the knitting characteristics of a particular person. Recommendations for selection are indicated on the thread packaging. It is worth considering that thick knitting needles will make the loops larger and looser, while thin knitting needles will make them tighter and tighter. The material and texture of the knitting needles depend on the yarn. For sliding threads you should choose rough ones, for fleecy ones - smoother ones.
Required measurements
Measurements for a hat must be taken directly from the head. You should not measure an existing headdress; the elasticity of the material may vary. You will need 2 main measurements: girth and height. The girth line is drawn above the eyebrows and a convex point on the back of the head. Height - the distance from the lobe to the parietal part.
The measuring tape should fit snugly to the head. Based on the characteristics of the model, other measurements may be needed. For a tight-fitting hat - from the crown to the end point of the future product on all sides; for a cap or earflaps - the circumference of the face.
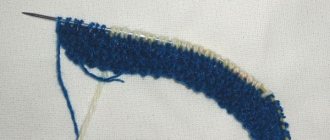
Set of loops
To calculate the loops for the side, you need to knit a sample, stretch it a little, count the number per 1 cm and multiply by the head volume obtained from measurements. For patterns that tend to stretch, you can remove 2 cm. The amount for the main type of knitting is also calculated, without subtracting the stretch length.
There will be more loops. Extra loops are added immediately after the elastic, tying 2 loops from one at the same interval. The method of casting on loops determines the appearance of the edge of the fabric and its elasticity. It depends on the chosen pattern and model.
Scroll:
- Traditional . The edge is neat and moderately free. It is necessary to pull out a long tail of thread, 2 times the width of the product. The thread is placed so that the end goes around the thumb and lies above the segment stretched between the fingers, and the main part goes around the index finger. Both ends are squeezed with the ring finger and little finger. The knitting needles must be inserted from the bottom up under the thread on the thumb and placed behind the near part on the index finger, while removing the yarn from the thumb and tightening the loop.
- Air loops. For products with stretchy edges, hats, socks, sweaters. The first loop is made by hand. Next, take the knitting needle and warp thread in your left hand. The tail of the thread should be wound around the thumb from right to left. This way all the loops are formed. The loops are transferred to the knitting needle without tightening too much.
- The Italian set is also used to create a free edge. To make the first row denser, use smaller knitting needles. The first regular loop is performed. The tail should be 3 times longer than the finished product vertically. The thread must be stretched between the thumb and forefinger, cover the knitting needle with the part from the thumb. Then make a knit stitch by grabbing the second thread from top to bottom and pulling it under the first. For purling, the sequence of threads is changed. When the loops are cast on, knit 2–4 cm with an elastic band.
Main part of the header
Stockinette stitch is a simple type of knitting, the fabric is smooth and dense. The essence of the process is alternating rows of knit and purl stitches. When knitting knit stitches, the thread is located behind the fabric. The thread is grabbed and pulled out through the loop. For a purl loop, the thread is placed in front of the product and grabbed from right to left. The first loop is not knitted, the last one is knitted.
Knit to the crown, 16 - 18 cm, then begin to decrease the loops.
The final stage of mating
The number of loops is halved by knitting in pairs. It is possible to decrease through a row according to the pattern 5 in satin stitch, 2 together, reducing the number of stitches in satin stitch. When no more than 12 loops remain, the thread is cut, pulled through them and secured from the inside.
Features of knitting a men's hat with earflaps
The product has a special cut. The classic model consists of:
- crown (main part);
- the bottom of the cap (crown);
- ears (2 parts);
- visor
A standard product pattern is the basis for implementing design ideas
Various models, Finnish, Eskimo, Olympic, differ in shape, length, size of ears and visor, presence of ties, and decorative elements. Not only sewn hats are popular, but also knitted items. Ushankas with large relief patterns are especially relevant.
The knitting technique is individual for each product.
Caps can be made:
- from bottom to top (starting from the ears);
- from top to bottom (from the top of the head);
- using a tool for knitting in the round (without a seam);
- on double-pointed, straight knitting needles with tips (with 1 or several seams).
Important! It is recommended to choose a circular tool with a fishing line 40 cm long. It is more convenient to form the crown using a set of stocking (sock) knitting needles of the same diameter.
A winter headdress must be moisture-resistant and retain heat, so they use blended or natural yarn from the wool of goats, sheep, camels, and alpaca. Often the hat is made with a lining. It can be sewn from fleece or knitted, repeating the model with an adjustment of 1-2 cm.
The standard yarn consumption is 1 skein, it may vary due to:
- sizes;
- forms;
- drawing;
- knitting density;
- features of the thread;
- spoke diameter
The product can be decorated with ties, pom-poms made of fur or yarn, or tied with thread imitating fur.
Important! The finished headdress is subjected to WTO, washed by hand, at a water temperature of 30 ° C, avoiding strong mechanical impact, and not twisted. Drying is recommended laid out on a flat surface.
Knitting fashionable men's hats - description and patterns
For lovers of the original, knitting hats for men with descriptions and patterns can be a way to test your abilities. However, it should be remembered that an unusual Viking or knight’s hat consists of several elements.
In some cases, it is necessary to divide the fabric into parts and knit them according to different patterns , increasing or decreasing loops, knitting slits for the eyes or mouth, and using yarn of different colors or textures.
Unusual fancy threads will also help make the product fun and stand out. Thread with knots, pompoms, curly, boucle, grass, thanks to its texture, will add individuality to even an ordinary model. You can choose sectional dyeing threads. Those who prefer materials with a traditional appearance may like bulky yarn, tweed with splashes, or drawstring yarn.
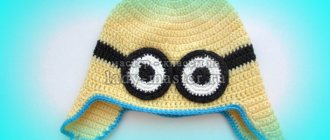
Hat with ear flaps
The original earflap hat is suitable for men of any age.
To connect such a model, you will need:
- 100 g yarn;
- knitting needles straight, circular, hook.
You can knit in garter stitch:
- Cast on 12 loops
- Knit 8 rows, adding loops.
- Complete 14 rows.
- Add 8 stitches to the beginning, knit 20 rows. Knit the second piece in the same way.
- For a visor of 22 loops, knit 4 rows, picking up 2 loops in each. Knit another 24 rows.
- Connect on circular knitting needles, knit the number of rows in height.
- Reduce the number of stitches evenly to 10 and pull off.
With lapels
Paired with a scarf, a flap hat looks stylish and will complement any look. Knitted with stocking needles.
Scheme:
- Calculate the initial number of stitches and distribute equally across the knitting needles.
- Use a 2 x 2 elastic band to tie 25 cm.
- Row knit purl stitches together, 2 rows follow the pattern.
- Work a row with knit stitches together, the next 2 according to the picture.
- Knit the remaining rows in pairs until 8 stitches remain.
- Pass the thread through the last loops and fasten off.
- Fold up the edge of the hat.
Beanie
A simple and fashionable beanie or stocking cap, the bottom fits close to the head and the baggy top is tucked in or left hanging. You can use garter stitch or make patterns. The beanie is easy to knit in the round.
Mating:
- Take measurements and calculate the loops.
- Tie 5 cm with a 1 by 1 elastic band.
- Decrease 30 stitches evenly per row.
- Knit stockinette stitch for another 15 cm.
- Decrease 8 stitches per round evenly until less than 25 stitches remain.
- Knit all the loops in pairs.
- Cut the thread and pull through the last loops. Pin.
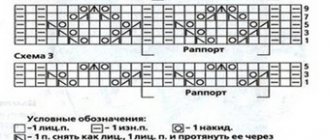
Zigzag of luck
A knitted hat for a man with a zigzag pattern is more complicated; you need to carefully study the description and diagram. The pattern is more embossed from the inside. Materials: 100 g yarn, circular knitting needles.
Mating:
- Calculate the loops so that the number is a multiple of six. Before counting, the sample should be washed, the pattern will stretch.
- Cast on stitches using any elastic cast-on.
- First knit with patent elastic. 1st row: alternate yarn over, unknitted loop and purl.
- Knit the loop and yarn over, then remove the loop and yarn over.
- Do not knit a loop, yarn over, purl the next one along with the yarn over.
- Repeat alternating rows 2 and 3 until the height is 4 cm.
- To create the “zigzag of luck” pattern, knit 7 rows according to the pattern: yarn over, knitted yarn over and loop, purl.
- In the transition row, yarn over before purling.
- For the next 7 rows, do not knit a loop, make a knit yarn over, pass the slipped loop under the yarn over, make a yarn over and purl.
- Transition: yarn over, remove a loop, knit a knit yarn over, pull the removed loop through the yarn over, purl a yarn over.
- Repeat the steps of the zigzag pattern.
- The remaining height is knitted with an elastic band 1 by 1 from crossed loops. The front loop is knitted behind the front wall, throwing the working thread on the knitting needle. In the same sector, products are reduced. To do this, knitting is divided into 6 parts, at the beginning of each 3 loops are knitted together through a row.
- When there are 24 stitches left, knit them in pairs.
- Knit another row of knit stitches and complete the hat.
Men's hat with knitted ears
Size:
head circumference 57 cm height without headphones 19 cm
You will need:
50 g each No. 1302 cream, No. 1306 green yarn Blue Sky Fibers Woolstok Worsted (100% wool; 50 g/112 m); circular knitting needles No. 4.5; stocking needles No. 4.5; markers; safety pin; tapestry needle.
Broach 1:
Remove 1 st as knit, k2. together, pull the knitted stitches through the removed stitch = decrease 2 stitches.
Broach 2:
remove 2 p. or 2 knits. together, knit 1, pass the knitted stitch through the removed stitches = decrease 2 stitches.
Patent pattern (even number of stitches):
knit 2 p. patent pattern with purl. sides, then 2 p. from persons sides. 1st (purl) row: with green thread * 1 purl, remove 1 st as purl, thread before work, repeat from *, purl 2, do not turn the work, move the stitch to the other end of the knitting needle. 2nd (purl) row: with cream thread, purl 1, * purl 1, 1 stitch, remove as purl, thread before work, repeat from *, purl 1, turn work. 3rd row: with green thread, knit 1, * knit 1, 1 stitch, remove as purl, thread at work, repeat from *, knit 1, do not turn work, move stitch to another end of the knitting needle. 4th row: with cream thread * knit 1, knit 1, remove as purl, thread at work, repeat from *, knit 2, turn work. Repeat from 1st to 4th row.
Jacquard pattern:
knit faces stitch according to the counted pattern, repeating the repeat loops.
Knitting density.
Patent pattern: 28 p. and 50 r. = 10 x 10 cm. Jacquard pattern: 25 p. and 25 circle. R. = 10 x 10 cm.
Description of work:
for each earphone: with a cream thread, cast on 20 stitches, perform the 1st row. patent pattern and r. (purl) with additions: 1 purl, 1 purl. increase, knit according to the pattern until the last stitch, 1 p. increase, 1 purl. = added 2 p. Perform the 3rd p. patent pattern, including added stitches to the pattern, and p. with additions (persons): cream thread 1 person, 1 person. increase, knit according to the pattern until the last stitch, k1. addition, 1 person = added 2 p. Repeat these 4 p. 4 more times = 40 sts and knit straight. At a height of 9.5 cm, set aside the item. Transfer the item of the headphones to the circle. knitting needles
Next lap. R.:
Use green thread to knit 40 faces. earphone, dial 35 p., 40 knits. second earphone, dial 12 p., place a marker, marking the beginning of the circle, p., dial 13 p. = 140 p. Close in a circle. Place a removable marker in the typesetting p. below the marker is the mark for the start of the circle. R. Link persons. 2nd circle R. Attach the cream thread and knit the faces. 1 lap. R. Perform from 1st to 17th r. counting scheme. Use cream thread to make faces. 1 lap. R. Use green thread to complete round 3. R. persons P.
Next lap. R.:
* cream thread knit 1, green thread knit 1, repeat from *. Continue knitting according to the pattern. 12 cm from the cast-on edge for the upper part, knit as follows.
Setting circle. R.:
knit 7 sts according to the pattern, place a marker, knit 19 sts according to the pattern, place a marker, knit 17 sts according to the pattern, place a marker, knit 19 sts according to the pattern, place a marker, knit 15 sts according to the pattern, place a marker, knit 19 sts according to the pattern, place a marker, knit 17 sts according to the pattern, place a marker, knit 19 sts according to the pattern, place a marker, knit 8 sts according to the pattern.
Circle. R. with subtractions:
* knit according to the pattern up to the marker, pass the marker, use green thread to decrease 1 (slip 1 st as knit, slip 1 st as purl, insert the left knitting needle into the just removed sts and knit them as k1), knit according to the drawing up to 2 stitches from the marker, k2 with green thread. together, transfer the marker, repeat from * to the last 8 sts, knit according to the pattern to the end = decrease 8 sts. Repeat decreases in each circle. R. 7 more times (switching to double needles) = 76 sts.
Circle. R. (intermediate):
* knit according to the pattern to the marker, remove the marker, draw 1 with green thread, mark this stitch, remove the marker, work from * to the last 8 stitches, knit according to the pattern to the end = 68 stitches.
Circle. R. with subtractions:
* knit according to the pattern up to 1 p. from the marked p., draw 2 with green thread and mark this p., repeat from * 3 more times, knit according to the pattern to the end = decrease 8 p. Repeat decreases in each circle. R. 6 more times = 6 sts. Cut both threads, leaving a tail of thread 30 cm long. Tie the remaining sts with green thread. Using green thread on the circle, pick up the knitting needles from the faces. sides and knit knit, starting from the removable marker. 12 p. along the cast-on edge, place a marker, 27 p. along the side of the earphone, place a marker, 20 p. along the bottom edge of the earphone, place a marker, 27 p. along the side of the earphone, place a marker, 35 p. along the edge of the cap, place a marker, 27 sts along the side of the earphone, place a marker, 20 sts along the bottom edge of the earphone, place a marker, 27 sts along the side of the earphone, place a marker, 13 sts along the cast-on edge = 208 sts Place a marker and bind off in a circle
Next lap. R.:
purl P.
Circle. R.:
knit up to 2 sts from the mark, slip 1 st as knit, slip 1 st as knit, insert the left knitting needle into the just removed sts and knit them as k1, throw over the marker, k2. together, [knit faces. up to 1 p. from the mark, increase with a slant to the right, knit 1, throw the marker, knit 1, increase with a slant to the left] 2 times, [knit knit. up to 2 stitches from the mark, slip 1 stitch as knit, slip the next stitch as knit, insert the left knitting needle into the just removed stitches and knit them as k1, throw over the marker. 2 persons together] 2 times, [knit faces. up to 1 p. from the mark, increase with a tilt to the right. K1, pass the marker, k1, increase with a slant to the left] 2 times, knit up to 2 stitches from the mark. Slip 1 stitch as knit, slip the next stitch as knit, insert the left knitting needle into the stitches you just removed and knit them as k1, pass the marker over, k2. together, knit faces. to end. Knit 1 more p. purl p. and close all sts. Make braids from green thread, make tassels at the ends and sew to the middle of each earphone.
Patterns for men's hats
Zigzag pattern
A simple and original, geometric zigzag pattern will allow a plain hat to stand out among the abundance of models that fit tightly on the head.
Knitting hats for men with descriptions and patterns is easy to do with step-by-step instructions at hand.
The pattern is created by yarn overs and alternating knitting patterns.
Pattern "Rhombuses"
Relief is achieved through cross loops. Cast on a multiple of 10, add 2. Beginning of the row – knit 4 stitches. Next, cross 3 loops to the left: transfer 2 to different additional knitting needles, place the knitting needles on different sides of the work, knit in the order of the loops, first the third, second, then first. Do 7 knits, repeat.
From the 3rd row, at the beginning, reduce the number of knit stitches by 1 to cross stitches, then increase. After knitting to the right, cross 2 loops, knitting a knit stitch around the first, knitting needle in front of the first, then the first in the same way, without removing the second. Remove both. Knit, then 2 crossed to the right in the same way, only the knitting needle behind the first loop. Repeat the pattern, reducing the number of knit stitches between the diamonds by 2.
Alternate rows with purl rows. The result is a stylish, no-frills design.
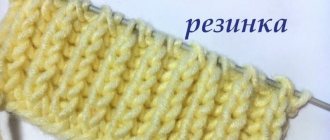
Pearl pattern
Similar to pebbles, the pattern is also called “rice”. Even a beginner can create a voluminous, rich, but at the same time simple drawing. To do this, you need to knit and purl, changing the sequence of the previous row.
Chess pattern
A knitted checkerboard pattern can be schematically described as an alternation of squares. A man will love a set of hats and scarves. To achieve the pattern, alternate a sequence of knit and purl stitches.
For example, with a 6x6 elastic band, perform 6 rows, starting with the front ones, then change the order. The size of the squares can be changed by selecting the required number of loops and rows.
Jacquard traditions
Traditionally, sports hats were made using knitting needles using the jacquard technique.
Now knitted patterns are also used for urban models. I suggest knitting a sports hat with earflaps with deer. Calculation for three sizes: 46/52/56 cm (from teenager to adult man). You will need: - Sandnes Alfa yarn (85% wool, 15% mohair 60met/50g) - for a hat, 50/50/100 grams of gray, 50 grams of white and the rest of black; for a scarf - 100 grams of gray and 50 grams of white; - knitting needles No. 7, hook. Density: 13 p. = 10 cm
How to knit a men's hat with earflaps?
- We start by knitting the ears. With a gray thread you need to cast on 6 sts. We knit in stockinette stitch, adding 1 st three times on both sides at the same time. in every second r. (=12p.). Next we continue straight up to a height of 7 cm. Add two more times by 1 stitch. through a row (= 16 p.). Make the second one in the same way.
- Connecting the parts: add 9/11/13 stitches to the loops of one ear (back part), put on the loops of the second and cast on 19/23/27 loops (front part), connect in a circle.
- Next - 2 rows of faces. Satin stitch with gray yarn, then we move on to knitting the hat pattern (pattern diagram is attached).
- When knitting the earflaps pattern, continue with the stockinette stitch in gray until the length of the hat along the front line becomes 14/15/16 cm.
- To decrease the crown: * K4, k2 together. * - until the end of the river Through two rows: * K3, k2 together. *. Through the row: * K2, k2 together. * Through the row: * K1, k2 together. *
- If knitting on circular needles becomes uncomfortable, switch to stocking needles. After another r. knit 2 stitches. simultaneously. Pull and secure the remaining ones.
We will knit the scarf crosswise. You need to cast on 200 stitches with a gray thread, knit in garter stitch (all stitches). Alternate colors like this: 4p. gray tone, 2p. white. Product height 12 cm.
Crochet
You can knit a hat for a man not only with knitting needles, but also with crochet. The process may seem more complicated, however, by following the description and understanding the diagram, you can create a beautiful product with soul.
Hook selection
The right tool is the key to beautiful work. Hooks can be long or short, depending on the type of knitting. You can find hooks made of metal, plastic, or combinations. The universal and most convenient hooks are made of steel. They do not smear the yarn, do not break, and are available in any size. The hook should be matched to the threads so that the product turns out neat and even.
Thin tools make the knitting tighter and vice versa. The sharp head can snag and separate the yarn fibers.
One of the selection methods is according to the table according to the length of the yarn. The shorter the thread per 100 g, the larger the hook size. You can select the hook manually: you need to tighten the thread in the recess of the tool head. The thread should fit in the beard without leaving any space or protruding.
Yarn selection
Crochet threads are selected based on the type of product and pattern. It is better to knit a sweater from a combination of thin and elastic threads to avoid an allergic reaction, and for accessories you can choose bright synthetic threads. The yarn should be uniform in thickness and strong.
Strongly twisted thread is not recommended; it will distort the pattern. If you want to use multi-colored or shaped material, the pattern does not have to be complex.
Stylish double knitted hat for a young man
Everyone understands why this model turns out to be much warmer than a single model, because it has two layers, or two walls, in its composition.
You use twice as much yarn to make it, but you get an amazingly warm and comfortable item. A simple single model is knitted from 150 grams of yarn, and in this case you will need about 300 g. If you knit with threads of medium thickness, then you will need knitting needles No. 3 or No. 4. It is advisable to knit with stocking needles, then the model will be without a seam. To knit a men's double hat, size 58, cast on 112 stitches (P) using a double-sided jacquard knitting set. The next master class will teach you how to perform just such a set of P in order to further knit with a jacquard pattern. Read
All about Peruvian knitting and the broomstick technique
Simple crochet hat patterns
A simple crochet pattern for a men's hat - an elastic band crocheted in a circle. The pattern is obtained by alternating convex and simple embossed double crochets. First you need to knit several rows and determine the number of columns. Then make a ring and knit the headdress in the round.
You can crochet a beanie hat. In this case, the width of the canvas is calculated according to the height of the product, and the length according to the volume of the head. The fabric is sewn together. Such a hat should be knitted from thin threads, the pattern should be made dense so that it does not lose its shape.
Half-column
The number of loops is calculated from the sample. The fabric set is made using air loops.
You need to pull the thread from the ball into the first sliding loop to get a new loop. For a half single crochet, the thread is grabbed through 2 loops at once.
Column
A single crochet stitch is also knitted using chain stitches. You need to grab 3 loops with your hook. The thread is passed first through the 2 outer loops, and then again through the remaining 2 loops.
Double crochet
For a double crochet, place the working thread on the hook and insert the hook into the fourth loop.
Pull through to make 3 loops. Knit the resulting loops in stages of 2.
Final stage
To reduce the volume of the hat, it is necessary to determine the side and pattern according to which the reduction is made. A simple option is to knit 2 loops at a time anywhere in the row. You can also reduce or increase the height by changing the types of columns. For example, from half double crochets to half double crochets and so on.
When the fabric is ready, the first and last rows must be connected, the loops of the hole formed on top must be gathered onto a thread and pulled together. Knitting or crocheting a hat will bring a lot of pleasure if you understand the pattern and strictly follow the description. All the difficulties will pay off when the man for whom the craftswoman worked hard accepts the gift and wears it with pleasure.