DIY autumn doll
To work on a doll manually, you need to prepare:
- cotton and knitted fabric for main parts;
- fabric for clothing and accessories;
- strands for making hair;
- filler – synthetic fluff or any other;
- doll shoes;
- threads, sewing accessories;
- hot gun (you can do without it).
Description
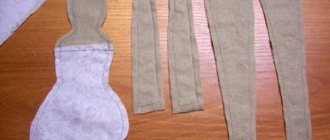
We start by making a pattern. You need to print it in full size, taking into account the selected scale. If you wish, you can change both the size of the doll and its proportions. For example, you can slightly reduce the length of the doll's legs. The result will not be a slender girl, but a plump cutie.
On cotton fabric folded in two layers, we mark all the details except the head covering. This part must be made of knitwear.
We pin the fabric with pins, fixing it on each part. It is more convenient to first sew all the parts and then cut them out. We also mark and stitch knitwear parts along the vertical sides.
We sew along the contour of each detail, except for the wedges of the head, leaving open areas for laying the filler. We sew the head wedges on one side along a convex line.
We cut off the head wedges, stitched in pairs, with the unstitched sides and sew them together, leaving only the bottom hole for stuffing.
We fold the stitched parts of the legs with the feet and sew a seam in the shape of a smile.
We place a dart on the body, sew it in, and cut off the excess fabric. A dart will make the torso look rounder, but you don't have to do it.
We turn out the parts and lay out the preliminary layout.
We fill all the parts with filler. We do this evenly and tightly, especially the legs and neck. For this operation, you can use any narrow, long handy object.
Sew up the remaining holes (except for the bottom hole of the head). Parts of the doll take on three-dimensional shapes.
Now let's start decorating the beautiful head of our doll. Pull the knitted piece around the neck.
We unscrew the wide part of the part on the body.
We place the head on the neck. In this case, we place the seams on the sides of the face. The head should be set deep and stable. But don’t overdo it, the neck should also remain. We sew the head with hidden stitches, making two passes in a circle. First, for convenience, the doll's head can be fixed with pins.
Then we pull the knitted “skin” over the head: it will be the face of the toy.
Carefully sew on the bottom edge and pull the top edge together, forming a neat crown.
At the next stage we will sew the arms and legs of the doll. They must be movable, so we will use the button method using strong thread and buttons with four holes.
We put our foot on it and check if it is oriented correctly. We insert the needle into the button, then into the 1st leg, pierce the torso, then the second leg and finally the 2nd button. Then we repeat the steps in reverse order in the other direction. We tie the ends of the threads, pulling them together so that the distance between the legs is not very wide. We sew the parts again in one and the other direction, passing the needle through the remaining two holes on the buttons.
Now let's start making the outfit. Clothing will consist of pantaloons and a long sleeve dress.
Outfit
Patterns of the necessary parts are shown in the following photo. We print and cut out every detail.
We must carve out:
- rectangle flounce - its length depends on the chosen length of the dress, and its width depends on the planned pomp of the frill;
- yoke - 2 parts;
- pantaloons - 2 folded parts.
We will make sleeves without a pattern. We measure the length of the handle, its volume at the widest point, and mark the rectangle of the sleeve. Fold the sleeve parts in half and chop them off. We decorate the upper edge with a semicircle of an edging.
On the pantaloons we sew the sections at the bottom and top. We sew seams on the sides of the trouser legs, overcast the edges, because the clothes should look neat even from the wrong side.
Turn one pant leg inside out and insert the right side into the other. We make a step seam and process the cuts.
We sew a seam along the waist and bottom of the legs using elastic instead of the bottom thread. We get soft gathers.
We assemble the details of the dress yoke. We cut off the excess fabric at the corners so that after turning the yoke in these areas, the yoke will lay out more neatly.
Turn the yoke inside out and iron it.
We sew the lower and side sections of the shuttlecock.
We sew the top edge of the shuttlecock with a wide stitch. We tighten the threads until we obtain the desired size (the length of the upper cut of the flounce should be equal to the length of the lower cut of the yoke).
We baste, then grind the flounce from one of the parts of the yoke, folding them right sides together. We remove the basting and iron the seam.
We fold the edges of the second part of the yoke and hem them by hand with blind stitches. In this case, the seam should go just above the seam for sewing the yoke with the flounce, so that it is not visible on the front side.
The doll's clothes are ready!
We try on the dress and sew it along the back with a hidden seam.
You can choose a simpler way to make a dress. First, the yoke is sewn directly to the body, then the flounce is sewn on top. In this case, the line connecting the yoke and flounce is covered with a belt made of the same fabric.
We put sleeves on the handles.
Now we will sew on the handles. On the first one we make a through puncture.
We pierce the body and remove the needle completely.
We pierce the second handle through.
Without tightening the thread, we make punctures in the opposite direction.
Then we tighten the thread (but the handles must be movable) and tie it with a strong double knot. We hide the ends of the thread inside the body using a needle.
This is what the doll looks like at this stage.
Now let's figure out how to sew hair on our beauty.
Hair
In our master class, a hot gun is used for this operation, so we pack the doll in a bag.
You can simply sew on the wefts by hand.
We start working with tresses by making a small roll, approximately 1 cm in diameter. We wind the tresses and sew them together.
The doll's head has two vertical seams on either side of the face. We glue the first row of hairs from seam to seam. We glue each next row a little closer to the face than the previous one.
Glue the fifth row in a full circle.
And it is from this row that we glue the wefts tightly, almost close to the previous row. We continue this way until we have a bald spot on the top of our head, equal in diameter to the roll we made earlier. We glue the roll, covering the bald spot, and we get a beauty with hair sticking out on the top of her head.
We lay out the protruding bundle of tresses over the head, hold it, and cover it with a damp cloth folded in four layers.
Iron the hair through the fabric, touching it with a hot iron for one or two seconds.
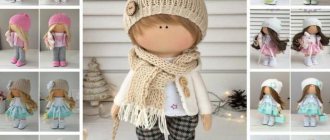
The doll is almost ready. All we have to do is design the face: mark the eyes with black dots, draw blush. Then you need to put on and dress up the beauty.
We mark the dots of the eyes with a black outline along the fabric.
To decorate the doll, we make a fashionable scarf with a brooch.
From the selected fabric, cut out a rectangle of the selected dimensions. The scarf should be voluminous. Fold it in half with the wrong side out, sew along three sides, and turn it inside out. We sew up the left hole, tucking the cuts inside. For the brooch, tear a strip of fabric along the edges, twist it in a spiral, simultaneously securing it with stitches. You can add suede cord loops. We make a narrow fabric bandage for the doll's head.
Doll “Cinderella”: master class on making
This doll has two dresses - everyday and elegant for the ball. Casual is worn over dressy ones.
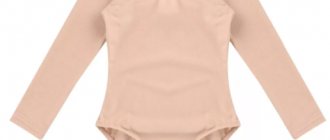
For manual work you will need:
- flesh-colored calico;
- filler – synthetic fluff;
- acrylic paints and brushes;
- wire;
- patch;
- satin hair ribbon – approximately 5 m.
How to sew a textile doll with your own hands
We print the pattern on A4 format and cut out the details.
We lay out the patterns on the fabric, positioning them so that the direction indicated by the arrows coincides with the grain thread. To cut out the arms, legs, upper body and butt, fold the fabric in half. We sew the details of the arms and legs, leaving gaps for stuffing. For the stitching, select step 1. Leave the front part of the foot unstitched for now. We cut out the stitched parts, leaving a 5 mm allowance. Cut out the stitched parts using zigzag scissors. If you do not have such scissors, then make notches with ordinary scissors in the places of the curved lines.
On the handles we make cuts between the palm and the finger, not reaching 1 mm from the seam.
We cut out the forefoot section with a minimal allowance, using simple scissors, along the line marked in red.
We turn out the parts of the handles, using cocktail tubes or thin sticks 20-25 cm long for convenience.
We fold the leg part as shown in the next photo, forming a foot. We baste and stitch with an allowance of 4 mm.
Turn inside out using tubes.
The body consists of three parts - one upper and two lower. We sew the upper part, leaving the upper part of the neck and waist line open. Cut along the waist line without allowance, using regular scissors. On the pattern this place is marked with a red line. In the remaining areas we cut out with a zigzag, making allowances.
We sew the back parts from point A to point B. Cut along the waist line without allowance, using regular scissors. On the pattern this section is marked with a red line.
We place the patterns of the head and lower part of the front on the fabric in one layer. We cut it out, providing allowances, except for the waist line (here we cut without allowance, using ordinary scissors). We sew the lower parts of the body from point A to point B, stitching in the direction of the arrow.
We put the sewn parts of the back and front together with the right sides inward, aligning points A and A1. We baste and stitch without sewing the waist line. Turn it inside out.
At the waist, fold the edges inward and secure with a basting stitch.
On the upper part of the body we also bend the sections inward along the waist line.
We sew up the neck with a temporary seam and begin stuffing the upper body through the open waist. We try to stuff the body tightly.
We also stuff the bottom part tightly.
We connect the parts of the body, checking the coincidence of the side seams. We perform a hand blind seam in two or three passes. At the same time, we leave a small open area for padding. It is highlighted in the photo with red thread.
Place additional filler through the hole left and sew it up.
Now we twist a rod from the wire along the length of the doll’s “spine”. Its length should be slightly longer than the total length of the body, protruding beyond the neck. We will make a small loop on the shoulder area to make it easier to sew on the arms.
Use a stick to make a channel in the body seal.
We insert the wire “spine”. On the neck we seal the space around the wire with filler.
We stitch the edge of the neck with thread and tighten it - see photo.
Sew tightly, passing the thread between the ends of the wire.
Now we take an adhesive plaster and wrap the protruding edges of the wire with a slight overlap onto the fabric neck.
We evaluate the proportions of the doll's figure. If necessary, you can “tighten” the back part a little with stitching so that it does not stick out too much.
Now let's take care of the head.
We baste and sew the dart.
Secure with two knots.
Trim off the excess fabric, leaving an allowance.
Along the fold line we make a cut into the corner, not reaching the seam by literally two or three threads.
Unfold the parts, straightening the seam. Fold with right sides inward, baste and stitch. We leave an open area at the bottom for turning.
We turn the head inside out and stuff it with filler. For this operation, you can use a stick, pencil or scissors with rounded ends.
First, fill the entire head not very tightly, paying special attention to filling the spout.
To prevent the filler from moving, we recommend securing it with pins or making several stitches.
Then we fill the entire head tightly, covering the seams with a wet brush.
To shape the chin, place a small fold in the direction of the center.
We sew it with hidden stitches, decreasing towards the top.
At point A the stitches should decrease to zero.
The result was an additional dart.
Instead of a dart, you can put an outer fold and sew up the edges. With this option we get a longer chin.
We place additional filler in the chin.
The following photo shows various options for positioning the head pattern on the fabric. The first option is obtained if you place the pattern along the grain, the second - along the corner, and the third - along the bias.
Let's start stuffing the pens. This must be done in parallel on two parts at once, so that it is possible to compare them and make them the same.
First, we stuff our fingers with small pieces of filler, then our palm and wrist, but not very tightly. We sew the part, separating the palm from the rest of the hand with a basting stitch.
Then we stuff the whole hand tightly, including the wrist. We remove the basting stitch and sew up the hole for stuffing with hidden stitches from top to bottom. At the same time, we leave a hole for understuffing. The upper part of the handles must be stuffed very tightly, otherwise the sewn handles will stick out to the sides. Sew up the left hole.
We start stuffing the legs from the foot. Place the filler tightly. Then we make a rod for the leg from the wire. Its finished length should be equal to the length of the leg to the knee. Twist the wire in half, making a loop at the bend. This section will be for the doll's knee. We wrap the ends of the wire with adhesive tape. In principle, you can wrap the entire wire with adhesive tape so that the filler sticks better.
We wrap the structure with filler, securing it with threads so that it does not slip.
We get this set for the legs.
We insert the rod inside the leg.
It should rest on your heel. Then we lay the filler, keeping the rod in the center of the leg. We tightly fill the entire volume of the leg, sew up the hole with hidden stitches from top to bottom, leaving a small hole for additional filling. We fill the upper part of the leg very tightly. Through the hole left at the bottom of the leg, add filler to the toe and heel, if necessary. Sew up this hole.
To assemble the body we will need flat buttons with two holes. The diameter of the buttons should be equal to the diameter of the upper arms or legs.
Sew the buttons on the outside of the arms, departing 5 mm from the top edge. We don’t tighten the stitches, we just attach the button.
We carry out a test assembly by placing all the parts on a long needle. The top of the handles should protrude 5 mm above the shoulders.
We mark the puncture points on the torso and arms with a disappearing marker.
We stitch the arms and body with several layers of thread, passing the needle along the marked points. In this case, we leave thread tails of 5-10 cm on both sides.
Then we do this stitching in the other direction, passing through the marked points and the second holes on the buttons. We press the arms tightly to the body and tie knots on the threads. We tighten the threads as tightly as possible. Properly sewn handles should not dangle.
We sew the legs in the same way. At the same time, make sure that in a standing position, the upper part of the legs fits into the notch on the lower part of the body, and in the side view, the front of the thigh coincides with the line of the abdomen.
When sitting, your lower thigh should be level with your butt.
Now let's work on the doll's face. To get it right and beautiful, we must place the pupils on a horizontal line dividing the face in half or slightly lower. If the pupils are above this line, the doll will have an angry face. The distance between the eyes should be equal to the length of one eye. We find the tip of the nose easily - this is the top of the facial dart. Below it we draw two points - nostrils. We draw the line of the mouth slightly higher than the average line of the distance from the tip of the nose to the bottom of the chin.
We paint the face with acrylic paints and dry it.
Using a stick, we make a channel in the head for the neck. We place the head on the neck. In this case, the neck should fit very tightly. If necessary, the hole in the head can be lightly sutured.
For sewing, we take threads in several folds. We enter the needle from the side of the crown, leaving a small tail (about 10 cm). We bring the needle out under the chin.
Then we pierce the neck.
Pull the needle through and pull the thread through.
Then we stick the needle into the head from below, bring it up, next to the first puncture, at a distance of 1 cm from it.
We stretch the thread, tie the tails with knots, and hide the ends inside the head.
The doll is ready, all we have to do is sew on the hair and make the outfit.
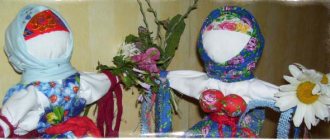
Brownie "Nikitka"
For manual work you will need:
- fabric for the body (double-thread);
- fabric for pants and shirts;
- white material for foot wraps;
- a piece of burlap;
- leg-split;
- knitting needles;
- materials for decoration.
Description
We start by making a pattern:
- leg – 2 parts;
- body – 2 parts;
- head – 2 parts;
- hand – 4 parts.
We transfer the pattern to fabric folded in two layers and sew the details along the contour.
Cut it out and turn it inside out.
We fill the body with filler, place a bag of salt or any other weighting agent on the bottom so that the brownie can sit steadily.
Place filling on the sides of the bag.
We fill all the parts with filler and sew up the holes.
On the arms and legs, fill half of the part tightly and stitch it. We fill the second half a little more freely.
We sew the limbs to the body.
We sew the legs with a hidden seam.
Now you need to dress the brownie. Clothing will consist of pants and a shirt.
For the pants, we cut out two parts as in the photo. We determine the sizes for clothes by taking measurements on the doll.
We sew the pants.
Fold the fabric in four and cut out the shirt. The red line shows where the shirt needs to be sewn in so that it fits the brownie.
We put pants on the doll. For the foot wraps, we cut out two strips of white fabric 5 by 50 cm. We wrap the leg, starting from the fold.
It turns out as in the photo.
Then we knit two rectangles (30 loops per 15 rows) from twine.
We try it on the leg and sew it on the sides.
We dress the brownie in a shirt and decorate the neckline.
Sew on the head.
We make pom-pom strands from knitting threads: 15 pieces for hair and 12 pieces for beard.
Sew or glue the hair.
We sew the beard in three rows.
Then we take scissors and give the brownie a model haircut.
We sew a bag from burlap and fill it with aromatic spices or herbs.
Decorate the bag as desired.
For the hat, cut out a square from burlap and stitch it in a circle. We tighten the thread and put the padding polyester inside.
We decorate the face and glue the cap on the head.
Face and body shaping
The exterior is designed according to the usual template. To make the torso functional, it is worth making the limbs mobile. To do this, arms and legs can be sewn on buttons. This improves mobility.
Face painting
Decorating a face is as easy as shelling pears, because all parts of the face are the eyes. At a close distance, 2 points are set with a black marker.
Face painting
Additionally, you can apply blush. Small facial features like these make the toy unique.
Sewing and decorating dresses
The costume for the little fat leg, the pattern of which is quite complex, can easily be replaced with a dress. Sewing and finishing parts of the doll's wardrobe:
- The blank is sewn on the sides, then put on the doll in an inverted state and hand-stitched along the shoulder line.
- Lace, satin ribbons, and guipure are used for decoration.
- Such materials are used to decorate the hem, sleeves, and necklines.
Additionally, you can sew on beads and glue rhinestones. A tulle petticoat looks very beautiful and will make the dress more festive and airy.
You might be interested in “Bat” sleeve patterns for dresses, blouses and sweaters
Shoes for dolls
Shoes for the doll can be sewn from felt. To do this, you can use the following pattern:
Algorithm for creating shoes
You can create a more complex version of shoes - sneakers or sneakers, using this sketch:
Pattern for sneakers
In any case, you should first take measurements of the foot and instep.
Panties or panties
If you manage to sew panties or panties, then in the future you can even try to make a jumpsuit. Pattern option for panties:
Panty pattern option
If you extend the parts from the fit along the leg, you will get straight pants in a classic style.
Textile doll “Greta”
For manual work you will need:
- three types of fabric;
- filler;
- sewing tool.
How to sew a textile doll with your own hands
First, we make a pattern and decide on the pose of the doll.
We select a combination of fabrics for the outfit, taking into account that the clothes will be cut out along with the body.
We fold the fabrics in the chosen combination and grind them down.
We sew the details along the contour, folding the fabric in half. Cut it out by making cuts along the convex places. Turn inside out using a thin stick.
Sew the figure. Now let's do the hair. We stick pins into the head and start winding it on one side, since we will be making a bagel.
Sew the hair to the head.
Cover the seams on the arms with a lace cape.
We sew lace frills on the legs. We make boots from felt.
For the skirt, we sew a rectangular piece, sew it into a tube and gather it at the waist.
How to make a hood is shown step by step in the following photos.
We decorate Greta with a ribbon at the waist. We are making a handbag for her.
We shape the face - embroider the eyes, powder the cheeks.
Textile dolls
For creativity, you can take any textile: linen, cotton, felt, calico. For hair - yarn of any color. You can buy the eyes ready-made, embroider them, choose from a suitable material and glue them, or paint them with acrylic paints. Your doll is a flight of your imagination. It can be made realistic or fantastic, similar to a cartoon princess or a real character. The main thing is to get down to work. At first, a doll pattern diagram will come in handy. Having understood the manufacturing principle, it will not be difficult to come up with a pattern yourself. What types of dolls are there, what are their differences and characteristic features will be discussed in a brief review.
Simple textile dolls
The easiest felt dolls to make. But you can take these models as a basis and make them from any textile.
The main idea. The first doll has an angel, the eyes are simply cross-stitched. Simple and accessible. The other has pieces of material sewn on. Two wonderful babies. Small additions and they look different.
Here are two girls. The noses are embroidered, the eyes are painted.
These dolls are not difficult to make. Next, we’ll look at how to make dolls with your own hands and patterns.
This is what Japanese (Korean) textile dolls are called. The dolls are elegant, gentle, in exquisite outfits with chic hairstyles. Unlike other dolls, trapiens have breasts. As a rule, this is embedded in a special cut. The eyes are small, there is no mouth. Often the nose is also missing. The arms are made half-bent. Painted cheeks are a must. The body is proportional.
Some representatives of tryapiens.
These are not dolls - empresses! Such dolls require patient, painstaking, careful, unhurried work.
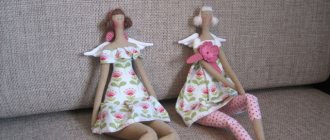
Beloved by many, these dolls have long won hearts. The difference from other dolls is the disproportionate, elongated body. Long arms, legs, neck. The head is oval. Classic style - a face without a nose and mouth. There are no ears either. The eyes are beads. Blush is required. But the hair must be amazing. The clothes are sewn to the body. Making Tilda is not difficult. We will provide photos of doll patterns later. Now let’s enjoy the view of these lovely creatures.
The world of Tilda is not only dolls, but also hares, bears, beetles, etc. We can say that this is a whole handicraft industry. Here are the Tilda hares:
Pumpkinheads
Funny dolls with a big head. The main difference is large eyes on an expressive face. Classic - there is a seam along the line of the nose, the head is sewn from wedges, usually 5 of them.
These are such beauties, with a not very beautiful name.
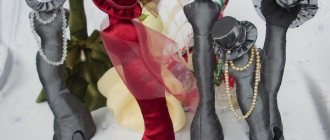
Interior dolls with large legs. The face is inexpressive, the eyes are not large. Disproportional legs in beautiful shoes, allowing the doll to stand.
Author's dolls
Author's creations do not have strict requirements. Everyone does what their heart desires. Let's look at these masterpieces.
DIY dolls. Patterns. So we moved on to the actual creation of dolls.
Let's look at the whole process step by step 1. Consider the pattern.
It shows that for the head and torso you need to cut out 2 parts, legs and arms - 4 each. 2. You can print the doll pattern on a printer, or copy it from the monitor screen. 3. Cut out the components.
4. Apply the cut out stencils to the fabric and secure with pins. 5. Circle the parts of the doll with chalk (pencil, a piece of soap) and cut them out. Don't forget to leave seam allowances!
6.Sew the cut parts, fold them and turn them right side out. For ease of turning, we help with a pencil.
This is what should happen.
Iron all parts.
Stuffing the doll We start the process from the head. We stuff it tightly enough and sew it together.
For stuffing it is better to use padding polyester. We sew on the body, and then stuff it too.
We get this doll.
Making hair To make hair you need yarn. The easiest way is to crochet a hat. We achieve complete fit to the head. We sew it to the head and tie pieces of yarn of the same length to it. The process is not fast, but it's worth it.
All that remains is to design the face.
Face painting You can paint your face with acrylic paints, or simply sew on eyes from beads, draw a mouth, cheeks and leave it at that.
It's so beautiful to paint.
Choose clothes to suit your taste. Those who can knit will always have leftover yarn. Now it’s time to benefit them. You can knit a blouse, skirt, booties.
A chintz dress will also suit. Make the cut one-piece, add ribbons and lace. The main thing is to follow the color scheme.
Patterning dolls for beginners step by step is the necessary help for those striving for creativity.
Now let's move on to making a Tilda doll. Sewing a doll is not difficult. The main problem is the correct stuffing. Tilda has narrow arms and legs, any kind of wool or padding polyester is difficult to push in evenly. Therefore, they stuff the doll with small pieces using a pencil, and in some places with a knitting needle.
Japanese dolls
Original dolls: the photo shows in detail the master class and the manufacturing process.
Sewing hair by hand
Step-by-step master class on sewing hair:
- You need to use chalk to designate places for sewing threads. You should first think through the layout of each element.
- Cut 300 threads of yarn and sew each one by hand to the head. Fix in the marked places.
- Use scissors to even out the length of the “hairs”.
You might be interested in this: Rules for sewing a hidden zipper in a dress
Making hair
If it is a hairpiece, then you need to coat the head with a glue gun and glue the parts prepared in advance.