Embroidery technology
Ribbon embroidery “bouquet” consists of a large number of flowers, which are made using the same technology. Therefore, sometimes to create one picture it is enough to know the basics of ribbon embroidery.
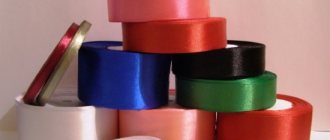
Embroidery ribbons
Each flower consists of a separate piece of satin. Work begins with small details. Gradually move on to larger ones. The ribbons are secured on the wrong side. This way the whole picture is completed. Different stitches are used for different colors.
Embroidery technology
Devices for work
Pictures embroidered with ribbons yourself do not require a lot of equipment. The needlewoman will need:
- hoop;
- floss threads;
- textile;
- needles;
- lighter for singeing ribbons;
- pencil;
- scissors;
- tapes.
Auxiliary devices are rarely required. Sometimes you need a copy sheet to transfer the diagram onto the canvas. The ribbons and base must also be of high quality.
Embroidery tools
Selection of needles
Choosing the right needle is the key to beautiful work. How to choose step by step:
- The eyelet should be large so that the strip passes through and does not wrinkle.
- The needle should also be large enough to allow the holes to allow the tape to pass through.
- It is recommended to use stainless steel needles.
Under no circumstances should the needle be a sewing needle. It will be physically impossible to insert a satin strip into it. And she will take on an unkempt appearance.
Needle selection
Selection of fabric for the base
You can embroider with satin not only on ordinary fabric, but even on leather and paper. But in the first stages of training, it is recommended to turn to linen or cotton. Unfortunately, the needlewoman has no room for error. Because the needle and ribbon makes a large hole that will be visible. If there is a risk of ruining the canvas, take a regular canvas for cross stitching.
You might be interested in this: MK on embroidery on mesh fabric for wedding dresses
Advice! It is recommended to use thick fabric for embroidery.
Embroidery on canvas
How to embroider a rose with ribbons? — Useful information for everyone
- It turns out that you can embroider not only with cross stitch or satin stitch, but also with ribbons. Moreover, such embroidery looks incredibly beautiful, especially entire compositions or bouquets of the same flowers.
Step-by-step master class on embroidering one rose with ribbons. By the way, you can embroider a rose in different ways.
I offer several visual step-by-step diagrams for creating a delicate rose bud using ribbons, threads, a needle, scissors and a piece of fabric on which the rose will be attached.
I also suggest considering the possibility of creating an unopened rosebud.
For roses, ribbons of any width and even any structure are suitable: silk, satin, tapestry, regular cotton, chintz. But it is best to take satin, this ribbon holds its shape perfectly, has the shine necessary for a rose on one side of the ribbon, is elastic, but soft, pliable for giving the desired shape to the petals of the future voluminous flower. If you decide to use a transparent ribbon made of tulle, keep in mind that the rose will look good to everyone, but it will be transparent, this hides the effect of the volume of the flowers, they get lost somewhere, turning into an airy ghostly pattern, where there will be glimpses of the rose.
To prevent the tape from moving from its assigned position, you need to hold it from behind with your finger, at this time the front part of the tape is carefully laid out on top, the exit from the fabric should also be leveled and the direction of the petal should be immediately set. In order for the petal to hold its three-dimensional shape, you need to bend the tape diagonally, as if you folded a sheet of paper diagonally in half. If the fold is forward, then the needle with the tape is inserted before the exit from the petal tissue; if the bend is backward, then the tape is inserted from behind under the exit at approximately a distance of 2-3 millimeters. Make sure that the tape does not shrink or change shape when tightening the petal; the bend angle should be clear.
For a small rose, it is enough to make 5-6 petals in a circle so that the center of the previous petal is the beginning of the next one. In other words, having made one petal, they begin to form the next one from the middle of the previous one, bringing the needle and ribbon behind the petal, everything should be tightly laid in front. 5-6 petals go to each tier of the flower. All subsequent ones are made from a wider ribbon or from the same one, but they tighten it less to the base in order to give the rose more volume in height. When creating a petal, the distance at the exit point and the entry point of the needle and tape is also increased; for large elements you need to retreat up to 5 millimeters, they look at the situation and how the petal lies. No matter how hard you try, each rose leaf will be individual and will lie in the way that is most convenient for it, so you need to adapt to the situation.
I offer this option, embroidering roses with ribbons. We start with a small bud, then gradually increase it, as in drawing
This kind of embroidery needs to be done on canvas, and then it is attached either to a postcard or picture, pillow, tablecloth, whatever you want to decorate.
Embroidering with ribbons is an incredible pleasure. The flowers look as if they were alive.
In order to embroider a rose, we will need a satin ribbon about two centimeters wide, canvas (it is convenient to embroider on it), and a hoop.
You should start embroidering a rose from a bud. To do this, you need to twist the ribbon in your hands to make a bud. Like this:
Then we sew the bud to the canvas and make a petal from the tail of a satin ribbon. The petal is easy to make when you thread the ribbon into the needle. Each subsequent petal must be formed with your fingers and then secured to the canvas. Like this:
We sew like this until the rose becomes the size you need.
By the way, you can embroider roses from ribbons of different colors.
A good lesson for beginners here.
Embroidering roses on fabric with ribbons is very beautiful and stylish! This embroidery will decorate and enliven any interior.
There are different techniques and ways to embroider with ribbons. For example, there is a technique to embroider a rose: you need to apply stitches from ribbons one after another, like the petals of a bud, twisting the ribbon before each next embroidered stitch, like in the picture:
And in more detail step by step and clearly one of the methods step by step:
Another technique for embroidering roses with ribbons:
There is also a technique where the ribbon is wrapped around a needle, then the needle is threaded through the fabric and the finished rose bud comes out in one stitch:
The technique of embroidering roses with ribbons can also be seen in more detail in the video:
info-4all.ru
Stitch methods
The lumbago (flower) looks interesting on the fabric; how to embroider it with ribbons depends on what stitches the craftswoman knows. Examples of basic stitches:
- Straight—thread a needle and ribbon and make a stitch.
- Extended twisted - straight stitch with twisting.
- With a curl - the needle is threaded into the ribbon.
- French stitch - wrap the ribbon around the needle and thread it back in.
- An aerial stem is a loop attached to one side.
Stitch method
Embroidering a rose with ribbons – Crafts Fair
I decided to show how you can embroider a large rose with satin ribbons. The fabric I use is gabardine (can be linen or canvas). We tint with acrylic paints for fabric, and draw the leaves with watercolor pencils.
For the middle, we take a ribbon 2.5 cm wide, 40 centimeters long, twist the middle of the rose, secure it with a needle and thread, first twist the middle and choose the most suitable option for us. A little secret: if the middle should look up, then you need to sew it not in the middle of the rose, but a little higher.
We fix it well.
We continue to embroider by inserting the ribbon into a large needle, insert the ribbon and create petals. Here you can give free rein to your imagination. You don't have to do it like I did. Just take my photos as a basis.
Next, we embroider the petals around the center, for this we insert the needle from the wrong side and form a petal, make a puncture with an embroider (I pierce it together with the ribbon) and bring the needle and ribbon out to the wrong side. The leaves form on their own, this process cannot be described, it always turns out differently. I think that's the beauty of it.
Next we embroider the upper petals. Insert a needle from the inside from the middle and place the petal up, fasten it, the tip of the leaf can be pulled up more, then the petal will turn out sharp.
In this way we embroider all the upper petals.
At the next stage, we use a 4 cm ribbon, embroider the side petals and move on to the bottom ones.
Well, it's almost ready.
Now a bud (make it from a pair of petals).
Now the rose is ready. You can embroider leaves with green ribbon, or you can embroider them with white ribbon and then tint them. I tinted the rose with acrylic fabric paints.
Thank you for your attention!
www.livemaster.ru
Patterns for embroidering flowers with ribbons
Ribbon embroidery, whether wildflowers, roses or peonies, is stitched according to a pattern. It doesn't look like a cross stitch pattern. There is no need to calculate anything here. The design is transferred with disappearing chalk onto the fabric and then embroidered with satin. This type of embroidery is notable for the fact that you can come up with an image yourself. At the initial stages of training, it is recommended to use ready-made diagrams.
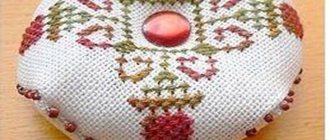
This is what the diagram looks like
Wildflowers and herbs
Wildflowers are mostly small. Therefore, it is recommended to arm yourself with thin tape. These are mainly violets, cornflowers, forget-me-nots and other small plants. The herbs are sewn with a simple straight stitch. You can add satin stitch for combined embroidery. For flowers, use a French seam. The scheme can be changed at will. Useful advice from craftswomen: it is recommended to make each petal a different size.
Wildflowers scheme
Bouquet of phlox
A vase with phlox looks impressive. A colonial knot is used to embroider flowers. The needle is pulled through and placed over the strip. They pick it up from below and unfold it. Then the free end of the tape is thrown over the needle and a turn is made. Hold the knot with your fingers, pull the needle through the turns and bring it out to the wrong side. Pull the satin until the air knot comes out. Grass and leaves are embroidered with a straight knot.
Phlox scheme
How to embroider lilacs from satin ribbons
A beginner can even master lilacs with ribbons. To do this, take a strip of 4 or 6 millimeters. She is brought to the front side. Then they circle the needle. Step back half a millimeter from the tip of the tape and insert the needle into the satin. It turns out to be a nodule on a leg. Pull the material to the wrong side. All other flowers are made in the same way. It is recommended to take ribbon of different shades. And the flowers, which are planned to be made darker.
You might be interested in this Interesting patterns for embroidering pictures using beads with full stitching
Lilac ribbons
Small flowers
Cornflower can be beautifully combined with yellow spikelets. The flower itself is embroidered with a strip of 5 millimeters. She is brought to the front side. Place the petal. They grab it with a thread. The satin is brought out on the wrong side below. Next, the petals are made according to the same pattern. And the flower is ready. The spikelets are embroidered with a simple basic straight stem.
Small flowers with ribbons
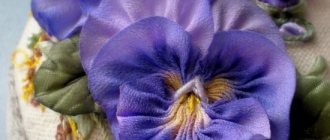
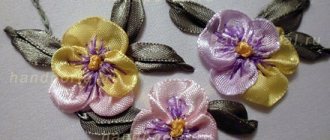
How to embroider pansies with ribbons
Embroidering ribbons in several layers will help create beautiful pansies. It is recommended to use satin strips of medium width. An air loop is used for embroidery. First, the bottom layer is formed. It can consist of 5-6 loops. Then make smaller loops of the top layer. The grass can be embroidered with a regular stem from a thin strip.
Pansies
Forget-me-not buds (French knot)
It is recommended to embroider forget-me-not buds using a French seam. To do this, pull the tape onto the front side of the canvas. Leave a one centimeter tip on the wrong side. Stretch the strip and throw it over the needle at a height of 1 cm from the fabric. Twist the needle while continuing to tighten. Make 2 turns. The tip of the needle is injected 1 mm from the insertion site. Bring it inside out and pull out the satin.
French knot
Beautiful peony with ribbons
In MK embroidery of peony with satin, ribbons of different widths are used. You need to cut the satin 7 centimeters long across the width of your palm. Form petals. Form 2 antennae on a narrow ribbon. Round off the ends. Make notches. Then make air stitches with a middle stripe. Then make another level with a wide ribbon and finish with a core. The rose is embroidered in the same way.
Peony scheme
Embroidered tulips in a basket
The master class on creating tulips contains instructions for creating the flowers themselves and the sequence of creating the petals. The satin is pulled to the front side, then 5 centimeters are retreated from the edge. A hole is pierced and the satin is pulled through. The straight stitch should not lie too tightly on the base. This is how the bud comes out. It can be formed with two volumetric stitches.
Ribbon tulips
How to insert ribbon into a needle
A bell or other flower must be formed correctly. To do this, follow the rules for securing the satin in the needle and fabric. The satin is slightly burned. Insert into a needle. Then the needle is inserted from the edge of the strip 1 centimeter down the center. It turns out to be a sailboat. Pull the end of the cauterized strip. Tie a knot.
You might be interested in this: How to sew a beautiful doll from threads and fabrics
How to insert tape
Rose sprig made of satin ribbon
The ribbon to create a rose is first twisted and the core is formed in the shape of a bud. Next, take another piece of the required length. Thread a needle and wrap it around the bud, making stitches. The rest of the flowers are created using this principle. Then they begin to form the stem and leaves.
Rose branch
Lilies of the valley with satin ribbon
Meadow lily of the valley is made from a narrow ribbon. Make a twisted loop. Bring the tape to the front side closer to the top of the loop. Unfold the petal using a stitch. Insert a pin into the loop at an angle from bottom right to top left. Make a curl by pulling it up. Fasten with a small stitch of white thread and another needle. Take out the pin.
Ready-made lilies of the valley
Fuchsia flowers
Poppy and fuchsia are some of the most popular flowers embroidered with ribbons. For fuchsia, use pink ribbons. Form a fuchsia skirt. Place 2 straight stitches. The stamens are made with embroidery thread. A few more straight stitches of shorter length are embroidered on top of the lower petals. Next, buds are formed in a darker tone.
Scheme of fuchsia flowers
Embroidery with ribbons of daisies
There are many options for embroidering flowers with ribbons. You can also find daisies. This is an option for beginners. The needle is threaded with ribbon. They straighten it out. Make a stitch and bring the needle down. Make the loop a little airy. Bring the needle out next to the intended next petal. They make another stitch. All other chamomile petals do the same.
Scheme for daisies
Blooming Japanese cherry blossom
A master class on delicate cherry blossom embroidery will help you create a spring picture. The flowers are formed with simple straight air stitches. You can take white ribbons and then tint them a little. It is not necessary to embroider branches with satin. They can be made with threads.
Japanese sakura
Ribbon embroidery is an easy way to create a three-dimensional picture. It is enough to know a few basic stitches. They can be used to create lush peonies and delicate miniature lilies of the valley. It is recommended to choose canvas as a fabric base at the initial stage of training. And then switch to thick linen.
Luxurious roses, ribbon embroidery | Needlework
Embroidery with roses for inspiration:
ROSE EMBROIDERY MASTER CLASS
Roses are embroidered with satin stitch, cross stitch, woven from beads and, of course, made from ribbons that look so much like delicate petals. This is what we will do now.
Gathered roses
A fairly simple craft that is made using the technique of gathering with thread or wire tape. For such a rose, ribbons of any length and width are suitable. To begin with, you can take a four-centimeter wide ribbon and practice so that you are fully equipped to make a flower. By combining several beautiful multi-colored roses, adding leaves and other decorations, you can quickly make a brooch or hair clip.
You can start with a wire tape four centimeters wide, and from 46 to 60 in length. You can make a rose by gathering on a wire or using a U-shaped stitch. To make a smaller rose, for example, on a brooch, you need to take a smaller wire ribbon (the width remains the same - four centimeters, and the length should be 20-25 centimeters).
DIY wire ribbon roses
- It is necessary to expose one and a half centimeters of wire at one end of the tape and connect them together. From the opposite end of the tape, make a gather on the wire, moving the fabric towards the fixed edge.
- After you have a lush assembly, the remaining ends need to be fastened together. Bend one end of the wire tape (long enough to hold the flower) and sew it in place.
- Now we twist the entire length we have.
- Don't forget to make stitches, this will secure the rows. Once twisting is complete, the raw edge of the ribbon must be folded under the base of the flower and sewn securely.
- All excess tape and wire are removed, and the resulting rose is sewn into the desired place or placed on the stem.
U-shaped gathering
- Before stitching, you need to remove one wire.
- Then, on the remaining one, assembly is done. One end of the tape is bent and twisted in exactly the same way as in the previous version. As you twist it, you need to secure the assembly with stitches.
- The rest of the tape is folded under the base of the rose and stitched through all the layers for a stronger fixation. The rose is ready for sewing or planting on the stem.
If you want the rose to look different, when twisting the ribbon, its top edge must be folded downwards.
Ribbon buds
Small pink and flat buds are made from ribbons 1.5-2 cm wide and 5 cm long. Well suited for a flat composition. For the cup, you need to take a green ribbon 2.5-6 cm. For such small buds, leftover ribbons are good.
- The tape from which the bud will be made is folded, gathered tightly and secured with thread.
- The gathered bud is wrapped with calyx tape and stitched.
- The ends of the bud are cut off, and the bud itself is sewn to the border or used at your discretion.
Folded roses made of satin ribbons
This technique is used to quickly make roses. Folding is a rather difficult technique to master, but it is the fastest. Once you've learned how to fold your ribbon the way you want, you'll want to fold any ribbon you see.
You can practice on a tape four centimeters wide and from 30 to 50 centimeters long. Sometimes, you can simply fold the ribbon and cut it to the desired size of the rose.
It must be remembered that the edges of the rose should be at the same level so that the center does not protrude forward.
- Bend the ribbon on the right side.
- We bend it across the previous fold again, and then wrap it around several times so that we get a twisted center of the flower. Such a beautiful curl will be the secret of the future flower. For greater reliability, you can flash it. There is no need to cut the thread.
- We bend the tape on the left side. To increase the space between the folds of the rose, the center of the bud needs to be slightly tilted. We twist it along the diagonal of the bent tape. To better secure the layers of the flower, they need to be stitched.
- We bend the ribbon again on the left side and twist it with a fold around the flower. There should be enough space between the layers to allow the petals to breathe. Secure with stitches. This sequence of actions is repeated several times, depending on the size of the future rose. Don't be afraid to experiment. The worst option would be to unravel the tape and repeat all the steps again.
- At the final stage of work, we bend the ribbon down and sew the raw edge to the base of the flower.
- The excess ribbon is cut off, and the newly made rose is attached to the desired place.
- If you want to attach a stem to the rose, you need to insert a wire into the base of the finished flower and secure it with glue.
You need to pay attention to the shape of the petals. As a rule, the edges of roses are not processed according to the folds, so they look unnatural and uninteresting. To make the rose more natural, you can process the edges accordingly: pinch here and there or turn the ribbon in the desired direction, the rose will become like a living one.
Master class from Nataliya k For work you will need: Satin ribbon of pink and green colors, 1.5 cm wide (about 2 meters each), canvas (burlap or other fabric - I don’t recommend starting with thick fabrics, because through thick fabric it’s more difficult to pull a needle with a ribbon),
threads to match the ribbons (floss), a special needle for embroidery with “chenille” ribbons - a thick needle with a large eye and a sharp tip.
This needle is good for embroidering on fabrics with fine weaving: silk, organza), or a “tapestry” (“knitted”) needle - with a large eye and a blunt tip - it is more convenient to embroider on canvas, burlap, knitwear.
For the rose, lay 5 frame threads radiating from the center, taking into account the diameter of the rose (in this case, the beam is 2 cm).
Bring the tape to the front side and begin to twist the carcass threads, passing the tape above and then under the carcass thread. Make sure that the tape lies with the front side up.
Lay the tape loosely without tightening it.
Our rose is ready
Now let's make several rosebuds with loops attached
Embroider the leaves around the buds with long stitches with curls (holding the ribbon with the front side up, bending the ribbon to the wrong side, in the opposite direction, make a puncture with a needle from above vertically in the middle of the ribbon according to a certain stitch length. You get an acute angle with symmetrical curls of the edges in the middle of the ribbon
Embroider the rose leaves with loops with attachments (like buds). Sew on twisted ribbons for the stems using hand stitches. Our roses are ready. All that remains is to design the composition. Good luck!
Regarding securing the “tails” on the wrong side, as a rule, I simply hem them discreetly with a regular needle and thread. From here
Dec 7, 2014Lydia
delaemrukami.info