Slippers on two knitting needles for beginners: how to knit warm slippers
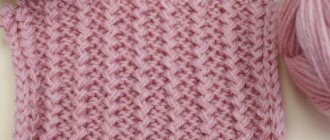
Before you start knitting slippers, choose the appropriate yarn. Pay attention to the composition of the yarn - it is better to choose yarn of natural composition (wool or wool blend).
In terms of thickness, choose the optimal yarn - a thread of medium thickness. If you have suitable yarn, but it is thin, then knit slippers in two folds of thread.
Materials:
- Yarn 100g/200-240 m
- Knitting needles No. 3
Knitting slippers on two knitting needles begins with the sole. For this you will need number 4 knitting needles.
Knitting density: 20 loops * 20 rows = 10 * 10 cm
Cast on 26 stitches.
Row 1: knit stitches, but increase two times at the beginning and end of the row. You will get 28 loops.
Row 2: knit
Rows 3-16: repeat rows 1-2. You will get 42 loops.
Row 17: knit, knit 2 stitches together at the beginning and end. There will be 40 loops left.
Row 18: knit
Rows 19-32: repeat rows 17 and 18. There will be 26 loops left.
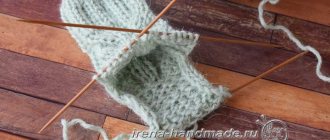
We have finished knitting the sole and are starting to knit the upper part.
Row 33: pick up 8 stitches from the heel stitches and knit 34 stitches.
Row 34: knit stitches with an increase at the end of the loop. 35 loops
Row 35: knit stitches
Rows 36-48: Repeat rows 34-35. There are 42 loops in total.
Row 49: cast off 24 stitches, knit the remaining 18.
Row 50: knit
Row 51: purl stitches
Rows 52-56: repeat rows 50-51. This makes 18 loops.
Row 57: Cast on 24 stitches and knit. Total 42 loops
Row 58: knit stitches, at the end knit 2 vm. 41 loops remain.
Row 59: knit stitches
Rows 60-73: repeat rows 58-59. 34 loops remain.
Close off the remaining loops, leaving a long thread. Sew slippers and decorate it as desired.
Knitting slippers without a seam on two knitting needles
It’s incredible that you can create home renovations with your own hands so quickly and easily. Simple and soft slippers on two knitting needles can be knitted without a seam. The knitting needles can be either on a fishing line or regular straight, but not less than 40 cm.
Tip: The most vulnerable point of knitted slippers is the sole. Therefore, it can be compacted by sewing a part made of leather, felt, leatherette or other suitable material.
Materials:
Yarn (100% wool)
Knitting needles No. 3
We cast on 49 loops and knit three rows with an elastic band 1*1
4th row: 23 loops with elastic band 1*1, yarn over, knit 1, yarn over, knit 1. – central, yarn over, knit, 23 loops with elastic band 1*1.
5th row: like all purl stitches, we further knit according to the pattern - 23s loops with an elastic band 1*1, purl the yarn overs and loops between them.
We continue to knit in this way until we have 10 holes.
Knit 6 rows in garter stitch (knit all stitches in all rows). Knit the 6th row only to the middle.
Next we will knit only 7 loops in the center using garter stitch. These will be the loops of the sole. Make the calculation this way: if there are 89 loops in total, then 89-7 = 82, 82:2 – 41 loops. This means we will knit 41 loops and 6, and 7 and 8 loops together. Turn over and knit 6 loops taking into account the previously knitted one, and 7 and 8 loops for two loops. So we continue to knit until there is not a single loop left on the knitting needles, except for 7 loops of the sole.
Knit the heel - on the sides, pick up the loops that are missing (14 loops on both sides) and knit the heel in the same way as you knitted
When the heel is ready, bind off the stitches and trim the thread. Also knit the second slipper on two knitting needles without a seam.
Simple slippers on two knitting needles
This simple model of slippers can be knitted on two knitting needles in literally a couple of hours; the proposed pattern is an ideal option for beginning needlewomen: it will help you “teach” your hand and will delight you with its original appearance. Calculations are given for foot size 38-39.
Necessary materials
Scroll:
- Yarn (300m/100g) – 1 skein.
- Knitting needles No. 3.
- Knitting markers.
- Needle for stitching.
- Additional accessories.
Sequence of work
Performance:
- You need to cast on 63 stitches on the knitting needles. The first row is performed with a classic 1/1 elastic band.
- The central loop (33rd) is marked with a knitting marker. Start from row 2 (then in all purl rows), you should make increases: yarn over in front of the loop in the center and immediately after it, knit them from the front side as crossed. Continue to knit according to the pattern with an elastic band and increase until the total number of stitches reaches 85.
- On the left side of the product, remove it onto an auxiliary knitting needle of 44 sts and put it aside temporarily. They begin to form the sole: on the right side, close 4 stitches at the beginning of the row, knit 7 cm in height with garter stitch.
- Moving on to assembly. Transfer the loops from the auxiliary needle to the working one. Moving from toe to heel, sew loops from both knitting needles with a needle (loop-to-loop stitch). The remaining 5 stitches are closed. Perform a side seam. Sew the heel, connect the toe.
- If desired, the upper part of the product can be crocheted, and you can also decorate the finished tracks with additional accessories.
Beautiful women's slippers knitted on two knitting needles
An original decoration can make simple slippers beautiful. The braided edging with beads will turn the slippers into elegant ones.
Materials:
- Yarn NakoAngora Lux (10% mohair, 10% wool, 80% acrylic, 100g/550m)
- Knitting needles No. 3.75
Knit in two layers of thread. Knitting density: 22 loops = 10 cm
We knit slippers for the left leg:
Cast on 26 stitches.
Row 1: slip 1, knit 24, purl 1.
Row 2: slip 1, purl 7, knit 17, purl 1.
Row 3: slip 1, knit 24, purl 1.
Row 4: slip 1, purl 7, knit 17, purl 1.
Row 5: slip 1, knit 17, slip 4 stitches onto an additional needle behind the work, knit 4 from the left needle, knit 3, purl 1. with additional knitting needles.
Row 6: slip 1, purl 7, knit 17, purl 1.
Row 7: slip 1, knit 24, purl 1.
Row 8: slip 1, purl 7, knit 17, purl 1.
Repeat rows 1-8 14 times (you will get 30 cm in length along the side of the scarf pattern)
Row 113: cast off 9 stitches, knit 15, purl 1. 17 loops remain.
Knit 14 more rows on the remaining stitches according to the pattern. Close the loops.
We sew slippers.
Slipper for right foot:
Cast on 26 loops using double thread.
Row 1: slip 1, knit 24, purl 1.
Row 2: remove 1, k17, purl 8.
Row 3: slip 1, knit 24, purl 1.
Row 4: remove 1, k17, purl 8.
Row 5: slip 4 stitches onto an additional needle before work, knit 4 from the left needle, knit 4. with additional needles, knit 17, purl 1.
Row 6: remove 1, k17, purl 8.
Row 7: slip 1, knit 24, purl 1.
Row 8: slip 1, knit 17, purl 8.
Repeat rows 1-8 14 times (you will get 30 cm in length along the side of the scarf pattern)
Row 113: slip stitch, knit 24, purl 1.
Row 114: cast off 9 stitches, k8, p8. 17 loops remain.
Knit 14 more rows on the remaining stitches according to the pattern. Close the loops.
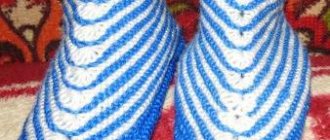
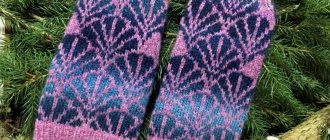
Shell slippers: how to knit on 2 knitting needles
These slippers are usually knitted from two colors of yarn. These slippers are knitted from the top and this is convenient because when the sole wears out, it can be corrected by tying the bottom rows - the rows of the sole.
Using color #1 thread, cast on 49 stitches and knit 2 rows with knit stitches. Replacing the thread with a different color (No. 2), knit 2 more rows. Change the thread again to No. 1 and knit with a lazy jacquard.
Row 5: chrome, remove the loop, leaving the thread behind the work, knits, remove the loop, leaving the thread behind the work, knits, remove the loop, knits, continue to alternate, knits, remove the loop, chrome.
On the knitting needle you will get loops of different colors alternately.
Row 6: remove a loop (a loop that was not knitted and leave the thread before work), knit, remove the loop and then continue alternating.
7-8 rows: knit with dark thread No. 2 with facial loops.
Row 9: edge, remove the loop, leaving the thread behind the work, knits., remove the loop, knits. and continue to alternate 23 loops in this way, remove the 24th loop, and from 25 loops we knit 9 loops (shell): knit, yarn over, knit, yarn over, knit. ), remove, faces., continue until the end.
10th row: like the 6th, with the loops that were knitted from the 25th loop (shell) knit.
Rows 11-12: knit thread No. 2.
We alternate rows 9-12 to make 9 shells. Depending on the size of your foot, you can change the number of these shells.
Knit 2 rows with knit stitches using thread No. 2
Repeat rows 5-8 or knit 4 rows , alternating yarn by color.
You will get 105 stitches on the knitting needles.
Tie the sole with two threads No. 1 and No. 2 together to make it tighter.
Divide the stitches into three parts 46 – 13 – 46 and knit like a heel on 13 loops, catching the loops on the sides. We continue knitting until the loops on the side knitting needles run out.
As soon as the sole comes closer to the heel, grab 3 loops on each side and so make the heel rounded. We do this until there are 9 loops left on the sole. Cast on the loops from the sides and knit the heel with lazy jacquard: 2 inm. on the face and 2 vm.faces. on the wrong side.
The last 4 rows are knitted with thread No. 1 in garter stitch. You can tie it with single crochets.
How to make drawings on slippers and five simple tips for “non-artists”
I was walking along the bridge, and suddenly - There, in the depths of the stream, water flowers are visible.
Boncho Nozawa
Cast:
- blank slipper;
- thin needle for felting;
- wool of pink-violet shades.
As I promised last week, I am posting the continuation of this mini-master class.
A little fun (watch a short two-minute video of the process) and get to work!
Select the best quality to watch.
So…
1. First, let's take the lightest color - soft pink. Let's outline the basis of the entire composition with woolen “klyas”. I didn’t suffer for a long time, because this is an almost exact copy of my other work. But the first time, yes, I suffered. Here I have a light Semenovsky fringe. For those who are not yet familiar with noil, I will add that it is just a waste product from wool production. The Semenovskaya factory sometimes sells it for pennies in its company store in Moscow. Why else is it needed - I don’t know. Let's place this tow so that it completely covers the contrasting color of the base. Artists might call it underpainting. Of course, instead of combing, you can use any wool.
Lightly poke the wool with a needle. You can also outline the shape of future “leaves” for yourself. Don’t be alarmed that there is a wet blank for a slipper right under the picture; it makes an excellent felting pillow. The main thing is to wipe the needles dry in time so that they do not rust.
2. Let's take a slightly darker color and place it in places on a light base. Then we will take another shade and also put it in places. We mix different shades of the same palette and throw colors here and there. You can do it anyhow for now. As a result, the leaves begin to develop some volume and texture. I wanted to define the edges of the large leaf a little better, so I added more dark color towards the edges.
I marked where the final cutout of the slippers would be so as not to get too close to it.
3. Now it's time for the stems and veins. For them, we take the darkest color from our palette (for me it seems to be plum). We nail them down carefully. This time I nailed them with a needle, but you can also put them “live”, like elements of a woolen watercolor. Right now the veins look pretty rough, but we'll still be tinting them with other colors on top, so it doesn't bother me.
Leave the tails of the stems long and tuck them under the slippers. They should not end somewhere in the air.
4. I wanted to better shade the large leaf, so along its outline I enhanced the mint background with a darker turquoise color. Not much yet, but until the end of the work I will report on it a little all the time. The wool used was carded. It is, of course, coarser than the base wool, but due to this the texture will only benefit.
On the second slipper you also need to add turquoise (for balance). Let's place it in light streaks on top of the stems and lightly shade the toe.
5. Now, using small pieces of different colors, we begin to give the leaves at least a hint of depth and volume. With small leaves it is more difficult, with large leaves it is easier. In some places we place wool very thinly over the veins, in others it is thicker, imitating shadows in the recesses. It’s the same with color: in some places there are lighter highlights, in others there are darker shadows.
To make the work easier, first we need to use a comb to turn the wool into well-matted wool wool, mixing different colors from our palette into this wool. Then we tear off tiny pieces from it (like a nail on the little finger or smaller) and place these “strokes” on the drawing.
6. At the very end, I decided to deviate a little from the original and add a scattering of dots above the small leaves. Or flowers, who can sort them out ? Seeds, or maybe magic pollen - let it also remain a mystery.
That's all! It is important to be able to take time away from work, the best is the enemy of the good
The drawing is ready!
I would like to end with a small lyrical digression... I hope no one thought that with such a master class I was encouraging people to copy their works? I'm not calling for it in any way. But, if it’s easier for you to study this way, then of course it’s good for you. In fact, I would like to show that even if you are not an artist by training (for example, I am not an artist), this does not mean that you cannot create interesting visual images with the simplest means. So this post is addressed primarily to non-artists. Artists themselves know what and how to draw.
I like to depict something fictional or highly stylized. Precisely because I am not an artist and simply do not know how to convey the world “as it is” well and correctly. That is, I could, for example, at the very least copy a cat or flowers from someone else’s picture (for this, by the way, there are special techniques that are not at all complicated). And if you try really hard, it might be a good idea to copy it. Surely, many of you think about yourselves in exactly the same way, and you understand me perfectly. But, you see, when an artist draws a cat from life, it’s a completely different matter.
What if you turn your imagination into reality? Who will blame you that the picture “doesn’t look like anything”? I understand that it’s “easy to say,” so I’ll try to give some simple practical tips that will allow your felted fantasies to look more advantageous. These are not even advice, but rather principles that I myself try to follow.
Tip 1. Color
Be sure to learn how to work with color. Color gives us so many additional possibilities for self-expression! I see that girls use this very actively, felting clothes or stoles, look how many bright spots and color transitions there are. But few people put more than two colors in their slippers when laying out the base.
It’s easy to put together interesting color combinations now - just buy special cards or circles. Don't neglect this. But wool is a special material, and the colors in it mix and match in a special way. Probably, it would be possible to make a table showing which colors mix well and which ones should absolutely not be placed next to each other, but it seems to me that everyone should get their own personal experience in this. Don't be afraid to experiment with colors and transitions. Stop making even green slippers and sewing a red poppy or a mimosa branch on them if something unusual has been asking to come out in your soul for a long time
Tip 2. Air
Let your picture breathe. Even if these are just stripes, do not sculpt them on top of each other so that after felting they merge into one incomprehensible pile. If you want to highlight a certain element, leave enough free space around it. Never cut slippers so that the cutout is too close to the decor. There should also be some kind of “margin” between the decor and the neckline. An exception is if the entire surface of your slipper is a “picture”, and the decor will also continue on the side of the cutouts.
Tip 3. Form
Work with form, work with form. The shape of a product greatly influences its perception. It doesn’t matter whether it’s classic or original. It is more important that both slippers look the same and equally neat.
Tip 4. Quality
Don't skimp on quality. No time, no materials. And if you don’t know how to draw, come to terms with the fact that it may also take you a lot of time to draw accurately, even if your drawing is just a fantasy. In other words, don't be lazy yourself and spend more time where others are most likely to be lazy.
On Sunday, I watched a broadcast of gatherings in the Casket, where the girls talked about their trip to Japan and their meeting with the amazing craftswoman Atsuko Sasaki. So, you know, Atsuko spends... 50 hours of working time to make an average-sized bag from thin merino wool. And this is just for felting the base. Arigato, Atsuki-san.
Actually, about quality, this is not even really advice, rather an urgent request. A kind of quiet voice of conscience from a distant dark basement. Quality work always looks better, lasts longer and allows our customers to avoid unnecessary disappointment.
Tip 5. Naive.
This is, of course, ridiculous advice, but still, if you don’t know how to draw, draw whatever you can and however you can! Like a child. If you choose the right palette and composition (leave space where it should be and fill in the areas that need to be filled), make the shape close to ideal, and the quality is impeccable, then whatever you draw will look impressive. For example like this
Stunning Dolce & Gabbana fall/winter 2015-2016 collection
Well, thanks to everyone who completed this work to the end!
I hope my unexpected advice will be useful to someone