The article contains the author's patterns for cross stitch, as well as instructions for beginning needlewomen on where to start and what tools they will need. I tried to make the most detailed master class with photographs and comments for each of my actions. I hope you will appreciate my work.
106 0
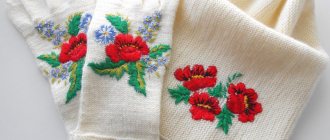
Since past centuries, floral embroidery has been a talisman for the family and a decoration for clothing and interior items. The flower represents purity, purity and beauty. Continuing the traditions of Russian craftswomen is not so difficult.
Previously, it was believed that cross stitch could protect a family. Flowers added a decorative element.
Materials and tools
To get started you will need:
- needles;
- hoop, machine;
- canvas;
- floss threads;
- thimble;
- scissors.
Schemes for beginners can get by with canvas, thread and needles. However, the use of additional tools reduces time and adds accuracy to the work.
Needles
Tapestry needles are most suitable for embroidery. The thread easily fits into the wide eyelet, and it does not fray during operation. The coarser the threads and fabric, the thicker the needle itself should be.
Hoop or machine
They create tension in the canvas, which helps to secure it and lay out crosses faster and more accurately.
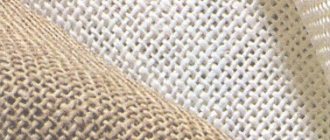
Canvas
It comes in different densities, shades, and materials. The most popular canvas in Russia is Aida No. 14. It has clear markings and wide holes. Consists of cotton. Suitable for beginners and most often comes with sets.
Floss threads
The most suitable option for standard embroidery. The threads do not lose color when washed, do not fade, and do not get tangled.
Thimble
Not all needlewomen use a thimble, but this device protects against punctures and helps to better push the needle through the canvas.
Scissors
Scissors must be sharp. Thread trimming scissors are available in specialized departments. You will also need scissors for cutting fabric and cutting canvas.
Speed up the work process
Embroidery takes dozens of hours of work. Needlewomen often lead an active lifestyle, take care of children and even work 8 hours every day. At the same time, the desire to leave time for a couple of stitches does not go away.
Learn how to independently develop patterns for embroidering flowers with satin stitch
The essence of the process is to create stitches of the same size. An outline of the flower is made on the fabric, which is completely sewn up with small stitches. The threads are located tightly to one another and completely cover the design. There is no set stitch size. Their size directly depends on the embroidered composition. The inclination can also be very different. The effect of the image depends on the location of the threads.
It is more difficult to embroider flowers using satin stitch than cross stitch, but the designs created using this method are more elegant. In this way you can transfer the smallest diagrams made. For beginning needlewomen, ready-made, simple patterns are better suited. More experienced craftswomen can do without them. We offer a small master class on flower embroidery using satin stitch.
Straight threads
If the thread is heavily twisted, it will tangle or lie unevenly as it passes through the embroidery. Constant pauses to correct such flaws take up half the time.
This can be prevented by smoothing the threads before starting work. Usually embroidery is done in 2 threads. They need to be separated from each other, straightened and ironed 2-3 times with your hands. Then they unite again. This also helps get rid of dust, hair, and other small threads.
The main entertainment and decoration in the early centuries was cross stitch. Flowers could be applied using gold and silver threads.
Types of stitches
Before you start, you should familiarize yourself with the popular types of stitches that appear in the patterns.
Stitch designations may vary slightly depending on edition. All designations are signed, so you won’t get confused.
The most interesting stitches are the French knot and ¾ cross.
Full traditional cross
Designation: denoted as a completely filled square.
This is the standard cross stitch method. It is done from right to left.
A knot is made on the thread or it is secured with subsequent stitches. It is brought out to corner 1, lowered to the wrong side through corner 2.
Then the needle is brought out through point 3 to the front side. Then we complete the cross by pulling the thread to the wrong side through point 4. The cross is ready.
The cross should be repeated equally throughout the entire painting. So that the top stitch is not directed in different directions. Then he will look neat.
Half cross
Designation: two ¼ squares, in the diagonal corners of the cell.
This is a stitch performed at the beginning of creating a full cross. The difference is that it remains unfinished, the top stitch is not overlapped.
It is performed in the direction indicated, or repeats the top row of full crosses.
¾ cross
Designation: a square, half shaded.
It is performed like a half-cross, but a small stitch is added to it in the corner, which is half of the top stitch.
Stitch back with a needle
Designation: straight line.
Typically used for embroidering outlines. It looks like a regular row of identical stitches. The uniqueness lies in the sewing technique. The needle always goes behind the thread, i.e. the needle is stuck into the canvas behind the thread at a stitch distance, and at the same time it is brought up ahead of the thread at the same stitch distance.
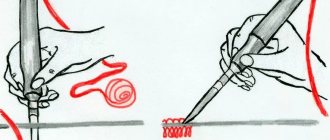
French knot
Designation: colored dot.
It is used for decorative purposes when decorating the final embroidery or used in various techniques and non-standard patterns.
It's very easy to do. The thread is wrapped around the needle 2 times, then stretched, after which the needle passes through the fabric.
To make the embroidery look beautiful, you should not tighten the threads in the crosses too much. They should fit snugly on the canvas, but not squeeze it. Otherwise, the holes will become larger, the threads will be difficult to see, and the flowers will look “liquid.”
Large landscapes
It is allowed to move on to making large landscapes only after embroidering small paintings has been mastered.
There are a lot of small details in landscapes, trees, houses, which sometimes even experienced craftsmen cannot do. You also need to familiarize yourself with large paintings through video lessons in order to know all the nuances of execution.
Autumn mill
This painting, like all large ones, must be placed under glass. Autumn nature is performed mainly in yellow, orange, green and blue tones. The work is quite hard, there are a lot of trees, leaves and birds in the drawing.
Autumn mill
Sea waves
The set with a pattern of sea waves includes a rather complex embroidery pattern. It may not be easy to convey the raging waves and glare on them. Ready-made sets will help you create the correct ratio of shades of blue and blue. This landscape will look great in the bedroom.
You may be interested in this Step-by-step instructions for diamond embroidery of icons
Night sea
It works the same way as the picture above, but with one condition. Here you need to add black colors for the sky, and also embroider small stars. For the night sea, you can add hanging trees and the moon. Such a picture is calming, and therefore it is advisable to place it in the bedroom.
Cross stitch pattern for sea waves
Fabulous winter evening
This rhythm is especially pleasing before the onset of the new year. Making a winter landscape will bring peace to holiday lovers. It is easy to embroider such a picture, but you need to be careful when choosing thread colors.
Cozy house
For the first works, craftswomen recommend making lighter paintings, such as fruits or flowers. You can try to embroider lakes, then gradually move on to heavier patterns - drawings of a small garden and a river, they are quite popular in European countries.
It is difficult to make a cozy house; it requires increased concentration and accuracy. Because if you screw up one row, you will have to redo the entire canvas.
Embroidery fox
Scheme selection
For beginners, it is better to choose simple patterns from large elements without additional stitches. A large color range at the very beginning is also not good for him; 3-6 colors are enough.
Gradually you can increase the level of complexity, take embroidery with a large number of colors and shades.
You can find simple and unpretentious diagrams on the Internet. Moreover, you can combine them and invent them yourself.
Here only floral patterns will be applied to the canvas. However, after embroidery, the empty space can be decorated with a laconic and cozy inscription or something unique can be added.
Preparation of materials
First you need to solve the issue of thread colors and outline. The fabric also comes in different shades: beige, pink, even black. This technique makes it even more decorative. The standard material is always white or slightly beige.
For simple flowers, no specialized tools are required; ordinary scissors and a needle will suffice. However, the threads and fabric must be of high quality; the final type of work depends on them.
To get started, it is important to determine the center of the composition. It is most convenient to start with the central crosses. This will save materials and add neatness.
All crosses are applied in the same direction. It is important not to overtighten the canvas so as not to stretch the holes or twist the thread.
In this case, flowers are embroidered using 2 threads. However, dark colors are best applied in 3 threads. Much depends on the quality of the materials and the personal desire of the needlewoman.
The thread at the back is secured with subsequent stitches. This creates a neat look on the reverse side. However, beginners can also use knots if it is more convenient. This will not affect the front side of the work in any way.
This application of crosses is called the “Danish method”. It consists of first applying half-crosses, and then re-applying to complete the design.
The method significantly reduces time. The hand remembers the same type of movement more easily and moves faster. In addition, by filling the top row with the second half-cross, you can take your mind off the diagram and watch your favorite movie.
We consistently follow the drawing diagram. If you make a mistake along the holes of the canvas, it is easy to go back. If difficulties arise, you can remove the needle and use it to pull the thread to the stage where the error began.
Flowers for embroidery can consist of either single-color elements or be an entire pictorial composition. Naturally, in the second case it is much easier to make a mistake.
The wrong side does not always turn out perfectly, especially in the first stages.
Embroidering the flowers took about 10 hours. Using the machine, operating time can be reduced by 1.5-2 times.
Flowers embroidery patterns: working methods
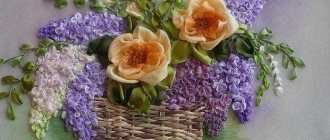
Satin embroidery is a needlework technique loved by many craftswomen. The works embroidered in this way stand out for their stunning realism. Beautiful flowers are one of the main inspirations for new creations. Today, we will look at patterns and embroidery methods for various representatives of the floral world.
Rose
The rose is truly a royal flower, which often attracts admiring glances. In satin stitch embroidery, this is one of the most popular representatives of flora. We recommend that you place such embroidery in a suitable simple frame, because the image itself will still take all the attention. You can complement the design with a delicate mat.
The presented pattern with a delicate rose measures 25 by 15 centimeters, and consists of nine shades of threads.
For this embroidery and painting design, the following materials and tools are required:
- blue cotton or linen material (size 40 by 30 cm);
- paper for transferring the pattern onto fabric;
- tracing paper;
- floss;
- needle;
- scissors;
- hoop;
- frame and cardboard size 25 by 25 cm.
Before you start embroidering with satin stitch, you need to trim the edges of the material. We take the diagram and, using tracing paper, transfer it through the copy paper to the middle of the prepared fabric. We thread the material into the hoop.
Satin stitch embroidery of roses is carried out according to the diagram. Foliage and petals are embroidered using the double-sided satin stitch method. For thin branches we use a stem stitch. In this work we use two-fold thread. The embroidered leaves are covered on top with thin veins of a stem-like seam.
At the end of the embroidery, the product must be ironed on the reverse side and left to cool. After this, we take thick cardboard and stretch the fabric over it, securing it with threads at the back. All that remains is to insert the embroidery into the frame.
Master class on satin stitch embroidery of calendula flowers
Calendula flowers are a miraculous and versatile plant, which also has a wonderful color. This wonderful shadow stitch embroidery will appeal to both beginners and experienced needlewomen. Let's take a closer look at the diagrams and process of creating this flower.