The Origins of Patchwork in Japan
In Japan, this art did not immediately take on its modern form: at first, monks sewed their clothes from pieces of fabric, quilting them by hand. When parts of the costume were worn out, new pieces were added and sewn on like patches. This is how quilting appeared in technology: it was noticed that quilting strengthens the product and has a decorative function. Later, the technique began to be used for the manufacture of military suits.
The spread of patchwork in Japan was also caused by the economic situation: it was forbidden to import fabrics from China into the country, which is why the local textile industry began to develop. Gradually, patchwork became a national tradition, turning from a technique for mending clothes into the art of decorating household items.
Oshie is the Japanese art of creating three-dimensional paintings from fabric and cardboard.
Osie is a Japanese handmade craft for creating three-dimensional paintings from cardboard and fabric or paper using appliqué technology. This type of needlework is very popular in Japan; in Russia it has not yet gained much popularity, although learning how to create paintings using the oshie technique is very simple. To create oshie paintings, you need Japanese washi paper (which is based on the fibers of mulberry, gampi, mitsumata and a number of other plants), fabrics, cardboard, batting, glue, and scissors.
The use of Japanese materials - fabric and paper in this form of art is fundamental, because washi paper, for example, in its properties resembles fabric, and, therefore, is stronger and more flexible than ordinary paper. As for the fabric, the fabric used here is from which kimonos are sewn. Of course, Japanese craftswomen did not specifically buy new fabric for oshie; they gave their old kimonos a new life, using it to create paintings. Traditionally, oshie paintings depicted geishas, samurai, children in national costumes, and scenes from fairy tales.
We recommend: Crochet pumpkin
If you decide to comprehend the basics of this art, I can offer you a master class , although it is in Japanese, but you can figure it out with photographs.
Before you start working, you need to choose a design for the painting, such that all its elements have a finished, clear look, all the lines should be closed, like in a children's coloring book. Briefly, the technology for creating oshie is as follows: each cardboard element of the design is wrapped in fabric, and batting is first glued onto the cardboard. The batting gives volume to the painting.
Features of Japanese patchwork
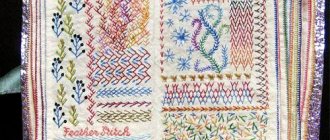
To a person not familiar with the features of Japanese patchwork, it may seem that there are no strong differences from European or American technology. But that's not true. One of the hallmarks of Japanese patchwork is the abundance of stitching, which is used along with appliqué and, in addition to strengthening the product, also has a decorative function. It is performed not only in the form of straight lines or geometric shapes, but also in the form of a symbolic pattern. Threads are not always used to match the fabric.
Sashiko - Japanese embroidery art
Sashiko is a simple and elegant Japanese needlework, somewhat similar to patchwork. Sashiko is a simple and at the same time exquisite hand embroidery. Translated from Japanese, the word “sashiko” means “small puncture”, which fully characterizes the technique of making stitches. Initially, sashiko patterns were used for quilting and insulating clothing; poor women folded worn fabric in several layers and joined it using the sashiko technique, thus creating one warm quilted jacket. Currently, sashiko is widely used for decorative purposes.
Basic principles of sashiko:
- Contrast of fabric and thread - the traditional color of the fabric is dark blue, indigo, the color of the threads is white, a combination of black and white colors was often used. Nowadays, of course, the color palette is not strictly adhered to.
- The stitches should never intersect at the intersections of the ornament; there should be a distance between them.
- The stitches should be the same size, the distance between them should also not be uneven.
Japanese patchwork fabrics
A distinctive feature of Japanese patchwork is the special fabrics used to create the products. In every country, the way of life, religion, way of life, nature that surrounds people is reflected in applied art. In Japan, the patchwork technique becomes a kind of meditation aimed at relaxation, detachment from worries and rest. Therefore, the material is used in muted and calm shades.
The main feature of oriental technology
The most commonly used fabrics are printed and textured cotton. The combination of hand stitching and such materials gives the work made using this technique a three-dimensional look. The main feature of Japanese patchwork: all products are sewn by hand, without using a sewing machine. With the help of mechanical tools it is impossible to achieve the same type and quality of products that are obtained by hand. When sewing on a machine, they turn out flatter, and some small details simply cannot be done mechanically. Such skill requires perseverance and takes a lot of time, which is why Japanese patchwork is very highly valued.
Modern patchwork in Japanese style
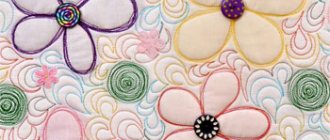
Increasingly, the eastern variety of patchwork began to be complemented by other handicraft techniques. Nowadays it is fashionable to complement products with hand embroidery, sew on rhinestones, beads or charms. Traditionally, such items are decorated with fringes and tassels. Japanese patchwork allows you to use several different techniques at the same time. A textile bead can become an unusual accessory. It is done simply: a 3 cm circle is cut out of a piece of fabric, a piece of padding polyester is placed in the center and the material is pulled together along the edge. Beads are used to complement locks and laces. They are used to make beads and bracelets.
Video
Patchwork for beginners. What does a beginner need?
How to cut fabric for patchwork?
Master class: phone case - Japanese patchwork
Master class: bag and cosmetic bag using Japanese patchwork technique
Recording of the broadcast in 4 parts
Necessary materials for patchwork
You can start learning the Japanese patchwork technique by making an ordinary cosmetic bag. There are kits for Japanese patchwork, but if you have unnecessary pieces of fabric at home for practice, it is better to use them. You can come up with a drawing yourself or take a ready-made diagram and transfer it to tracing paper. It is very important to choose high-quality needles for your work. They should pass through the fabric easily and not remove fibers. Good threads and fabrics will make the work much easier. The color of the material is chosen to be close to natural shades: green, brown, red. For appliqué, non-contrasting colors are used that harmoniously combine with the base. If you use checkered fabric in your work, it will be more convenient to quilt it.
For beginners, Japanese patchwork may seem difficult, but in fact the sewing technology does not pose any particular difficulties for beginners. The main thing is to be patient, as all the parts are sewn by hand, and this can take a lot of time. If the applique has very small elements, it is recommended to use a glue stick to secure them for the first time. All parts of the product are cut with seam allowance. Before starting work, the fabric must be washed and ironed. Hand quilting allows you to use various decorative seams and will make the product softer.
Video
Patchwork for beginners. What does a beginner need?
How to cut fabric for patchwork?
Master class: phone case - Japanese patchwork
Master class: bag and cosmetic bag using Japanese patchwork technique
Recording of the broadcast in 4 parts
Required Tools
To work you will need:
- pattern for the base and design;
- base fabric;
- several small patches for appliqué;
- two bias tapes;
- thick paper for applique;
- scissors;
- lightning;
- lining material or synthetic winterizer;
- needles for patchwork;
- leather thimble;
- pins;
- threads
Japanese patchwork: master class for beginners
The product creation process consists of the following steps:
- You can make a pattern for a cosmetic bag yourself or take a pattern from open sources. You will need thick cardboard for it.
- From the main fabric we cut out two identical rectangular blanks for the front and back sides. We put filling between the shreds, creating a “layer cake”. For convenience, it is better to secure it with pins or special fabric fasteners. The base can also be made using the patchwork technique, assembled from multi-colored scraps.
- Mark the base with soap or pencil and begin stitching. Quilt the fabric completely.
- We attach the pattern and mark the outline on the fabric, do not forget about the allowances.
- We cut out the details of the design from thick paper: these pieces will be wrapped in scraps of fabric and serve as the basis for the applique. Leave a seam allowance of at least 3 mm.
- We make small notches on the scraps with scissors to make it easier to attach them to the paper blanks. We bend the edges inward and smooth them. Instead of paper, you can use adhesive interlining. Then it will be much easier to assemble the drawing: just carefully bend the edges and iron the finished elements.
- We assemble the applique, wrapping the parts in fabric, and sew it to the workpiece with neat stitches using a hidden seam. Additionally, you can fasten the design with a decorative stitch using contrasting threads.
- You can decorate your cosmetic bag with embroidery, beads or sew on buttons. For this purpose, the floss is chosen to match the tone of the main part of the product. This must be done before assembling the product.
- We sew the edges of the blank for the cosmetic bag so that the threads do not fray, and cut out the main part.
- We begin to process the edges. We cut out a strip 5 cm wide and sew on the bias tape using a blind stitch. Now all that remains is to shape the product.
- We fold the main part in half and retreat about 4 cm to the left and right, marking these places with pins.
- We work from the inside out. Turning the sides towards you, we begin to bend along the central part. We retreat 2 cm from the edge, stitch and cut off the corner. We sew a piece of fabric to the untreated area to hide the tip.
- We sew the cosmetic bag turned right side out to the points where the pins were placed.
- We form the bottom and sew in a zipper.
The cosmetic bag is ready! We created this product with our own hands. Japanese patchwork does not tolerate machine sewing, so we can safely say that this cute accessory is completely handmade.
Japanese ring rug
Another very beautiful Japanese rug is made using a similar technology from rings, only the middle part does not need to be knitted.
After this publication came out, I still found the time and knitted such a cute rug. And recently I made a video to show all the features of this knitting.
I want to say that the difficulty here is that it is very difficult to do the calculation initially. I had to undo my work five times before I achieved the desired result.
I used thick Circassian yarn (acrylic + wool blend) in four folds. Yarn consumption: 200 grams of beige and mustard yarn and 250 grams of brown yarn.
The hook needs to be number 6-8, the size of the hook is important here so that the pattern is clearly visible.
I got a rug with a diameter of 80 cm.
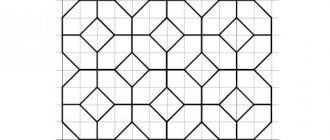
Japanese rug patterns
Description of work
I came to the conclusion that to knit the first ring you need to cast on a chain of 50 air loops (we close them into a ring, connecting the first and last loops of the connecting chain).
In the first row, we knit a single crochet into each loop of the chain, inserting the hook under the back loop.
Row two: two unfinished double crochet stitches together in each stitch of the 1st row. The hook here and further is under the back walls of the loop, this way you will get a beautiful scar on the ring.
Row three: like the second, between groups of columns there is one chain stitch.
Row four: single crochets.
The result should be a ring, the width of which should be slightly more than half of its internal diameter. If the ring is too narrow, the mat will not work, the rings will not fit tightly to each other, there will be holes between them.
And then we knit the next ring of a different color, first introducing the chain under the first ring.
In total we should have 9 rings of three colors connected.
After knitting them, you should tie the entire rug around the perimeter with single crochets using yarn of one of the colors.
Japanese craftswomen also suggest tying the base of the rug according to the given pattern. But I just sewed the rings onto a piece of tapestry.
I also recommend sewing all the rings together with a needle and thread using hidden stitches so that when washed the rug does not fall apart and maintains its shape.
And if you think that the rug will slide on the floor, there are some other steps you can take. I published these tips here>>.