Types of basic hand stitches
Hand stitches are divided into straight and oblique, simple and complex types.
Simple options are:
- Estimating
- Overcasting
- Assembly
- Copying
- Spacers
The complex category is divided into:
- Looped
- Hemmed
- Curly
- Darning
- Fur
- Plastering
Important: When sewing stitches, the thread tension must be uniform.
Basics
Types of straight hand stitches with pictures
- The simplest option or seam with a needle
It looks the same from the front and back sides, the distance of stitches and skips is the same, it is done from right to left. Used for marking cutouts and manual assembly. Based on it, the following options are built.
Seam 1
- The most popular is the running stitch.
The execution is similar to the previous version, but on the front side the length of the stitches is longer than on the back side, and the distance between them is shorter. Stitch length is from 0.5 mm to 3 cm, depending on the type and thickness of the fabric, between gaps 5-7 mm. It is used to connect parts, mark the contour, places where parts join, the line of the middle of the back and front.
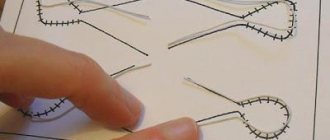
There are two types: for temporarily basting two parts along the contour (Fig. a) and for basting the hem at the bottom of the product, for example, for sleeves and the bottom of clothes (Fig. b). There is also a subtype of basting stitch - basting stitch. It is used more often to connect two small parts, such as a patch pocket, or when connecting shelves with a side lining.
Rice. A
Rice. b
- Copy or transfer stitches
Their purpose is to transfer a line from one part to another, or copy joint marks. It is performed with a “forward needle” stitch, but at the first stitch the thread does not reach by 1.5-2 cm, then two straight stitches, etc. according to the scheme. The distance is from 5 mm to 1 cm. Then the fabrics are moved apart and the stretched threads are carefully cut.
Copy seam
- Manual assembly or double seam “forward needle”
The work requires smooth and strong threads. The second line runs at a distance of 0.5-1 cm from the previous one, completely identical to it. Move “forward with a needle.” Used to assemble folds to the required length.
For assemblies
- Line stitch or “over the needle”
Performed from right to left, the needle is inserted at the puncture site and removed at a distance of one stitch. On the reverse side, such stitches are twice as large as on the front side. Creates an imitation of a machine stitch for durable stitching of two parts. Depending on the type of fabric, the distance between stitches and their length may be different.
- Needle stitch with fabric gaps
It is completely identical to a simple line stitch, but at the same time the needle is removed at a distance of two stitches, while taking less time to complete. That is, from the inside out, the distance between the stitches is 3 times greater. This method is used for sewing on zippers and linings.
Line stitches
Types of hand stitches. 5th grade.
Types of hand stitches
The most common seam at the initial stage of product manufacturing is the running seam
. It is used for temporarily connecting parts (basting) and creating assemblies. Depending on what kind of fabric you are dealing with and what you are using this seam for, the length of the stitches is 0.2-5 cm.
Interlining seam
- a type of estimate. It is convenient to use for making notes during fitting, marking the middle of the product, etc. It is performed on one layer of fabric. The length of the stitches is 1-3 cm, the distance between them is 0.5-0.7 cm.
Silky
or
copy seam
. Used for precise transfer of contour lines and control marks from one symmetrical side of the product to the other. It is very convenient, gives an excellent opportunity to sweep and combine products with each other absolutely accurately for further work. It is carried out as follows: the parts of the product are folded together with the front side inward. Along the intended lines, using soft threads (preferably cotton), running stitches are laid with a distance of 0.3-1 cm from each other. It differs from a simple running stitch in that the thread is not tightened, but loops are made 1-1.5 cm high in depending on how thick the fabric is. After marking the entire contour, the parts of the product are moved apart, and the stretched threads are cut in the middle.
Stitch seam
– resembles a machine stitch. It is used for permanently connecting parts in places where machine stitching is not possible, or in cases where it is necessary to obtain a seam of increased stretchability. There is no space between stitches. Sew from top to bottom. The distance between the entrance and exit of the needle is 0.1-0.7 cm. The injection is made at the exit site of the previous stitch. Requires a fairly experienced hand.
Seam “by the needle”
(
marking
). Perform the same as stitching, but leave a distance between the stitches. The needle prick is made halfway between the entry and exit of the previous stitch.
Overlock stitch
serves to prevent fraying at the edges of the fabric.
There are several types of overlock stitch: - Oblique
, done over the edge.
From bottom to top, the line is laid from right to left. For 1 cm - 2-3 stitches. - Cross-shaped
, similar to oblique.
As in oblique, the needle is inserted from top to bottom, but only in two directions. In this case, the thread is not opened and the product is not turned. - Looped
. It is used to process sections in loose tissues. The needle is inserted from top to bottom, the thread of the previous stitch lies under the needle. The line is laid from left to right. The seam density is 2-3 stitches 0.4-0.6 cm long per 1 cm of fabric.
Occupational Safety and Health.
Safety rules when working on a sewing machine.
1.Before work, tuck your hair under a headscarf.
2.Sit on the entire surface of the chair, slightly tilting your body and head forward, in front of the needle.
3. The distance from the worker to the machine should be 10 - 15 cm.
4.Before work, remove needles and pins from the product.
5.There should be no foreign objects on the machine platform.
6. While working, your hands should be at a safe distance from the moving parts of the machine.
7.Connect the sewing machine to the network and disconnect it with the permission of the teacher.
8.When connecting, first connect the pedal to the machine, and then the machine to the network. When disconnected, it’s the other way around (first from the network, then from the machine).
9.Make sure that there are no bags or packages near the pedal. Remove your foot from the pedal if work is temporarily suspended.
10. It is prohibited to change moving parts of the machine when the equipment is plugged in.
11.Keep your foot on the pedal so that the machine operates at the same speed.
12.After finishing work, remove the workplace and wipe the pedal.
Safety rules when working with needles, pins, knitting needles and crochet.
1.Work with a thimble.
2. Store needles and pins in a certain place (special box, pad, etc.), do not leave them at the workplace, and under no circumstances take needles or pins into your mouth or put them in clothes.
3.Do not use a rusty needle for sewing.
4. Attach the patterns to the fabric with the sharp ends of the pins in the direction away from you.
5. Store the knitting needles and hook in a case and, when finished, put them in a place inaccessible to small children.
6.Collect pieces of broken needles or pins and give them to the teacher.
Machine seams
Types of hand seams and their application
In order to use the arsenal of hand seams, let's take a closer look at them. Such knowledge can be useful to you in your work, since the sewing of each product begins with manual work - we perform copying stitches, basting of parts and many other sewing operations manually. Stitch by stitch, lines are born, although not poetic, but created with the help of threads, but no less beautiful. So, let's understand stitches and lines - what they are, which ones we regularly use in our work, and which ones we may have forgotten about, but are worth remembering!
Beginning of the form
End of form
Beginning of the form
End of form
Hand stitches - classification
All hand stitches are divided according to the location of the stitches on the fabric (straight oblique, cross-shaped, loop-shaped, looped). And the stitches themselves are divided according to their purpose: basting, basting, hemming, finishing, etc. For simplicity of the picture and greater clarity, let’s present hand stitches and stitches in the form of a table.
Table. Types of hand stitches and stitches
Stitches, as mentioned above, consist of stitches, and stitches are divided into straight oblique, cross-shaped, loop-shaped, looped. Let's study them in more detail.
Straight stitches
Straight stitches are used to temporarily connect and secure parts when preparing a product for fitting. Using straight stitches, chalk lines are used to mark seam allowances, markings for stitching parts (pockets, belt loops), control marks for sewing in sleeves, collars, etc., and forming gathers. Straight stitches can be used to make basting, basting, basting, basting, copying and gathering stitches.
Rice. Straight stitches
Straight stitches make up the lines that we will look at below.
Basting stitch
A basting stitch is used to temporarily connect (baste) parts of a product. The parts are folded, the sections are aligned along the edges, the parts are basted without tension or with a slight fit of one of the parts (shoulder and side sections, sleeve seams are basted, sleeves are basted into the armhole, collar parts, etc.). The length of the stitches may vary depending on the fabric and the purpose of the stitch (from 0.5 to 5 cm). When stitching without a seat, the length of the stitches is from 1.5 to 2 cm, with a seat - from 0.7 to 1.5 cm.
Note stitch
Rice. Straight stitch stitching
Using stitches with a straight stitch, allowances along the bottom of the product and sleeves are folded and secured. The length of the tacking stitch is 1-3 cm depending on the type of fabric.
Basting stitch
Rice. Straight stitch basting stitch
Straight basting stitches are used to fasten the parts of the product together by placing one part on top of another and further basting. Baste the side lining onto the shelf, pockets, etc. The stitches are made without a fit and with a fit.
Copy line
Rice. Straight stitch copy stitch
Copy stitches are used to transfer contours and markings on paired parts. The parts are superimposed on each other, aligned by cuts, copy stitches 0.5-1.5 cm long are laid according to the markings (depending on the type of fabric), loops 1-1.5 cm high are pulled out. Then the parts are carefully pulled apart and cut in the center stitches
Gather stitch
Rice. Gather stitch
A straight stitch is used to form gathers. Two lines are laid at a distance of 0.2-0.4 cm from each other with a stitch length of 0.5-0.7 cm. The threads are pulled to the desired length, forming folds.
Oblique stitches
Bias stitches are also used for temporary and permanent fastening of parts, but bias stitches, unlike straight stitches, create stronger and more elastic connections. Temporary oblique stitches are used to perform basting and basting stitches, permanent stitches are used for overcasting, as well as quilting, hemming and piecing (used for inconspicuously joining parts).
Rice. Oblique stitches
The following types of stitches are made using oblique stitches.
Basting stitch
Rice. Basting stitch with bias stitches
Basting stitches with oblique stitches are used in cases where it is necessary to obtain a stable, strong connection of several layers of fabric. This stitch prevents parts from shifting during further processing. Baste the details of collars, hems on shelves, etc. Stitch length is 0.5-2 cm.
Basting stitch
Rice. Basting stitch with bias stitches
The basting stitch with oblique stitches is used to finish the edges of stitched parts. To begin with, the parts are machine stitched, the allowances are trimmed, the parts are folded to the front side, the seams are straightened and sewn with oblique stitches from the front side. The allowances remain inside.
Overcast stitch
Rice. Overcasting with bias stitches
Overcasting stitches with oblique stitches are performed when overcasting sections of parts in order to protect them from fraying. This stitching is also performed on products with lining. An overcast stitch made with thin silk threads when sewing products from thin fabrics is practically invisible and does not create an excessive thickness of the seam allowance, which is important for the appearance of the product. As a rule, 3-4 stitches are performed for every 10 mm with a length of 0.5-0.7 cm.
Quilting stitch
Rice. Quilting stitches
Quilting stitches are used to connect several layers of parts - usually from the main and interlining fabrics, to obtain a part that holds its shape well and to give it a certain bend for a fit. The interlining fabric is stitched through, the main fabric is stitched through half the thickness. The quilting line should not be visible from the front side. They quilt the fronts of men's suits and coats, linings, and collars. In this case, oblique stitches are performed over the entire surface of the part. Depending on the fabric, the length and distance between stitches can vary: stitch length 0.5-1.5 cm, width 0.5-0.7 cm, distance between lines 0.5-0.7 cm.
Hemming stitch
The hemming stitch with oblique stitches is used when securing seam allowances and hemmed parts with open cuts and is performed similarly to the overcasting stitch (Fig. Overcast stitch with oblique stitches). This stitch is used to process seam allowances and hems of the bottom of sleeves in a jacket lined with loose fabrics, etc. Perform 3-4 stitches for every 10 mm, stitch length 0.4-0.5 cm.
Piece stitch
Rice. Piece stitch
The stitch stitch is used mainly for repairing clothes. With its help, dense, non-fraying fabrics are sewn together in places where there is a tear or a cut. 6-7 stitches are made for every 10 mm, 0.2-0.3 cm long.
Cross stitches
Cross stitches are used to hem the bottom of garments. A special feature of hand hemming is the absence of a seam on the front side of the product. The standard is 2-3 stitches per 10 mm of length for easily fraying fabrics and 1 stitch per 5 mm for regular fabrics. Stitch width is 0.3-0.5 cm depending on the type of fabric. The hem can be made open along the edge or hidden - inside the hem allowance. Cross stitches are also used for finishing stitches in the manufacture of women's and children's clothing.
Cross stitch
Rice. Cross stitch
Cross stitches are divided into hemming and finishing stitches. Hemming stitches are very flexible due to the interlacing of cross-stitches and are used to fix the hem of the bottom of the product and sleeves. Cross stitches are also used for finishing women's and children's clothing.
Loop stitches
Loop stitches are used for the strongest and most elastic stitches. Using loop stitches, you can make permanent stitches for a strong, hidden fastening of parts. Using loop stitches, stitching, hemming, fluff, and marking stitches are performed. The very name “loop-shaped” indicates that the stitches are made in the shape of a loop.
Stitch stitch
Rice. hand stitching
The stitching resembles a machine seam and is performed in those places where machine stitching is not possible or difficult. Its peculiarity is that there are no gaps between stitches, and the needle enters into the exit of the previous stitch.
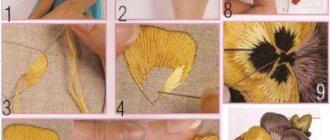
Fur stitch
Rice. Fur stitch
Fur finishing stitch is used to trim the edges of cuffs, sleeves, lapels of jackets and coats, sides, etc. The distance between stitches, as well as the length of the stitches, is determined by the designer. This hand stitch is also called a “back needle”. The top layer of fabric is pierced through, the bottom half. The fluff stitch can also be used to fix internal allowances in order to secure them in the product (facing, hemming, etc.).
Marking line
Marking stitches are carried out similarly to fluff stitches and are used mainly for flexible permanent fastening of two or more layers of fabric in places where it is necessary (for example, fixing allowances on the lining of sleeves, hems, sewing on shoulder pads, etc.) Stitch length - 1.5- 2 cm.
Copy line
Rice. Loop stitch copy stitch
A copy stitch with a loop stitch is used to transfer contour markings to paired parts. After completing each stitch, the thread is pulled out by 1-1.5 cm. The length of the stitches is 0.5-0.7 cm, 1-2 stitches for every 10 mm of stitching. After the stitches are laid, the parts are moved apart and the threads are cut in the center.
Hemming stitch
Rice. Hemming loop stitch
Hemming stitch is used to permanently secure the hems of the bottom of the product and sleeves, lining, and pockets. The allowance is pre-stitched with an overlock stitch. The product is folded down from the allowance and a loop-shaped hem is sewn. The peculiarity of this stitch is that the stitches are not visible either from the front or from the back side of the product, but are completely hidden inside the hem. Perform 3-4 stitches for every 10 mm with a stitch length of 0.3 - 0.4 cm.
To secure stitches
Loop stitches are used to secure the ends of stitches after performing manual work, such as sewing on buttons, hooks, and snaps. And also for making fastenings at the ends of loops, pockets, etc. Stitch length 0.3 - 0.4 cm.
Loop stitches
Loop stitches are used for sewing hand stitches - straight, curly with an eye.
Rice. Loop stitches
Buttonhole stitch
The buttonhole stitch is used for sewing buttonholes, and it is also used as a finishing stitch for processing the edges of napkins, bedspreads, and clothing. The frequency and length of stitches are determined by the designer’s goals. To make loops, stitch frequency is 6-10 for every 10 mm, width 0.2-0.3 cm.
Rice. Buttonhole stitch
Special stitches
Using special stitches, tacks are made and accessories are sewn to the product: buttons, hooks, loops, buttons, etc. Straight tacks are made on pockets (to secure corners) and loop ends. Curly tacks are used to secure the ends of folds and reliefs. Air thread loops (a type of straight bartack) can be made using stitches.
Buttons with two holes are sewn with 4 - 5 stitches, with four - 3 - 4 stitches in each pair of holes, a match is placed under the button to form a “leg” 0.1 - 0.2 cm high, depending on the thickness of the fabric. The leg is wrapped with 2 - 3 turns of thread, the end of the thread is secured and cut.
Now you know more about hand stitches and stitches and can use them when sewing your own unique clothes. See you again at the Sewing School!
Types of oblique hand stitches
They are available for permanent and temporary purposes, as well as for overcasting edges and hemming fabric. Lay from left to right, stitch length 0.7-2 cm. The needle is brought out through all layers from the bottom, a few millimeters from the edge. The needle enters perpendicular to the cut of the fabric, but the stitch lines are at an angle.
Oblique hand stitches are:
- Basting – for basting collars, hems, etc. To connect the parts together as much as possible and prevent their displacement;
- Basting – for patch pockets with or without lining, collars, sides, etc. Such a seam is necessary to create a neat front stitch of already sewn parts in order to hide the seam and cuts inside;
- Quilting - needed to connect several layers of fabric. They are often used so that the lining material holds its shape well or so that the product fits better on the figure. The wrong side is stitched completely, only slightly capturing the main part. The seams on the front side should not be visible!
Varieties
Oblique stitches are used for hemming and overcasting seams. We'll look at them below.
Hand stitches and stitches: types and patterns
There are different types of stitches for hand sewing with a needle. They can be decorative or ordinary - this is a general classification. The first group includes species that are used only for decorating clothes. The latter perform a practical function.
Simple hand stitches
Main varieties:
- "back the needle";
- marking stitch;
- forward the needle;
- edging with open cut;
- connecting seam;
- secret hem;
- edging with braid;
- hand furrier stitch;
- grinding and marking;
- padding seam;
- "crosses";
- running seam;
- hem;
- double or French seam;
- "check mark";
- sewing
Important! It is recommended to take a thread length from wrist to elbow.
Rules for hand stitches
Back stitch
At the very beginning of learning to sew, it is recommended to use a seam, the stitching of which will be strong and simple. “Back needle” is a basic stitch, it is used for fastening in difficult places on fabric products. How to do:
- Bring the needle up.
- Make a backward stitch. About 2 millimeters.
- Bring the needle up. Back off a few millimeters along the seam.
- Insert the needle into the end of the stitch and bring it out to the stitch in front.
When sewing a stitch, 3 mm are retreated from the edge of the fabric.
Important! There is also a version with skips.
"Back the needle"
Hand stitch “by the needle” (marking)
Linen can be sewn and even embroidered with stitches using the needle. They look like machine-made ones, look neat, and are simple to make.
How to machine stitch by hand:
- Bring the needle to the front of the fabric.
- Move a few millimeters to the right. Pull the thread.
- Bring the needle to the front side at the starting point, it will be to the left.
- Bring to the wrong side at the end of the stitch. Print on the front side to the left.
There is also an option with interrupted stitches, but when bringing the needle to the back side, the stitch is made wider than on the front side.
"For a needle"
Seam "forward needle"
A simple toy can be sewn using the “forward needle” stitch. It consists of gaps and seams and is used for lightweight products.
You may be interested in this: Sewing a beautiful robe without a pattern and sewing
How to make a hand stitch:
- Fasten the thread from the edge of the material.
- Make a stitch of 5 millimeters.
- Bring the needle inside out.
- Skip the same number of millimeters.
- Bring the needle to the front.
- Make the next stitch.
It is recommended to maintain the stitch size when sewing. But the length may vary slightly; this type is often used for outlining a pattern.
"Forward the needle"
Open cut edge stitch
There is an option with an open and closed cut; it is used with different fabrics. They look identical from the front side, but from the back they can be distinguished.
Execution sequence:
- Align the binding and the edge of the material. Sew 5 mm from the edges.
- Unscrew the trim. Work with an iron.
- Fold it inside out and wrap the cut. Baste to the base.
- Sew a stitch along the front of the binding.
A sewing machine is most convenient for this method of sewing. This option is notable for the fact that it can be used to process even thick fabrics.
Open cut edging option
Reinforced connecting seam
This is an option for joining thick fabric, such as felt. If you have a suitable needle, you can process a “suit”, jeans, even coat materials.
How to do it:
- Make several stitches that go through all the layers.
- Take the next steps through 2 layers (if the previous ones were through 3). Retreat 15 millimeters.
- Leave the thread loose, do not tighten.
Recommended for use with strong thread and needle. The fabric is folded in three layers.
Types of connecting hand seams
Blind hem stitch
Seams for DIY hand sewing can be hidden. They are visible on the reverse side, but absent from the front side of the fabric. This option is used to process the bottom of the product.
How to do it:
- Tuck the fabric.
- Pierce with a needle.
- Cover a small area above the fold. In this case, the thread is not visible on the front side.
It is important to take each step with a small needle; there should be 4 of them per 10 mm. The length is kept at 4-5 millimeters, width - up to 3 millimeters.
Blind hem stitch
Edge seam with braid
The name of the seam itself speaks for the technique of its execution. It is made in the same way as a simple edging version with an open and closed cut, the braid is necessary to strengthen the edge.
How to proceed:
- Make a braid, fold it so that one edge protrudes 1 millimeter beyond the other. Iron.
- Insert the braid into the cut.
- Sew a line 1 mm from the edge.
This option is appropriate when processing neck and pocket cuts. This helps protect them from falling off and makes the product more aesthetically pleasing.
You might be interested in Features of the chenille technique: details for beginners in sewing
Scheme of edging seam with braid
Hand furrier stitch
Leather is sewn with a regular straight-stitch machine, but fur products are processed using a furrier's machine or manually using a seam designed for this purpose.
How to hand sew two fabrics together using furrier stitch:
- Perform the stitch from right to left.
- The needle is threaded twice into one hole.
- Make stitches from right to left. They take a small step.
- Each subsequent stitch is performed in the same place without indents.
Important! This method of sewing fur skins allows you to make the stitching even and strong. A household machine will not be able to stitch a natural product with high quality.
Hand furrier stitch
Stitching and marking seams
This option is suitable for joining fabric on a sleeve or front if the old machine stitching has come apart. It is recommended to take small steps of 4 millimeters. You should not leave large gaps; 5 steps are taken per 10 centimeters. The marking seam is performed in the same way, but a gap is left between each step.
Stacky view
Interlining seam
For an interlining seam, it is enough to master the basic technique. The needle is inserted from right to left, making sure that the thread is evenly tensioned. Between the stitches make a distance of 3 millimeters, equal to the stitches themselves.
This option is suitable for marking on fabric, as well as gathers.
Spacer option
Cross stitch
The main option for temporary fastening of fabric. Used at the stage of preparation for sewing on a machine, as well as for rough drafts.
How to do:
- Make stitches from top to bottom and from right to left. Pay attention to the space between the horizontal stitches.
- Move back up, stick the needle into the lowest point. Pull out in the top puncture of the bottom stitch.
Stitch "Cross"
Running seam
The types of seams for sewing with threads by hand include “running”. It is used as an alternative to stitching for decorating fabric.
How to do it:
- Make a “back needle” stitch.
- Grab a few millimeters.
- Back off 10 millimeters.
- Remove the needle.
- Grab the top layer of material.
- Repeat steps.
Running stitch
Hem
This option is used for hemming bed linen, as well as the bottom of light children's and adult clothing.
How to do it:
- Bend the edge by 5 millimeters.
- Bend it again by 5 millimeters.
- Sew with a regular stitch 1 mm from the fold.
The result should be an even line of equal steps with small gaps.
Hem
Double or French seam
Suitable for processing loose fabrics, as well as where additional reinforcement is needed. These are pillowcases, cuffs, pockets, etc. This type of stitches has several names: double, French, reverse.
You might be interested in what tunics are: description of clothing
How to do it:
- Place the two pieces with the wrong sides facing inward. Align the cuts and sew with a straight stitch. Leave a distance of 4 millimeters from the edge.
- Trim the seam allowance close to the stitch line.
- Fold the parts to the wrong side.
- Iron the fold.
- Sew another line 6 millimeters from the edge.
Double stitch
Check stitch
This hand sewing method is used to hem zippers. How to do it step by step:
- Make a backstitch from right to left.
- Pull the needle to the left 5 mm from the thread.
- Sew the same stitches further back with a needle.
It is recommended to make the connection in steps of up to 5 mm, although a length of 10 mm is allowed.
Seam tick
Covering seam
You can hem clothes discreetly and neatly using a hemming stitch. On one side of the product you will see 2 lines, and on the other - one. The option is notable for the fact that the stitching is durable, and frequent washing of the item is not a problem.
How to sew:
- The distance between lines is maintained from 3 to 10 mm. The second line is made 1 mm from the fold.
- Place fabrics right sides together. The bottom one should protrude.
- Fold in the bottom seam allowance.
- Sew a line.
- The free part goes around the cut.
- On the wrong side, add another line.
Important! The denser the fabric, the wider the allowances.
Covering stitch
Types of overlock hand stitches
- Seam “over the edge” or the main overlock
It goes from right to left. These are parallel and identical stitches located obliquely to the cut of the fabric. They are identical on both sides. There are 2-3 stitches per 1 cm. This seam is necessary for manually fastening fabrics that are fraying.
Overlock stitch
- Cross stitch by hand
This is a double oblique seam - goes from left to right and in the opposite direction. The needle enters the holes already created from the previous move.
- Loop or edge stitch
Similar to the first option, but the needle goes perpendicular to the tissue section, passing over the thread. Move the needle towards you, frequency of stitches is 2-3 per 1 cm. The loop at the bottom of the needle is slightly tightened when done. Most often used for finishing frayed fabrics, processing loops and as a decorative element.
Loop processing
- Twist seam
Complex seam for processing very loose and light fabrics. Straight overlock stitches are made as close to each other as possible, with your other hand folding the edge of the fabric. Such a seam can be made with gaps - to do this, grab 1-2 mm of the main fabric and 2-3 mm strictly at the top of the folded section. The stitch frequency is no more than 5 mm. Threads are used thin (possibly silk) to match the color of the fabric.
The stitch frequency is small, but arbitrary
Types of hemming hand stitches
There are open, hidden and figured.
- Open seam
Used for non-flowing fabrics and hemming the bottom of trousers, skirts, etc. The needle comes out from the fold of the folded part, grabs 2-3 mm of the main fabric, again we return to the folded part (at a distance of 3-7 mm) and grab 2-3 mm. 2-3 stitches per 1 cm. The principle of oblique hand stitching is used - the needle enters perpendicularly, but the stitches are made at an angle parallel to each other.
- Blind hand hemming stitch
Similar to the previous method, but the stitches are very short on the right side. On the main fabric we grab 1-2 threads, on the folded side - 2-3 mm. The color of the thread must match the color of the fabric. Used for hemming blouses, items made of thin fabric, or when the seam is not noticeable.
Hemming seams
- Goat stitch
Used for thick fabrics or for decoration purposes. The stitches are laid from left to right in the form of a cross, the needle goes strictly parallel to the cut! The length of the stitches is from 4 to 7 mm, their density depends on the type of fabric - the denser the fabric, the rarer the stitches.
Algorithm
Types of hand stitches and their application
There are a lot of seams with which stitches are formed for:
- sweeping away products;
- grinding;
- markings on the product;
- loop formation;
- hemming the bottom of the item, etc.
Running stitch
This type is made to lay stitches with threads that temporarily connect the parts of the product. They are used when sewing things for fitting and preliminary inspection of the item being created.
To complete this, a line is laid in which one stitch has:
- with a loose connection - an average of 1.7 cm;
- for basting with the addition of one of the parts, the stitch length is from 0.5 to 1.5 cm.
A running stitch is used in cases of fastening side and shoulder parts, and basting sleeves. To lay it, the parts are folded and aligned along the edge. The stitch is laid along the desired line, adhering to the required length.
Basting stitch
Basting is similar in technique to the previous one, but is performed when one part is superimposed on another. For example, when basting pockets.
Copy seam
Copy lines are laid when you need to transfer the contour line to a paired part. To do this, the halves are folded and stitches are made. They need to be laid easily, without tightening the parts. After this, the parts are moved apart and the stitches between the halves of the product are carefully cut with scissors.
When laying, make sure that the stitches on the desired part of the product are as visible as possible.
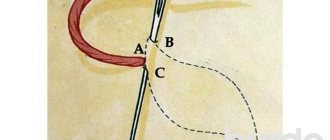
Back stitch
Do it as follows:
- fasten the thread from the inside out;
- make a puncture with a needle in the opposite direction at a distance of 1 conventional stitch;
- pull the thread with the needle from the wrong side 2 stitches forward. You need to count from the place where the thread is attached;
- pull out the needle and again step back 1 stitch, go under the fabric 2 stitches forward;
- as a rule, it is used either to design the outline of the embroidery, or to hem the bottom of the product.
Overlock "loop" seam (oblique, cross, loop)
The edges of the product are processed with an oblique overcast, thus preventing the thread from fraying.
When making a seam, the thread enters from one side of the product, is thrown over its edge and enters from the reverse side at a certain distance.
With this type of seam, the density of the stitches depends on the thickness of both the thread and the fabric. The thinner the fabric and the more prone to fraying, the more often you need to stitch.
The cross stitch is performed similarly to the previous one, but first from right to left, and then in the opposite direction. In this case, the thread is not broken and the product is not turned over.
Overcasting is also performed to process the edge of the product.
For this:
- the needle and thread are thrown over the edge, starting from the inside out;
- make a puncture and pull the needle out from the front side. Do not tighten tightly;
- the next time you throw the thread over the edge, the needle must be passed through the free loop from the previous seam.
Note stitch
The bottom of the product is secured with a seam. The technique is similar to basting, but has a longer stitch length. Ranges from 1 to 3 cm.
Basting stitch
If there is a need to fasten already stitched parts, then a basting stitch is used. It is needed for further work on the product. For example, to lay a decorative seam along the edge of a collar.
Hemming stitch (simple, blind, figured)
A hemming stitch is applied for permanent use of the product. It does not evaporate later, like some types of seams.
In order to make a simple seam, you need to make the same movements as with a cross stitch. Only this is done along the already pre-folded edge, and the thread should not take a lot of material along the front part.
The main load falls on the wrong side. A hidden seam is made in such a way that the needle enters the joint to a small depth.
The figured hem forms a folded, fixed edge. The seam moves in the direction from left to right and from top to bottom. Make a puncture with a needle in the main fabric, while grabbing 3 threads from left to right. Pull out the thread. After this, a grip is made in the folded edge, also from left to right. Moving to the right side, repeat the movements.
How to make complex hand stitches: description with diagrams
- Fur hand stitch
Used for through fastening and processing the edges of sides, gates, etc. And in the case when the line should not be visible! Sometimes a fur stitch replaces machine decorative stitching, ensuring the durability of the product. We pierce the bottom layer completely, we capture only 2-3 mm of the top layer. For 1 cm up to 3 stitches.
- Tricky or hidden seam
Used when repairing clothing or when creating a hidden seam. The needle is inserted from the left along one part of the fabric, making a stitch to capture 1-1.5 mm of fabric on the other side. We repeat this algorithm, capturing only a little of the canvas. For 1 cm up to 3 stitches. We stretch the thread - the seam is not visible, all the stitches are hidden on the wrong side.
Execution schemes
- Plaster seam
It's also a butt seam. Used for joining wool and other thick fabrics that do not fray. Can be done with straight, oblique and even loop stitches. Their length is 2-3 mm, frequency - 6-7 stitches per 1 cm.
- Darning stitch
At the moment it is used very rarely. Previously used for repairing damaged items and for decorative embroidery. It is laid with perpendicular straight or oblique stitches with high frequency. The threads should create a weave.
Execution schemes
Hand stitches and seams
In order to learn how to sew beautifully and competently, we need to carefully study the topic of “hand stitches and seams.” This is the basis of sewing skills, the secrets of which I will share with you on the pages of my blog!
In this article we will get acquainted with hand stitches - where they are used and how they are performed. And to begin with, I’ll tell you what a stitch is and what a seam is.
A stitch is a complete cycle of weaving threads between two needle punctures.
A stitch is a sequential row of stitches.
So, let's look at the types of hand stitches and their applications:
Basting seam - used to temporarily fasten parts of the product. The stitch length is from 0.7 to 2.5 cm, depending on the type of fabric and type of work. The distance between stitches is 0.2 - 0.5 cm. That is, on the front side we see stitches of 0.7-2.5 cm, and on the back side of 0.2-0.5 cm.
Basting stitch - used to attach one part to another. For example: we baste a pocket to an apron. The stitch length is 1.5-3 cm. The finer the details, the finer the stitches.
Stitch stitch - used to secure the folded edge of the product. The stitch length is 1-3 cm, depending on the structure of the fabric. We sweep “unruly” fabrics more carefully and make short and frequent stitches. For thick and dense fabrics, increase the stitch length.
Basting seam - used to fasten parts that have been previously turned and turned inside with a seam. The stitch length is 1-2 cm. We also take into account the type of fabric. The thicker the fabric, the larger the stitch. Copy seam - necessary for transferring marked lines to a symmetrical part. We baste two parts along the line requiring transfer, without tightening the stitches. They should look like loops on the front side. Then we move the parts apart and cut the threads between them. This way, we will have threads sticking out on both parts, along which we can safely draw chalk lines. Stitch length 1 - 2 cm, loop height 0.3 - 0.5 cm.
Oblique stitch basting stitch - used for temporary fastening of parts when basting with a fit. For example, for fastening the upper collar to the lower one or valve parts. In the corners of these parts it is necessary to make a small fit from the top part. A bias stitch basting stitch will hold the fit very well. The fabric will not “shift” or warp. Stitch length 0.7 - 2 cm. Stitch width 0.4 - 0.6 cm.
Oblique stitch basting seam - used to fasten parts that have been previously hemmed and turned inside with a seam. And it is used in cases where we need to form an edging, a frame, or secure split seams. This seam is used when processing the edge of the side, lapels, collars and pockets. Stitch length 0.7 - 1 cm. Stitch width 0.5 - 0.7 cm.
Oblique stitch overlock stitch - used to secure the edge of the part and prevent threads from spilling out. It can completely replace the overlock stitch. Stitch length 0.5 - 0.7 cm. Stitch width 0.3 - 0.5 cm.
Hemming stitch - used to permanently secure the folded edges of the product. To secure the bottom of the sleeve, the bottom of the product. For attaching internal sections of beads. The stitch length for securing the folded edges of the product is 0.3 - 0.4 cm, for hemming the hem 1 - 1.5 cm. The stitch width in seams with an open cut is 0.2 - 0.3 cm, with a closed (folded) cut 0. 1 cm. Seam width for hemming 0.3 - 0.5 cm.
Overlock cross stitch - used for hemming collar flaps, bottoms of women's coats, dresses, trousers made of easily fraying fabrics. The so-called "goat"