There are always things in our wardrobe that can be decorated or remade. Still good things, spoiled by a stain in a visible place that cannot be washed off. Jeans or trousers, frayed at the knee. T-shirts and tank tops bought on sale. Perhaps it's time to go through your closet of clothes?
Perhaps, in the process of sorting out the rubble, you will come across things that will make you want to pick up sewing supplies and start decorating. And we bring to your attention a selection of do-it-yourself embroidery on T-shirts.
What will you need for work?
- Actually, a T-shirt. It is advisable that the item be monochromatic. Then the DIY embroidery on the T-shirt will stand out and look organic.
- A sheet of paper and a pencil. They are needed to transfer schemes. Select the pattern you like and enlarge to the desired size. Place the paper on the computer screen and trace the drawing. It's even better if you have a printer at home.
- Disappearing or washable marker. Needed for marking a template on fabric.
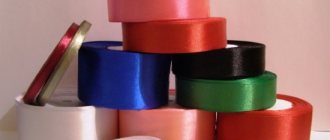
- Threads. Traditionally, floss is used for embroidery. You can experiment with types of threads. Try adding lurex to the floss or embroidering a section with one shiny thread. Nowadays stores have lurex of different colors in their assortment. Also try adding thin and thick knitting yarn in places.
- Scissors.
- Hoop. Definitely required. Otherwise, the fabric will “gather” after embroidery, that is, gather into folds.
- Different sizes of beads, seed beads, sequins, rhinestones. Any template can be decorated with these elements. Choose combinations to suit your taste, don’t be afraid to experiment. Then you will end up with an original designer T-shirt embroidered with your own hands.
- Needles. It is advisable to choose comfortable needles with a long, flat eye. Threading will be easier.
Next Step: Learn Stitches
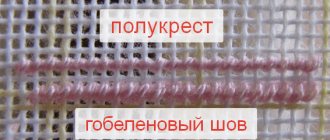
There are a great many types of stitches for embroidery. Stem, “forward needle”, cross, half-cross, herringbone, twig, etc. Watch the training video, because it’s better to see it once.
Another very interesting and educational video on this topic. Using a comb, it turns out, you can embroider a three-dimensional flower. See below for a great variety of life hacks and useful tips.
Tip: try to practice on scrap fabric before you start the main work. The best option for beginning embroiderers is to buy a piece of canvas. This is a fabric with a cellular structure. Working on canvas makes it easier to embroider even and neat stitches. Invite patience, attentiveness, and most importantly, inspiration into your embroidery company.
So, the stitches are worked out, the material is prepared. Now is the time to choose what kind of DIY T-shirt embroidery you want. And in what technique?
Machine embroidery
Previously, about 20 years ago, exclusive machine embroidery on your clothes could only be done to order in an atelier. Modern sewing machines have many useful functions, one of which is the ability to embroider. In addition, there are inexpensive embroidery machines that can be used to create colorful compositions from cotton or silk threads.
Embroidery is not only an interesting, but also a useful activity that calms the nervous system, develops fine motor skills, and develops perseverance and attentiveness. Clothes hand-embroidered with floss look unusual and beautiful, always attract curious glances and cause admiration.
Do-it-yourself satin stitch embroidery on a T-shirt
The technique of this embroidery is both simple and complex at the same time. A seam called “forward needle” is used, which is easy to perform. Craftswomen recommend clearly transferring the contours of the design onto the fabric in order to confidently make the next stitches. The satin stitch covers the pattern with a dense layer, the thread lies in one direction. Sometimes the outline of the design is embroidered separately.
Stitches are divided into oblique and straight stitches. Straight stitches should go exactly in the direction of the thread of the fabric being embroidered. A typical technique for satin stitch is a satin stitch with flooring. To do this, the outline of the pattern is made with a regular stitch, and the entire element is filled with it. After this, the entire pattern is covered with a thread, which should be thicker than the main one. When using this technique, the embroidery will look voluminous and convex.
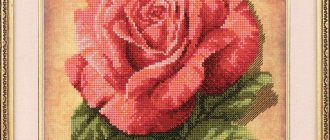
First, try embroidering small elements - small flowers, motifs or simple patterns. Below is a photo of DIY embroidery on a T-shirt. It is made using satin stitch:
As you can see, volumetric elements were used here. The embroidery is made of flowers and leaves, tightly adjacent to each other. The thread is bulky, most likely it is not floss, but something thicker. For example, cotton threads for knitting.
The video tutorial shows how to embroider a flower using satin stitch. Notice how tightly the fabric is stretched:
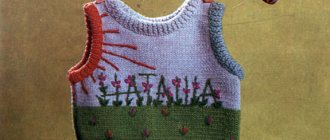
Embroidered inscriptions look very interesting. Like, for example, in this photo.
Look, very beautiful and original. Here we see how the word hello is embroidered using simple stitches and multi-colored floss threads. If you give free rein to your imagination, you can diversify the embroidery of the inscription on a T-shirt with your own hands. Add beads, beads or sequins. And, of course, choose the phrase as you wish. The inscription can be placed under the collar line on one or two sleeves.
Beginning of work
The selection of materials and patterns depends on the type of fabric, item of clothing, style. If the work is done in cross stitch using floss, then cotton will be the ideal material. A T-shirt decorated with a bright picture or element can complement your everyday look.
For a festive evening dress, you can experiment with glass beads or cutting. Although craftsmen consider beads to be inexpensive materials, in skillful hands they can turn into a real masterpiece. The advantage of processing with this component is volume and splendor.
For business style, large embroidery or recreation of scenes is not used. A laconic pattern on the cuffs or compact elements on the collar would be optimal.
The color of threads, beads, beads must correspond to the type and tone of the fabric. Sharp contrasts will be welcome in everyday style, but for a date or going to the theater you need to decorate your clothes more sophisticatedly.
Beginning embroiderers should practice on repeating elements. The simpler the pattern and the more unpretentious the chosen pattern, the faster the craftswoman will be able to see the result of the first embroidery and create further.
Before starting work, you need to wash the product. If it is a cotton T-shirt, then there should be no problems with the fabric during the work process, but when the material has a complex composition, it is better to be on the safe side so that after the final wash the fabric does not “shrink” and the pattern does not become lumpy.
Be sure to do a test with threads on a piece of material: whether they will shed after washing or not. To do this, just place a thread on a light material, moisten it with water, and then rub it with the cloth. If there are specks left on the surface, then the floss is of poor quality.
Embroidery on dark fabric can also change color, but under the influence of the material.
Preparing fabric for embroidery
Cross-stitching on clothes requires preparation and accuracy. To make a design look beautiful, it is not enough to mentally imagine the cells on cotton and try to embroider on your hands. It is necessary to carry out a number of manipulations:
- Smooth out the fabric and straighten it. So that the embroidered elements do not become warped.
- Using stramine (overlay canvas), fix the place that will be processed and attach the fabric with cells to it. While working, it is important not to pierce the canvas with a needle, this will significantly complicate the process of pulling out the threads. You can replace Stramin with a soluble base, the product with which, after completion of work, can simply be washed.
- To ensure that the crosses are neat and perfectly even, tuck the item into a hoop or ku-snap so that the fabric is taut.
What if you try cross stitch?
A very popular technique. Known since time immemorial, it has long won the respect of millions of needlewomen. Countless patterns and elements - and just one type of stitch. Made with floss threads. Do-it-yourself embroidery on a T-shirt using the cross stitch technique opens up a wide range of possibilities.
You can embroider individual small elements.
Or you can embroider a whole picture. These seals are cross-stitched, and to give the work volume and realism, the edges are trimmed with long stitches. They imitate wool. A very beautiful and interesting idea.
For this technique, the main thing is to master a simple stitch and correctly transfer the pattern onto the fabric. Recently, programs for creating diagrams have appeared. There are both paid and free ones. The main beauty is that you can make a diagram based on any drawing or photo. Then print it out and embroider it.
Thus, with the help of such applications, you can even embroider photos of your family on fabric. Or create an original gift - a T-shirt with the image of the birthday boy. Such a gift will not go unnoticed.
How to embroider an inscription
Embroidered items always make their owner stand out from the crowd and attract a lot of looks. For those who do not like pretentious images, love minimalism, but want uniqueness and exclusivity, embroidered inscriptions are perfect. It looks discreet, interesting, and can fully convey the character of its owner. In addition, creating T-shirts with embroidered slogans yourself is not difficult.
Inscription on the T-shirt
To do this you will need to complete several steps:
- Create a stencil. You can find a suitable font, type this inscription, and then print it, or attach a sheet of paper to the monitor and redraw it. Then this inscription needs to be transferred to adhesive interlining. This can be done by boldly tracing the inscription with a marker or pen, then printing it on the fabric. You can continue to embroider using any convenient technique. For those who do not yet have experience in this matter, a cross is best suited. You can find a huge number of ideas on thematic forums
- Working with adhesive interlining. It must be prepared in advance. The prepared stencil is applied to it and the interlining is cut to its shape. Next, you need to apply it to the inside of the T-shirt (in place of the future embroidery) and go over it with a hot iron. This is necessary so that the embroidery does not deform over time and retains its original appearance for a long time. Washing non-woven fabric is absolutely not scary. Even when working with dense fabrics, this condition will not be superfluous.
- Transferring the drawing to the product. The best option is to place the glass on the surface so that it has a free edge. Place a lamp under this edge, and on top a T-shirt with a sketch in the place where the embroidery will be. At this stage, a water-soluble marker will come in handy (sold in almost any craft store, you need to pay attention that the marker is of a color that will stand out on the fabric; it is especially difficult to choose for black fabrics). With its help, the design is transferred to the fabric. It is important to compare the sketch with the already glued interlining.
- Embroidery. Before you begin this important stage, you need to make sure that the threads do not fade, otherwise the whole work will be ruined very quickly. To do this, you need to take a piece of thread, a small piece of light fabric and wash them together. It is best to embroider on a hoop. This way the result will be smoother and there will be less chance of dragging out the work. Before work, it is recommended to wash your hands well to avoid leaving marks on the product.
- Shutdown. After the embroidery is completed, the T-shirt will need to be washed. It is better to do this in water without adding detergents or in slightly soapy water.
You might be interested in this. Interesting patterns and sewing procedures for children's envelopes
Knowing how to embroider on a T-shirt, everyone can create their own masterpiece.
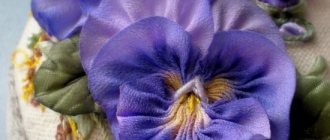
You can decorate clothes with embroidery in a free style
Any diagram, drawing or template is taken as a basis. By combining different types of stitches, you can create an individual embroidery that no one else has. It all depends on the flight of imagination and creative thought.
Different techniques are used in the photo. Here you can find a satin stitch, a French knot, and a “forward needle” seam. You can leave it as is. Or you can fill the empty spaces with small sequins and beads. They can be of different shapes and sizes - this will add charm to the embroidery.
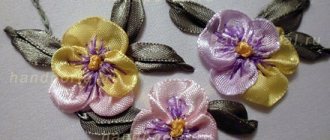
Another idea is to combine embroidery and applique in your work.
It turned out to be a very beautiful T-shirt.
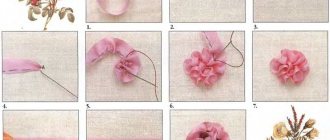
For this work you will need to stock up on pieces of fabric. Chiffon or organza will do. Circles of different sizes are cut from the fabric. The edges must be processed using a lighter or candle. This is done quickly. Do not scorch the fabric with the edge of the flame, as it will become smoky.
Next, a flower is collected from circles of different sizes and sewn onto a T-shirt. The center of the flower is filled with beads and beads. The stems are decorated with embroidery.