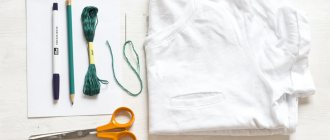
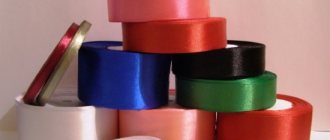
Tools and materials
Attention! The correct selection of tools is 60% of success in work. All materials must be of high quality and not break during embroidery (this very often happens with bad needles).
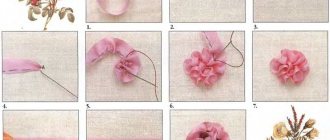
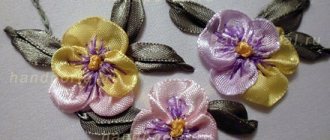
Painting with a flower
A hoop is the most necessary tool for needlework. They can have different shapes (circle, square, oval), and are also made of metal, wood or plastic. Wood products hold the canvas best. Plastic ones may lose their abilities over time. The frame sizes are also quite varied. A novice needlewoman who wants to embroider small-sized canvases needs to buy a frame 15-20 cm in diameter.
Machines for work
Currently, in stores you can find a large assortment of machines - also made of plastic, wood, metal and combined ones. The choice depends on personal preferences, they can be:
- desktop;
- sofa;
- floor
Necessary tools for the job
But it is advisable to try all three models to choose the most suitable one for yourself. For those with back problems, it is better to use floor holders. In this position, the spine will not bend, and the entire load will be transferred to the legs. If a person sees poorly, it is recommended to use a large magnifying glass and additional artificial lighting.
Needle selection
To work, you need to have a special needle with a wide eye (especially for multi-layer floss) and a blunt point, thus reducing the risk of getting neighboring stitches into the floss. You can use a double-sided needle.
Roller for textiles
You can use either a roller or various types of sharp scissors:
- tailor's - for cutting material;
- medium - for trimming excess tissue;
- small ones - for cutting thread;
- stitch scissors.
Types of embroidery scissors
Tailor's scissors are generally very heavy and bulky, so they cannot always be used.
Fabric chalk or marker
Textile markers can be divided into several types:
- disappearing;
- washable;
- waterproof.
The first option disappears on its own over time, the second - after the first wash, the third - is used to correct the finished work. The latter type is not so often used by needlewomen, mainly in the studio.
You might be interested in this Traditional patterns of Russian folk embroidery
Cross stitch material
Embroidery can be done on any canvas, but the most common is canvas. It is divided into holes into which the design is sewn during the process.
Types of canvas
It is mainly made from cotton or linen fabric, but can be purchased from other materials. The color palette is small, mainly white, light, olive and other neutral colors. The basis can also be:
- with a large cage;
- woven;
- double;
- tapestry\carpet;
- plastic;
- Soluble.
Materials and threads must be of high quality so that the product does not deteriorate in the future. Their prices may be above average, but this is a guarantee that after two or three washes the floss will not begin to burst.
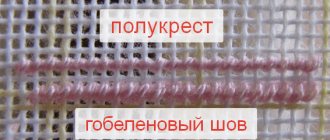
Basic rules of cross stitch
Important nuances that a novice craftswoman needs to know:
- in nature there are only 3 directions of seams;
- It is necessary to sew the picture only with a needle in a vertical direction relative to the fabric;
- the top seams should be located in the same direction;
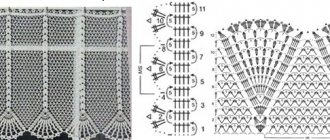
- The lines are performed in two steps. Sew a stitch from the bottom seams, and then finish the cross with the top seams;
- for roses in vintage style it is better to use Aida 14 canvas;
- When making a separate row, you need to completely, immediately embroider each cross.
Note! Beginners need to familiarize themselves with all types of stitches before work and learn how to use them on an unnecessary piece of material. The canvas can be washed so that it shrinks a little.
Cross stitch pattern of roses
Learning to cross stitch roses
Before you begin this exciting workflow, prepare all the necessary materials that you will definitely need, namely:
- comfortable wooden hoop;
- floss threads in the required shades;
- embroidery needle, scissors and canvas.
To prevent a piece of canvas from crumbling during embroidery, we recommend that you treat its edges with an adhesive solution, which will securely fasten all the threads and keep the material intact. After this, you need to use a simple pencil to draw the fabric into squares of 10 by 10 crosses. This will help you not get confused. The floss should be divided by color and wound into bobbins, which are easy to make with your own hands.
So, we begin to embroider the bud from the upper corner, which is located on the left side. Thus, the cross will be formed from left to right, and the rows will go one after another. To ensure that the back side of the canvas looks no less neat than the front side, we recommend that you learn how to fasten the thread without creating a knot. Leave the tip of the base material long enough on the wrong side so that you can sew the first stitch over it later. Poke the needle into the bottom left corner from the wrong side, and then bring it diagonally across the face only in the top right corner.
Read
Mythical unicorn in cross stitch pattern
Your task is to sew diagonal stitches to the right side of one row, and then return to the beginning again. To do this, insert the needle into the left corner located on the left and bring it out on the wrong side to the lower diagonal corner. Now you should have neat crosses. You should not start working from the middle of the canvas, or rather the pattern, as you risk getting confused and not embroidering the rose pattern correctly.
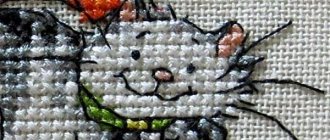
Simple embroidery: roses for beginners with patterns
Floral motifs are great for first projects. They are quite easy to embroider, the main thing is not to use a lot of small details in the picture. For roses, red, pink and white floss are mainly chosen. Below you can read the operating instructions.
In the basket
Roses in a basket look good in embroidery. For work, it is recommended to choose a soft beige canvas. This embroidery can be used to decorate pillowcases or jeans. Also, a painting on canvas can be placed in a frame and presented as a gift.
Useful tips for working with embroidery:
- the workplace should be well lit. This is the most important thing for comfortable work. If you neglect this rule, you can ruin not only the craft, but also your eyesight. It is advisable to do embroidery during the daytime;
Embroiderer's workplace
- comfortable place. If the embroidery will take a long time, it is better to sit in a comfortable chair or on the sofa;
- need to take a break. You can't work while squeezing all the juice out of yourself. Because of this, the quality of the embroidery may deteriorate. It is necessary to give yourself rest every hour;
- the canvas must be at least 3 cm longer than the holder, otherwise it may slip out, fidget and the pattern will float.
You may be interested in this Step-by-step instructions for diamond embroidery of icons
For those who are just starting to learn how to embroider, this pattern will be difficult due to the fact that the basket is usually made in different colors and is decorated with small ornaments.
Therefore, it is better to try to make a test picture and only then start working.
In a bouquet
Embroidery in a bouquet will look good in the kitchen. If the painting uses bright shades of thread, then it must be placed on the sunny side. Then, when the rays hit it, the rose embroidery will shimmer beautifully. For this work, it is advisable to use the French knot technique. If the picture is placed in a frame, then it can be coated with colorless varnish so that as little dust as possible settles on it.
Embroidery white roses "Alice"
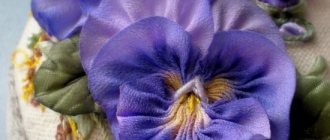
Symbolic rose
A rose is a flower that carries a certain symbol, namely love and passion. Since ancient times, the color yellow has been considered a symbol of separation, so such bouquets were presented when they wanted to say goodbye forever. In the modern world, the color yellow is no longer considered a harbinger of separation, but rather symbolizes romantic and tender relationships. That is why needlewomen are increasingly choosing charming yellow roses for their masterpieces. White color can be used if you purchase a canvas that is not white, but rather colored. But a composition of white buds will look gorgeous.
And if you consider yourself an absolute beginner, then we recommend that you cross-stitch one-color or two-color monochrome, which even a child can handle. Be sure that you will not spend a lot of time on such work and will not strain your eyes too much. Basically, such schemes depict one or maximum three flower queens. In this article, you will definitely be able to choose the right scheme for yourself from the collection that will be presented to you. You can create unique embroidery on home textiles with your own hands, diversify your interior, or make an unforgettable gift for your family. We also invite you to watch the video material, which contains recommendations from experienced craftswomen.
Read
Dress decor using hand embroidery
Embroidery “Tea roses”
A painting with a tea rose will look very beautiful in the living room. For this type of flower, only pink and white threads are used. This is the simplest scheme for a beginner. Embroidery is done using the backstitch technique (back needle). This stitch looks great in small paintings. For greater realism, you can do voluminous embroidery.
Scheme for tea rose
Cross stitch “Bouquet of white roses” (video)
In conclusion, we can say that embroidering roses is a beautiful and easy task if you choose the right pattern. The great advantage of embroidering roses is that there are no restrictions in the color scheme, so you can create many different patterns on fabric, decorate pillowcases with embroidery, and make original gifts for your friends. We can say for sure that something made with your own hands will be a wonderful gift, especially if it is a beautiful rose embroidery.
How to create a diagram from a picture
For a beginner, it will be quite difficult to transfer the desired design onto the fabric. To do this, you need to use carbon paper, a pencil or marker, and a ruler. To make your work easier, you can make a step-by-step embroidery pattern on the Internet.
You just need to select a photo or drawing, and the program will generate the diagram itself. Ready-made templates are obtained in PDF format. To open them, you must install Acrobat Reader. In each diagram, for ease of work, the size of the canvas, a shade map, pagination, and a small copy of the drawing are indicated. The shade card contains a list of thread colors that you will need to work with.
Set of roses Dana embroidery
If, nevertheless, the choice was made in favor of the manual method of translating the drawing, then you need to know a number of rules for use:
- carbon paper leaves marks on the fabric and cannot be washed off, so you need to transfer the design with care;
- you can transfer the drawing using glass and paper, but for this the weather must be sunny;
- it is better to use chalk or soap instead of a pencil so as not to leave marks on the canvas;
- If a person has artistic skills, then you can draw the picture yourself, while changing its details.
You might be interested in this: Simple satin stitch embroidery patterns on clothes for beginners
Blouse decoration with a cross