Embroidery ribbons. Basics of craftsmanship. Part 5
So... Leaf by leaf, flower by flower... It's time to consolidate what you've learned! Today the task will be unusual, but very interesting! First, we will study the last 3 stitches that I planned to give you. Secondly, we’ll immediately “weave” them into a common flower wreath!
Part 1 here>>
Part 2 here>>
Part 3 here>>
Part 4 here>>
The task will be, as usual, independent! I give you the embroidery pattern... and that's it... The rest is up to you! You will “read” the diagram, embroider, select the colors of the ribbons - all by yourself! Full creative flight!
Let's start by examining the seams:
seam No. 10 - “rose-web”; seam No. 11 - “loop under the knot”; seam No. 12 - “straight” Seams No. 10, 11 and the “leaf” seam differ from the rest in their completeness. If those seams were separate elements of the whole, then these ones can act independently. Everyone has probably seen the “web rose”; someone has already embroidered it. Check yourself - do you know everything about it!? For the “web rose” you will need a 6mm ribbon of any color and cotton threads to match it. For the “loop under the knot” seam, any ribbons of two different colors. For a “straight” seam, the tape is green. Draw a circle of the diameter you need on the fabric and, using a cotton thread in 2 folds, sew 5 rays, always starting from the middle.
Fasten the thread on the wrong side. This is the base of the rose, it should be like a turnip.
Drag the needle and ribbon onto the face of the embroidery in the middle of the “web”.
And begin to intertwine the rays with ribbon - passing one from above, dragging the ribbon under the other.
If you weave the ribbon straightening it all the time, the rose will turn out to be closed.
If you twist the tape and lay out the turns side by side, it will “open up”.
If you put “loops under the spine” along the edge of the rose, you get the third option! And I immediately remember the film “Girls”, where the heroine of Nadezhda Rumyantseva talked about options for preparing potatoes... With a “web rose” too. You can weave 2 ribbons at once, you can take turns; you can use a ribbon of one color to make a closed middle, and use a ribbon of a different color to “open” it... there are many options! I didn’t show everything, because you should have a flight of fatia too! The main thing is not to stop there! The only thing I can say based on the execution technique: find the golden mean in tightening the turns! The coils should not lie loosely, but there is no need to tighten them too much. In general, try it, experiment! What’s interesting is that all the roses will be different! It is very difficult to repeat one in one! Next, seam No. 11 “loop under the knot.”
The loop is sewn in the same way as the “loop under the spine”, only the distance between the exit on the face and the entrance of the tape on the wrong side increases. It should be the width of the tape or slightly larger.
The loop is secured on top with the already familiar “knot”! And the last seam is called “straight”.
You are already familiar with this stitch from the “leaf”. It was with them that you filled the space of the sheet. But it can also be used separately. For example, like this!
Both the “web rose” and “loops under the knot” are good for embroidering children’s little things and various “things” - accessories. These seams are very decorative. So, let's sum it up! We studied 12 types of seams ! Let's remember them:
These are the main stitches used in RIBBON EMBROIDERY. The rest is all variations of their combination. I want to warn you right away that the symbols and names of seams may not coincide with other sources on tapes. I studied from Donatella Ciotti’s book, took a lot from it, and then came up with names and symbols myself, so that my students would remember the stitches faster. Therefore, the wreath diagram that I give you consists of my symbols and names. I think you can figure it out for yourself.
The only other way I can help is to place the diagram on the fabric.
First, draw a circle, let it be 5 centimeters smaller than the diameter of your hoop (i.e., move 5 cm away from the edge of the hoop). The circle is the thread on which you will “string” the “bead” flowers.
Mark the large flowers and leaves first.
Then draw the outlines of the “web roses”.
Indicate the direction of small details: leaves of roses, clematis buds, the middle of a gerbera.
Draw another direction of the gerbera petals. You don't need to draw anything else. Small flowers: forget-me-nots, flowers - “loops under a knot”, “knots”, etc. you will outline, if necessary, after you have embroidered all the large ones. My recommendations: I would like you to use all the stitches we have learned in this project. But I give you the opportunity to show your observation and individuality. You can replace flowers. For example, instead of clematis, you can embroider another flower, BUT! similar to using buttonhole stitches; you can replace the gerbera with a daisy or another flower, but be sure to use a “swirl stitch,” etc. That is, all the stitches shown in the diagram must be used. Try to ensure that the color scheme of the wreath is harmonious... Embroider with pleasure, slowly...
Dear girls! If you can embroider this wreath yourself, the door to a magical craft called “RIBBON EMBROIDERY” is open to you!
With best wishes for the exciting process of embroidery,
Galina Masyuk. See you!
Embroidering leaves with ribbons in different ways. Leaves
Embroidery ribbons. LEAVES Each plant's leaves have their own shape and appearance. It is also important to take into account their color, size and relationship with the flower itself, and the method of attachment. The picture below clearly shows the variety of embroidered leaves. 1. This sheet is embroidered with a straight stitch, sewn in the center of the ribbon. 2. This is a slightly more complex version of sheet No. 1. For this, straight seams sewn along the left and right edges are aligned like the top half of the iris. 3. To embroider this leaf, it was necessary to make three seams, sewn in the center of the ribbon and diverging from one point. 4. This sheet consists of three tape seams, straight seams are tacked with six matching threads and repeat the tape ones. 5. These leaves are straight stitches made from the center to the tips; the tape had to be held with a second needle. 6. Moss is not a leaf, yet it is often found in gardens and serves as a prominent feature in landscaping. This pattern is embroidered with French knots, the needle was wrapped with thread once or twice. 7. Another sheet made with a tape seam. 8. To make a sheet of twisted tape look even, it must be pulled tight. 9. These leaves are similar to leaves number 8, but here they are embroidered with a ribbon stitch. 10. Another type of leaves embroidered with a straight seam. 11. I associate this shape with fern leaves; I embroider them with gathered ribbons. For this example, I took a piece of tape 7 mm wide and 4 cm long and gathered along the center. Mark two points on the fabric, 3cm apart, to determine the length of the leaf, then secure one end of the gathered tape where the leaf will attach to the stem. Sew a tape stitch, leaving the gathering thread on the right side of the fabric. Pull the thread to give the leaf shape, then use the same thread to secure the ribbon. Sew the stitch along the gather line again to create a vein and sew the leaf to the fabric. 12. These ivy leaves are a variety of leaves number 3. 13. The holly is embroidered in the same way as the leaf number 11, only the ribbon is not gathered. To begin, mark the length of the sheet equal to two centimeters on the fabric with two dots. Fasten the ribbon at the junction with the stem, straighten it on the fabric, insert a needle into the ribbon at a distance of 3 cm from the fixed end, then pass the needle through the second point to make a loop. Having secured the second end of the tape, lay it along it, tightening the seam so that the loop is flattened along its length. Using a tiny chain stitch, gather the folds and embroider the spikes. 14. These mistletoe leaves are embroidered with a straight stitch. 15. It is clear that the cones are not leaves, but I was attracted by their interesting shape, moreover, in nature they are quite common and go well with the branches of holly and mistletoe. Embroidering pine cones is not an easy task, and before you begin, you should practice. Transfer the outline of the pine cone to the fabric, secure the tape at point L, then make loop stitches through points B, C, D, E, E and so on, as shown in the diagram, without tightening the tape too much. 16. This buten (a type of wild parsley) is embroidered with a straight stitch. The stem is embroidered with double thread, everything else with single thread. 17. It is very useful to learn how to embroider grass. In our example, all the blades of grass are straight, and they are made with threads of different colors and textures.
- hoop;
- canvas;
- leaf tape;
- the tape for the stem is denser;
- tapestry needle;
- thread.
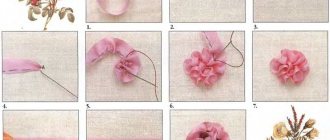
Stretch the fabric over the hoop. Take a rose leaf and place it on the fabric. Trace the outlines of the leaf.
Insert the ribbon into the needle and make the first stitch from the bottom. Bring the ribbon at the beginning of any leaf near the stem to the right side of the fabric.
Make the next needle injection at the point of the sharp end of the sheet, passing the needle through the tape. This will secure the dimensions of the sheet and create a sharp edge on the tape.
This is what the leaf looks like.
We make the second stitch the same way as the first.
The photo below shows very clearly how to properly stitch through the tape.
So far, the petals do not lie so as to cover the contours made in pencil. But we'll straighten them out a little later.
We lay out all subsequent leaves very carefully so that the tape does not wrinkle as it passes through the fabric.
Look how cute the leaves turned out!
All that remains is to make the top sheet in the center. Notice how the top of the sheet turns out if you insert the needle in the center of the tape, and not on the side as we did earlier.
Well, that's all, the leaves are ready.
Now we will make the stem. Take the green ribbon. Insert the needle and ribbon from below. Bring the ribbon to the front side.
Now twist the tape into a bundle.
Take a regular embroidery needle, insert the thread and fasten the flagella according to the pattern on the canvas. Look at the photo below.
This is the rose leaf you got! Straighten the ribbon and give the leaves a beautiful shape. The mark is visible here; if you accurately stick the needle into the outline, you will be able to hide the drawing.
Very beautiful and very similar! Now you can embroider ribbons with leaves, not just a bud! Based on materials from the site https://www.facebook.com/
Leaves
Each plant's leaves have their own shape and appearance. It is also important to take into account their color, size and relationship with the flower itself, and the method of attachment. The picture opposite clearly shows the variety of embroidered leaves.
1. This sheet is embroidered with a straight stitch, sewn in the center of the ribbon. 2. This is a slightly more complex version of sheet No. 1. For this, straight seams sewn along the left and right edges are aligned like the top half of the iris. 3. To embroider this leaf, it was necessary to make three seams, sewn in the center of the ribbon and diverging from one point. 4. This sheet consists of three tape seams, straight seams are tacked with six matching threads and repeat the tape ones. 5. These leaves are straight stitches made from the center to the tips; the tape had to be held with a second needle. 6. Moss is not a leaf, yet it is often found in gardens and serves as a prominent feature in landscaping. This pattern is embroidered with French knots, the needle was wrapped with thread once or twice. 7. Another sheet made with a tape seam. 8. To make a sheet of twisted tape look even, it must be pulled tight. 9. These leaves are similar to leaves number 8, but here they are embroidered with a ribbon stitch.
10. Another type of leaves embroidered with a straight seam. 11. I associate this shape with fern leaves; I embroider them with gathered ribbons. For this example, I took a piece of tape 7 mm wide and 4 cm long and gathered along the center. Mark two points on the fabric, 3cm apart, to determine the length of the leaf, then secure one end of the gathered tape where the leaf will attach to the stem. Sew a tape stitch, leaving the gathering thread on the right side of the fabric. Pull the thread to give the leaf shape, then use the same thread to secure the ribbon. Sew the stitch along the gather line again to create a vein and sew the leaf to the fabric. 12. These ivy leaves are a variety of leaves number 3. 13. The holly is embroidered in the same way as the leaf number 11, only the ribbon is not gathered. To begin, mark the length of the sheet equal to two centimeters on the fabric with two dots. Fasten the ribbon at the junction with the stem, straighten it on the fabric, insert a needle into the ribbon at a distance of 3 cm from the fixed end, then pass the needle through the second point to make a loop. Having secured the second end of the tape, lay it along it, tightening the seam so that the loop is flattened along its length. Using a tiny chain stitch, gather the folds and embroider the spikes. 14. These mistletoe leaves are embroidered with a straight stitch.
15. It is clear that the cones are not leaves, but I was attracted by their interesting shape, moreover, in nature they are quite common and go well with the branches of holly and mistletoe. Embroidering pine cones is not an easy task, and before you begin, you should practice. Transfer the outline of the pine cone to the fabric, secure the tape at point L, then make loop stitches through points B, C, D, E, E and so on, as shown in the diagram, without tightening the tape too much. 16. This buten (a type of wild parsley) is embroidered with a straight stitch. The stem is embroidered with double thread, everything else with single thread. 17. It is very useful to learn how to embroider grass. In our example, all the blades of grass are straight, and they are made with threads of different colors and textures.
Anne Cox "Embroidery with Silk Ribbons"
Today we will embroider sunflower leaves with ribbons
. Sunflowers and their leaves in nature vary in size, so we will be guided by our idea or scheme. I don’t take small ribbons, but 25 mm wide. If your base fabric is dense, then at this width you will have to first widen the hole with a needle. Pass its tip between the weave of the warp threads and twist a little. My fabric has a slight stretch effect (stretches a little), so even this width fits well, and even more so is fixed.
Let's begin.
I definitely couldn’t stand the drawing. Firstly, you can’t really see it in the photo, so I just made a sketch with a self-disappearing marker. And secondly, a photo is one thing, but a tape is completely different. Sometimes you want to bring something of your own. There is no marker, so sweep the contours with contrasting threads, first drawing with a piece of tailor's chalk or ordinary soap residue.
In the photo you can see a squiggle on one side of each leaf, this is where the top is. It is desirable and more convenient to start embroidering from those leaves that are located further and lower in the pattern. Then we make those that fall on them (located on top) more voluminous. But more on that later.
To embroider sunflower leaves with ribbons (lesson 12), we use two types of stitches - ribbon stitches with ribbons
(when the tip is curled) and
straight stitches
(raise them above the fabric, adding volume).
We fix the tape on the wrong side
better method of stitching with thread. Learn to lightly burn the ends of the ribbon with a lighter, this will prevent them from unraveling.
We bring it to the front side.
We perform a ribbon stitch. We pass the needle inside out through the ribbon at the top of the petal. Stretch to the desired type of tip. Do not pull too hard; the tip may slip through to the wrong side.
The wrong side.
Under the number 1 you can see the attached end of the tape.
Number 2 is where the ribbon exits at the tip of the first petal. I don't cut it off. So - since the second petal of the sunflower is nearby to simplify the process and create more diverse shapes, I will embroider with a straight stitch with a ribbon. And it can be done in the direction from the top to the tail, and vice versa. I bring the needle to the front side at the top of the next petal, it is next to the one just embroidered. For reliability, I lightly sew the ribbon to the fabric so as not to disturb the shape of the petals and not to stretch too much. You can see how it came out on the front side.
We pass the needle inside out. Please note that the tape may twist (the arrow is where the tape came out, the cross is the place where it twisted). If the drawing and your idea do not provide for this, then straighten the tape, otherwise after pulling it through it will be more difficult to do. They straightened it out and stretched it out.
Do not tighten too much; the sunflower leaf embroidered with ribbons should be voluminous. Also note that it should cover the place where we finished embroidering the branch. My leaf is laid out slightly on its side.
I'm moving on. The next one will be a ribbon stitch again. Therefore, the direction is from the tail of the leaf to the top. I move the place where the needle pierces the tape to the side, so the stitch will turn out slightly curled. Such randomness in direction makes the embroidery more alive.
This is what happened. We go back again with a straight stitch. And this is the direction from the top to the tail. Thanks to this alternation, you do not have to cut the ribbon each time to start stitching from the tail to the top, which is required for a ribbon stitch with its end turned over.
I bring the tape to the front side, hooking the pattern of the branch (the place of the red arrow) so that the sheet overlaps it and there is no emptiness.
To add volume, I lift it above the fabric and the previous petal. Don’t tighten too much right away, it’s better to insert a stick or something else under the tape, and then pull until the desired splendor.
We check our drawing, what to embroider under and what to embroider. We control the process. Sometimes you have to embroider each sheet separately, cutting and securing the ends.
Another ribbon stitch. To fill the void, sew one petal nearby with a straight stitch of short length. We add volume by lifting it.
From under this stitch we will embroider another sunflower leaf with a ribbon. Therefore, let's move it slightly to the side and remove the needle.
This is the top leaf here. Therefore, it needs to be raised more strongly above the fabric. Just don’t tighten it too much and its tip will remain on this leg, and therefore will be raised.
The second part of the leaves. We drew and marked where the tops are. I have squiggles there. We embroider with the same stitches.
Let me remind you again. Ribbon stitches will change direction at the top and take on interesting curves depending on where you insert the needle - in the center, right, left, or even taking both sides of the ribbon at once.
I took it from the last photo, it turned out to be such a complex bend.
We are gradually bringing the work to completion. The marker marks will soon disappear.
And we only have a few strokes left and the drawing will be finished.
Thank you for your attention. Our gardening adventures are coming to an end; it’s almost winter outside our window. So we will embroider more often. And the sewing of a souvenir horse is on the way, after all, it’s a symbol of the year. Prepare the flaps.
Ribbon embroidery for beginners: basics
This art came from Italy, although it gained particular popularity in France. The finished paintings, even if simply supplemented with elements of ribbon stitches, look amazing, and flowers are, of course, the most attractive in this technique. Glossy, voluminous buds and petals look just like life, you just want to touch them.
- To work, the craftswoman first needs to understand the tapes themselves: depending on the idea, their width can be either 2 mm or 50-55 mm. But the most optimal size is 7-25 mm. Accordingly, the larger the part, the wider the working belt will be.
- The most effective material is silk, but for beginners it is impractical due to its high cost, so it should be replaced with satin. It has a less pronounced shine on the front side, it is a little denser, but much more affordable. Satin is even denser, even stiffer, so it is not suitable for all parts, and it is convenient for them to work only if the tape is narrow.
- With fabric, everything is a little more complicated: it is easiest to embroider according to a pattern already applied to the material. In addition to the fact that you won’t have to endlessly monitor the space for fear of making a stitch in the wrong direction or the wrong length, you will know for sure that you have a fabric that is comfortable and ideal for the job. If you buy a simple clean cut, buy regular canvas (Aida 11 is perfect due to the size of the cells) or linen.
The main nuance when choosing fabric for beginners and experienced craftswomen is its density. The material must be stiffer than for cross stitch, otherwise the stitches will not lock and will pull the base along with them and become deformed. The picture will be ruined. And after you learn how to make basic details on such fabric, you can immediately try to make markings on ordinary things that you would like to decorate with a ribbon pattern.
- Make sure you have a lighter or at least a candle and matches: fire is needed to burn the tape so that its edge does not crumble. For fabric without markings, you will need water-soluble markers.
It is also recommended to purchase a hoop, the size of which is selected individually: for beginners, the most convenient diameter is considered to be 20-22 cm. Needles for ribbon embroidery are identical to those used for cross-stitching: they have a wide and elongated eye, and a rounded tip. The thickness is selected according to the fabric, so there is no universal advice here. The only thing is to pay attention to the numbering: for the thinnest ribbons and small holes in the fabric - the largest needle number (20 or 18, etc.), and vice versa.
Video: how to thread a ribbon through a needle
So, after you have inserted the ribbon, transferred the design to the fabric and tucked it into the hoop, you can proceed directly to the embroidery itself:
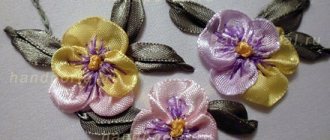
- Straight stitch
We begin our embroidery with the three upper petals, which will need to be made using straight stitches. The main thing is not to forget to secure the tape itself before starting the work process. When making a straight stitch, we first drag the needle and ribbon to the front side. Then, having decided on the size of the petal, at the desired point we again bring the needle to the wrong side. It is worth noting that the appearance of a straight stitch largely depends on the thickness of the tape;
- Having finished embroidering the three upper petals with wide ribbons, we can begin to work on the two side petals. We also embroider them with straight stitches;
- You will need to embroider the lower two yellow petals using the same stitch;
- Loop seam
Having done this, you can begin to make the core of our flower with ribbons. To do this we need a loop stitch. Bring the needle to the front side at point “A” and, making a slight indent to the right, through point “B” return to the wrong side. Then, at point “C”, bring the needle to the front side so that the ribbon is directly under it. The final stage will be to carefully tighten the loop and return the needle to the wrong side;
- Twisted stitch with ribbons
Thanks to the step-by-step instructions, you were able to easily embroider the petals and the core; now you just need to decorate the side and bottom petals with floss threads and your flower will be ready. In the photo we see only two flowers, but if you wish, you can embroider a whole composition consisting of pansies;
- When the ribbon embroidery of the flowers themselves is completed, we can begin embroidering their stems. And we embroider them using twisted stitches: First, you will need to stick the needle out to the front side, and carefully turn it with your fingers to twist the ribbon. Then you will need to pierce the ribbon in the place you need and bring the needle to the wrong side. Now you need to secure the twisted stitch with a knot. In order to do this, it will be enough to simply bring the needle to the front side next to the place of the previous puncture of the tissue and, having formed a knot, return it to the wrong side again;
- Ribbon stitch
Embroidering leaves is done using ribbon stitches (sometimes called curl stitches): Having straightened the ribbon on the front side, you will need to pierce it with a needle at point “B”. After returning to the wrong side, all you have to do is adjust the degree of tension of the tape. In this way, you will need to embroider all the leaves with green ribbons. And these wonderful hand-made flowers will appear in your painting:
Pansies can be embroidered in various ways. After watching a short video, you will see one of them:
Video: master classes
Easy-to-read video tutorials on ribbon embroidery can be found on websites for needlewomen. It demonstrates step by step how to embroider with ribbons. Many things can work out the first time. This is great motivation for beginners to continue the fun of ribbon embroidery.
You can also learn from the video that embroidery with ribbons is not a newfangled activity. This art has been known in France for several centuries, and it was mostly used not to create paintings, but to decorate the clothes and hats of noble ladies.