In fact, in cross stitch, this is the only acceptable “knot” that is used to add volume to the finished product... It is often used to highlight the eyes of animals, bouquets of flowers, or some individual fragments of the design that need special emphasis.
It is interesting that this embroidery element “came” to Europe from China. Such a cute touch on embroidered Chinese clothes brought by traders was noticed by French craftswomen. It was among them that this embroidery technique received the greatest recognition and became known as the “French knot,” and this knot was used to decorate the clothes of noble people.
It is best to perform these decorative elements with a sharp needle on finished embroidery that has been washed and ironed.
History and features of the French knot
A similar technique (embroiderers also call such loops “fruzelkas”, “French loops”) allows you to add volume to embroidered work. This type of needlework came to Europe from China. It acquired its name thanks to French women who really liked this method of embroidery.
Goods embroidered using a similar technique, brought by merchants from China, simply captivated French seamstresses with their beauty. They began to actively popularize it among needlewomen, finishing garments of monarchical persons and representatives of the aristocracy with knotted embroidery. Usually decoration was done with gold and silver threads and satin ribbons.
A French stitch is a rounded stitch that protrudes above the surface of the fabric. It has a depression in the middle. This loop resembles a bead or a small bead. Its size depends on the thickness, quality and number of folds of the threads. The tension force, as well as the number of revolutions around the needle, is also important.
Each knot is performed separately, highlighting different elements. For example, snow flakes, flower stamens.
Or they are collected in groups. This is how tree crowns and clouds are decorated. All work can be done only using this technique. The pattern looks expressive, original and impressive. Especially if different shade combinations are used.
master class on creating a knot with threads and ribbons for beginners
The French knot is a technique that allows you to make embroidery voluminous. It has been used for a very long time, first appearing in Ancient China.
However, in Europe it became known thanks to embroiderers from France, who received goods from the Middle Kingdom and copied them, and therefore received the name French.
Contents of the material
What is a French knot?
The French knot is used quite widely in embroidery. It is made using both regular floss and ribbons. It may seem difficult for beginners, but it is enough to study several master classes to create beautiful images using this technique.
As mentioned above, this technique is used to create volume, which is obtained through repeated entwining. The purposes of its use can be completely different. So, this technique will be useful:
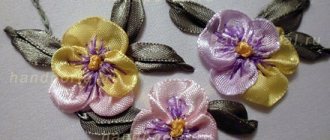
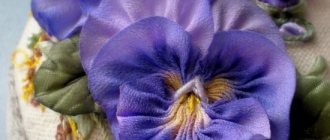
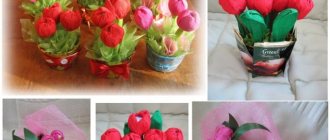
- when embroidering flowers. Here this technique is used most widely, and both threads and tapes are used. Whole buds or just their cores are embroidered. Another application is the creation of voluminous leaves when embroidering wood;
- with its help they make the eyes of animals more expressive, and they often use it to create voluminous animal noses;
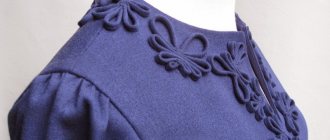
- with their help they decorate both real clothes and clothes depicted in paintings. It was in clothing that the knot was originally used in France - it was used to decorate the outfits of nobles;
- This technique is perfect for simulating snow;
- they use it to depict something voluminous and fluffy - from lamb embroidery to elegant women's hairstyles;
- Using this technique, you can create entire paintings that look very unusual and attract the eye.
Conventional cross stitch patterns, supplemented with this technique, allow you to create interesting and “live” pictures.
Gallery: French knot in embroidery with threads and ribbons (25 photos)
How to perform a knot
Knot embroidery is most often done on top of already finished work to make it more interesting. It should be noted that the work must first be washed and ironed. However, decorating already finished works is not the only function of this technique. There are special diagrams and master classes that show how to create entire images using this technique. Sometimes they use a trick - to create a whole picture using this technique, they use bead embroidery patterns, where each bead is replaced with a knot. There are two ways to create a French knot - using floss and using ribbons. Let's look at each of them.
Embroidering a French knot using floss
- In preparation for work, a canvas is pulled onto the hoop, which should be dense and with small cells. Ideally, the hoop should be fixed, as it is more convenient to work with two hands.
- Fasten the thread on the wrong side and bring it to the front side. The needle is held in the right hand, point forward. With your left hand, wrap the thread around the needle two or three times.
- Then, still holding the thread with your left hand, bring the needle out to the wrong side. The thread should be tensioned so that the eye of the needle passes through it, but not loosely - otherwise the knot will be sloppy. This should be done as close as possible to the needle exit on the front side. The resulting knot must be held while the thread is on the wrong side.
In practice, this process is simple; to understand it better, you can look at the diagrams, of which there are quite a few on the Internet. To create a picture you may need knots of various sizes. It is worth noting that in order to make them larger, you do not need to make more windings, but take a thicker thread. For beginners, the results may be unaesthetic - this is normal, since this technique requires training. Ugly knots can also be due to the fact that the thread gets twisted during embroidery. Do not rush when doing the winding - beginners often forget about this.
We also recommend reading:
Embroidering a French knot using ribbons
The technique of embroidery using ribbons is not very different from embroidery floss, although it has its own characteristics. The use of ribbons makes the picture even more elegant; most often they are used to create buds.
- When embroidering with ribbons, a small tip, approximately one and a half centimeters in size, is left on the reverse side.
- The needle is brought out, the tip is directed to the side, and two windings are made away from you.
- Just as when embroidering with threads, stepping back a very small distance, bring the needle to the wrong side, holding the ribbon so that it is stretched, but the needle can pass through it.
- Carefully, holding the resulting knot, pull the tape out. You shouldn’t tighten it too tightly for the result to be voluminous and beautiful.
Like thread embroidery, French knot ribbon embroidery requires practice. It will take time to learn how to embroider perfectly. The work is framed in thick frames so that glass does not put pressure on them, otherwise the work turns out very sloppy.
Conclusion
Embroidering using the French knot technique is worth learning for those who want to diversify their work with the help of unusual decorative elements. Both small sections of the image and entire paintings made using this technique look very impressive and are pleasing to the eye. A variety of schemes can help you master it, many of which can be found on the Internet. Anyone can learn to embroider French knots - the main thing is to have time and desire, since creating perfectly neat pictures requires practice.
French knot: photo
https://youtu.be/qLl55zuz15Uhttps://youtu.be/6CKfGPiWg1Q
_
Attention, TODAY only!
1igolka.com
Where can the French knot embroidery technique be used?
The French knot in embroidery makes things unusual. Skilled craftswomen use this technique to create unique objects. For example, blankets, towels, bags. They also decorate icons, brooches, and hairpins. They also design entire paintings.
Products embroidered with satin ribbons look very elegant. The author selects their width according to his idea. Narrow strips are used for small details. Such patterns turn out to be convex and lush. They are incredibly attention-grabbing.
Ribbons are used to decorate knitted items, clothing, and interior items. And also accessories. For example, bracelets, necklaces, pillows.
Paintings made in this way look incredibly attractive. Works made entirely using this technique look original. They have their own flavor and appeal. The works, complemented by contour drawings, have a modern look.
Often, with the help of such a technique, only certain moments in the plot are emphasized. For example, tree foliage, images of people or animals, decor in clothing. These can be three-dimensional elements in paintings.
embroidery and its features, master class
Even beginners can embroider using the French knot technique: the algorithm of work cannot be called too complicated, even if it requires a short training of the skill. The paintings obtained using this technology are distinguished by volume and relief, as a result of which French knots are perfect for decorating pillows, blankets, and towels. Moreover, it is not necessary to complete the whole picture in this technology - you can only add accents.
French knot embroidery for beginners: video and highlights
The main question that beginners have is what materials to use for this technology? Unlike the more usual trends in embroidery, the “French knot” is almost always done with ribbons, and most often, satin ones. Threads are not always suitable, since it is very difficult to achieve the required volume with them. The ribbons, with each new turn, will create not just a three-dimensional knot, but a complete element. And depending on the number of turns mentioned, as well as the size and density of the tape, the relief of the pattern varies, as well as what parts can be made with a certain knot. If you work with threads, use floss or wool, and very thin ones will need to be folded 3-4 times.
The volume of knots depends not only on the width and density of the ribbons you embroider with, but also on the size of the needle: larger, thicker needles allow you to form large knots, thin needles allow you to form small and hard knots. And, of course, it’s unlikely to be possible to wind a ribbon 5-6 times on a small thin needle - for this you need a longer needle with a larger diameter. All this is taken into account when studying the idea of a future painting: for example, it is good to add snowflakes to the canvas with small French knots if they are in the form of balls, and with large ones – unopened buds of peonies, roses and other flowers, especially if they are in a wreath.
It is recommended to purchase “gypsy” needles: they have a very long and wide eye, while the needle itself is of medium thickness, and they are ideal for soft and thin silk ribbons, as well as for denser satin ones. Nylon ribbons work well with short gold needles. The advantage of such needles is that they are protected from surface oxidation, which means they will not lose their smoothness. But when working with threads, you can resort to chenille needles numbered 13 and 11.
A lot depends on the fabric: the more uniform its weaving, the more convenient it will be for you to work with it. Fabrics on which punctures spread quickly are not suitable for the “French knot”, since a very thin and small knot can simply fall through the resulting puncture.
French knot: master class
The seam technology is no more complicated than in regular cross stitch: the ribbon is simply wrapped around the needle several times, after which the needle pierces the canvas again, fixing the result. As a result, the entire seam is performed in 3 steps:
- The needle passes through the canvas to the front side, the tape is pulled out to its full length, the needle is placed under it parallel to the canvas.
- The ribbon wraps around the needle in the direction of the craftswoman (clockwise) the required number of times; you need to hold it with your finger, slightly moving it towards the edge to make it more convenient to remove it from the needle.
- The needle pierces the canvas near the exit point and goes back to the wrong side. The tape is led behind it, the knot is smoothly pulled together, but you should not make it too tight, especially if the canvas has wide holes.
Despite the fact that these steps look very simple, sometimes in practice, beginning craftswomen have many questions and mistakes. The main thing is to hurry: you need to pull the ribbon into the knot very slowly so that it does not twist - this will instantly destroy the volume. In addition, the shorter its free part, the easier it is to perform a French knot: its location as close as possible to the outline allows you to avoid accidentally tangling the “thread”. And it will simplify the work even more by lightly pressing each knot against the canvas with the pad of your finger at the moment of its formation. In addition, professionals pay attention to the fact that the direction of twisting the tape should be the same for adjacent elements: this will give the picture integrity and harmony.
The finished knot can be supplemented with small beads or seed beads, placing them along the edges if wide ribbons were used, or in the center for narrow and thin ones. This method of decoration looks most attractive for embroidered flowers, as it gives them realism. In addition, when you master the technology of the “French knot” in 1 ribbon, you can try to add variety - stretch a 2nd ribbon through the same point, in a different color. But this must be done either simultaneously, working with 2 needles at once, or not tightening the knot tightly so that the ribbons can easily connect.
French knot embroidery is perfect for the final finishing of finished paintings: any accents placed with a French knot will immediately attract attention. This is especially true for the combination of the satin surface in which the entire canvas is made and the volumes created using this technique. Knots can easily replace beads, rhinestones and other decorative elements.
lucky-girl.ru
What do you need for embroidery?
Before you engage in creativity, you should prepare the necessary materials and tools.
Threads
Threads are chosen based on intended goals. Darker tones are usually used in the foreground to make the image look more voluminous. The use of a wide range of colors allows you to achieve very unexpected results.
Small details like beads are embroidered using floss. Wool yarn is chosen for large elements. Satin ribbons are used to create three-dimensional flowers. However, you should not take too long threads. They get confused while working. 30 cm will be enough.
Needles
Tapestry needles are used mainly for stitching with ribbons. They have a wide eye and a blunt end. However, you may need regular sewing and beading needles with sharp ends. With their help they embroider with threads.
Fabrics
Fabrics need to be given special attention. Pictures or flowers should be embroidered on thick canvas. Otherwise, the stitches may spread or fail due to the loose structure of the fabric.
In principle, the knotting technique can be performed on any finished product. The main thing is that the matter is dense. And even knitted and knitted items can be trimmed with ribbons.
Other accessories
You also need to prepare other tools:
- scissors;
- drawing diagrams;
- pencils, felt-tip pens, markers of different colors;
- hoop;
- square frames for embroidery;
- carbon paper, graph paper;
- thimble;
- ruler.
Secrets of proper embroidery
To make the embroidery beautiful, smooth and correct, you need to use some tricks in your work. A large, voluminous knot can be obtained by using a thicker thread.
But it is worth remembering that the needle and thread must match each other in thickness - a thick needle and one thread will not result in a beautiful knot, nor will a thin needle with four threads. It is also important to choose the right threads to use - this will affect the appearance of the French knot.
For small bead-shaped knots, you need to take mercerized cotton thread (floss). Mercerized cotton will give the desired effect. Large knots are formed when embroidering with wool thread. The fabric for embroidery should be dense, with a uniform weave. Loose fabric may pull some of the knot stitch to the wrong side.
The rules are simple, and if you follow them, learning French embroidery will not be difficult. And the handicraft will turn out neat, tidy and complete, which is what is required from the finished product.
Traditionally, several elements are embroidered with a knot on the product. In case you want to complete the work entirely using one technique, patterns for embroidery with beads are suitable, only knots will be used instead of beads.
Alternatively, in the proposed cross stitch pattern, you can replace the flowers with the French knot technique. An original product will be created if you use the knotted technique to create a contour embroidery pattern.
So, what is embroidered with a French knot today and how is it made?
Most often, French knots can be found as separate elements in ribbon embroidery and satin stitch embroidery. And if in ribbon embroidery this is one of the main techniques, then in satin stitch embroidery the French knot became widespread with the advent of fashion for applied embroidery in the form of various brooches, as well as paintings framed in hoops.
Using a French knot, volume is added to some embroidery elements. Most often, flowers are created through it. However, in fact, you can embroider almost anything with a French knot, you just have to show your imagination, or use our “tips” - pictures that we have selected especially for you. We hope they will serve as additional inspiration.
How is the French knot performed? First, the thread is secured to the wrong side of the fabric and brought to the front side. Threads are wound tightly onto the needle. Then, holding them with your fingers, the needle is brought to the wrong side of the fabric and the thread is tightened. Notice that the needle is stuck into the fabric near the place where it came out in the first place.
The French knot is made with floss threads or satin ribbons. It can be made either small or larger - it all depends on the thickness of the thread and the width of the tape used in the work, the tension of the thread, and the number of turns on the needle.
You can, in principle, embroider with a French knot on any fabric (Aida or uniform), but you should remember that on loose fabrics with frequent weaves (for example, 11-count Aida canvas), the knot or part of it can stretch to the wrong side.
As we have already mentioned, usually only individual elements of embroidery are embroidered with French knots. However, there are exceptions.
Today, there are very few embroidery patterns using only French knots. If you still want to try to embroider a whole picture using this technique, you can do this, for example, according to the bead embroidery pattern, simply replacing the beads with knots of a suitable color.
You can also experiment with a cross stitch pattern, for example, a contour stitch - also replace each cross with a knot. Isn’t it true, it will be very interesting to wait for the result of the work.
Where can I get patterns for 3D embroidery?
Unfortunately, patterns designed specifically for French knot embroidery are extremely rare. But you can always find a way out.
For example:
- The selected ornaments are transferred to the canvas. Then the designs are filled with multi-colored frizels or sewn along the contour.
- When working with ribbons, sketches for stitching are used.
- They draw the plots of future paintings with their own pencils.
- French knots are made according to patterns used in embroidery, beads or cross stitches. The designations of crosses or beads are replaced by stitches.
What about the French knot? - Arts and crafts fair
I would like to continue my publications on embroidery, and today we will talk about a simple but very effective technique - the French knot.
Here at the Fair, there were many articles devoted to satin stitch, cross stitch and ribbon embroidery, but the French knot was somehow unfairly ignored. And in vain! After all, this technique deserves a lot of attention, since it allows you to add volume and subtle transitions and nuances of color in embroidery. The French knot is beautiful on its own, and in combination with satin stitch, appliqué and ribbons it is especially expressive.
Although this type of seam is called French, it originated in China. French craftswomen borrowed this technique after seeing it on goods imported from China. And the knot got its name because it became very popular among French craftswomen. They decorated the outfits of the nobility and representatives of royal dynasties with this seam.
When we hear the expression “French knot,” we think of something elegant and sophisticated. And indeed it is! This seam gives the work grace and subtle charm.
I invite you to admire the works using this elegant seam, and maybe be inspired to create your own masterpiece using it!)
Inspiration, friends!
www.livemaster.ru
Master class for beginners: step-by-step creation of a seam
Fruzelki give the work a beautiful texture and splendor. Rarely located elements make them airy and light.
Embroidery floss process:
- First of all, a thread is fixed on the wrong side of the fabric.
- Then, in the place where the element will be located, the needle is brought out onto the face.
- Next, it is held parallel to the surface of the fabric.
- Now they wrap the floss with it, making one or several turns. It depends on the desired volume of the part.
- Next, the thread is carefully held.
- Then the needle is brought out to the wrong side.
- It is pulled out from the point closest to the place from where it came out to the front side.
Then the picture is complemented with other loops, if necessary. But they do this after washing and ironing the finished work.
How to embroider with ribbons:
- First, a satin strip of fabric is attached to the wrong side of the product.
- Then she is taken to the front side.
- Next, the ribbon is pulled tight, and then the needle is inserted from below.
- Then they make one turn clockwise around the needle.
- Then they step back slightly from the initial puncture point, and the needle is stuck into a point located directly next to it.
- Next, the ribbon is moved to the tip of the needle. It is pulled up, forming a not too tight Frenchie.
- Then the needle is pushed through the knot. It is pulled out from the inside out.
- The satin strip is then pulled to complete the creation of the piece.
Here the size of the satin bead depends on the width of the strip.
How to make a seam - instructions
For some, it may be enough to see in a schematic image how this stitch is performed:
If you want to master the French knot technique, you need to remember the following:
- It is best to embroider on fabric secured in a hoop, because well-stretched fabric frees the embroiderer's hands, and both hands are required for accurate and coordinated work.
- The thread must be secured on the wrong side and the needle brought to the front side in the right place.
- Make one or several turns of thread around the needle and bring it to the wrong side of the work as close as possible to the initial puncture; pull the thread slowly, without haste. Be sure to pay attention that the thread is straight and not twisted - the quality of the element depends on this.
- A more even knot is obtained if you start forming it as close to the outline as possible.
- After the needle has finally reached the wrong side of the work, you need to press the knot formed on the front side with your finger. This will help the stitch form neatly.
- It is important that the knots within one part “twist” in one direction.
To achieve success, it is advisable to know small tips and tricks that will definitely help you in your work.
Thickness of needle and thread
A larger knot is obtained by using thicker thread. It is very important that the threads and needle match each other in thickness. It is unlikely that you will be able to make a beautiful element with a thick needle of one thread, just as it will be difficult to make a knot of five threads with a thin needle.
Thread and fabric material
If you need small knots in the form of beads, then you need to take mercerized cotton threads, for example, floss, they will create the desired effect. If you make a knot with woolen threads, it will turn out completely different, much larger in size. It is better to choose fabrics for embroidery with a dense, uniform weave, since on loose fabrics with holes, part of the stitch may be pulled to the wrong side.
Beautiful diagrams and description of work using the French knot technique
Now on the Internet there are various schemes using French.
The French knot in embroidery adds volume to the paintings where it is needed. Therefore, the stories become interesting and unique.
Combinations with cross stitch
Fruzelki are often combined with cross stitch:
- they are used to decorate the face and body of animals, so they look more realistic;
- This technique allows you to emphasize foliage on trees or flower petals.
- Using this method, clouds, the sun, and other natural and climatic phenomena are created.
Raindrops and a sunny or cloudy day are also depicted as knots. Other elements of the picture are embroidered with a cross. Lilac flowers look quite natural if you decorate them using the French fruzel technique. A dog's nose or eyes sewn in this way will look quite realistic.
However, it is permissible to embroider only small fragments on panels. Only then does the work look more harmonious. Almost any needlewoman can cope with such a technique, knowing its basics.
Step-by-step instruction:
- First, use a needle to pierce the underside of the fabric. Then she is brought out onto her face.
- Next, the floss is taken with the left hand. It is held with two fingers approximately 3 cm from the surface of the canvas. The thread is pulled.
- Then the thread located between the outline and the fingers is wrapped twice around the needle.
- Be sure to make sure that the turns do not unravel.
- The needle is then inserted into the fabric at the point where the working thread comes out.
- Next, it is pulled inside out.
A knot like this is not at all difficult to embroider. The presented technique can be used in almost any work. More detailed instructions are available only in specialized books or thematic magazines.
It is worth saying that the described method is almost no different from the technology that came from the Middle Kingdom. In the Chinese version, not two twists are made, but one turn around the needle.
The French knot in embroidery fits well on regular fabric. It will not slip through its fibers. But most often they sew with a cross on canvas. And its structure is distinguished by rather large distances between the threads. Therefore, such elements may well not be tied or slip into them over time.
It is necessary to adhere to certain rules when working in order to avoid such situations:
- it is preferable to use thick woolen threads or floss folded several times;
- a large number of turns should be made around the needle;
- It is best to choose a canvas with the smallest cells.
When choosing one of the above methods, you need to practice more in working with knots in order to determine for yourself which of them will be the most acceptable. This is how experience is gained.
Often, beginning needlewomen are interested in: “Which pattern to choose with knotted elements?” The answer is quite simple: “Absolutely any guide used in cross stitch will do.”
For example, a winter landscape with snow made in knots or the Eiffel Tower rising against the background of the night sky, where the stars are depicted in a similar way.
A lamb or ewe is depicted in the same manner.
And a novice needlewoman can easily master this simple embroidery pattern:
- First, a sketch of the animal is drawn onto the canvas.
- Then the sheep's face is made with a cross, and the fur is embroidered with French stitches.
Black and white wool threads are used.
Combination with ribbon embroidery
Ribbons give the works splendor and make them voluminous. For example, they can be used to embroider the “Lilac” panel.
Required list of materials and tools:
| needles | You should take special tapestry |
| drawing diagram | Embroidery is carried out on it |
| copy paper | With its help, you can translate your favorite ornament. |
| fabric (curtain fabric) | A plot is embroidered on it |
| silk and satin ribbons | They embroider the ornament |
| frame | The finished product is designed into it |
Progress:
- First of all, the drawing should be transferred to the canvas. Any pictures can be used as a basis.
- Copy paper is placed on the fabric, and the diagram is simply traced with a pencil.
- Next you need to take a lilac ribbon.
- It is threaded into a needle, and then brought out from the inside to the front side. Leave a small free end of 1.5 cm.
- Then the index finger is placed on the ribbon. They make one turn, and then they bring it out to the wrong side. The remaining loops are created in the same way.
- In this case, it is necessary to ensure that from the inside the needle does not fall into the ribbons embroidered earlier.
- Next, the buds are made. The needle is inserted on the front side.
- Then the ribbon is laid on the canvas, retreating slightly.
- The needle is again stuck directly into the ribbon. Afterwards it is pulled out inside out.
- It should be noted that the larger the indent, the larger the bud.
- Using this technique, the entire stencil is filled.
- Next, the stem is depicted. Take floss and simply embroider it with satin stitch.
- Then the panel is framed.
The French knot in embroidery allows you to create magnificent paintings.
Other flowers are also created using a similar technique. For example, forget-me-not buds.
Description of work:
- First, the tape is pulled onto the front side of the fabric. Leave a 1 cm tip on the inside.
- Next, the strip is pulled tight. Afterwards it is thrown over a needle about a centimeter from the canvas.
- Then the needle is wrapped with satin, making a couple of turns. They still continue to tighten.
- Then the end of the needle is injected 1 mm from the insertion point.
- Next, it is brought out on the wrong side, pulling out the tape.
You can also create a flowering tree.
Materials:
- satin ribbons in white, beige and pink shades measuring 0.4 mm.
- floss in brown tones;
- needles;
- hoop;
- scissors;
- scheme;
- thick fabric;
- frame.
Work process:
- To begin with, the wood pattern is transferred to thick fabric.
- Then the canvas is threaded into the hoop.
- Next, the outline of the trunk is embroidered with a wrapping stitch. Then its bark is isolated. The floss is taken in 3 additions.
- Then simply wrap around the intended stitches. Use threads of several brown shades.
- Then the crown of the tree is sewn together using a French knot. The elements are arranged according to the picture or in the desired order.
- This is a small panel with an area of 10 X 15 cm. Therefore, one turn is made around the needle with a satin strip.
Pure French embroidery on fabric
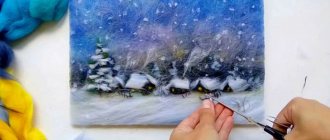
A French knot in embroidery can completely decorate the entire panel. A striking example of this is the painting “sunflower”
Necessary materials:
- floss, woolen threads, and iris;
- linen 100;
- scissors;
- hoop;
- needles;
- saucer;
- pencil.
Step-by-step instruction:
- First of all, draw a circle using a saucer.
- Then it is divided into 3 parts.
- Then they draw sunflower petals.
- You can also simply transfer the image of a flower onto the canvas, and then fill the spaces with embroidery.
- Next, they begin to sew the middle. Here you can take thicker green threads.
- Then they embroider with “lemon” floss.
- The third part is sewn with dark brown or black threads.
- Then the boundaries are “blurred” by adding orange and also brighter yellow tones.
- When the base is ready, the petals begin to be filled with knots.
- Upon completion, the work is framed.
The “sakura blossoming” panel will look good in any interior.
You need to prepare:
- dark brown wool threads;
- white, peach, pinkish floss;
- needles;
- hoop;
- scissors;
- diagram;
- simple pencil.
Description of the work process:
- First, the diagram is applied to the canvas or the tree is drawn by hand.
- Then the trunk is stitched using satin stitch using wool threads.
- Stitches are also placed over sewn seams. This will make the bark look more textured.
- Then they sew the twigs.
- Next, the sakura crown is embroidered with French stitches. The floss is taken in 4-6 folds to make the pattern more voluminous. The colors are arranged in a chaotic order.
- The finished painting is framed.
A children's room can be decorated with a spectacular owl. The pattern is suitable for cross stitch.
You should prepare:
- floss in red, brown, yellow shades;
- white, burgundy cotton threads;
- needles;
- sketch on paper;
- scissors;
- hoop;
- transfer tracing paper.
Completing of the work:
- First, the ornament is transferred to the canvas.
- Next, the bird's eyes are embroidered with black threads. Whites use owls and backgrounds for “glasses.”
- Then the head, middle of the body, and also the tail are filled with red knots.
- Then the paws and nose are sewn with yellow floss.
- Next, the frame of the body, consisting of 4 - 5 rows, is embroidered with brown or burgundy threads.
- And finally, the branch with the crown is sewn with brown floss.
This technique looks good in monochrome. For example, a bird.
What you will need:
- cross stitch pattern;
- floss of any desired shade;
- needle;
- scissors;
- hoop;
- tracing paper
How to work:
- After applying the design to the fabric, it is filled with French loops.
- Each knot is embroidered in the place where the cross should have been located.
- The background can be sewn with threads of different colors as desired, or left as is.
- The work is then placed in a frame.
The French knot looks beautiful in any embroidery. For example, you can make a picture, a landscape in black and white. And then use knots to place red accents. Artists also use a similar technique.
Small features
Many needlewomen recommend roughly dividing the intended design into 5-10 parts and embroidering everything one by one. They do not advise making a pattern in one color at first, then abruptly switching to a second one. As a result, it may turn out that as you embroider, the pattern will not come together. Everything must be done gradually. It is better to start from the extreme top or bottom corner and work towards the opposite. Then repeat the same action with the other row. Continue this way until the full picture is embroidered.
You might be interested in this All about hoops for cross stitch and bead embroidery: we do it ourselves
Some people advise focusing on specific details and then moving on to others. For example, if the drawing is supposed to embroider a tree, sunset and roses, then first you need to finish the tree, and then move on to the background and finally to the roses. In addition, this way the color balance will be maintained and a lot of irreparable errors will not occur. It is better to add accessories not included in the kit at the very end. This way it will be clear whether it is needed or not.
A simple scheme for forming a nodule
Where to get the image
Choose schemes based on your skills and desires:
- For cross stitch or bead embroidery. It is enough to make each cross or square with a knot of the corresponding color. Such patterns are suitable for full-fledged French knot stitching.
- Outline drawing. Simply transfer the embroidery design onto the fabric and move the stitches along the outline.
- Designed for the French. Close to the contour pattern, but supplemented with other satin stitches (for example, knotted flower patterns, and a stem stitch for twigs and stems).
As you can see, you can adapt any painting, image or ornament. The main thing is to confidently hold the needle in your hand and be in an inspired mood for new masterpieces.
Choose threads that match the texture of the image. The bead effect will be achieved using metallized or mercerized floss. Woolen ones form a soft fluffy knot.
Execution order
Here are the step-by-step steps to creating a voluminous and beautiful French knot:
- Bring the needle to the front side at the point where you will form the ball.
- If you are right-handed, then pull the thread with your left hand almost at the very puncture point, and with your right hand wrap the tip of the needle with the stretched piece of floss the required number of times.
- The left hand does not let go of the thread so that it does not sag.
- With your right hand, pierce the fabric with a needle near the site of the first puncture.
- Continuing to pull the thread, use your right hand to push the needle to the wrong side.
- Make sure that the threads on the needle do not loosen or jump off.
- Slowly and carefully tighten the thread on the wrong side, holding the threads on the right side of the fabric.
- A knot should form near the canvas itself. The winding strength and number of turns will affect the size of your knot.
Try making a French knot slowly the first time. Try to feel the tension in the floss and adjust the turns if necessary. Over time, you will begin to do knot embroidery faster than cross stitch.
master class with photo and video lessons
Fruzelki or Frenchies - these little knots also have such an interesting name. In this embroidery method, not only threads are used, but also satin ribbons; such embroidery looks very beautiful on clothes, it will make her look chic. Also, when embroidering this way, the work looks very voluminous. In this master class we will look at French knots in embroidery using videos and descriptions.
Description of the French knot
The volume of the knots depends on the number of threads, the size of the tape, the tension and the number of revolutions of the thread.
This technique is used to give the work volume and convexity. If you apply this method to embroidering flowers, you can give them different sizes, for example, they look great in large dahlia flowers or the middle of redbeckia. Smaller knots are used for embroidering various inflorescences, for example, hyacinth, or in embroidering ears of corn.
Well suited for items that are embroidered in the background. Knots look very voluminous in the creation of paintings, if you embroider volumetric clouds or clouds, the sea, in embroidering the eyes and noses of animals. If the paintings depict people, it looks very original if you embroider dresses or hairstyles. Embroidery looks beautiful if you use this technique in separate stitches.
Step-by-step French knot technique
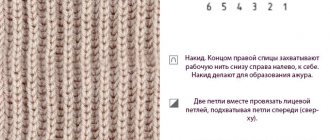
We fix the canvas into the frame and stretch it. When doing this type of embroidery, it is advisable to have your hands free to secure and hold the knots. We fix the thread on the reverse side from the front side. And we point the needle on the face to the place where you need to make a knot (place 1). We make turns according to the diagram and point the needle to the wrong side (place 2), as close as possible to place 1. Next, we bring the thread to the wrong side.
Nuances when embroidering
- You need to pull the thread or ribbon very carefully and do not rush.
- The thread must not be allowed to twist; it must be ensured that it is even and straight.
- You need to hold the thread with your fingers to the very edge. If you start making a knot closer to the outline, the result will be smooth and neat.
- The thickness of the needle should be equal to the thickness of the thread; if you embroider a knot in one thread with a thick needle, it will look sloppy.
- It is better to wrap the needle around the thread closer to the canvas.
- To make the knot look more accurate, you can make one turn instead of those drawn in the diagram, but you need to choose a thicker thread.
- Do not pull the thread too hard when turning the needle, this will make it difficult to bring the needle to the opposite side, which will lead to an untidy knot.
- When you finish bringing the knot to the back side, press the knot. Thanks to such actions, it will lie flat on the fabric and will be more neat.
- If the threads of the knot stick out or bristle, when correcting it, you need to pull them out one at a time.
- It is more convenient to perform French knots at the end of the work, after embroidering all the seams.
Small tricks
— When embroidering small knots, it is better to take threads like floss, they will create a convexity and the desired effect.
— It is better to take a canvas that is dense and evenly woven; with large holes, the stitches can stretch to the wrong side.
Embroidery ribbons
We bring the tape with the needle onto the face, slowly tighten it, slipping the needle under it and stepping back from the place where the needle was inserted. We put the ribbon under the needle and make one turn around it to the right, we put the needle next to the first place where the needle is inserted, we move the ribbon to the end of the needle and pull the knot. We don’t need to make it very tight and dense, we will need to push the needle through it, then point it to the opposite side of the front side, tighten the ribbon again and make a slightly tight knot, without pulling the ribbon.
In ribbon embroidery, using knots, you can make the middle fragments of a flower, only the turns need to be done from right to left, and next time we pierce the canvas not next to the first place, but at the end, and we will get a leg.
In ribbon embroidery, the size of the knots depends on the size of the ribbon and the number of ribbon turns around the needle.
Following simple skills will help make such a knot more neat and will prevent it from falling apart, there will be no fluffiness and sticking out in different directions, which will give the work a more sophisticated look.
You can give the painting a more impressive look if you do not embroider several knots, but take the embroidery pattern for beaded paintings and make knots instead of beads. You can embroider patterns with flowers for cross stitch using the knotted method - it will turn out very original.
It looks very unusual if the contour pattern is embroidered using knots. To create perspective, it is better to use a sharp needle on the finished embroidery.
It is best to frame finished paintings under a multi-layer mat so that the glass does not press too hard against the work, and the painting will look more voluminous.
Happy creativity!