With the arrival of spring, many flowers bloom in forests, fields, and flower beds. Their delicate petals captivate the subtle female souls, and they want to transfer natural beauty to their clothes.
In this master class, I will teach you, dear needlewomen, the art of bringing embroidery close to nature.
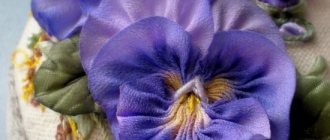
So, we have ribbon embroidery of pansies in which they will take on a beautiful and delicate appearance, just like in nature.
Embroidery with pansies ribbons
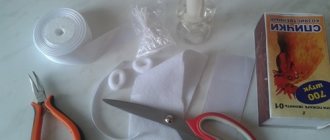
You need to decide what will be decorated with flowers: a dress, an apron, a nightgown or a lady's summer handbag. To work you will need:
- matching fabric;
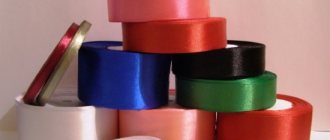
- ribbons for flowers need a width of 13 mm;
- ribbons for leaves - 7 mm;
- tapes for the middle - 4 mm;
- hoop;
- scissors;
- embroidery threads;
- needles.
For each flower you will need two colors of ribbons - you can select them from the photo, or it is better to look at the real flowers in the flowerbed in order to more accurately determine the richness of shades.
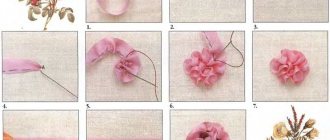
So, we make a flower from a satin ribbon. The pansy flower consists of two parts, which we will assemble in a certain way. For the lower part of the flower, consisting of two petals, take a ribbon 7 cm long (ours is yellow) and, using tailor’s needles, chop it in half at an angle. We did exactly the same thing in master class No. 3.
Next, we sew along the chipped edge with a basting stitch, beveling the corners diagonally.
For the upper part of the flower, consisting of three petals, you need to take a ribbon of a different color (ours is lilac) 10 cm long and, conditionally dividing it into three parts, fold it and cut it with needles.
We also sew the pinned tape along the edge, beveling the edges.
The stitched parts of the flower must be pulled together and the gathers secured with small stitches to prevent them from unraveling. Now, in our ribbon embroidery, pansies take on their natural image.
Now you need to sew both parts together, with the lower part overlapping the upper.
Colonial knot
We place the pansy flower in the place allocated for it in the embroidery with ribbons and fix it with a needle. We fill the middle with a seam called a colonial knot (it turns out to be denser and is more suitable for the middle than the French one). We stretch a yellow ribbon (4 mm wide) through the hole in the center of the flower, straighten it, and pick it up with a needle like this:
Next we wind the ribbon onto the needle in a figure eight pattern.
We stick a needle near the exit point of the tape and pull the knot tightly.
We stretch the ribbon, forming a knot, cut it and fasten it on the wrong side.
Using purple embroidery threads, we sew strokes of different lengths on top of the flower, diverging from the center (this way the flower is sewn to the base). Well, are you able to embroider pansies with ribbons? Let's continue.
We add leaves, which we embroider with a “loop in a fastener” stitch (how such a stitch is made, you can see in our previous master class Sasha embroidered with ribbons) and the first flower is ready, you can start making the rest.
Our next master class on embroidering pansies with ribbons has come to an end. Was it useful to you? Soon we will embroider a picture with ribbons, where pansies will definitely take their place. So you can practice for now. ????
The next master classes will be no less interesting and educational. Subscribe to our RSS feeds and you will be the first to know all our handicraft news. See you on the pages of our home crafts blog - https://handportal.ru/!
Source: https://HandPortal.ru/vyshivka-lentami-anyutiny-glazki.html
Trying to make a flower with a contrasting center
We present to your attention a small master class that will teach you how to make a violet flower from satin ribbons with a center of a different color.
Take ribbons of 3 colors (yellow, purple and black) and cut 3 squares from black ribbon. size 3×3 cm, purple-3 and yellow-2 pcs. with size 5?5. Light colored silk cord for the middle.
Use yellow leaves to make a petal like a fan.
Fold the square in half to form a triangle of 2 layers.
Holding the nose of the triangle, lower the wings (sides) down. The result is a fold.
Now we turn the leaf over and repeat the previous action.
We correct the folds, pinch with tweezers, cut off the excess and singe (melting so that the petal does not fall apart).
Let's make leaves from purple and black at the same time. Fold both squares into a triangle and on top of each other.
Then do everything as in the previous sheet, only at the same time with two squares folded together.
We slightly deepen the middle of one of the petals with our finger towards the center, pinch it and melt it.
Assembly. Glue the yellow petals together as in the photo.
Tie the cord and glue it into the center of the two-color petals.
Glue 3 petals and glue the yellow petals, the flower is ready.
Pansies - ribbon embroidery
In the sea of everyday worries and problems, I want to surround myself with beauty and home comfort. Decorative pillows have always been an element of home decor. Each craftswoman decorated these “lumps of comfort” in her own way. Ideas for creativity can be drawn from the well of nature. This is the cute little pillow I came up with, and I was inspired to create it by the gentle “pansies” in the flower bed near the house.
How to sew such a pillowcase for a decorative pillow will be discussed in our master class.
For work we will need white fabric for a pillowcase, cotton embossed lace 2.5 cm wide, satin ribbons width. 13mm pink, lilac and two shades of yellow, grass-green ribbons wide. 4mm and 7mm, bright yellow ribbons wide. 4mm green and purple embroidery threads, needles, scissors, hoop.
The first stage of work is embroidering a heart from “pansies”
Cut the fabric to the size of the pillow with 1cm seam allowances on all sides, draw heart-shaped branches schematically with a simple pencil and stretch the fabric onto the hoop. Using grass-green threads, we begin to embroider the branches using a buttonhole stitch.
Now we need to make 6 colors. Each flower consists of ribbons of two colors: yellow and lilac, pink and lilac, yellow and pink. For 1 flower, cut two pieces of ribbons of different colors, 7 cm and 10 cm. We singe the edges of the ribbons so that they do not fray.
For the lower part of the flower, take a 7cm ribbon, fold it in half at a right angle, secure it with a pin and sew it with a basting stitch diagonally from one corner, then along the edge of the ribbon and again diagonally to the second corner.
We fold a 10 cm long ribbon like this: divide it into three parts, bend the outer parts at right angles downwards and secure with pins. Next, we sew from the corner diagonally to the edge of the tape and along the edge of the entire tape to the second corner, also diagonally.
The stitched fragments are carefully pulled together and hemmed.
We connect both parts of the flower, placing the upper three-petal part on the lower two-petal part.
We also sew the bases of the remaining 5 flowers. You should end up with 3 pairs of pansies in different color combinations. We place them on the embroidery and pin them with pins.
Now in the center of the flower we embroider 1 colonial knot with a 4mm bright yellow ribbon. To do this, pick up the tape drawn in the middle with a needle away from you (initially the needle should lie on the tape).
- With your left hand, we wrap the ribbon behind the point of the needle (the ribbon lies in a figure eight), tighten the knot on the needle, stick it in near where the ribbon comes out and pull it out on the wrong side, forming the center of the flower.
- We embroider colonial knots in .
- Using purple embroidery threads, we make random straight stitches from the center of the flower, coloring the middle and, at the same time, sewing the flower to the base.
Using 7mm grass-green ribbon, we embroider the leaves near the “pansies” using a single loop stitch. We bring the ribbon out at the edge of the petal, stepping back 2mm, stick the needle in and, without pulling it through, poke it out to the length of the leaf. Next, we draw the ribbon around the tip of the needle and pull it through the fabric. Secure the resulting loop with a short stitch.
- We embroider three leaves near each flower.
- On top of the ribbon with green embroidery thread, on each leaf we sew 3 stitches in the shape of a chicken foot.
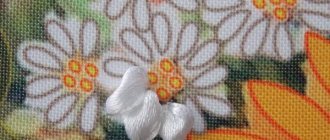
Let's try to make delicate satin daisies with our own hands
Daisies can be embroidered with satin ribbons in two ways. Everything will depend on the size of the flower. It is better to embroider large and large flowers using the "attached loop" stitch. Small daisies can be embroidered using a straight stitch.
Let's remember how the attached loop is made. We remove the tape from point A, form a loop from it and, holding it with a finger, insert the needle into point B, located near point A. We remove the needle to the outside at point C, which is located at the top of the loop on the inside. Now grab the top of the loop and pull the needle to the inside. You will get a loop attached to the fabric.
Ribbon embroidery of pansies. Master class No. 5
With the arrival of spring, many flowers bloom in forests, fields, and flower beds. Their delicate petals captivate the subtle female souls, and they want to transfer natural beauty to their clothes.
In this master class, I will teach you, dear needlewomen, the art of bringing embroidery close to nature.
So, we have ribbon embroidery of pansies in which they will take on a beautiful and delicate appearance, just like in nature.
Pansies
Embroidery with pansies ribbons
You need to decide what will be decorated with flowers: a dress, an apron, a nightgown or a lady's summer handbag. To work you will need:
- matching fabric;
- ribbons for flowers are needed 13mm wide;
- ribbons for leaves - 7mm;
- tapes for the middle - 4mm;
- hoop;
- scissors;
- embroidery threads;
- needles.
For each flower you will need two colors of ribbons - you can select them from the photo, or it is better to look at the real flowers in the flowerbed in order to more accurately determine the richness of shades.
So, we make a flower from a satin ribbon. It consists of two parts, which we will assemble in a certain way. For the lower part of the flower, consisting of two petals, take a ribbon 7 cm long (ours is yellow) and, using tailor’s needles, chop it in half at an angle. We did exactly the same thing in master class No. 3.
Pin up the tape
Next, we sew along the chipped edge with a basting stitch, beveling the corners diagonally.
We sew the tape along the edge
For the upper part of the flower, consisting of three petals, you need to take a ribbon of a different color (ours is lilac) 10 cm long and, conditionally dividing it into three parts, fold it like this and cut it off with needles:
Fold and chop
We also sew the pinned tape along the edge, beveling the edges like this:
Flashing
The stitched parts of the flower must be pulled together and the gathers secured with small stitches to prevent them from unraveling. Now, in our ribbon embroidery, pansies take on their own image.
We tighten and secure
Now you need to sew both parts together, with the lower part overlapping the upper.
Sew both parts into a flower
We place the flower in the place allocated for it in the embroidery and fix it with a needle. We fill the middle with a seam called a colonial knot (it turns out to be denser and is more suitable for the middle than the French one). We stretch the yellow ribbon (4mm wide) through the hole in the center of the flower, straighten it, and pick it up with a needle like this:
Stretch the yellow ribbon
Next we wind the ribbon onto the needle in a figure eight pattern.
We wind it with a figure eight
We stick a needle near the exit point of the tape and pull the knot tightly.
- Pull the resulting knot
- We stretch the ribbon, forming a knot, cut it and fasten it on the wrong side.
- Bring it inside out and secure it
Using purple embroidery threads, we sew strokes of different lengths on top of the flower, diverging from the center (this way the flower is sewn to the base). Well, are you able to embroider pansies with ribbons? Let's continue.
- “Drawing” strokes with threads
- We add leaves, which we embroider with a “loop in a fastener” stitch (how such a stitch is made, you can see in our previous master class Sasha embroidered with ribbons) and the first flower is ready, you can start making the rest.
- Adding leaves
Our next master class on embroidering flowers with ribbons has come to an end. Was it useful to you? The next master classes will be no less interesting and educational. Subscribe to our RSS feeds and you will be the first to know all our handicraft news. See you on the pages of our home crafts blog - https://handportal.ru/!
Source: https://kaprizylka.ru/284-vyshivka-lentami-anyutiny-glazki-master-klass—5.html
Origins of technology
The word kanzashi itself came to us from Japan. At first it was called stick-shaped hairpins, decorated with simple elements - wooden beads and metal trim. Japanese culture is so multifaceted that each caste wore its own type of hairpins, which differed not only in decoration, but also in material. Their number in the hairstyle was also important.
With the advent of silk brought from China, hairpins began to be decorated in a special way. Craftsmen created unique compositions from small pieces of fabric. They were folded in a special way and glued together using rice glue. Each master independently dyed pieces of silk using natural dyes. They tried to create compositions as close as possible to real flowers. Traditional clothing began to consist not only of kimonos, but also of kanzashi, decorated with complex and rich floral motifs. In Japan, it is customary to distribute the traditional calendar into 28 seasons. For each season, a certain shade of clothing and symbolism is selected, for example, March is characterized by yellow kimonos and hairpins decorated with peach flowers, daffodils and peonies. Quite often, butterflies, birds and dragonflies are made using the kanzashi technique, which are an indispensable adornment for Japanese women.
Gradually, the art of kanzashi penetrated into Europe and was greatly liked by the simplicity of the technique and the indescribable beauty of the finished products. Europeans did not attribute any sacred meaning to the art of creating flowers from fabric, so for convenience they used satin ribbons made in factories. The technique itself transformed and changed, and floral arrangements became decorations not only for hairstyles, but also for clothing, jewelry, and interior decoration.
Related article: Square crochet motifs for a cardigan: patterns with photos and videos
In addition to traditional flowers, a wide variety of products appeared - crowns, snowflakes, boxes, and various interior compositions.
Embroidery with ribbons “Pansies”
Today we will make a flower from silk ribbons, it seems to me that pansies are especially natural. You can decorate absolutely any thing with it: a hairpin, a daughter’s dress, any blouse.
We take gabardine, a hoop, a needle, scissors and ribbons of different colors, 25mm wide.
Making the top petals.
We cut the tape 13-15 cm, fold it in half and start stitching, first we go up.
Then we stitch down.
Next we go halfway and up.
We stitch again, going down.
We sewed the entire bottom and finished our top petal.
Next you just need to tighten the tape and strengthen the petals by stitching them.
The top part of the flower is ready. The bottom one is also stitched, but we divide the tape into 3 parts.
They stitched and pulled.
Now we sew the 2 parts of the flower together.
Sew the flower to the fabric and embroider the stamen with 6mm yellow ribbon.
We embroider the stamen with a French knot.
Now how could it be without stems and leaves? I took green silk threads - here are the thin stems.
After this, we embroider the leaves in the usual way.
- Here are the main points of embroidering pansies, just sew it and decorate the thing you need with it!
- Happy creativity!
- Marina Krylova VL
Source: https://masteraiumniki.blogspot.com/2016/08/blog-post_82.html
Master class: embroidery with ribbons of flowers
The most spectacular ribbon embroideries are, of course, flowers. The flowers are very voluminous and realistic. A small master class on embroidery with satin ribbons of bright colors will help you learn how to decorate clothes, pillows, or simply create compositions and make them part of your home interior.
You can embroider any flowers with ribbons: roses, daisies, pansies, asters and many others. Wildflowers for beginners can be the first lesson. To embroider them you don’t need to know how to make complex stitches, but the composition will turn out very bright and sunny in summer. In our master class you will see all the basic principles of work.
We study a master class on ribbon embroidery of poppies with diagrams and descriptions
The poppy is rightfully considered one of the brightest wildflowers. It is difficult not to notice it in a clearing among its other inhabitants, due to its bright red color.
To create a poppy bouquet from ribbons you will need: satin ribbons of various widths, red, green and dark green, fabric, beads, threads and of course a needle.
The first step is to draw flowers and stems on the fabric in order to know exactly how the picture will be positioned. It is better to place them in the center of the fabric.
We take a red ribbon and sew it along the edge to then tighten it. We lay out a flower from the pulled ribbon onto the fabric and carefully sew it on with small stitches to match the ribbon.
We fill the middle of the flower with a French knot, and you can also decorate it with beads.
The size of the poppy will depend on the width of the ribbon. Buds of flowers that have not yet bloomed can be made using straight stitches. The size of the bud will depend on the length of the stitch. You can use a stem stitch to sew poppy stems.
Let's try to make delicate satin daisies with our own hands
Daisies can be embroidered with satin ribbons in two ways. Everything will depend on the size of the flower. It is better to embroider large and large flowers using the "attached loop" stitch. Small daisies can be embroidered using a straight stitch.
Let's remember how the attached loop is made. We remove the tape from point A, form a loop from it and, holding it with a finger, insert the needle into point B, located near point A.
We remove the needle to the outside at point C, which is at the top of the loop on the inside. Now grab the top of the loop and pull the needle to the inside.
You will get a loop attached to the fabric.
Third option. Making silk pansies quickly and easily
Flowers like pansies amaze with their variety of colors. So don't limit your imagination. Feel free to make pansies from ribbons of any color. And if you take a ribbon of different widths, then the flowers will turn out to be different sizes.
A pansy flower consists of lower petals and upper petals. Each petal is sewn separately before being sewn to the fabric. It’s better to take two colors, so the flower will be more interesting.
For the upper petals, the ribbon should be laid in a V shape, secured at the bottom with a pin and stitched along the outer edge. For the lower petals, the tape must be laid in a U shape, each fold should be secured diagonally and also stitched along the outer edge.
Pull the stitched ribbons together, secure each one with small stitches, and then fasten them together. The center can be decorated with beads. Sew the finished flower to the fabric.
Cornflowers are truly summer and delicate flowers that carry a piece of the sky. To create them, you can take several shades of blue.
For cornflowers, it is better to take a narrow ribbon, 0.5 cm is quite suitable. Embroider them with a regular straight stitch around the center. The main thing is that they are different in length and layered on top of each other. Thanks to this, the flower will be more realistic. The center can be filled with knots or beads.
Patterns for embroidering wildflowers: how to transfer to fabric
Very often, patterns are simply drawn by hand on the fabric. But if you don’t have artistic abilities, then you can use ready-made patterns and simply transfer them to fabric. It's very easy to do.
Tools for work
Every housewife knows that the quality of the entire composition depends on the correctly selected instrument.
For ribbon embroidery you will need:
- Hoop. The better the base for the composition is stretched, the better the result will be. The hoop must be selected according to the size of the future painting. If you are planning a small job, you can use a hoop with a diameter of 10 cm. If the picture is of impressive size, you will have to use a large hoop, namely a stationary one.
Special or tapestry needles. Embroidery with ordinary sewing needles is not possible in this case. The ribbon should fit easily into the needle. The needle size can be from No. 13 to No. 18. A No. 26 needle is also required for beads. It is best to use blunt needles. They will not cling to the warp and move the warp threads apart perfectly.- Lighter. Cut ribbons must be singed immediately to prevent them from unraveling.
- Scissors.
- An awl if the work is planned to be done on a thick base.
- Floss threads. A flower stem embroidered with floss will fit perfectly into any composition.
- Paints for fabric or batik. Used to achieve more dramatic shades.
The quality of the tools should not be neglected. It is better to purchase a quality tool once that will last a long time.
Ribbon embroidery for beginners step by step
You can embroider not only with threads, but also with ribbons, and it turns out very colorful and elegant.
You can make beautiful flowers using this method, for example, cornflowers with butterflies, pansies with basket embroidery, landscapes of tulips or poppies, gerberas, lilacs, spring flowers lilies of the valley, where the leaves are not as difficult to make as it seems, or a bouquet of chamomile flowers with peonies or irises, gladioli.
You can make a beautiful basket for March 8th with roses, containing a few rosebuds. Christmas trees made using this technique look original. Today’s material will be useful for beginning needlewomen: in it we will tell you step by step, with a video and description, about ribbon embroidery.
Embroidery with lilac ribbons: instructions for beginners step by step
- We will need:
- — Satin ribbons 4 mm, 6 mm, 1 cm and 2.5 cm.
- - Threads.
- - Candle.
- - Print.
Progress
We start the work with the buds, take 4 and 6 mm tape and sew the edges of the branches. We direct the tape to the outer part and wrap the needle. Now, having measured 0.5 centimeters from the end of the ribbon, we stick a needle into the material, as a result a French knot is formed on the leg, and we direct the ribbon to the wrong side - this is the first bud. This way we do everything else.
Now on top of the buds, we embroider with a wider ribbon and larger buds of a slightly different shade. As a result, the embroidery turned out to be more voluminous.
Next, we proceed to the inflorescences, cut the ribbon 1 cm wide into strips of 12-15 cm, singe the ends and make 4-5 folds, sewing on the petals. Next, we sew the petals in different directions, then we sew them at the bottom to the fold, and we do this until the end of the ribbon. One petal is stitched and we go up and down again.
When the ribbon is stitched, 4 petals have formed, we tighten the inflorescence and sew on the wrong side in the middle. Now we sew the inflorescence to the branch, not forgetting to step back from the buds. Next, fill the entire branch with inflorescences.
We take the yellow threads and make the middle in one twist on the needle.
For the leaves, take a 2.5 cm ribbon. We direct the ribbon to the face of the product, measuring 3-4 cm, and direct the needle in the center, going out to the wrong side. We do this for all the foliage.
Take a 2.5 cm brown ribbon and make branches. We direct the tape from the beginning of the branch to the end, twisting it a little. We twist it, point the needle at the face and go to the wrong side. We sew the tails of the ribbons on the inside with threads.
Step-by-step master class for beginners on ribbon embroidery of baskets with flowers
- - Textile.
- — Satin ribbons: for flowers 13 mm, for leaves 7 mm, for the center 4 mm, for a basket 6 mm.
- - Frame.
- — Embroidery threads and needle.
Embroidery technique
First we make a basket, for this we take a frame, attach the fabric to it and draw a basket on the fabric. Now we take a 6 mm tape, a needle with a wide eye and begin to embroider horizontal stitches, correcting each stitch at once as we go. When finished, melt the edges of the tape.
We embroider stitches vertically, intertwining, but we twist the ribbon into a rope. To make the handle, we make seams and, without piercing the fabric, overcast the handle. The basket is ready.
Now let's move on to the flowers. They have 2 parts that fold together. For the lower zone, which has 2 petals, take a 7cm ribbon and cut it in half with a needle.
We pin up the ribbon and sew it along the pinched part with a basting stitch, the corners are slanted and we sew the ribbon on the sides. For the upper zone, which has 3 petals, you will need a 10 cm ribbon, divide it into 3 zones and pin it, then sew on the sides. The stitched parts are tightened and the assemblies are secured with small seams. We sew all 2 parts together, placing the bottom one on top of the top part. We sew everything into a flower.
We sew the flower into the basket, sewing the middle with a colonial knot. To do this, pull the ribbon through the hole in the central part of the flower, straighten it and pick it up with a needle. Pull the ribbon and wrap it around the needle in a figure eight. Next, we pierce the needle near the exit point of the ribbon and pull the knot. Now we stretch it, pull the ribbon, making a knot, cut it off and fix it on the wrong side.
Using embroidery threads, we sew lines of different sizes on top of the flower, which diverge from the middle. At this stage we add leaves; to do this, we embroider a loop into the attachment with a stitch.
We fill the entire basket with such flowers, making the required number, and if desired, we put the picture in glass and in a frame.
How to embroider a Christmas tree from ribbons
- We will need:
- - Green fabric.
- — Satin ribbons 13 mm.
- - Christmas tree filler.
- - Cardboard.
- - Beads and sequins.
Cut out the Christmas tree template and transfer it to the fabric.
Now we embroider rows of loops, to do this we bring the ribbon to the outer part, straighten it, point the needle to the wrong side, pull it up without twisting it, a loop of 1 cm is formed. Similarly, we make 2 elements of the Christmas tree and decorate it with sequins and beads. We sew the sides of the tree and stuff it with stuffing.
Cut a circle out of cardboard, cover it with fabric and attach it to the tree.
Happy creativity!
Pansies made from ribbons: master class. Photos step by step and description of stages
To create such a flower, you don’t have to be an ace in embroidery. Using simple stitches and basic techniques, you can make your own ribbon pansies. The master class is quite simple:
- On the base canvas, mark the middle of the future flower and the top of each petal.
- Attach the ribbon in the center, leaving a knot on the wrong side.
- Lay the ribbon so that it forms a free-lying stitch, and then stick the needle into the point designated as the top of the petal. In this case, the resulting stitch should be pierced.
- Very carefully pull the tape to the wrong side, making sure that the front side is smooth. The tape is pulled until the roller forms an acute angle.
This technique is used to embroider all the petals of pansies. First, they make those that are conventionally directed at 10, 12 and 2 o'clock (taking the classic arrangement of numbers on the dial as a guide). Then they return to those looking at 11 and 1 o'clock. Later the remaining petals, stem and buds are embroidered.
The center of such flowers is made using a “French knot”. The principle of its formation is shown in the photo.