Fine art is immortal, as is evident not only in the museum gallery, but also in the interior of every home and office. The walls are always decorated with paintings, and if they are not decorated, they still have time to do so. If only there was enough space for compositions. If only there was enough money for frames.
The latter are for paintings like outerwear for a person: you can go outside “unsuitable for the weather,” or you can dress up properly to delight passers-by.
So the frame paints the picture. Moreover, you can make it yourself, without asking yourself how to make a frame for a picture from wood or plastic? This is because improvised means can replace expensive materials.
They are always at hand
The cost of a picture frame depends on the material, size and artistic design of the baguette. The total indicator can kill any desire to design an artwork or photograph.
But in pursuit of an affordable alternative, enthusiasts have found several materials from which they can create a thematic frame:
- Paper;
- Cardboard;
- Skirting board.
Molding frame
The molding material can be polystyrene foam, polyurethane, wood, metal and others. For beginning craftsmen, polyurethane is suitable; it is quite dense, elastic and can be easily cut with a stationery knife.
To make a beautiful, and most importantly neat frame, you will need the following building and office materials.
- polyurethane moldings according to your sizes.
- a ruler and a protractor, or better yet a miter box.
- putty and white acrylic paint.
- paint or varnish as desired.
- glue "Titan".
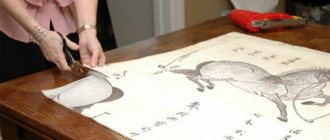
We make a picture frame with our own hands according to a pre-planned plan. First we measure, then we cut off the corners, lay out the parts on a hard surface and only then glue them together.
If cracks have formed at the corners, they must be treated with putty and painted with white acrylic. After complete drying, the product can be painted, varnished or decorated.
Paper frame
Paper is the easiest to obtain and easiest to work with. But when making a thematic frame, you need to understand that not every “papyrus” will fit a certain plot or photo. For example, it is better to decorate children's drawings and family photos in a frame made of colored paper.
Black and white graphics greet the frame, assembled from newspapers. Paper frames for serious paintings can simply be painted one color with acrylic paint, which dries quickly.
Depending on the shape and manufacturing method, paper frames are:
- Volumetric;
- Wicker.
The first frames are created according to the type of gift boxes:
- A cross with a large square or rectangle in the center is drawn on colored paper;
- Each of the 4 strips of the cross protruding outward must be measured and divided with a pencil into several segments, which will later have to be bent;
- Cut out the desired silhouette and begin to form the frame;
- After retracting the protrusions deeper into themselves, fix them with paper glue.
The next question is how to make a frame from paper for a picture using the wicker method. To do this you need:
- Roll several dozen identical tubes out of paper;
- Cut a rectangle out of cardboard with a cutout inside (the area of the cutout should be 1.5-2.0 cm less than the area of the picture or frame);
- Apply paper glue to the profile;
- Wrap the cardboard profile with tubes or create a weave over the profile;
- Press the tubes onto the cardboard using clothespins.
How to make a paper frame?
Paper is the most common and easiest material for thematic production.
If the paper is newspaper, then its frame is suitable for black and white photographs. It’s better to frame children’s art or family photos with colored “papyrus”.
If you are wondering how to make a paper frame for a picture with a good subject, then the finished thematic frame should be painted with quick-drying acrylic paint.
In general, paper frames are made using the folding method (as gift boxes are made) and the woven method.
In the first case, the following operations are performed:
Note!
- Kinusaiga technique for beginners: what is it, a description of creating paintings from threads
How to weave a figurine from rubber bands: how to learn to weave animals, toys and what you can make from rubber bands on a slingshot
How to make flowers with your own hands from paper, fabric and scrap materials. We create bouquets of homemade artificial flowers
- Use colored paper to mark a cross, the center of which is a square;
- The four protruding stripes of the cross are divided into sections for deflection;
- The cross is cut out to freely bend its protrusions under itself (to make the structure stable, the deflections are fixed with paper glue).
A wicker frame is made from many identical paper tubes. The latter are mounted on a cardboard screen (passe-partout), where there is an internal cutout for the picture.
Installation occurs using glue. To make the tubes fit better, you can tie them around the screen. In any case, the tubes must be clamped with clothespins until the glue dries.
After this, the paper frame can be painted if necessary. When the frame is ready, all that remains is to “plant” it on a paper drawing or canvas.
Cardboard frame
The second affordable and easy-to-use material for making frames is cardboard. Its structure is dense and at the same time capable of bending to take different shapes.
Therefore, it is not necessary to watch a lot of videos and photos on how to make a cardboard frame with your own hands. It is enough to follow the following sequence:
- Cut two large sheets of cardboard from a discarded box;
- If necessary, paint these sheets with acrylic paint;
- Make a drawing of a passe-partout on one sheet, and a drawing of a frame with a cutout on the other;
- Cut out the mat and frame;
- Apply glue to 3 sides of the mat and frame so that the remaining 4th slot can accommodate a sheet with a design or photo.
If a cardboard frame is made for a canvas, then it is not necessary to make a passe-partout, because one frame will serve as a frame.
You can also make a tabletop photo frame from a thematic design by gluing a triangular stand to the back of the mat. The latter can be made from a cardboard strip by bending it several times and fixing the ends with glue.
Small options
If you need small photo frames, then, as mentioned above, they can be made from cardboard or from small slats. To make such frames more cute, fabric that can be used as upholstery and cotton wool, which can be used to fill such a frame, will help. You will also need: pencil, scissors, ruler, heat gun, needle, thread and cardboard. The required dimensions of the slats are cut from the slats.
Article on the topic: Toys made from socks - RABBITIES. Master Class
They are connected into a frame, and since all this will be decorated with fabric, the type of these slats does not matter at all. Cardboard will replace plywood, and the backing is cut out of it. And from the fabric, strips are cut out that correspond to the size of the slats, but 3 cm are added to each such strip, 1 of which is for seams and 2 for filling with cotton wool. The fabric strips are sewn together and placed on the frame. All voids are filled with cotton wool, this is done evenly. Then all that remains is to insert the photo, secure it with a cardboard wall at the back and start decorating.
What to replace cardboard with?
Cardboard is lightweight and relatively durable. However, it may not be at hand when you need to make a passe-partout.
- DIY photo frames are popular ways to create from scrap materials. 110 photo frame ideas: wooden frame with buttons, decor with stones and shells, salt dough frame, collages, decoupage
- Cassette roller blinds: design examples, installation options, color choice (photo)
- Do-it-yourself drawings on T-shirts - step-by-step instructions, necessary materials, advice from craftswomen. 120 photo ideas on how to make a print on a T-shirt
In this case, enthusiasts are limited to:
- Old postcards;
- Notebook covers;
- Paper from food packaging.
This approach is not the most practical, but for the sake of affordable frame manufacturing it will do.
Frame made from scrap materials
The materials left over after the renovation is completed are an excellent option for making frames. Skirting boards (ceiling boards) and moldings are perfect for this purpose. The base is made of cardboard or plywood (thin) according to the principle of constructing a wooden frame.
The process of gluing decorative blanks is carried out directly onto a wooden base. The resulting cracks are puttied. The finished product is sanded where the putty is applied and painted.
Acrylic and water-based paints are more preferable. To add shine, the finished product is coated with water-based varnish. If necessary, attach a footrest or loop. The noble painting is ready to become a worthy part of the interior.
Frame made of skirting boards
After renovation, many people are left with plastic skirting boards with patterns that are akin to the patterns of expensive picture frames. Therefore, white stripes can be used if we are making a frame for an embroidered picture or other painting.
The sequence of thematic production is as follows:
- First, according to the size of the canvas or paper with the image, you need to set the dimensions of the frame by attaching a plastic plinth to the picture;
- Cut the plinth according to the marks, and the resulting ends should be sharp (go at an angle) so that the future frame at the joints of the plinths resembles a real frame;
- Paint the frame, if necessary, with two colors - dark for the background, light for the pattern;
- Glue the frame to the canvas.
If an embroidered picture or drawing on a sheet requires framing, then you will also have to cut out a passe-partout from cardboard. It will serve as a basis for tensioning the fabric or fitting the sheet, respectively.
- DIY gift baskets are a universal gift for any occasion! 80 photo ideas for decorating baskets: romantic, formal, children's, Italian, Brazilian, for movie fans
A DIY gift for your loved one: for Birthday, New Year, Valentine's Day, anniversary. 110 photo ideas for original and fun gifts that will surprise your loved one
Do-it-yourself lambrequins - manufacturing instructions with patterns. Types of lambrequins, choice of variety. Preparation of material and tools. Step-by-step manufacturing guide
Let's start simple
It’s very easy to make a picture frame yourself; if you get a little familiar with this business, you will no longer need framing workshops. Doing your own work is much cheaper than ordering a professional frame, and to be honest, it is easier to create a frame yourself that will fully meet your expectations.
To understand what materials are needed to get started, you need to answer two questions. First: what kind of canvas do you want to display? And second: what does the proposed accommodation space and its design look like? When you decide on this, you can safely begin to select color, brightness, material and not be afraid of the unpleasant dissonance between the result and the desired one.
The best option that can suit different interiors is a classic picture frame. Its difference is its monotonous frame, standard width and unobtrusive color scheme. Such frames are made from wooden materials, both natural and artificial imitations. If the frame is small, then it can be made not from wood or wood substitute, but from cardboard. These frames are suitable for small tabletop photos.
What paint should I use?
If necessary, the finished frame is painted. The best way to do this is to use:
- Acrylic paint;
- Oil paint.
The latter, unlike the first, takes a long time to dry, so to speed up the process, you can apply varnish over the oil.
Wooden frame
How to make a picture frame correctly if you want to use noble wood?
To begin with, it is worth emphasizing that instead of solid wood, you can limit yourself to the following lumber:
- Wooden skirting boards;
- Glazing beads.
They can serve as an excellent facial addition to a finished mat. But working with solid wood to make the appropriate frame is carried out in the following ways:
- Hand carving - requires special skill and many tools, including chisels;
- Copy-grinding - requires skill, a duplicate machine, an original frame.
- DIY beads are interesting photo ideas for creating original jewelry. Step-by-step master class on creating jewelry from scrap materials
- DIY Tilda for beginners. History of the toy, materials and tools for creation, step-by-step manufacturing process. Sewing tilde: secrets of mastery
DIY Christmas nativity scene: history and traditions, the main components of a Christmas nativity scene. Nativity scene using toys, plasticine figures, nativity scene made of paper and cardboard
By the way, in order to start creating patterns on the mat, you must first assemble the frame. And this, in turn, is better done with a special machine for making baguette frames. Therefore, many people choose easy methods - making frames from cardboard, paper, plinth.
Wooden frame with glass
It’s worth noting right away that to work with wood you need certain tools; if you don’t have a special machine, then you must have a saw, as well as a hammer and wood glue. After completing the rougher work with wood, you will need materials for its decorative processing - varnish or paint. Varnish will preserve the original appearance of the wood, while paint will add color effects. Well, and of course, those tools that everyone probably has in the house - a pencil, a tape measure, a ruler.
Related article: How to hang a horseshoe to bring good luck
The frame is made of wooden slats, its width is selected in a size suitable specifically for your case.
We cut it into four parts, two equal. Please note that for good fastening of the canvas in the frame, 5 mm should be allocated for this on the inner edge. Since we are preparing a frame with glass, we will need glass slightly smaller than the perimeter of the frame, and plywood, which will be the back of the picture. If the picture size is 30/20 cm, the glass will have the same parameters 30*20 cm, and the plywood will be 33*23 cm.
In order for the glass to fit tightly, you need to prepare a recess in the slats. After retreating 3 cm, a small lowland is sawed through. To join all the slats together, you should process the corners, cutting off unnecessary parts diagonally. For clarity, it is better to use an angled ruler. For tight joining, all sections are processed with sandpaper and then glued together. When the glue is completely dry, you can begin decorating the painting, covering it with varnish or paint. After each coated layer it is important to ensure complete drying.
When the frame seems to be completely ready, the last stage remains - sealing. The frame is placed face down on a clean surface, the glass and canvas are placed in their place, everything is clearly aligned. In order for all the elements to settle better, add a small press; ordinary cardboard will do for this. A sheet the size of a painting is placed on the canvas, and plywood is placed on this backing. When everything is combined, the edges of the frame are treated with glue. If you have a furniture stapler, secure all corners or hammer in small nails. Now your picture frame is completely ready. An example of creating a wooden frame can be seen in the video:
Which material is better?
Each of the available materials for making picture frames has its own advantages and disadvantages:
- Paper - takes different forms, but does not tolerate moisture well and requires painting;
- Cardboard is quite rigid, but mostly requires painting;
- Skirting boards are hard and beautiful, but not everyone has them;
- Wood is noble, beautiful, natural, wear-resistant, but requires skills in processing.
You can work with the first three materials using only scissors, glue, a ruler and a pencil. But the wood already has to be sawed, cut, and assembled with tools.
Workflow Description
The description of how to make a baguette frame at home can be divided into several stages, half of which relate to preparatory work:
Stage No. 1: selection of material
Photo of plastic fillets imitating wood
Before you make a frame from a baguette with your own hands, you need to buy it. Finished fillets, as a rule, can be made of three different materials:
| Material | pros | Minuses |
| Styrofoam |
|
|
| Plastic |
|
|
| Tree |
|
|
Tip: if you are making a frame for the first time, it makes sense to use foam as a training material. Then, in case of failure, your family budget will be practically unaffected.
As you can see, you can choose economical options, but do not forget that the main purpose of the frame is to decorate the framed composition, and wood can best cope with this task. Let’s take it as an example for further consideration.
Wooden ceiling skirting boards
In addition to the selected fillet, immediately purchase suitable paint or varnish for decorative design of the finished frame, which will also perform a protective function.
Advice: it is recommended to opt for acrylic compounds, as they do not emit toxic fumes and are therefore best suited for use in residential areas.
Example of acrylic paints
Stage No. 2: preparing tools
Also, before making a frame from a baguette, make sure you have the following supplies on hand:
| Tool | Purpose |
| Wood glue | Gluing frame elements |
| Hacksaw | Cutting fillets |
| Miter box | Control of cutting corners of plinths |
| Tape measure and pencil | Marking |
| Brushes | Application of paints and varnishes |
| Sheet of thick cardboard | Formation of the back wall |
| Glass of the right size | Formation of the front wall |
Hacksaw for woodworking
Stage No. 3: creating a frame
Now let’s directly look at how to make baguette frames:
- We use a tape measure to measure the size of the painting or photograph that is planned to be included in the decorative design;
Construction tape
- We put the results obtained on a baguette;
- We cut the fillet using a hacksaw, taking into account that the set aside sections are the inner part of the future frame. In this case, it is necessary to make cuts at an angle of 45 degrees, so that all the fragments then fold into an even and neat rectangle. For this purpose, a miter box is used, which is a box without end walls with special slots for the saw to move;
An example of how 45 degree angles are created using a miter box
- In a factory setting, special equipment helps to make stitching for baguette frames, but we will use wood glue and a flat surface. That is, we apply adhesive to the ends of all fragments and fold them into a rectangle, tightly connecting the corners. Then we leave the structure to dry;
Drying frame from ceiling plinth
Stage No. 4: final work
How to make baguette frames is now clear, but the whole process is not over yet:
- We take the selected paint or varnish and apply it with a brush to the resulting structure;
Painting a wooden frame
- After the paint coating has hardened, cut out a rectangle from thick cardboard along the outer contour of the product and glue or staple it on the back side;
- We put a photograph or painting inside;
- Then we insert the glass and carefully secure it with small nails.
Result of the work done
Photo frames for paintings
Read here - DIY New Year's gifts: 70 photos of unusual and original ideas for New Year's gifts
Help the site, repost 
0