Origami flowers Popular as home decor, wedding decorations or gifts for special occasions. In order to make an origami flower out of paper with your own hands, you need to master the art of origami, learn the basic basic folds and methods. There are techniques suitable for any skill level that even a beginner can use easy to make origami flower with your own hands.
In this article you will find origami flowers with step-by-step photos of different types of models with links provided to detailed instructions for each project. These are mostly flowers with traditional designs made using basic origami folds. Almost all examples are suitable for advanced beginners, so you can choose origami flower models for children to introduce them to this interesting art.
Paper flowers using the origami technique. Master class with step-by-step photos
How to make paper flowers with your own hands for children. Master class with photos
Master class for children with step-by-step photos.
Bouquet of paper flowers. Author: Ilya Tarasov, 9 years old, student of the Zheleznogorsk Social Assistance Center, Zheleznogorsk, Kursk region. Head: Natalia Vladimirovna Pukhanova, additional education teacher, Zheleznogorsk Social Assistance Center, Zheleznogorsk, Kursk region. Description: The master class is designed for children of primary school age, teachers, parents and creative people. Purpose: flowers can serve as interior decoration, a gift to mothers and grandmothers for their birthday or any other holiday. Goal: making flowers from paper using the origami technique. Objectives: develop creativity, aesthetic perception, fine motor skills, cultivate artistic taste, perseverance, patience and accuracy. Like the wings of butterflies, Flower petals, Alluring with tenderness, Freshness of perfume. In the field and in the flowerbed, And in pots they grow, And in the colors of the rainbow, All the flowers bloom! Author: Leonov V.A.
Origami flowers are not at all difficult to make, but they look very interesting.
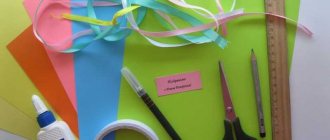
For work we will need:
• colored office paper • bamboo skewers • glue – pencil or PVA • green crepe paper • scissors • pencil • ruler • glue gun
Progress:
1. Cut out identical squares from paper. One square will make one petal, for one flower you need 5 - 6 squares. 2. Fold the square diagonally and place the corner up.
3. Bend the bottom corners towards the top corner.
4. Then fold each folded corner down in half. Then we unfold the resulting fold and fold it so that the fold line is in the middle.
5. Fold the resulting corners down, then bend the corners inward, fold them in half along the fold line up. 6. We have a diamond shape. Fold in half and glue the wings together. The result is a petal. Glue the finished petals together on the sides. 7. Make the middle of the flower a different color. Cut a piece of a sheet of a different color, measuring 3 by 7, and cut the fringe. Wind it tightly onto a bamboo skewer, gluing the bottom edge.
8. Coat the middle with glue and insert it into the center of the flower.
9. Coat the outside of the flower with hot glue, insert a bamboo skewer inside and wait for it to dry completely.
10.Then glue strips of green crepe paper to the receptacle to the end of the stem. 11. Let's start with the leaves. We cut out rectangles measuring 5 by 7 and make cuts 5 millimeters wide, not reaching the end 1.5 - 2 centimeters.
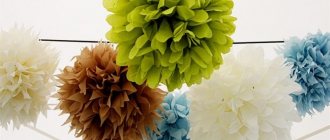
12. Using glue, attach the leaves to the stem. 12. These are the beautiful flowers we got.
13. Flowers can be put in a vase and decorate the interior, or you can give them to your mother or grandmother for the holiday.
The original flowers are ready! Thank you for your attention.
We recommend watching:
DIY gift for Mother's Day Gladioli made from crepe paper. Master class with step-by-step photos DIY flower meadow. Master class with step-by-step photos Volumetric applique. DIY paper flowers
Similar articles:
DIY birthday gift for mom
DIY paper flowers. Chrysanthemums
DIY paper flowers. Basket with flowers
DIY flowers made of corrugated paper. Dandelions
DIY summer paper crafts. Summer bouquet
Paper bouquets
A bouquet of paper flowers can be a very pleasant and valuable gift. It may not cost a lot of money, but its value cannot be underestimated. It's no secret that gifts made with your own hands are much nicer than ordinary ones bought in a store. If you are giving something that you have put your heart and soul into, the gift will be taken much more seriously.
Of course, you also need to spend time and effort searching for and buying a souvenir in an online store. But you can’t buy these things anywhere:
The advantages of paper bouquets are obvious.
- Paper crafts will not wither or lose their shape, unlike natural flowers. They do not need to be watered, treated, or placed in a solution every evening so that they can stand longer.
- Flowers made of glossy shiny paper always retain their color and do not fade over time.
- The cost of purchasing materials is much less than for a ready-made arrangement of fresh flowers.
- Paper crafts can be a great family activity to do together. With a little help from the kids, making paper flowers will delight everyone in the family.
- It is believed that creating compositions from paper calms and encourages positive thinking. It is not for nothing that the origami technique was used in ancient Chinese medicine.
- From the point of view of the psychology of preschool education, origami is a very effective way to develop the skills of spatial thinking, fine motor skills, motor coordination and perseverance.
Related article: Do-it-yourself wedding glasses: master class with photos and videos
It turns out that creating paper flowers not only gives a pleasant result, but also contributes to more versatile development.
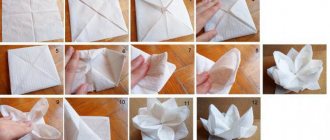
Delicate lily
The lily is a little more complicated to fold than the tulip.
On a square sheet of paper, two fold lines are drawn: along and across the sheet.
Diagonal fold lines are drawn on the reverse side.
The center points on the left and right sides of the square need to be folded towards the center of the bottom base. You will get this detail:
A triangle should remain on top, the corners of which are again folded from the center line outward and straightened as shown in the figure.
Related article: Raglan crochet top: models with jumper patterns in the master class
The same procedure is done on the reverse side.
On the resulting polygon, the lower corners are turned up and immediately returned back. It is necessary to obtain an outline of the fold line.
The workpiece is folded in half so that another mark appears across it.
Using the resulting lines, the lower part of the workpiece is pulled to the upper like this:
The last three points are repeated for each side of the workpiece.
After this, each of the triangles unfolds along the fold line; the model must be unfolded with the open side up.
The side corners are folded towards the center of the model to create two more fold lines. This action is repeated for each side.
Along the fold line, all the lily's petals unfold outward.
The result is a flower like this:
Lily is ready!
To better understand the manufacturing method, you can watch this video: