No child will refuse to congratulate his father and grandfather on Defender of the Fatherland Day. Invite him to make an origami “Boat” out of paper. Such a gift will certainly appeal to men who have completed military service or are interested in the history of the navy. This craft can be kept as a souvenir or used for children's games.
Model 1
To create the simplest version of a boat using the origami technique, you only need to complete 6 simple steps. But this is only at the beginning. After acquiring the appropriate skills, the product is crafted in just 2 stages.
This craft has 1 long fold and 1 outer reverse fold. By folding it, it is quite possible to practice the art of folding on the outside. If you wish, you can test the boat on the water - it will float, but for a short time. It is permissible to use any type of paper in your work. But the boat will look most impressive if the front and back sides of the paper sheet differ in color or texture.
Model 2
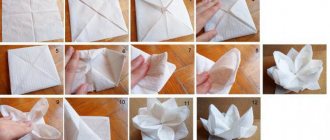
Origami “Punt Boat” is interesting because you can put small toys in it and send them on a journey across open water. This design easily floats on the water surface. Algorithm of actions:
- Fold a sheet of paper in half along the short side, then fold it across.
- Carefully fold each corner of the workpiece inward.
- Fold the corners again according to the diagram. This is necessary to make the conical elements of the product even sharper.
- Bend the figure away from you along the central edge and turn it inside out, opening the middle “cleft.”
- Carefully straighten the craft and tuck the inner folds. The punt can be lowered into the river.
Model 4
Want to do some testing on the water? Make a light boat using origami technique. Folding such a craft only seems like a simple matter. In reality, the baby is unable to cope with it. It is recommended for production by elementary school students. The required material is a square piece of thick paper. Procedure:
- Fold the sheet in half.
- Fold the top and bottom edges to the central axis.
- Fold the sheet along the marked horizontal fold.
- Position the workpiece so that the folded edge is facing you. Turn the corners away from you.
- Make a board from the top paper layer, folding both sides of the layout twice along a narrow strip to the bottom.
- Push the bottom part of the craft inside. Carefully straighten the boat.
If desired, you can add a passenger – a small doll – to this water transport and play, transporting it from one side of a puddle or bath to the other. In such a situation, it is recommended to use glossy paper instead of regular paper - it does not absorb moisture.
In addition, taking this version of the boat as a basis, you can create a three-dimensional composition or create an appliqué. You just need to add auxiliary accessories and decorate the toy.
A similar scheme is appropriate to use for folding textile and paper napkins. They will keep their shape if you carefully iron the kinked areas. These boats are good for serving knives and forks. They can also be used to place portions of sweets on the holiday table.
Catamaran
To make a catamaran out of paper, you need:
- fold it in half and unfold it;
- bend both sides towards the central fold;
- fold the bottom and top parts towards the center;
- unfold both folds;
- open the bottom along the dotted lines;
- open and straighten the pocket;
- open the sheet at the top in the same way as you opened at the bottom, and repeat the previous step;
- bend the layout in half, opening the sections of the catamaran upward.
Video: Unusual ways to make boats
In order to make even more complex paper ship models, you can watch several video tutorials on this topic.
Master classes will help you make a two-pipe motor ship, a boat and a complicated ship out of paper.
Share with your friends!
Subscribe to our Yandex.Zen channel or Yandex.Messenger
Yacht
The process of making a yacht is in many ways similar to the process of creating a catamaran. The basic element is the gate fold. A gate is a folding method whose action is similar to closing a gate. There are two methods of bending gates - horizontal and vertical.
In reality, the same technique is used, so the only difference is the right angle. To create this craft, you do not need to have any special origami skills. Everything is quite accessible. Here's the procedure:
- Fold and unfold a sheet of paper.
- Fold in the center. You should have four rectangles and three folds.
- Repeat the action, but this time perpendicularly. Fold in half, unfold, fold towards the center.
- Fold in half again to form a triangle. Unfold and do the same, but at an angle of 90 degrees to what has already been folded.
- Having unfolded it, fold the corners of the workpiece into the center and bend it to form a rectangle.
- Bend the top corner flaps to the sides. Press on the lower part behind them and form a trapezoid. Do the same on the other side. Then bend one edge of the trapezoid along with the valve.
- Turn the workpiece over. Take the top corner and bend it diagonally to mirror the bottom. The yacht is ready!
How to make a boat with sails from paper?
As soon as you can quickly make ordinary paper boats, you immediately want to quickly find out how you can make something more complex and interesting out of paper. Therefore, the next step will be a master class that will help you learn how to make a sailboat out of paper. However, it should be noted right away that this craft cannot float on water; it is more of a decorative item or a beautiful bookmark.
How to make a paper boat - sailboat:
Cut a square from an A4 sheet, or take a ready-made square sheet for crafts. Fold it in half diagonally to form a triangle.
Then we unfold it back and fold the future paper boat in half in the usual way.
The sheet needs to be unfolded again and folded in half in the other direction - so that obvious folds remain on the paper.
Having straightened a sheet of paper, you can see a web of folds on it, which in the future will help you quickly navigate when making a boat.
Next, you should bend the corners of those squares lined with lines to the center of the sheet, where the folds were still empty, as in the photo.
Now we bend the craft in half and unbend it.
The left free corner of the paper must be folded towards the center to form an open envelope.
The same edge needs to be bent to the side, as shown in the photo.
We bend the entire resulting angle inside the future boat.
It turned out to be something like a rhombus with a sail.
The right corner of the diamond is bent upward - now there are two sails.
The lower corner of the boat needs to be bent towards the center in the opposite direction and the product should be turned to the front side.
Now the boat with sails is ready for interior decoration.
Canoe
A canoe made from office paper can be an interesting toy. Here you will need a little more diligence due to the design feature - the bow parts of the product are closed. Progress:
- Fold the paper square twice, forming four even parts, and unfold.
- Fold each of the 4 corners evenly inward, toward the center. You should end up with a smaller square.
- Unfold the workpiece and fold the corners inward again, but now align the top with the nearest edge. This way, each corner will be folded twice.
- Turn the layout over and bend its upper part and lower quarter towards you.
- Bend the corners of the resulting rectangle inward. Additionally, bend both sharp edges of the boat inward. Bend the “obtuse” corners towards you as well.
- Open the craft and, holding the folds, turn it inside out.
- Straighten the bow of the canoe.
Maybe not the first time, but your child will be able to learn how to create boats using the origami technique. Perhaps your child will even surpass you in this type of paper craft. The Japanese art of paper folding is truly fascinating. In addition, it develops the brain and imagination, and also has a beneficial effect on fine motor skills. Therefore, creating an origami paper “Boat” craft for children is the best way to spend time.
Original version
To make a submarine out of cardboard you will need:
- cardboard;
- match;
- glue;
- awl;
- cotton buds;
- black paint;
- drink can;
- sharp scissors;
- plastic ball;
- firecracker;
- rectangular cap.
First you need to empty the contents of the cracker. Then trace the deodorant cap onto the surface of the cracker and cut it out. Glue this cap to the cracker, you should get a chopping block. Make holes in the cap with an awl and insert them into the antenna or periscope using cotton swabs.
Make a cone out of cardboard so that its base is equal to the diameter of the cracker. The cone will be the stern part of the submarine.
Next you need to cut out the blades for the stern from cardboard. They will act as rudders, as well as bow and stern rudders.
Glue the cardboard parts onto the cone, make slits so that the parts stick better. Glue the bow rudders to the bow of the boat.
Cut a propeller with six blades from a tin can and bend it. Make a hole in the center and insert a match into it. Secure the propeller to the stern.
Paint the finished craft.
It is best to use an aerosol can for this; acrylic paints are also suitable. You can also paint the product with raw or green colors.
Paint the tail number with white paint or a regular corrector. You can also simply print out the numbers. The submarine is ready!
Related article: Knitting vests - a selection of stylish knitting patterns