For the New Year, you can create a huge number of handmade decorations, but this craft is remarkable because you don’t need to buy a bunch of beautiful materials for it. These home decorations can be made from what you know you have. All you need is tissue paper, glue and scissors. And of course, don't forget some glitter for the balloons!
What should happen? What will you create?
- White tissue paper
- Gold glitter
- Glue stick
- Brush (optional)
- Paper knife
- Scissors
- Die die
- Marker
- 2 plates
- 3 sheets of A4 cardboard
- Ruler
- Adhesive tape
- Thread and needle
Let's prepare the paper
Step 1
Place two pieces of cardboard next to each other. I use A4 cardboard, but cardboard from boxes such as breakfast cereals will also work. Now place a large plate or any other round object with a diameter of about 26 cm on the cardboard. Draw a line along the contour with a pencil.
After making sure that the cardboard has not moved, remove the large plate and place a smaller plate with a diameter of 20 cm inside the large drawn circle. Fix it in the center and draw a line with a pencil.
Step 2
Cut out a large circle - you should end up with two semi-circles.
Step 3
Place one semicircle on several layers of tissue paper. Smooth and level the paper. Hold the cardboard and paper straight and cut out a semicircle from the tissue paper using the template.
For one honeycomb ball you will need about 50 sheets of tissue paper. Once the cigarette half-circles are ready, cut out a smaller circle from the cardboard. Then lightly trim the outer, larger circle of cardboard to create a smaller shape than the already cut out tissue layers.
Let's add some sparkle
Step 1
Now you need to add glitter to the edges of the tissue paper. Place the tissue paper on something solid, such as cardboard. Carefully apply a layer of glue along the edges of the semicircles. To do this, you can use a glue stick or PVA glue and a brush. If you are using a pencil, make sure it is not hardened. If you are using PVA, add just a little glue.
Using gentle movements towards the periphery of the circle, spread the glue onto the tissue paper. After you have applied the glue, sprinkle glitter on the paper. You can even use a paint brush for this.
Step 2
Repeat the same for all layers of tissue paper. When the glue dries, add glitter to the other, reverse side.
Sprinkle the edges well with glitter.
Step 3
As an alternative to glitter, you can use gold paint. But do not dilute the paint with water, otherwise the edges of the paper may become wet. Apply the paint by carefully moving the brush along the edges of the semicircles.
Glue the paper
Step 1
Turn the cardboard over to the left side. Place the first stack of tissue paper half circles with the straight side facing the edge of the cardboard. Mark on the cardboard where the cardboard “intersects” the top of the semicircle. Once you have done this, you can lay out all the layers of tissue paper in the same pattern. The cardstock will help you line up the left edge of the tissue paper.
Step 2
Now turn the cardboard over the semi-circle and run a glue stick along the slots in the cardboard. On the first layer, simply run glue along the slots outlined with a marker.
Step 3
Now turn the cardboard over to the left and place a new layer of paper on the very top. You should lay it in the same way as you laid the very first layer. Smooth out the paper with your hands and check whether all layers of paper are stuck along the sizing lines. Flip the cardboard over and this time run a glue stick along the unmarked lines.
Repeat this step for all layers of paper.
Link and open
Step 1
Now all we have to do is tie all the layers of paper together. To begin, take the cardboard templates that we created at the very beginning. Carefully glue one cardboard semicircle to one side of the stack of paper semicircles and another cardboard semicircle to the other side.
Step 2
Thread a needle and pierce the top corner of the cardboard semicircle. The loop must be loose to form a ball. Tie a knot and repeat the same from the other end of the cardboard semicircle. Here, do not cut the thread, but leave a decent tail so that you can hang the ball from it. To do this, you can choose a thicker thread.
Step 3
Now comes the fun part. The magical moment has come when the ball can be opened. Ready? Forward!
Step 4
After opening the ball, glue the cardboard semicircles to each other. If you want to save it until the next New Year, the semicircles can not be glued, but secured, for example, with paper clips. Having removed them, the ball can be folded and put aside until the next New Year.
If you want to create honeycomb balls without glitter, the instructions can be slightly modified. To do this, you can cut rectangular strips that will be larger than semicircles and glue them together. Once the tissue paper is glued together, cut the strips into a semi-circle shape to form a ball. Then you won't have to be careful when placing the paper when gluing all the layers. Plus, you can cut out different shapes from cardboard, then the honeycombs will have different patterns.
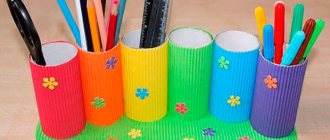
Festive pom-poms
A holiday is decoration, beautiful scenery, fun and good mood. When everything is decorated with taste, if the preparation for the holiday takes a long time and carefully, then charming balloons will be one of the best ways to decorate the celebration. Such delicate, airy pom-poms will give you a special romantic mood that will not be forgotten for a very long time. It’s not difficult to make paper balls yourself; you can easily get the necessary materials, because they are sold in every stationery store.
What we need to prepare:
- corrugated paper;
- scissors;
- thread;
- ribbon to hang the ball.
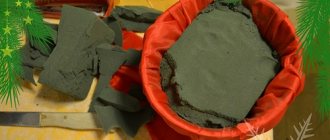
Take the required roll of crepe paper (corrugated) and cut it into equilateral squares. After everything is cut (the quantity depends on the splendor of the ball), we place all the cut out parts on top of each other, but so that all the corners match. Afterwards, we must carefully fold the resulting layer like an accordion, but so that the folds are equal. When everything is ready, take the thread and begin to wrap it tightly in the middle of the accordion. After that, we begin to carefully unroll each layer, taking our time so as not to wrinkle or tear the paper. Now the ball is unfolded, now we take the ribbon and tie it to the ball, you can hang it. This is how easy it is to make a ball of corrugated paper.
Related article: Simple pullover with a mesh top (crocheted)
As has already become clear, such balls are made according to the same pattern, so it is clear that even a child can cope with this.
In addition to corrugated paper, other materials can be used. We can include this type of paper, from which the balls are best made, more airy and lighter. This material is most often used by experienced needlewomen, but taking into account the fact that such paper cannot always be found in local stores, balls made from corrugated paper are no worse. Another type of material is tissue paper, but this is a denser material that is not used as often. In kindergartens and schools they use ordinary colored paper, but due to the density of the material, the balls are not so light. From this we can conclude that it is better to use corrugated paper or paper.
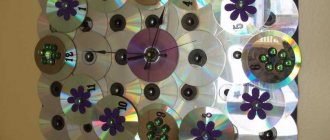
Decorate your house with balloons
Tie the balls to make a garland. Honeycomb balls look great when grouped together. And then your home will glow with shiny New Year's decorations.
In this tutorial you learned how to create a cardboard template and make honeycomb balls from it. They can be used for any celebrations, parties and events. You can also make a smaller ornament to decorate cards or gifts. In general, welcome to the world of magical honeycomb balls!
Did you like this handmade? If you have any questions or suggestions, write in your comments.
Happy brilliant New Year to you!
From the most ordinary crepe paper you can make very beautiful balls for decoration. Let's find out how to do this.
Master class “Volume paper balls”
First, as always, prepare all the necessary materials so that they are on hand. To make it you will need: a pack of colored corrugated or any other thin paper, two sheets of thick white cardboard, two colored markers, a glue stick, large scissors and a needle and thread. So, let's get to work!
- Using a compass, draw a circle on a piece of cardboard. Its diameter should be equal to the desired diameter of the future ball. Cut the resulting circle into two parts. Cut the folded corrugated paper into rectangles. For a medium-sized ball, it will be enough to make 40-50 pieces.
- Place one of the colored sheets of corrugated paper on the second sheet of cardboard. Using felt-tip pens, draw vertical stripes on the sheet at regular intervals. The number of cells on the finished ball depends on the number of these stripes and their density. There are no special requirements here - try several different options to see which one you like best.
- Moving from one mark to another, draw vertical lines marked in blue in the figure. This should be done using a glue stick, holding it at a slight angle.
- Then take the next piece of corrugated paper and repeat the process, this time connecting the strips marked in pink. In this way you need to process all the rectangles you have. Fold the glued leaves into a neat pile.
- Place one of the cardboard semicircles on top, press down so that the top layer of corrugated paper sticks to the cardboard, and outline it.
- Along this line you should cut out the future ball, folded in half. Use large, sharp scissors as there are quite a lot of layers.
- Cardboard is needed to glue the ball together. And so that it is not visible on the finished craft, it needs to be slightly disguised. To do this, on the other side, glue the second semicircle not completely, but after cutting it out in the shape of the letter “c”.
- Make a hole in the corner of the craft (with a gypsy needle or awl), and then pass the thread through it. Don't tighten it too tight or your ball won't open.
- Sew the second corner as well. You can leave one of the threads - you can hang a craft from it if this simple ball of paper is used to decorate the room. In this case, the thread must, firstly, be long enough, secondly, strong and, thirdly, match the color of the ball.
- Now comes the most crucial moment in the work - you need to open the ball. Take the craft by both cardboard sides and carefully move them apart. Be very careful not to tear the thin corrugated paper. If you followed steps 3 and 4 correctly, then you will not have any special problems with opening the ball (this is why it is so important to use a fresh glue stick). If the individual parts do not stick together, you can glue them as you go.
- This is what your ball will look like at this stage. The cells that it consists of are the unglued areas on your rectangles from step 4.
- The cardboard joints need to be glued together so that the sphere becomes solid and fully colored. As you can see, making a ball out of corrugated paper turned out to be quite simple.
- These two- and even three-color balls can be made to decorate your living room or nursery. Similar crafts of different sizes and colors will also look very appropriate as New Year's decorations.
Every holiday that comes into our lives needs to be made unforgettable, bright, so that it stands out against the backdrop of everyday bustle. This can be achieved through all kinds of decorations with which you decorate the space and any interior elements.
DIY paper balls are one of the most popular techniques
. A variety of design options allows you to make the design of an event or holiday unusual and varied. It is not difficult to master such needlework; it is only important to strictly follow all the recommendations and strictly follow the steps of the master class, which can be found on the Internet or on specialized handicraft forums.
This activity can be easily mastered not only by adults, but also by children. You can learn how to make your own paper balls and then do it with your kids. Time will fly by unnoticed during such an exciting activity, and amazing decor will appear in your home. But first, you need to stock up on everything you need:
- Sheets of tissue paper in silence. Although this material is thin, due to the many small folds it has excellent flexibility and strength. Silence is an absolute favorite among needlewomen because of its resistance to multiple bends and deformations;
- Scissors – any you use around the house will do. And for children, we recommend choosing specimens with rounded ends so that the child does not get hurt while working on crafts;
- Glue - convenient tubes in the form of a pencil or PVA will be very useful;
- Thin wire, fishing line to connect the workpieces together and hang the paper balls quietly wherever you like.
How to make Chinese balls: step-by-step instructions, description, photos
Anyone who has attended celebrations in the Middle Kingdom has seen how people decorate their homes and neighborhoods with balloons, lanterns and other compositions to create a good holiday atmosphere. You can also make a small miracle for the New Year at home with your own hands. Let's learn the technique of creating a Chinese honeycomb paper ball.
Materials:
- Paper (creped)
- Stationery glue stick
- Cardboard, scissors
- A4 sheet
- Thread, needle
How to make honeycomb balls?
Progress :
- Prepare at least twenty identical sheets of colored paper.
- On a white piece of paper, make marks that will conditionally divide these pieces of paper into 5-6 parts (equal).
- Then place the piece of paper, mark its borders and draw strips of glue across each one.
- On the second sheet, draw stripes of glue where you have not drawn them yet.
- And so alternate each sheet.
- Then cut out a circle from cardboard. And do the same with colored paper.
- Divide the cardboard into two semicircles, glue them to the beginning and end of the colored paper.
- Connect the ends and glue them together. The result is a honeycomb ball.
Honeycomb ball - a toy for the Christmas tree
Chinese ribbed balls are made almost according to the same scheme given above, but gluing is done along horizontal lines. And cardboard blanks are made in the form of an arc. Their width is three to five centimeters. And they coat the colored paper with glue so that it is glued between the parts of the arcs. At the end, the edges of the arcs are connected to the cardboards and threads are attached to hang the product.
Ribbed Chinese balls
How to make a paper pompom
Everyone loves bright jewelry. Many people want to transform the interior of their own home and create creative decor for the holiday. We will tell you how to make paper pompoms with your own hands.
- Take 6-8 sheets of corrugated paper of the same shade. It is better to start with single-color products, and once you understand the principle of their manufacture, you can vary the color shades, making them more complex and exclusive.
- Fold each one like an accordion. Mark the middle and carefully fasten it with thread and wire.
- Please note that the finished decoration will have a diameter that is equal to the width of the selected paper sheet. Reducing this value is simple: cut figuratively along the edges to the desired size.
- The unfolding process will captivate not only adults, but also children. Show how to carefully and slowly fluff each layer like a fan so that your child can repeat it. A real miracle will be born literally before the eyes of those who decide to make pom-poms with their own hands.
If you are afraid of ruining the paper with silence, then practice on ordinary table napkins. Although they do not hold their shape well, they will be indispensable as educational material. Having honed your skills, you can start decorating the baby’s room, the room where the festive celebration is planned. Amazingly beautiful paper pompoms will create the mood and emphasize the solemnity of each event.
paper ball
Every woman loves beautiful balls, especially those that look like flowers. Flowers are used to decorate the windowsills of houses and hang them from the ceilings. But fresh flowers cost a lot of money, and you can’t stock up that much for each time. Therefore, you can make charming balls using corrugated paper. Such products turn out to be very original and voluminous. This master class will help you learn how to make an ice ball from corrugated paper yourself.
What we need for work:
- corrugated paper, take one roll, which is 50 cm wide and 250 cm long;
- stationery scissors;
- ruler;
- a simple pencil;
- threads or fishing line.
Article on the topic: Women's summer crochet hat
We take the prepared roll of blue color and draw equilateral squares of 25 by 25 cm. Next we will need these 9 squares, so we take scissors and carefully cut them out. We take each sheet and place it one on top so that all sides match. It is very important that everything is smooth and neat, the beauty of the ball depends on this. Now we take all the squares together and, using a ruler, draw lines, the width between each should be 3 cm. Next, we fold an accordion along the lines, and cut the edges in the form of a triangle. Take the thread and wrap it tightly in the middle of the accordion, but leave a long thread. All that remains is to unfold the ball.
Please note that there is no need to rush in this work, otherwise you can very easily destroy the product.
This is how you can easily make a beautiful ball of corrugated paper.
DIY honeycomb balls
If you don’t want to stop there, then we suggest learning how to create honeycomb balls with your own hands. Depending on the theme of the holiday and color preferences, you can make completely different decorations. You just need to follow our instructions and attached photos:
Think in advance about the diameter of the ball you need. Cut a circle of this diameter from cardboard and cut it in half.
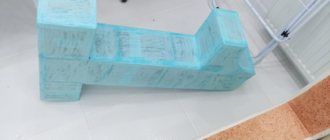
- Prepare a template as shown in the picture. To do this, take a thick sheet of cardboard and use a breadboard knife to make slits at equal distances. This value will determine the width of the cells of the future cellular ball. Using two markers of different colors, highlight the lines.
- To create quiet balls, take a stack of sheets of the same size, corresponding to the size of the circle. Usually, for a lush and beautiful product, they take from 40 to 50 leaves.
- Now let's start gluing! Take the first leaf from the stack, place a template with slots on it and carefully apply glue only along the markings of one color. Remove the template and place the next sheet of paper. Smooth it out so it sticks to the previous one.
- At this stage you will glue along the slots of a different color. So, alternating the order of gluing, you will assemble the entire structure.
- Glue two semicircles at the beginning and end of the craft to give strength to the entire product.
- Carefully sew the upper and lower corners of the semicircles with thread, fastening them together. This is necessary for the ball to turn around. Additionally, on one of the tops, attach a fishing line or ribbon, from which you plan to hang the paper honeycomb balls.
- Hold the craft with both hands and open it, and glue the edges again. And if you plan to use this decor multiple times, then sew on ribbons.
You can enjoy the resulting decoration!
Plain or rainbow, in patriotic colors or any other shades, paper balloons for decorating a hall, open area, or apartment interior will give only positive emotions to everyone present.
With a little practice, you can make original decor for any holiday. And, who knows, perhaps this will become your life’s work, which will bring not only pleasure, but also a stable material income.
Paper balls are a popular trend in the decoration services industry
. They look impressive in the form:
- hanging or wall decorations;
- unusual elements for various pieces of furniture;
- interesting design finds when you need to create bright accents.
If you are looking for an original and budget option for a children's or family party, wedding celebration, anniversary, then choose paper decor for decoration!
Using voluminous multi-colored balls made of paper, you can decorate a room or a Christmas tree, thereby creating, for example, a New Year's holiday atmosphere. This article will present master classes with detailed instructions, after reading which it will become clear how to make a paper ball with your own hands. Several options for making New Year's and Christmas tree balls will be offered, and the process of making a paper balloon will also be described. See the photo below for examples of finished work.
We make a pompom from corrugated paper with our own hands. Master Class
Hello everyone! Another master class on the ShkolaLa blog! Today we will make large paper balls, the same ones that are used as a festive design at various parties.
Come with us! Join our creative fraternity! And making pom-poms from corrugated paper with your own hands is not difficult and very interesting. For your convenience, here are step-by-step photos.
So look what we got.
It all starts with preparation.
To make a pompom we will need:
- a roll of corrugated paper, also called crepe paper;
- scissors;
- pencil;
- ruler.
Standard size paper. Its width is 50 cm and its length is 2.5 meters.
We take a roll and use a ruler to determine where its middle is. Draw a line in this place with a pencil.
Without unwinding the roll, use scissors to cut it into two equal parts. There was one long roll, but now there are two short ones.
Then the rolls still need to be unrolled and cut into identical rectangles. You can make rectangles measuring 25cm X 50cm, then each roll will produce 5 rectangles. We made 25 X 40, and we got 6 pieces each.
The larger the rectangles, the more voluminous the pompom will be.
Then the rectangles need to be folded in a neat stack, on top of each other.
Since our paper always wanted to curl back into tubes, we pressed it with scissors on one side and a ruler on the other to take a photo. And, if you noticed, a ball of thread appeared in the photo! It should have been mentioned at the very beginning, during the preparation process. But we remembered that it is needed only now and immediately declare it. Instead of threads, you can take a beautiful ribbon. But we didn’t have it and we made do with threads.
Then we turn the stack of sheets on one of the short sides towards us and begin to fold the sheets into an accordion.
It should look something like this.
Using a ruler, we determine where the middle of our corrugated accordion is and make a mark with a pencil.
We take a thread and tightly tie our accordion in the middle. One end of the thread should remain long.
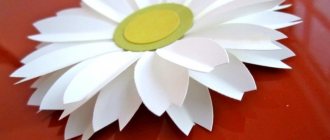
Now let's start decorating the ends of our pompom. We will trim them a little and round them off so that the pompom looks like a flower. The photo shows which trajectory we will use to cut.
First, cut off one corner.
Then another. Well, we've sorted out one end. We do the same with others.
And we get this figure) The most important steps follow. Let's open the pompom.
First, we unfold one side in the form of a fan.
Very carefully, so as not to tear, grab the first layer of paper and lift it.
Then the second one.
Well, then the third, fourth, fifth and sixth too. It's already beautiful!
We turn our “fan” over to the other side and fluff out the remaining six layers of paper. Only at the same time we try not to crush those that have already been issued.
It turns out like this. Very similar to a bridal bouquet. If you make half a pom-pom out of white paper and decorate the handle in green, it will look exactly the same. But now we have a different task, we are making not a white bouquet, but a pink pom-pom. Therefore, using the same principle, we fluff the other end of our accordion.
And we get such beauty! We adjusted it a little with our hands so that the pompom took the shape of a ball. Then we decided to experiment and make another smaller pompom from the remnants of yellow corrugated paper that Tema found in the closet with all sorts of creative things. That’s what we call it – a creative locker. We have paints there, plasticine, glue and colored paper too. In principle, it worked.
And now we know that it is possible to make a small pompom, but it is much more difficult than a large one. And in this little yellow ball, we got not 12 layers of paper, like in the big one, but only 8, and that’s where the paper ended.
We hung these two pompoms on the chandelier in the children's room. And it immediately became more fun there! Well, holidays are coming soon in our family. First it’s my birthday, then our beloved grandmother’s. And now we know exactly how to decorate the premises so that it is elegant and beautiful.
But if we had a lot more of this paper, we would try to make the same beautiful flower as in the video below. Very beautiful! And the manufacturing principle is similar to pompoms.
We also already know how to make pompoms from threads and we know what can be made from these pompoms, we told you about it here.
Friends, you can leave your opinions about our master class in the comments. We will also be very grateful if you share the link to the article on social networks.
Thank you for your attention!
Happy creativity!
Always yours, Alexandra, Artem and Evgenia Klimkovich.