Types of women's knitted vests
Women's knitted vests (photos below) can be made in different versions so that you can have not one, but several products in your wardrobe.
The most popular will be the following:
- A knitted vest with a handmade pattern - from grandma's piggy bank - will be an interesting addition to clothes of any style, from informal to business. Works with embossed braids will be a real masterpiece, but only on condition that they are done by a skilled knitter.
- Modern women have managed to give a knitted vest a new motif by combining incompatible fabrics. Evening models are usually catchy and bright. An airy long skirt paired with an openwork knit vest looks extravagant. This set is not suitable for everyday wear.
- An office version of a knitted vest is a sleeveless vest. In combination with a white blouse, it will add a little romance to a strict business style. The vest is worn in the off-season, when wearing a warm sweater indoors is not comfortable.
- An elongated vest is a model in which vertical lines predominate. The product can be made from threads of any thickness, in any pattern. This thing will make girls and women much slimmer. Long vests can become elements of a daily outfit or an addition to a sports outfit.
- Teenagers love sleeveless vests with a non-standard cut . They are made very simply - the fabric is knitted in any pattern and folded in half. This vest requires an accessory - a belt. You can make a trapezoidal sleeveless vest, the distinctive feature of which will be hanging lapels.
When making a knitted vest, you need to think about the color of the future product:
- light sleeveless vests can refresh your entire wardrobe and last for several years;
- pastel-colored yarn for products is suitable for classic options;
- vests knitted with a relief pattern will set off black blouses or sweaters;
- It is important to choose a contrasting accessory for a gray product.
How to choose a women's vest
Women's knitted vests (photos show complex outfits) can be worn to the office, to college, and even to an official reception. This accessory emphasizes the advantages of a woman's figure and hides her flaws. The selection criteria can be seen in the table given below.
How to choose the right vest:
| Type of product, what to wear with it | What features of the figure does it hide? | Length | Cut | Material texture |
| loose vest, worn without buttoning, over blouses and T-shirts | hides wide hips and waist | a product whose length is below the knees is suitable for tall girls; for short ones - maximum length to the knees | straight silhouette | fine wool and coarse thread will visually give fullness to the figure; It is better to knit with a simple stockinette stitch made of fine wool |
| a short vest can be worn buttoned or, conversely, unbuttoned, at the waist, under the vest, wide belt | will make your large breasts invisible and visually lengthen your figure | can be up to the waist or reach mid-thigh | fitted, neckline - round, shallow or V-shaped | soft wool |
| fitted vest, short or long | will cover thick thighs | to mid-thigh or knee | has a flared hem, short - with shelves above the waist | light openwork knitting, refined patterns |
| loose vest with a wide belt without fasteners or pockets | will hide all figure imperfections | to mid-thigh | asymmetrical hem, V-neck | smooth fabric made of thin threads, fine pattern |
| granny square model | suitable for girls with any figure | from the knees | free | squares made of acrylic, fine wool of various colors, with different patterns |
| voluminous knit vests | for slim people: the product makes your figure heavier | long or short | loose or fitted fit | thin threads, patterns: braids, plaits, complex ornaments |
Preparation of materials and tools
If earlier knitters had homemade knitting needles and homespun yarn in their hands, today the available line of tools is quite long.
The list of equipment for a beginning knitter may be as follows:
- knitting needles of different thicknesses (thickness is determined by number)
- straight knitting needles, long and short , allowing you to knit “back and forth”;
- circular knitting needles - 2 metal or bamboo knitting needles connected with a fishing line. With such knitting needles you can quickly knit heavy items, because the fishing line allows you to evenly distribute the weight of the product;
- modern knitting needles with the CLICK system , which allows you to turn straight knitting needles into circular ones within a few minutes;
- hooks could be used to pick up a slipped loop or create a decorative finishing element;
- a row counter is a practical modern thing, a cylinder in which there are latches that allow you to move the loops mechanically (the number of loops is visible in the counter window);
- tips on the knitting needles - the thread is fixed on the knitting needles so that the loops do not slip off if knitting is postponed for a while;
- plastic markers - they mark the beginning of a patterned line, or the beginning of a row when knitting in the round;
- thread separator - a plastic thimble with protrusions on the top side; All the threads used in the work are passed through the hole in the thimble. The separator prevents the threads from getting tangled;
- stitching needles : a thick wool thread is inserted into the needle through the gap on the eye;
- safety pins
- special ruler , on the surface of which are dimensions in different metric systems; a magnetic ruler that allows you to knit a pattern exactly according to the pattern;
- glomerulus - a plastic box in which the ball is placed. It is very convenient because the thread is pulled through the hole and the ball does not unravel.
Yarn is required for knitting.
The range of yarn produced by modern industry is very large:
- synthetic yarn;
- natural fibers (angora, mohair, lurex);
- synthetic yarn, which contains several types of unnatural fibers.
Before choosing yarn, you need to think about what time the vest will be worn. For warm products, it is better to take mohair threads; for the summer version, synthetic yarn is suitable.
How to knit a women's vest
Women's knitted vests with knitting needles (the photo shows how to complete the model step by step) are easy to knit with your own hands, but first you need to study the pattern of the model and then assemble the tools.
For knitting you need:
- Knitting needles: if you are planning a thin sleeveless vest, you need thin knitting needles. The thicker the yarn for the product, the thicker the knitting needles.
- Yarn: The yarn number is usually indicated in the model description, but the knitter chooses the color herself.
- Knitting pattern : you need it all the time, so it’s better to make a large, clear copy.
To ensure that your hand-knitted product never ceases to please, you need to listen to the advice of experienced knitters:
- during the knitting process, you need to monitor the tightness of the knitting and avoid increasing the number of loops;
- You definitely need to knit a sample that will help you calculate the knitting density and the number of loops;
- for those who are knitting their first sleeveless vest, it is better to choose a simple pattern, while experienced knitters can experiment by connecting threads of different colors and knitting complex patterns;
- a product made in a single piece will be warmer than one that has a clasp;
- a ready-made vest made of fine yarn, it is better to wash it by hand, do not twist it, but wring it out;
- The finished product must be sewn in a certain sequence: first, the seams on the shoulders, then on the sides;
- After the vest is sewn, you can tie the neckline. In order for the plank to come out neat, you should not take the edge loops, but those that were a row earlier;
- you will have to ensure that the number of loops along the armhole is the same on all sides.
Classic knitted vest
A classic knitted vest is a universal item that makes any woman visually slimmer. An elongated model with a hood will not keep you warm in cool weather. A vest with large buttons and a leather belt will add style to your look.
Descriptions and knitting patterns for various patterns can be found on the Internet. Knitting pattern for a classic long vest:
For a size 48 product you will need:
- 500 g of yarn 300 g of polyester, 200 g of acrylic yarn, metallic terracotta color;
- circular knitting needles No. 4 and hook No. 3;
- stitching needle.
- Knitting pattern: - stockinette stitch (you should knit carefully, because you should not confuse the front and back loops);
- garter stitch - knit all rows with knit stitches;
- The model can be made in separate strips of acrylic and fluffy yarn.
The product execution process will be as follows:
- cast on 10 loops from mohair wool, knit a strip with stockinette stitch, the length of which will be 65 cm (8 parts will be required);
- Taking terracotta-colored yarn, cast on 10 loops and, using garter stitch, make 4 strips, 65 cm long;
- 1 piece 56 cm long, 2 pieces 40 cm long are knitted from the same yarn.
The connected parts are sewn together according to the pattern; work should begin with the shoulder seams.
To prevent the bottom of the product from curling, it should be tied with a patent using terracotta-colored yarn.
To do this, you need to cast on the edge loops on the knitting needles and knit a strip of 7 cm. The neckline, shelves, armhole can be crocheted - 2 single crochets.
How to knit a vest with knitting needles
Knitting a sleeveless vest yourself is not as difficult as it seems at first glance. First of all, you need to have desire and patience. It will not be difficult to choose a model with a clear diagram and description. Then you need to buy threads and knitting needles of a certain size.
In order for the item to be the required size, you need to make a pattern .
To do this you will need the following measurements:
- length of the product;
- chest girth;
- waist circumference;
- hip girth;
- armhole depth.
Depending on the product model, some of these measurements may be omitted.
The width of the product is the half-circumference of the widest part. For some it's the chest, and for some it's the hips.
Thus, to knit a sleeveless vest with knitting needles for beginners, you only need three sizes:
- product width;
- length of the product;
- armhole depth.
Pattern selection
If a sleeveless vest will be the first product, then you should not choose a too complex pattern for it. The more complex the pattern, the more time, patience and effort it will take to work.
When choosing a beautiful but complex pattern, you need to clearly understand that the product will take a long time to knit with it. You may not have enough patience to make the item. Such an experiment may end unsuccessfully: the knitting needles and threads will be abandoned, and the vest will be bought in a store. Knitting will not become a hobby.
How to knit a vest for beginners using a simple pattern is not difficult.
The main thing is that this will take a little time.
The simplest pattern for the product is garter stitch.
It is knitted only with knit stitches in knit and purl rows.
The details of the product are knitted according to the pattern: decreases are made in certain places, the loops are closed.
Using a simple knitting for a vest, you can get a finished item in a short period of time. Only in this case will the beginning craftswoman have a desire to knit new products.
Loop calculation
Depending on the thickness of the thread, knitting needles are selected. The thicker the thread, the fewer loops there will be in the work. It is impossible to determine the exact number of loops by eye.
To do this, you need to knit a sample from the selected yarn.
Next, it needs to be washed and dried. This is how you can determine what a product knitted with such threads will look like.
If the sample has become smaller in size after washing, then this must be taken into account when casting on loops. After all, a product that is bound in size may become small after the first wash.
Then it will urgently need to be bandaged.
To avoid this, you need to take the dimensions of the washed and dried sample . A certain number of loops is a certain number of centimeters. From this you can calculate how many loops are in one cm.
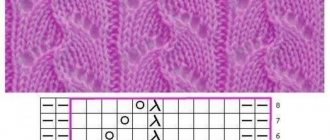
Knitted vest with braids
Women's knitted vests (the photo shows a model with braids, whose shoulders are slightly dropped), looks very elegant.
Using this pattern, you can knit a product of any size. The diagram for the model is given below:
Necessary:
- 50 g of white wool yarn;
- ordinary knitting needles No. 3.5 and 4;
- knitting needles with fishing line No. 3.5, long and short;
- 1 free knitting needle;
- hook No. 4;
- a few buttons.
Patterns:
- stockinette stitch is applied along the edge;
- purl stitch;
- The elastic is knitted with knitting needles 3, 5 - the first 2 loops are knitted, the subsequent ones are purl;
- Edge loops are used for the fastener bar:
- 3 rows – stockinette stitch;
- Row 1 is knitted with knit stitches, on the next row knit and purl loops are knitted together;
- 7 cm is knitted with an elastic band: 2 loops are closed at a uniform distance, which are picked up again in the next row;
- The neck binding is knitted like a fastener bar, but the loops for it need to be cast on in advance;
- The armhole placket is knitted like a neckband.
A separate issue is knitting the main pattern - braids. The pattern can be small or large, the weave can be located side by side and have different lengths. Even if the knitter makes just one braid, the item will look original.
Braid knitting pattern and symbols
- front loop;
- 10 loops should be crossed to the left side (5 loops are removed unknitted onto the knitting needle. The next 5 loops are knitted in the front way, then the loops from the free knitting needle are also knitted).
- 10 loops are crossed to the right and knitted in the manner described above.
You can also distinguish the rows in the diagram by counting: to the left - odd rows are the front rows, in the opposite direction - even rows are the purl rows. The width of the piece is 20 sets, after 12 rows are knitted, the pattern is repeated. The braid can be of any length. When performing the classic version, the weave is done through 5 rows.
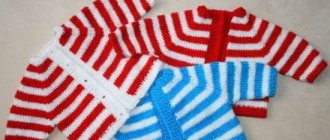
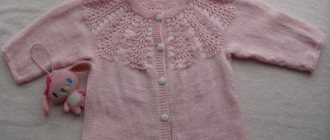
Simple children's vest
It’s very good if the first knitted item is a children’s vest. How to knit a vest for a child quickly and without problems - you just need to choose a simple pattern.
The pattern is presented for a newborn child, and there is also data for children aged 6 to 18 months. You can make a similar one by substituting your own dimensions.
For such a product, garter stitch and stockinette stitch will be used. Instead of a regular elastic band, garter stitch is knitted, and the main background is stockinette stitch. Since the product has buttons on the front, the trims will also be knitted in garter stitch.
You need to cast on the stitches for the back on the knitting needles. Eight to ten rows are knitted in garter stitch, after which the work continues in stockinette stitch.
Knowing the height of the product, you need to knit up a little more than half of it.
Next, the design of the armhole begins. For it you need to cast on three loops at once, then 2 loops and two times 1 loop on each side.
Having a pattern, it will not be difficult to make decreases for the shoulder bevels.
At the same time, you need to design the neckline. To do this, you need to close off the middle 8–10 loops and continue knitting the two halves separately. In every second row, cast off 5 stitches, and then 7–9 stitches, depending on the thickness of the yarn and the size of the vest.
The front part of the product consists of two halves, which are fastened with buttons and knitted separately. Half the back stitches are cast on the knitting needles, plus 4-6 stitches for the placket. Knitting begins with garter stitch. After 8–10 rows, the work continues with stockinette stitch, while the edge where the fastener will be is decorated with a strip knitted in garter stitch.
The fabric is knitted like a back: the armhole and shoulder bevels are also shaped. But the neckline will be different. They begin to design it after the armhole, after 4–6 cm, making decreases by 1 loop, knitting two loops together after the bar. Such decreases are made 10–12 times in every second row.
The second half of the front is knitted in the same way. In order for the back of the product to have a bar, it should be knitted separately. By casting 5 stitches on the knitting needles, a strip is knitted, the length of which will correspond to the length of the back neckline. Then the loops must be closed.
Assembling the product means making the side and shoulder seams, as well as the seams of the bottom of the sleeves. The strap is sewn to the back of the product, and buttons are sewn on.
Using this pattern and step-by-step description, you can choose any other simple vest pattern. How to knit a children's sleeveless vest quickly and easily is described above. The main thing is to be patient.
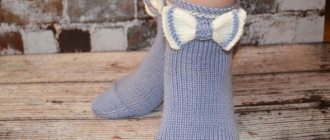
Men's vest
It is not difficult to knit such a model. Work starts from the back. Loops are cast on and a 1x1 or 2x2 elastic band is knitted at 6–8 cm. In the last row of ribbing, stitches are increased after every third stitch. The work continues with the main pattern.
Sleeveless vest
The sleeveless vest is universal in a woman's wardrobe. Modern fashion offers many models - sports, with a hood, long or short versions. Some models are similar to sweaters, but without sleeves, some are like a summer sweater. By combining a sleeveless vest with different wardrobe items, you can have a new set every day.
For knitting you will need:
- 100% merino yarn 8-9 skeins (100 g per skein);
- knitting needles of two sizes - 4 mm and 5 mm; markers.
The product is made in stockinette stitch and garter stitch from the right sleeve to the left. To calculate the knitting density, you need to knit a small square, the side of which is 10 cm. You should calculate how many loops are in 1 cm. Multiply the resulting number by the size of the hip circumference and divide by 2.
Knitting pattern for a sleeveless vest
To make the product look more modern, you can make the back longer than the shelves.
Vest size 52 for older women - knitting
Double-breasted vest with a belt is knitted from wool yarn. This model is perfect for older ladies.
Knitting description is designed for sizes: 52-54
You will need: 700 g of dark gray Veljesta yarn (75% wool, 25% polyamide, 100 m/50 g), knitting needles No. 4.
Follow the pattern below for knitting a vest.
Knitting density: 19 stitches. satin stitch = 10 cm, 23 stitches of slightly stretched relief pattern = 10 cm.
Description and knitting patterns for a vest for older women
Further…
Long women's vest with hood
A long women's vest with a hood is a product that can combine various knitting methods. This outfit is suitable for young people as it has a sporty look and is best worn with leggings or skinny trousers. Using the pattern given below, you can knit a vest from sizes 36 to 42.
Knitting pattern for a vest with a hood
Necessary:
- 800 g of blue thread (60% wool, 40% possum wool) and a skein of elastic thread;
- knitting needles – 4, 5 mm and 5.5 mm.
The knitting process will be as follows:
The back is covered with blue thread, folded in half.
- you need to cast on 81 loops and knit an elastic band, 5 cm wide;
- knit 2 rows with stockinette stitch, adding 1 loop;
- the next stage is knitting a pattern from braids;
- after 56 are knitted, bind off the loops for the armholes (72 loops should remain);
- after the length of the back reaches 75.5 cm, the loops for bevels on the shoulders are closed, first – 9 stitches, then – 16;
- At the same time, the loops on the neck are decreased by 20 loops each, and the row is closed.
The left and right fronts are knitted symmetrically.
To complete the left shelf you need:
- cast on 47 loops, go 5 cm for the bar;
- add 1 loop;
- knitting of the pattern begins;
- compare the product with the first part - the back and make an armhole;
- after the length of the shelf reaches 66 cm, a cutout is made for the neckline and a bevel for the shoulder, as on the back.
The hood is also knitted with a braid pattern:
- 47 loops are cast on and the pattern is made;
- add 5 loops to the back;
- having knitted 22 cm, match it with the pattern and put the part aside, knit the second half;
- cut the loops on each half so that the piece becomes round;
- parts of the hood are sewn together.
If all the details are completed, then the product can be sewn:
- the hood is stitched to the neck and tied with an elastic band, casting the edge loops of the shelves onto circular knitting needles;
- side seams are made;
- The entire product is tied with an elastic band and the loops are closed.
HIGH NECK VEST
A stylish and laconic high-neck vest from Yarnspirations designers is interesting in its details: the back is longer than the front, and it has vertical stripes of garter stitch on the sides. Knitting such a vest is very simple; even a novice craftswoman can do it.
Translation from English made for the website www.svyazanospicami.ru
Size XS/S, M, L, XL, 2/3XL, 4/5XL
For chest circumference XS/S [71-86.5 cm], M [91.5-96.5 cm], L [101.5-106.5 cm], XL [112-117 cm], 2/3XL [122-137 cm], 4/5XL [142-157.5 cm]
Finished chest circumference
XS/S [91.5 cm], M [101.5 cm], L [112 cm], XL [122 cm], 2/3XL [144.5 cm], 4/5XL [165 cm]
Description given for smaller size. Differences for other sizes are given in parentheses. If only one size is specified, it applies to all.
Materials
Yarn Patons® Alpaca Blend (60% acrylic, 22% wool, 10% nylon, 8% alpaca) 142 m / 100 g 3, 3, 3, 4, 4, 5 skeins (color Slate (01005) shown in photo)
Knitting needles 6 mm straight and circular 40 cm long or other suitable to match the knitting density
2 loop holders, 1 marker
Knitting density
15 stitches and 20 rows = 10 x 10 cm in stockinette stitch.
Description
Back
Note: the back is approximately 2.5 cm longer than the front. To decrease a left slant stitch, slip 2 stitches on the right needle one at a time, return them to the left needle and knit 2 stitches together at the back.
**on two straight needles, cast on 67 (75-83-91-107-123) sts.
first row: (LS). *3 persons 1 purl. Rep from * to last 3 stitches. 3 persons
second row: *P3. 1 person Rep from * to last 3 stitches. 3 p.**
Repeat last 2 rows of rib (k3, p1) 6 more times.
Next knit as follows:
first row: (LS). Knit.
second row: 5 persons. Purl until the last 5 stitches. 5 persons.
Repeat the last 2 rows until the height is 40.5 (40.5-43-43-45.5-48) cm from the beginning. Finish by knitting the last row on the WS.
Forming an armhole
Cast off 3 (6-7-8-9-10) sts at beg of next 2 rows. 61(63-69-75-89-103) stitches remain.
Size 4/5XL only: cast off 3 sts at beg of next 2 rows. 97 stitches remain.
Only available in sizes 2/3XL and 4/5XL
First row: (LS). remove as knit 1 pet. 1 person Decrease 1 stitch with a slant to the left. Knit to last 4 stitches. 2 persons together. 2 persons (87-95) pet.
Second row: Slip 1 st. 1 purl. 2 together purl. Purl until the last 4 stitches. 2 together from the back wall. 2 p. (85-93) pet.
Repeat last 2 rows another (4-5) times. (69-73) pet.
All sizes
First row: (LS). remove as knit 1 pet. 1 person Decrease 1 stitch with a slant to the left. Knit to last 4 stitches. 2 persons together. 2 PERSONS. 59 (61-67-73-67-75) pets.
Second row: slip as purl 1 st. Purl to end of row.
Repeat last 2 rows 6 (7-7-9-4-4) more times. 47 (47-53-55-59-65) pets.
Continue in stockinette stitch, slipping first stitch on each row to armhole height of approximately 15 (16.5-16.5-18-18-19) cm. Finish by working row on WS.
Shaping the shoulder line
Cast off 5 (5-6-6-7-8) sts at beg of next 2 rows, then 4 (4-5-5-6-7) sts at beg of next 2 rows. Place remaining 29 (29-31-33-33-35) stitches on stitch holder.
Before
Knit the rib ** to ** as on the back.
Repeat 2 rows of rib (k3, p1) 3 more times.
Next knit as follows:
first row: (LS). Knit.
second row: 5 persons. Purl until the last 5 stitches. 5 persons.
Repeat the last 2 rows until the height is 38 (38-40.5-40.5-43-45.5) cm from the beginning. Finish by knitting a row on the WS.
Forming an armhole
Cast off 3 (6-7-8-9-11) sts at beg of next 2 rows. 61 (63-69-75-89-101) stitches remain.
For sizes 2/3XL and 4/5XL only:
First row: (LS). remove as knit 1 pet. 1 PERSON Decrease 1 stitch with a slant to the left. Knit to last 4 stitches. 2 persons together. 2 persons (87-99) pet.
Second row: slip as purl 1 st. 1 purl. 2 together purl. Purl until the last 4 stitches. 2 together from the back wall. 2 p.
Repeat last 2 rows another (4-5) times. (69-65) pet.
All sizes
First row: (LS). Remove as knit 1 stitch. 1 person Decrease 1 stitch with a slant to the left. Knit to last 4 stitches. 2 persons together. 2 persons 59
(61-67-73) pet. 59 (61-67-73-67-63) pets.
Second row: Slip 1 st. Purl to end of row.
Repeat last 2 rows 6 (7-7-9-4-5) more times. 47 (47-53-55-59-65) pets.
Continue working in stockinette stitch, slipping the first stitch on each row, until the armhole measures approximately 11 (12-12-13-13-14.5) cm. Finish by working a row on the WS.
Forming the neckline
First row: slip 1 st. 13 (13-15-15-17-19) persons. 2 persons together. Turn knitting. Place remaining 31 (31-35-37-39-43) stitches on stitch holder.
Second row: purl 2 together. Purl to end of row.
third row: slip 1 st. Knit to last 2 stitches. 2 persons together.
Rep last 2 rows until 9 (9-11-11-13-15) stitches remain.
Knit 1 row evenly, without decreasing stitches.
Shaping the shoulder line
Cast off 5 (5-6-6-7-8) sts at beg of next row. Knit 1 row evenly. Cast off remaining 4 (4-5-5-6-7) sts.
With RS, work back next 15 (15-17-19-19-21) sts from stitch holder.
Join the yarn to the remaining stitches, decrease 1 stitch, slanting to the left. Knit until the end of the row. 15 (15-17-17-19-21) pets.
Next row: Slip 1 st. Purl until the last 2 stitches. 2 together from the back wall.
Next row: Dec 1 st, slanting to the left. Knit until the end of the row.
Repeat last 2 rows until 9 (9-11-11-13-15) stitches remain.
Knit 2 rows evenly.
Shaping the shoulder line
Cast off 5 (5-6-6-7-8) sts at beg of next row. Work 1 row evenly and cast off remaining 4 (4-5-5-6-7) sts.
Assembly
Sew shoulder seams. Sew the side seams, leaving some of the elastic unstitched.
Gate
Using circular needles, starting at the right shoulder seam, pick up and knit 9 stitches along the right front neckline. K15 (15-17-19-19-21) from front stitch holder, 9 stitches along left front neckline. 29 (29-31-33-33-35) sts from back stitch holder, decreasing 2 (2-0-1-1-2) sts evenly. Total 60 (60-66-69-69-72) stitches. Place a marker for the beginning of the round and complete the round.
First round row: *K2. 1 purl. Repeat from * to the end.
Repeat the last circular row until the collar height is 10 cm and close the loops loosely, without tightening, according to the elastic pattern.
print
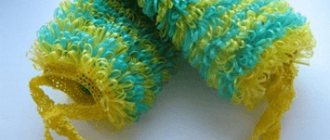
Women's grass vest
A grass vest with short sleeves is the perfect casual accessory for a cold day.
Knitting pattern:
You should prepare:
- 2 skeins of blue yarn (main thread) and 7 skeins of white - “grass” (additional thread);
- circular knitting needles (10 mm);
- markers and an additional knitting needle.
The sleeveless vest is knitted simply: a continuous piece of fabric is knitted up to the armholes. The diagram shows 3 parts, but the left shelf will be exactly the same. Two threads are used to create multi-colored stripes.
The knitting process is carried out according to the following plan:
- the main thread is folded into the widow and 72 loops are cast on and the 1st and 2nd rows are tied with facial loops with the introduction of an additional thread;
- from rows 3 to 6, the main yarn is knitted with knit stitches;
- the next rows - from 7 to 10 - with an additional thread; this alternation occurs until the back length is 35 cm;
- the number of loops is reduced on both sides - for the armhole;
- By changing the main and additional threads, the left and right fronts are knitted with bevels for the armhole and sleeves.
After the rows are closed, the product is sewn together, starting from the shoulders, then along the sides, and the sleeves are sewn on.
Openwork vest
Women's knitted vests (the photo shows many options knitted with an openwork pattern) always look festive. If you knit something from cashmere or wool, it will not only complement your look, but will also warm you up on a frosty winter day. It will go well with sports or classic clothes.
Knitting pattern for an openwork vest
For a size 48 product you need:
- 500 g of Arina yarn, which consists of acrylic and wool in equal quantities (the color of the yarn can be any);
- knitting needles and hook No. 5;
- buttons.
Knitting density: in a square with a side of 10 cm (20 rows), 16 loops are placed in one row. The diagram shows how the openwork pattern is knitted, but only the front rows; in the purl rows, the loops are knitted purlwise. A hook is used to make air loops of single crochets and double crochets.
Knitting description:
- The right and left shelves and the back are seamlessly knitted. To do this, cast on 85 loops and 2 edge loops and knit the fabric.
- Then the loops are divided - 23 for the left and right front, 29 for the back.
- Knitting the right front
- 12 rows are worked in an openwork pattern (according to the diagram);
- in the 105th row (from the beginning of knitting) edge loops are added (there will be 37 loops on the knitting needles);
- the pattern element is knitted and the number of loops is reduced by 3;
- in the new row these loops are picked up again;
- on the 144th row the loops of the right shelf are closed.
- The left shelf is performed like the right one.
Assembling the vest goes like this:
- side seams are made. The neck, shelves and bottom of the product are crocheted;
- the shelves are overlapped and stitched together;
- a button is sewn on.
Elegant sleeveless vest
Knitting a beautiful, sophisticated vest is more difficult. For such a product, you need to carefully choose the yarn, pattern, and model. You must act strictly according to the description.
Deviating from the sequence of actions risks negatively affecting the formation of a chic silhouette. If you encounter any difficulties in your work, you can always watch a video of knitting a vest.
We recommend reading:
- How to knit sleeves with knitting needles - instructions for beginners, diagram and master class from experts (110 photos and videos)
Knitting pattern for braids - detailed instructions on how to knit braids with your own hands (135 photos and videos)
Collar knitting patterns: the best ideas, patterns and instructions for beginners (145 photos and videos)
Waistcoat with waffle patterns
Women's knitted vests look charming. The photo represents a line of products with a waffle pattern.
To implement the option you like, you need to take:
- 700 g of dark red (wine-colored) yarn: “Ascot” melange thread is suitable, which contains more than half wool, as well as viscose, alpaca;
- 300 threads of pinkish color “Silkhair”, in which mohair is combined with silk;
- knitting needles No. 5 and 6.5, circular knitting needles.
- The product is knitted with double thread.
To knit a vest, you can use the following pattern:
There are several patterns you need to master:
- the edge of the vest is knitted in a chain: the 1st loop is knit, the last loop is purl;
- elastic band: purl 2 loops, knit 2 loops;
- facial surface - how the loops are visible;
- garter stitch - only knit stitches on the front side;
- The waffle pattern is knitted according to the pattern, beginning with the first arrow, then 4 repetitions.
Description of knitting product:
- back;
- Using knitting needles No. 5, cast on 98 loops and knit 6 cm (12 rows) with an elastic band;
- switching to knitting needles of a different number, knit 2 rows in satin stitch and switch to knitting 49 cm, mark the beginning of the armholes with markers;
- after completing 19 rows, cast off 5 stitches;
- then gradually close the loops through the row.
Shelves: first the left shelf is made, then the right.
The knitting pattern is the same:
- cast on 49 loops;
- tie the strap with an elastic band;
- switch to other knitting needles of a different number,
- knit 2 rows in satin stitch, add stitches and knit in a pattern
- after 58 rows have been completed from the bar, make a bevel for the neckline: bind off 1 loop at a time over 16 rows;
- The bevel on the right side is performed as on the back.
The pockets can be tied with an elastic band or the same as all other parts.
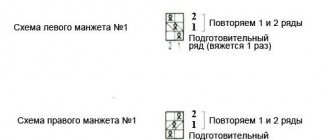
Magic threads
In the first part of the “Sleeveless Vest with Knitting” master class, we will figure out the pattern, choose a pattern, and knit the back.
So, let's begin! Dear needlewomen! I want to warn you that I knit the loops “grandmother’s way” - behind the back wall of the loop. This method is not classical, and in many sources the products are knitted in the “classical way”. Read more about how to knit stitches here.
First of all, we must draw up a pattern, with dimensions in centimeters. Pattern making is a whole big topic, and I will definitely consider it in the future and therefore I advise you to subscribe to new lessons on the site at the end of this master class. But when we have such a thing as the Internet at hand, the easiest way is to take a ready-made pattern from there. Type in the search engine “Vest with knitting needles” and the age of the child, or the desired size (if you are looking for a pattern for an adult), and the system will definitely find you articles that will most likely contain patterns. If you still don’t find anything, write to me in the comments and I will definitely help! I found a pattern for my daughter, she is 4 years old. And the next step for us should be the transition from centimeters to loops, and for this, first of all, we will decide on the pattern, or rather, the patterns.
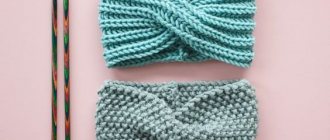
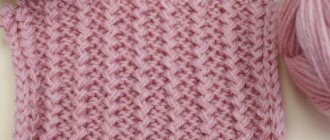
I will tie the bottom of the product, as well as the armholes and neckline, with a 1 by 1 elastic band. The main pattern of the product is shown in the diagram. As you can see, the pattern is very simple, consisting of knit and purl, however, it looks good on the product.
The third step is to choose the yarn. I have yarn “Pekhorka” “Competitive” 50% wool, 50% acrylic, 250m per 100g. In the photo there are 3 skeins, but I used less than 2. The yarn packaging indicates knitting needles No. 4, but I used knitting needles No. 3 for the main pattern , and for the elastic, knitting needles No. 2.5. For tying armholes and necklines, it is more convenient to have knitting needles on a fishing line, or stocking needles, like mine. Next, you need to knit a 10 x 10 cm sample for both patterns, and calculate the number of loops for all the measurements that are given in the diagram in centimeters. Calculating loops based on a sample is a separate topic, just like drawing up a pattern; if you have any problems at this stage, be sure to write to me, I will create a more detailed master class. When converting vest measurements into loops, the main problem that may arise is calculating the decreases for a V-shaped neck, since they must be uniform (for example, in each row we decrease a loop, or in every second). In this calculation, strive first of all not for the accuracy of the numbers, but for the approximate observance of proportions. I will indicate my measurements during the master class.
I cast on 74 stitches on needles No. 2.5.
We remove the edge. Next, the elastic band is 1 by 1. That is, knit, purl.
And so on until the end of the row.
There should be 14 rows of elastic in total.
15th row. This row will be quite complex, because we will need to complete 3 tasks at once: firstly, switch to needles No. 3, secondly, start knitting the pattern, thirdly, evenly add 8 loops. For an even increase, I mentally divided the canvas into 9 sections. The first and last will have 2 loops each, and the middle seven will have 10 loops each. Between these segments I will make additions. In total, you should end up with 82 loops in the fabric. As you can see, the final width of the vest (82 loops) is not a multiple of the pattern repeat, and in order for the pattern to fit correctly and the right side of the vest to be symmetrical to the left side, it is necessary that the middle of the vest (between the 41st and 42nd loops) coincided with the middle of the pattern repeat (between the 11th and 12th loops). I calculated that for symmetry I need to start knitting from the 16th loop of the pattern (marked with the first red line on the left in the pattern diagram). Edge loops are not included in the pattern. We remove the first edge (in the front rows we remove the working thread after knitting, in the purl rows - before knitting). So, remove the edge loop.
Next according to the pattern is the front one.
We have knitted, it turns out, 2 loops, now we need to make an increase. We will add from the constriction between the loops; I talked about this method in more detail here. So, I crossed the banner. But I won’t just take it off on the right needle, but knit it according to the pattern.
That is, in this case, on the wrong side.
And further along the pattern - 2 knits, three purls.
We have reached the end of the pattern repeat and now we will knit it from the beginning. That is, 3 more purl stitches, and then draw the pattern in a circle.
After the first increase, we knitted 10 loops, and now the next increase. For me, it is again knitted purl-wise according to the pattern.
And so we knit until the end of the row, making increases every 10 loops (after the last increase there should be 2 loops left in the fabric) and observing the pattern repeat. The last time we knit the pattern repeat to the second red line in the diagram. So, the most difficult row is ready.
The next row is purl. We start knitting it from the place where we finished (the second red line), but only in a different direction.
And so on we knit according to the pattern. I knitted 32 rows. And then the rapport is repeated. In total we knit 62 rows of fabric.
Next you need to start making decreases for the armholes. In total, you need to decrease 10 loops for the armholes, but not all at once, but gradually.
In the first decrease, in the 63rd row, we will decrease 3 loops, that is, we knit 4 loops together.
Next we knit a row, following the pattern.
Do not knit 4 loops to the end.
And we knit them together.
We knit this purl row and all subsequent purl rows without decreasing.
In the 65th row we decrease 3 loops again - 4 together at the beginning of the row.
And 4 together at the end of the row.
67th row. In this row we decrease 2 loops from both edges. That is, 3 together at the beginning and at the end of the row.
And we decrease 1 loop twice, that is, in the 69th and 71st rows we knit 2 loops together from both edges. Don’t forget to shift the pattern repeat as you decrease.
73rd row. All reductions have been made. Next we knit without them.
In general, the height of the entire canvas is exactly 100 loops. So, the back is ready. Continuation - front, stitching of parts, processing of armholes and necklines in the following master classes.
Vest with geometric shapes
The vest with geometric shapes looks original and resembles a poncho.
Beautiful knitted vests for women. Options in the photo.
To complete it you will need:
- dark blue (200 g) and white (100 g) yarn (100% microfiber);
- straight and circular knitting needles (it’s better to take No. 3).
Pattern - zigzags
Pattern diagram:
The pattern consists of two parts - A and B, the width of which is 37 loops. It should be knitted in satin stitch. To change the color you need to cross the thread on the reverse side of the pattern. The pattern is repeated several times (from rows 1 to 36). The light pattern is knitted in the same way as the dark one, but the stitches are counted in the opposite way. Product diagram:
To complete the back, cast on 80 stitches (blue thread).
Followed by:
- knit 1 cm in purl stitch;
- go to the front stitch and knit 14 rows with pattern A, the last 37 loops with pattern B.
- After the pattern is completed, you should knit 84 rows with blue thread, then close the armholes on both sides by decreasing the loops in each row;
- after 45 cm the neckline is completed: 24 loops are closed,
- knitting continues on each side of the neckline. Gradually the row closes.
The front part is made like the back, but the cutout is made deeper.
The vest is assembled in the following sequence: first, the shoulders and sides are sewn together. Then you need to knit the neckline and armholes on circular knitting needles. Women's knitted vests have become the most unusual item in a woman's wardrobe. The photo shows popular models that you can make yourself.
Article design: Anna Vinnitskaya