Types of bibs
Knitted. They are a woolen wardrobe element that perform an important function. They are used instead of a scarf to keep the neck covered and warm in cold weather. You can often see such an element on young mothers, since they do not have much time when getting ready to go out.
Made from fleece and velvet. The main difference from knitted bibs is the material and the fact that some models can be connected to a hood. In this case, the top will look like a sweatshirt or bomber jacket.
With clasp. Such shirtfronts are not one-piece, unlike other models. They usually have a clasp at the back, which is very convenient.
Dickies that look like a scarf-collar. Models of this type are very voluminous; they do not lie flat on the shoulders.
Modesty. Usually they are worn not on some element of the wardrobe, but on the naked body.
Chemisette. The most elongated of all types, it can cover the back and arms. Some models may have a length below the middle of the torso.
Knitted shirtfronts are especially popular because they look very feminine and elegant, and also keep you warm. Many needlewomen do not want to buy such an accessory, but prefer to make it with their own hands.
You can find many articles on the Internet about how to knit a shirtfront with knitting needles, so you won’t have any difficulties finding the necessary information.
Note!
- Knitted raglan - step-by-step instructions, patterns, recommendations. Photo review of the best works and new products from craftswomen
- Knitting a shawl - step-by-step instructions for making a shawl with your own hands. Tips for beginners on knitting + photo reviews
Amigurumi ring ⭕: features of the amigurumi technique. Step-by-step DIY master class with simple knitting patterns + 180 photos
The history of the shirt front
The history of the shirtfront began in Venice. In the sixteenth century, women's dresses had a deep neckline. To cover it, tailors invented a chest insert. Exquisite decoration with embroidery and lace has become a part of everyday life.
It could be sewn to fabric and worn depending on the mood. In Russia it has been known since the seventeenth century. First, a men's item appeared in everyday use. But gradually options for ladies also emerged.
There are many ancient costumes with these items preserved in museums, which testify to their popularity.
Over time it became removable. It could be unfastened and washed, which significantly saved the owner’s money.
Note!
- How to crochet a mouse and a rat: video master class on crocheting the 2020 symbol
How to knit a warm hat with ears for a newborn boy and girl - video tutorials with patterns, instructions for beginners
- How to crochet a beautiful scarf: video master class on creating unusual, beautiful, simple scarves for boys, girls, men and women
Despite the fact that the main production existed for the aristocrats, the poor also had them. The differences have always been the cost of the material used. Nowadays, soft and cozy little things are produced for children and the elderly, for men and women.
It is convenient to have for walking and playing sports. Also, this spectacular wardrobe item is good in cool weather, both winter and summer.
Material selection
Before you start knitting, you first need to choose a material. This is a very important stage, since the bib fits tightly to the neck. If you choose the wrong material, it can cause discomfort and irritation.
If you plan to wear the shirtfront in winter, it is best to knit it from natural wool. If it is demi-season, then it is recommended to make it from merino yarn or from yarn with a mixed composition (50% wool and 50% acrylic).
This yarn is hypoallergenic and very pleasant to heat; it will not deform after washing.
For children's models, special yarn is usually used, since it does not prick and retains heat well. And for children these are important components.
Who are the bibs for?
Most often, the use of shirtfronts is attributed to children. It's convenient and practical. This “scarf” does not need to be tied; any child can use it. The accessory is convenient for women who prefer to wear clothes with an open neckline. The shirt-front sits tightly, does not swing open, and tends to slide off.
This is also the reason for the popularity of the accessory among men, especially those who lead an active lifestyle. Another shirt-front will be a wonderful decoration for your look. It will act as an excellent imitation of a fashionable sweater and will allow you to slightly open your neck on cold days.
Loop calculation
After choosing the material, you must first knit a sample. This helps to correctly calculate the loops so that the main product is the right size.
The loops are calculated as follows:
Note!
- Knitted braids: simple patterns and the best master class for creating patterns with knitting needles. How to knit braids with your own hands + photo reviews
- Knitting booties for newborns: detailed patterns for knitting booties for beginners + 150 photo reviews of the best products
- Mittens - TOP 100 photos of the best creation ideas. Description of the technique + instructions for knitting mitts with your own hands for beginners
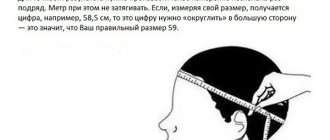
- It is necessary to measure the volume of the head and neck.
- Next you need to cast on 20 loops and knit 15 rows in stockinette stitch.
- The resulting product is then measured. It is important that it lies freely and stretched as much as possible, otherwise you will get incorrect values.
- Now the formula comes into play:
First, divide the width by the length. Then we multiply this value by the circumference of the head and add 4 cm to the resulting result so that the accessory is easy to put on and take off. The resulting value must be multiplied by 20 and divided by the width. The result will be the correct number of loops.
Information can be found not only in articles and magazines. Many needlewomen like to watch videos because they can see the whole process.
Rules for knitting a shirtfront
Knitting a shirtfront with knitting needles is not very difficult, but beginning needlewomen need to know a few rules. They will help them make a beautiful and comfortable accessory.
- Knitting always starts from the top, more precisely from the neck to the shoulder.
- To avoid any seams, the neckline is knitted with stocking needles.
- There is no need to make the knitting pattern very loose, otherwise the accessory will very quickly stretch and lose its shape.
- A shirt knitted with knitting needles always has a front and back part, as well as sleeves. Don't forget about this.
Knitting a men's shirtfront
A master class on knitting a men's shirt-front is not so easy to find, since many are convinced that men do not wear such accessories. It's not like that at all. Such products are also in demand among men, as they are a good replacement for a scarf.
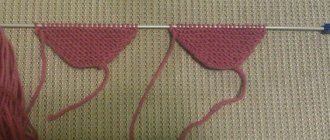
To knit such a shirtfront with your own hands, you need to cast on 72 loops and knit an elastic band 19 cm high. Next come 4 rows of stockinette stitch. We divide the resulting canvas into 4 parts.
The first needle will have a shoulder that starts with 2 knit stitches and a slip stitch. These will be followed by 10 knit stitches. The second knitting needle will have a backrest. It starts with a slip stitch, continues with 20 knit stitches and ends with a slip stitch too. On the third needle there is a second shoulder, which is knitted in the same way as the first. The last fourth knitting needle has a front part that has a braid pattern.
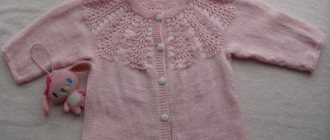
Knitted shirt front for girls 2 – 4 years old. Knitted shirt front for a boy 2 – 4 years old
Whether the accessory you knit will be for a boy or a girl depends on the color of the yarn you choose. The photo shows a model that will warm both a little princess and a brave knight.
Knitted shirt front for a child 2-4 years old
For work you will need:
- Bambino yarn (TM Kamtex). Composition: wool - 35%, acrylic - 65%. Total weight: 100 g. Footage: 300 m.
- Spokes on line: #4.
Attention: double thread is used!
Description of work:
- Cast on 80 stitches on the knitting needles.
- Connect the cast-on edge into a circle and knit the collar to the required height (+/- 16 cm) with a 2x2 elastic band: 2 SC, 2 IZ (repeat from *).
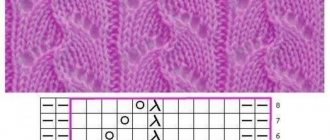
- After reaching the required collar height, start working on the yoke (see the loop distribution diagram).
Scheme for distributing loops for a shirt front
After distributing and marking raglan loops, add loops (using yarn overs or knitting from a broach) in every 2nd row.
At the end of all increases, there are 136 loops in the work.
- Bind off the shoulder, back, shoulder loops. Continue knitting in turning rows, lengthening the front of the shirt front. You can leave it rectangular or make it rounded by decreasing 1 stitch at the beginning and end of every 2nd row. The number of decreases is 7-8. Close off the remaining loops.
- If you wish, you can decorate the edge of the product with decorative crochet binding (see video at the beginning).
Raglan Dickey
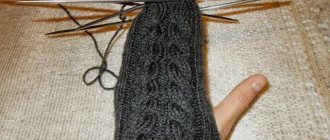
This shirt-front is a more complicated option, and therefore requires increased care when knitting. It has raglan lines that are best knitted using circular or double needles.
After the neckline is knitted, the entire product must be divided into 4 parts and the loops around which the pattern will pass must be marked.
The knitting pattern for a shirtfront is very simple:
There are only 108 loops in the knitted neck. The front part is made with a size of 41 loops, the back with 35 loops. 14 loops are allocated to the sleeves and a pattern path should pass between each part.
Raglan on 4 knitting needles
The most popular description is the description of knitting a shirtfront on 4 knitting needles using raglan. The product starts from the top. Cast on the estimated number of stitches and knit the neckline.
When the desired length of the element is reached, the loops are distributed and the main pattern is moved on. To do this, the total quantity is divided by 3. One part will be on the front and back, and half a third will be on the sides. Markers are placed between the parts.
Along these lines, increases are formed in every second row. At the desired height of the product, all loops are closed. You can make the parts related to the sleeves a little shorter.
Shirt without raglan lines
Knitting a shirtfront with knitting needles is done according to a pattern that involves adding loops on the wrong side. To prevent holes from forming in the places of the throw-on loops, they are knitted with crossed loops in the purl rows. After this, the product will be almost finished, all that remains is to sew it.
Sequence of work:
- Cast on neck loops
- Knit the height of the collar area with an elastic band
- Using increments, form an area that will be intended for the shoulders.
- Tie to the required length
- Sew the product
Model with clasps
In models of this type, you additionally need to design strips and buttonholes. It is worth noting that such shirtfronts are knitted with only two knitting needles. For beginners, the option with a zipper or button is perfect, since you don’t have to make a large number of additional buttonholes.
The knitting pattern is the same as in the shirtfront with knitting needles for women without raglan lines.
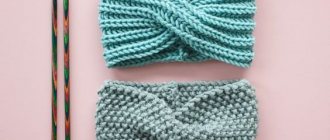
Types of knitted shirtfronts
There are many models of shirtfronts that differ from each other in patterns and design. They are knitted for small children, as well as adult men and women. In any of these cases, the models differ from each other. If you want to knit an option for a little girl or boy, you can choose a model with a hood.
There are types of products knitted entirely, that is, in the round. They are knitted extremely often and worn over the head like a turtleneck sweater.
They are used for such handicrafts as relief or three-dimensional patterns, as well as plain or colored jacquard fabric.
There are types of shirtfronts that are worn under outerwear, or put on top. There are models that look great over a coat or jacket.
Such models that are knitted from thick yarn look extremely stylish. They look especially impressive when they are long. In this case, the model can be worn even instead of an autumn blouse or sweater, that is, without outerwear.
Read
Photo and video master classes on knitting a star pattern with knitting needles
There are options that fasten with a zipper or buttons, which is also very convenient in some cases.
This master class examines just such knitting, which allows you to make a shirtfront with buttons using knitting needles.
Asymmetrical collar model
First, you need to cast on the knitting needles 32 loops, which must be knitted with a scarf fabric, i.e. all rows must be knitted. The first edge stitch of each row is removed, and the last one should always be purled.
The length of the product should be 48 cm, when it has reached this length it is necessary to close the loops. Measure 12 cm and fasten the marker on the side where the “tail” remains after closing the loops.
Next, you also need to measure 12 cm from the “tail” itself and mark this place with a marker. Thread the tail into the needle and fold the fabric so that both markers coincide. After that we sew this place.
The thread must be threaded through the purl loops, then you will get an invisible and neat seam. All “tails” are crocheted to the wrong side of the product. The shirt front is ready.
Decor can be added upon request. On the Internet you can find a photo of a knitted shirt front and choose the option you like.
How to knit correctly
To learn how to knit a shirtfront for women, you just need to study a photo with a knitting pattern and understand the principle of forming the product. Our simple diagrams and step-by-step instructions will help you with this.
Knitting pattern for an openwork shirtfront for women
To create such an openwork shirtfront you will need:
- wool yarn (merino or alpaca) – 100 g;
- circular needles No. 3.
Cast on 104 stitches and make a 2 by 2 ribbing of the length you need, then follow the repeat pattern shown in the photo.
Knitting pattern for shirt-snood for women
If you like voluminous scarves made of thick threads, then use the instructions for creating a detachable collar. For work you will need 300 g of wool yarn . The pattern chosen for this product is quite simple, but effective - 6 by 6 braids. To beautifully decorate the edges, you can make a scalloped edge with crochet.
Knitting pattern for a beautiful shirtfront for women
If you are a fan of simple and laconic forms, then choose this simple scheme for creating a detachable collar, but focus on the color or texture of the yarn. For work you will need 100 g of melange yarn . To ensure that the product does not stretch and keeps its shape well, we recommend choosing a combination yarn that contains at least 70% wool, and the rest is synthetic fibers.
A simple scheme for making a shirtfront for women
This pattern can be chosen by those who are just mastering this needlework. You will need 100 g of thick wool blend threads and circular knitting needles No. 3-3.75. We recommend using mixed yarn for this product, which contains 20-30% synthetic fibers. Melange yarn looks most successful in this version of a removable collar.
- Cast on 56 loops and make 15-20 rows in a circle with a classic elastic band: 1 knit, 1 purl.
- Starting a new row (it is better to mark it with a marker), add another loop to each purl loop, and leave the number of knit stitches unchanged.
- This way you will get a new row of elastic, where 2 purl loops alternate with 1 knit stitch.
- Repeat this repeat for another 20-25 rows and bind off the loops of the last row.
If you wish, you can decorate the first and last row with openwork crochet or small decorative pom-poms. If you chose a softer yarn than in the photo, then the elastic band around the throat can be doubled and a lapel can be made.
Knitting pattern for an elegant shirtfront
For work , take thick yarn and knitting needles No. 6 . The thicker and denser the thread, the better the product will keep its shape.
- Cast on 30 stitches and knit a fabric 60-70 cm long and 20 cm wide in garter stitch.
- When the rectangular fabric is knitted, bend its upper part to the left and the lower part to the right so that their sides touch diagonally.
- Sew these sides together using an 11cm seam.
- Turn the product inside out and bend the top corner.
- Decorate it with large buttons or a crocheted flower.
Knitting pattern for a women's shirtfront
You will need yarn with a characteristic of 100 g per 100 m and knitting needles No. 9.
- Cast on 46 stitches and knit a 12 cm long fabric with a 2 x 2 rib.
- Starting from the next row, purl one stitch in every 4th row.
- You should get no more than four such additions, and the length of the entire product should not exceed 25 cm.
- Cast off the stitches of the last row and sew the sides.
- Finish the top and bottom edges with a scalloped pattern using a crochet hook.
Model for small children
Dickies are an excellent accessory not only for adults, but also for very young children. Most often, such things are knitted for girls, but there are times when boys also wear such collars.
A knitted shirtfront for a child is distinguished by the absence of a tight neckline. It is knitted from special soft yarn that does not irritate delicate skin.
Children's products
The most creative activity: knitting shirt fronts for children. Here you can experiment a lot with color and pattern. Not only a pattern, but also a color or textured picture can serve as decor. Children's products can be bright.
Making a shirtfront with your own hands is not such a difficult task. If, after reading the job description, questions arise, you can watch a video of knitting a shirt front. The procedure will immediately become clearer and simpler.
Progress
We cast on 30 loops, which are knitted in this way:
First, 25 loops are knitted in garter stitch and 1 loop should be an edge stitch.
After 2 cm from the 1st row, 2 rows are knitted with a special openwork pattern between the marker and the edge loop. Then you need to knit again in garter stitch, and the openwork pattern is repeated every 5 cm. After 22 cm from the initial row, you need to make holes for the buttons. To do this, 2 loops are knitted together with the front one and 1 is thrown over.
A girl's shirtfront with knitting needles is first moistened, then stretched and allowed to dry. Only after this are the buttons sewn on.
Openwork shirtfront
On the Internet you can find many models of knitted shirtfronts with descriptions, but it is quite difficult to find a specific type of this type. Although such an accessory is not at all difficult to knit.
The peculiarity of this shirt-front is that the fabric is knitted not in a vertical position, but in a transverse one. The pattern consists of 10 rows, which forms one strip with a tooth on the edge. Afterwards, the pattern is repeated again until the desired length of the product is reached.