How to knit house slippers on two knitting needles
To knit “Shells” socks we will need:
- dense yarn made of wool or wool mixture (for the heel it is better to choose wool mixture, it is more wear-resistant);
- two knitting needles No. 3.
Description
We will need to knit these house slippers from top to bottom. This is very convenient, because when the heels wear off, you can quickly unravel them and re-bandage them without unraveling the entire product. The number of loops is designed for size 37 (38).
Top part
To begin, cast on 39 (41) stitches and knit 8 rows of knit stitches. p. Mark the middle stitch - we will knit increases from it.
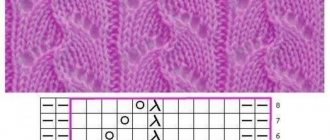
The following is the diagram.
1 rub.: persons. p. From the central p. we knit 7 p. loosely (the same shell). This is done like this: we knit 1 stitch, without removing the stitch from the left knitting needle, we make a yarn over, knit a loop again - there should be 7 of them in total). There is no need to tighten the shell, we knit the loops loosely. We complete the row of faces. P.
2 rubles: persons. p. The number of loops increases by 6.
3-4 pp.: persons. P.
5 rubles: persons. p. to middle p., shell, knits. p. to the end of the row.
6-7 pp.: persons. P.
8 rubles: persons. p. to middle p., shell, knits. p. to the end of the row.
9-10 pp.: persons. P.
We knit in this way until we have 5-6 “shells”, after which we knit 5-6 rows in garter stitch (we knit all the stitches) to move from the toe to the sole.
Sole
We take a denser and more wear-resistant yarn (you can simply add nylon thread). We make 11 (13) rows of faces. p., making decreases in the middle (knit 3 stitches in-line) and along the edges (2 stitches in-line) to create an oval.
When the sole is knitted, you will need to divide the work in half, into two knitting needles, and start closing: knit 1 loop from the side and from the foot together. We continue until the sole is completely attached to the base, after which we sew the slippers at the back.
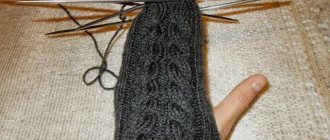
Knitting socks on two knitting needles... 9 ways + video master class!
If there are only two knitting needles in the house, this is not a reason to be left without knitted socks! Warm, beautiful knitted socks are the best gift for your feet in the cold winter. Until recently, they were knitted using 5 knitting needles, which frightened many needlewomen, and especially those new to this business. But progress boldly moves forward, and now this wonderful product can be created on two knitting needles.
Knitting socks on two knitting needles
The socks are knitted on two needles. I cast on 49 loops on needles No. 3. I knitted 30 rows with a 1 by 1 elastic band. I found the middle loop (25th) and marked it with a colored thread. In each front row, 5 stitches were knitted from this loop (knit, yarn over, knit, yarn over, knit). I knitted the purl rows as the knitting looks. When 97 loops were knitted on the knitting needle (this is for size 37), I knitted 6 rows in garter stitch, i.e., all with knit stitches, and began to run the sole on 13 loops (like a heel).
Then I sewed it at the back. That's all! From the comments: Without completing 6 stitches on the knitting needles, I begin to decrease the middle 3 stitches of the sole in each knitting pattern. in a row until only one sole remains, and then I don’t sew it with a needle, but connect it with knitting needles, like a shawl border. Don't forget about the decrease on the sides.
Another technology that appeared not so long ago, it is much easier and faster than the classic method of making homemade socks, and therefore is accessible even to beginners.
Socks with this method come out very neat and comfortable.
Knitting socks on two knitting needles
You will need
- yarn in desired colors
- 2 knitting needles
- centimeter
Progress
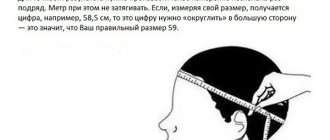
In order for the product to fit perfectly on your foot, you need to know exactly your foot size and instep height. Also decide on the height of the sock itself.
The work begins by preparing the back of the cuff. Cast on 22 stitches on both needles. Knit 4 centimeters of elastic, alternating a knit stitch and a purl stitch.
Knit another 4 centimeters in stockinette stitch. That's it, the back of the sock is ready.
Now move on to the heel. To form it, while knitting in each row, decrease the second, third and 2 penultimate loops. Do this until you have 12 stitches left in the row. Next, you need to expand the work, increasing the size of the canvas.
Begin the row by knitting the first knit stitch of each row from the edge stitch of the previous one until you again have 22 stitches - this will form the bottom of the heel.
Knit the sole of the product in stockinette stitch for about 8 centimeters (depending on the size of the foot). The back and sole are ready.
Form the toe in the same way as the heel: decrease the stitches to 12, and then increase to the original number. Knit the top of the sock 8 centimeters, in each front row connecting the first and last loops with the edge ones. With this knitting, the sole is connected to the top of the sock and the product takes on a completed look.
Work 4cm of the front instep in stockinette stitch, joining to the back of the sock in the same way as the top to the bottom. Now knit 4 centimeters of the elastic cuff.
Ready! By analogy, knit the second sock.
This way you can knit warm socks without much difficulty. Knitting gurus always come up with different techniques and tricks that make this process easier and more fun.
How about these indoor sock boots? They are very warm and cozy. You can take care of your feet yourself and make them feel good. Knitting such socks-boots is not difficult, even a novice knittress can handle it!
Save so you don't lose.
Source
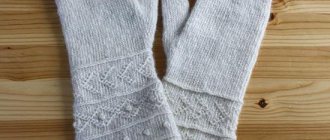
Baby booties for beginners
We will knit children's slippers using:
- yarn (50/50 wool with acrylic, thickness approximately 150 meters per 100 grams);
- two knitting needles No. 4.5.
Description
The work scheme is designed for a period of 3 (6, 12) months. The slippers need to be knitted in one continuous piece from the bottom up, and then sewn along the sole and back. We dial 27 (35-43) p.
1 rub. and all odd pp. (IS): l. P.
2 rubles: 1 l. p., approx. 1 p., 12 l. n. (16, 20), approx. 1 p., 1 l. p., approx. 1 p., 12 l. n. (16, 20), approx. 1 p., 1 l. p. = 31 (39, 47) p.
4 rubles: 1 l. p., approx. 1 p., 14 l. n. (18, 22), approx. 1 p., 1 l. p., approx. 1 p., 14 l. n. (18, 22), approx. 1 p., 1 l. p. = 35 (43, 51) p.
6 rubles: 1 l. p., approx. 1 p., 16 l. n. (20, 24), approx. 1 p., 1 l. p., approx. 1 p., 1 l. p., 16 l. n. (20, 24), approx. 1 p., 1 l. p. = 39 (47, 55) p.
Next you need to complete 11 pp. simple garter stitch.
Toe reductions: detailed description
1 rub.: 15 l. p. (19, 23), 2 p. vm. persons., 5 l. p., remove 1 p., 1 l. p., pull through the removed loop, remove 1 p., hold the thread before knitting. Let's turn the work around.
2 p.: 2 p.m. persons., 5 l. p., remove 1 p., 1 l. p., pull through the removed loop, hold the thread before knitting, remove the next loop as a purl, turn the work.
3 p.: 2 p.m. persons., 5 l. p., remove 1 p., 1 l. p., pull it through the removed loop, remove 1 p., hold the thread in front as usual. Turn the knitting.
4 p.: 2 p. vm. persons., 5 l. p., remove 1 p., 1 l. p., pull through the removed loop, hold the thread before knitting, remove the next loop as a purl, turn the work.
5 p.: 2 p. vm. persons., 5 l. p., remove 1 p., 1 l. p., pull it through the removed loop, remove another 1 p. and turn the work.
6 p.: 2 p.m. purl crossed, 5 and. p., 2 p. vm. purl, slip off the next stitch as if purling. Turn the knitting.
7 p.: 2 p.m. persons., 5 l. p., remove 1 p., 1 l. p., pull it through the removed loop, remove another 1 p. and turn the work.
8 p.: 2 p.m. purl crossed, 5 and. p., 2 p. vm. purl, slip off the next stitch as if purling. Turn the knitting.
9 p.: 2 p.m. facial, 5 l. p., remove 1 p., 1 l. etc., pull it through the removed loop. L. p. to the end of the row = 21 (29, 37) p.
10 rubles: i. P.
Continue knitting in garter stitch for another 5 (6, 6) cm and finish the work after knitting the purl row. We close the loops.
We sew a seam along the sole and heel, and turn up the cuff. Children's slippers for beginners are ready!
How to go to the sole and count it
The knitted top resembles a triangle. Having placed it with the top up, we mark the number of loops for the width of the sole. In our example it is 19 (the number must be odd).
Read
Knitting a men's scarf: patterns with patterns for beginners
To calculate, select the central loop and mark it with a pin. We count from the center by 9 to the left and to the right and also mark these loops. These 19 pieces are our sole. The remaining loops on the sides of the marked ones are the side panels.
How to knit original slippers for the whole family
These slippers are designed for sizes 35/37, 38/40, 41/43 (foot length 22, 24, 27 cm, respectively), so they are suitable for men’s, women’s, and teenage feet. They are quite easy to knit, just follow the pattern!
For work we will need:
- yarn (wool/polyamide or wool/acrylic, approximately 100 grams per 50 meters);
- circular knitting needles No. 4.5, 60 cm.
Important! Increases are made as follows: add 1 stitch on both sides of the middle 13 stitches using the yarn over method, in the new row we knit a twisted yarn over, otherwise a hole will form.
Garter stitch is performed according to the classical principle (single stitch on both the front and back sides of the work). Knit + purl row = 1 rib.
Scheme
Facial rows are indicated.
Description
We knit as on straight knitting needles (straight and reverse rows).
Cast on 49 (53, 57) sts and knit 4 ribs (8 rows in garter stitch).
After this (LS): 1 p. pl. knitted, 17 (19, 21) sts. ch., pattern (13 p.), 17 (19, 21) p. Ch., 1 p. pl. viscous.
We continue to knit the pattern, at the same time in the first row we add 1 loop on both sides of the middle 13 stitches. We repeat the increases in each row on both the front and back sides 15 (17, 20) times = 79 (87, 97) P.
We perform 1 p. after the last increase. As a result, the length of the product should be 9 (10, 11) cm. Continue square. viscous, at the same time, after the third rib (6 rows), close one loop at the beginning of the next 6 rows. (3 p. on each side) – 73 (81, 91) p.
Having knitted all 6 scars (12 rows), loosely close all the remaining loops.
House slippers: detailed description of work
These comfortable and quite cute little patterns can be knitted with two knitting needles. We knitted them from leftover threads containing 50/50 wool and acrylic. We recommend using knitting needles of size 3-3.5.
Description of work
We cast on 30 loops.
1-6 pp.: l. P.
7-22 pp.: front stitch (odd pp. = l. p., even – i. p.).
23-41 rr.: knit the heel. We knit 19 l. p., 20 and 21 p. knit together, turn the work. We knit 9 and. p., 10 and 11 p. we knit together purlwise. Turning the work, 9 l. p., 10 and 11 together knit. We continue in the same way.
RUR 42: cast on 10 stitches along the side, turn.
43 r.: knit 20 l. p. from the other side and dial on another 10 p. = 30 p.
44-74 pp.: stockinette stitch.
75 rub.: 7 l. p., 3 p. vm. persons., 10 l. p., 3 p. vm. persons., 7 l. P.
76 r.: i. P.
77 rub.: 6 l. p., 3 p. vm. persons., 8 l. p., 3 p. vm. persons., 6 l. P.
78 r.: i. P.
79 rub.: 5 l. p., 3 p. vm. persons., 6 l. p., 3 p. vm. persons., 5 l. P.
80 rub.: i. P.
81 rub.: 4 l. p., 3 p. vm. faces., 4 l. p., 3 p. vm. faces., 4 l. P.
82 r.: i. P.
83 rub.: 3 l. p., 3 p. vm. faces., 2 l. p., 3 p. vm. faces., 2 l. P.
84 rubles: 9 i. p. and the 10th we knit out of the braid (in total, 18 p. are collected from the sides on each side).
85 rub.: 4 l. p., 3 p. vm. faces., 3 l. p. and 4th from the braid.
86 rubles: 9 i. p. and the 10th we knit out of the braid (in total, 18 p. are collected from the sides on each side).
87 rub.: 4 l. p., 3 p. vm. faces., 3 l. p. and 4th from the braid.
Repeat 86-87 stitches until we have knitted all the loops from the braid.
We close the last 9 loops.
We wish you inspiration and happy knitting!
Felt or leather sole
To make knitted slippers last longer and be warmer, you can sew a sole made of felt or leather to their bottom part.
You can buy ready-made insoles in the store or cut them yourself to the size of the feet of the future owner of the slippers. The sole is sewn to the slippers with thick threads using a looped seam. The slippers are ready, even in the photo you can see how cozy they are. Take your time and make such a cute thing for yourself and your loved ones.